Close
0%
0%

Electrospinning Machine

Bring an open source electrospinning machine to the hobbyist level. Made with easily sourced and inexpensive materials.

Similar projects worth following
I intend to build a low cost Electrospin machine from common materials available everywhere. It will allow the hobbyist to investigate new materials at home, and may serve to bring even more options to the 3D printing arena.
For all the promise electrospinning provides, there is really little hobby activity in it. There should be much more. The machine I'm building will give the citizen scientists out there a chance to enter a whole new area to explore.
When materials are electrospun, a strong electrical field pulls and stretches the droplets as they are extruded. This stretching can bring the fibers produced down into the nanometer range. There, some materials exhibit behavior different from other forms of the material.
Furthermore, I intend to try different methods to get the 'landing area' down to as small a spot as I can.

There no applicable third-party licenses/restrictions on this project.

Why do we need this? Simple: As individual makers we can't always afford the materials we'd like for our projects, so we'll have to make them for ourselves. A lot of smart people are working on getting these materials produced at lower cost, but scaling up production is not always all so easy. Until they get there the costs are prohibitive. So with this project I intend to let us trade TIME for MONEY. We can make them in small batches for our own use, even if the process is slow. We'll use our time, and save our money. :)

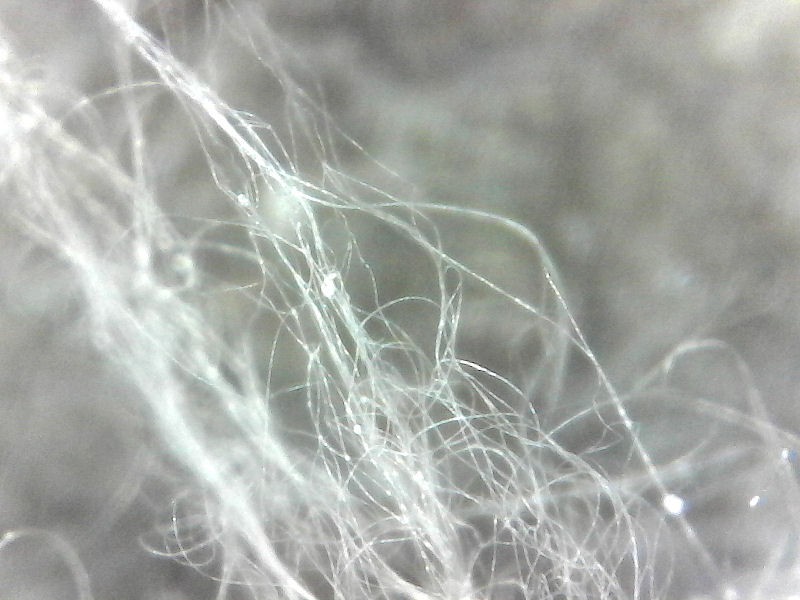
Many people are making carbon nanotubes at home right now, in small amounts. But how often do they actually USE them for anything? Seldom. The tubes are not in a form they can make much use of. Looking for that strength the tubes promise? Sorry, not right now at home. How about the electrical properties? Again, sorry, not in the right form. Want to mix nanotubes electrical properties with a PVDF membrane on an energy harvesting device you want to build, maybe even on a flexible substrate you can wear? Not going to happen, But with this project that can change. It's just a matter of putting in the work and getting it done.

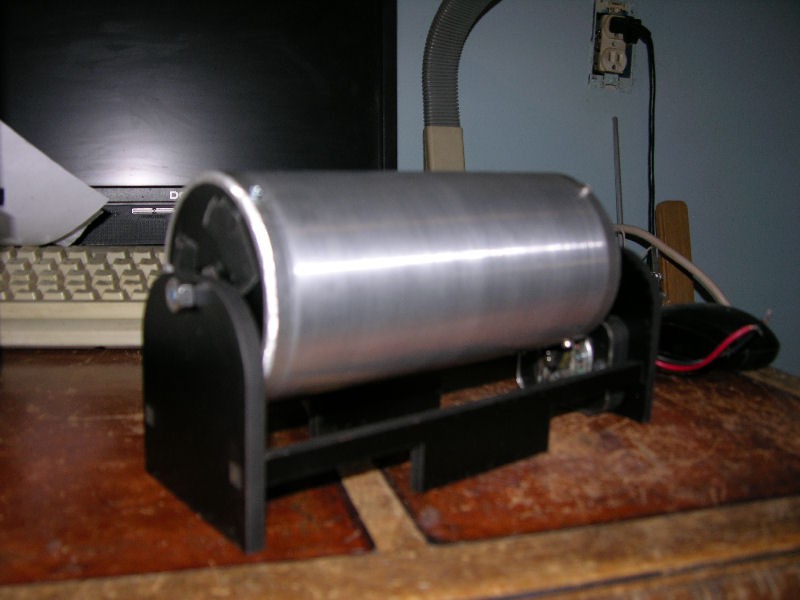
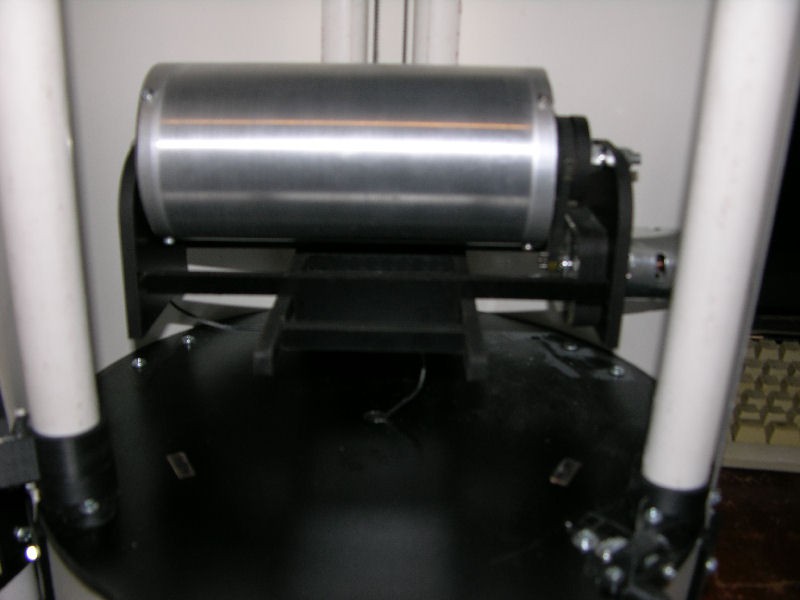
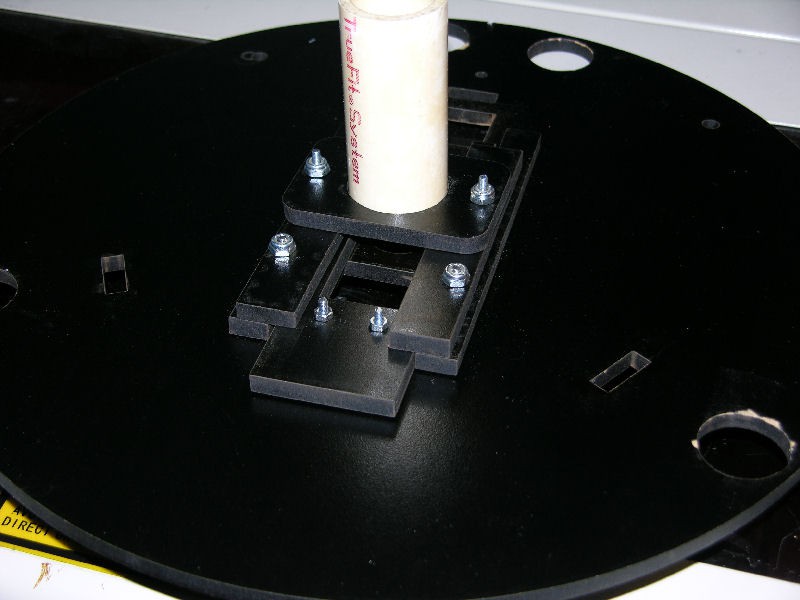
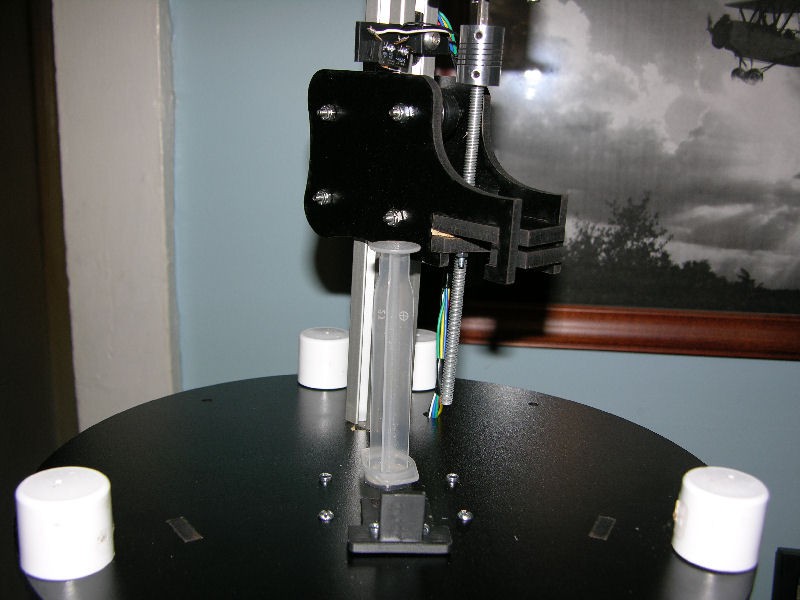
I intend to proceed in several steps. The first step is to use what I have available to build a basic electrospinning machine, and start learning how to use it. It won't have all the bells and whistles, but it will help define the envelope the final machine will operate within.

Step two is to improve on that machine, fix what needs fixing, and then put together a final machine using commonly available worldwide materials, easily sourced from Ebay as well as the usual hobbyist sources. At this stage I'm going to modify a delta 3D printer, enclosing it to make it safe to operate. I chose a delta printer for several reasons. One, I have one (insert happy face here) Two, they provide the needed clearance on the Z axis. And three, it will be easy to build an enclosure for it that will keep all the dangerous electrical away from me.

Step three will be working, using a few ideas I have, to get the landing spot to as small a size as I can. Normally, the fibers are deposited in a mat all over the grounding plate. Not good enough for what I have in mind.

Step four is to publish as open source all the hardware and software needed for anyone to build their own machine. They will be able to pick and chose just what they need to make their own machine, or add it to any 3D printer that has sufficient work area available.

I'm hoping that the final machine will open a new area for hobbyist level exploration of new materials they may not have thought of yet. In particular, carbon nanotubes and their behavior at the nano scale.

As a given, every effort will be made to make sure it's safe! We'll be using voltages up to or exceeding 20kv. While that sounds like a lot, and it is, we already have appliances in our homes that use similar voltages, like microwave ovens and CRT's, and all are made safe enough that we don't even think about it when we use them. This machine will have to be equally safe to use.

ElectroSpinnerAssembly.pdf

Assembly manual for the cabinet.

Adobe Portable Document Format - 5.23 MB - 06/25/2016 at 15:02

Preview
Download

  • 1 × Arduino Uno - or compatible
  • 2 × NEMA 17 Stepper Motor
  • 1 × GT2 2mm Pitch Timing Belt Pully -5mm Bore - 20Tooth
  • 1 × Ball Bearing GT2 Idler Pully 3mm Bore, 20 tooth
  • 1 × GT2 Timing Belt 2mm Pitch 1164mm

View all 28 components

  • Moving to a new project.

    Douglas Miller03/27/2017 at 21:11 0 comments

    After much thought and encouragement I am entering the new version of this project into the HackaDay 2017 contest. Further progress logs will be posted in that new project.

    PLEASE go over there and follow that project.

    Thanks!

  • Rotary Speed Control Box, Testing.

    Douglas Miller03/23/2017 at 14:12 0 comments

    I tossed together a box for the speed control for the rotary, and added plugs to the cabinet to plug every thing in nice and simple. Then it was time to test the rotary out.

    Mixed results. For something slapped together in such a hurry out of things hanging around the shop, it works. That's the good news. The bad news is it gets too hot during a run. So more work needed there.

    I got some smaller needles in the other day, and gave it a go with them These are 23G needles. Made a big difference! I'll have to do a bunch of runs to get the settings all down pat, but early results are certainly encouraging. Check out this photo:

    It's hard to pick out, but inside the yellow lines is a long fiber being pulled. Keep in mind that the outside of that needle is .6mm, so you can see the fiber itself is pretty darn small. The best I've been able to catch under the microscope after a run with this setup comes in about .015 mm diameter.

    I stuck a small screw on the plate during a run, and let it collect fibers for a few minutes. Of course I messed the fibers up with my fingers, but this is what it look like under the scope:

    The head of that screw is 5 mm. It's the black part, of course. Check out the fiber diameter, and length. Some of the lengths, when I get everything dialed in just right, are stretching into 110-120 mm range. I haven't got a picture of one of those yet because they are so hard to see due to their small diameter that I seem to loose them between the machine and the scope. Lol.

    So, where am I? I'm happy with the length and diameters I'm getting. Still need to work on collection methods and all that, but the main work is heading into hours testing out each of the four main variables and how they interact. Those are solution ratio, feed rate, high voltage level and distance between the plate and the emitter. I'm just going to have to slug it out and put in the time to run it in a organized and highly planned manner. I was planning to do that before now, but I wanted the rotary done first.

    Taking all of this to MRRF2017 in a couple of days. See you there?

  • Making Rotary Attachment, Getting Ready For MRRF2017

    Douglas Miller03/17/2017 at 23:42 0 comments

    Well aware that MRRF 2017 is only a week or so away, I'm getting the one piece of equipment I still really need for this thing: a rotary cylinder. It'll allow me to make long fibers instead of just mats. It's almost ready. Still need to do the speed control and straighten out the wiring to connect it to the electrospinner. But it works! :)

    For now I'm using a spring inside to connect the center rod, which does not spin, with the cylinder, which does. I need that to ground the cylinder for the hV, of course. As it spins the fibers tend to grab and stick, then lay down around the cylinder. You wind up with longer 'strings' of fibers instead of just a unwoven mat.

    It fits into the machine and sits on the table supports. A notch at the bottom keeps it in place on the supports.

    This is what it looks like, inside and out.

    A few days ago I tossed something together for the USB microscope. The thing works great, but at high magnification the stand that comes with it is all but unusable. So I made a better one. This is what that looks like. I'm sure I'll have both of these new doodads at MRRF, if you're coming. I hope you do!

  • Testing New Machine.

    Douglas Miller03/10/2017 at 21:22 0 comments

    So far I like this new machine. It's the one with the syringe up on top. Lot easier to get set up for a run. Finally got to the point of making a couple of runs on it, and they went well. Still a lot to learn on my part, but the machines doing okay.

    First results are with ABS in a 15/85 ratio (by weight). After a bit of playing around with the feed rate, voltages and so on, I started to get fibers about 200mm long. Under the microscope I can see they are running around .004mm in diameter, with some down to about one quarter of that size. I learn something every time I make a run, and this time was no exception. Main lesson learned was I need a better collection method. By the time I get the fibers to the microscope they are in clumps, so that's the only pictures I have to show you, but that not the way they are in the machine.

    What that really tells me is I need to get the spinning cylinder accessory built.

    Another thing is I need to get some smaller needles, ASAP. I KNOW I can start to get the fiber size down as soon as I get some. Better get right on that, huh?

    Well, here's a look at what it gave me. I'm not unhappy with any of it, just need to get on those couple of things I mentioned above...

  • Anyone going to MRRF 2017 this year? And a new syringe mount.

    Douglas Miller02/08/2017 at 20:10 0 comments

    The Midwest RepRap Festival 2017 is coming up soon, and I intend to have this machine there. Come on out and check it out. It's local to me, so how can I not go, right?

    I'm making a couple of changes to a special version of the machine for MRRF 2017. It starts with a new way to do the syringe. Not sure how this is going to work out, but it'll be ready for a test in the next week or so.

    What I'm doing is moving the syringe up on top of the machine. I'm doing that because the single biggest hassle in making a run on it is pissing around with the tubing that goes from the syringe tip to the emitter. You need to make sure you have the right type of tubing for the solvent you are running, getting it cut to the right length, and threading it into place. There's also the cost factor. It ain't much, but if we can get rid of it so much the better.

    The syringe is going to be mounted on top of the machine, with the needle sticking right down into the chamber. No tubing at all used. :)

    The syringe mount swings out of the way to load the syringe, and a mechanism locks both the syringe itself down firm and keeps the whole assembly in place during the run.

    There's a few more pictures on the projects website at OpenESpin.com. Go to the last couple of pages on the porfolio/inprocessbuild tab to see them. More details as I get it polished off and run a few trials.


  • Changed name to OpenESpin and gave it a home.

    Douglas Miller01/29/2017 at 17:15 0 comments

    It's now project OpenESpin, and it has it's own website. You can check it out here. It'll be easier to expand and provide more information on it's own site. Hope you like it!

    Go easy on me, it's new and I've got almost a whole week in putting it together. Never claimed I was a website designer. Lol.

  • Not sure what I can do with it, but it's interesting anyway...

    Douglas Miller11/29/2016 at 19:21 0 comments

    Just ran across this and thought I'd post it. Going really, really small is where all the interesting stuff is happening. http://news.mit.edu/2016/carbon-nanotubes-water-solid-boiling-1128

  • Just and update on where we are.

    Douglas Miller09/15/2016 at 17:22 0 comments

    Been looking at modifying the files a bit in a way that could help anyone making one do it cheaper and with a greatly reduced part count, providing they have access to a laser cutter able to cut a complete 14 inch circle. A lot of the parts are there because the typical hobby laser can't cut that large.

    Just my luck the mother board on my design machine took a crap, and I'm down until the replacement gets here. Shouldn't be long. (Gotta love that Amazon Prime fast and cheap shipping!)

    Due to current financial constraints I can't do a whole lot with this right now, but I sure don't want to let it die! So I'll keep moving, slowly, as well as I can. I have to admit I was hoping to get in the finals, because that $1,000 would have gone a long way with this project. Being that I didn't things will go slow, but they will go on..

    Started working on a website for the project, but until that motherboard is replaced, that's also on hold.

  • Looking to put together a team.

    Douglas Miller07/20/2016 at 16:34 0 comments

    With the end of the contest for us, it's time to look to the future of this project. It WILL go on! How fast and how far may depend on you!

    I'm looking for people interested on helping take this forward. If interested please message me.

    The end goal is the same, an open source electrospinning machine for makers. While I feel I have made great progress, it will take more than myself to take it as far as I know it can go.

    It has been suggested several times that maybe this would make a great Kickstarter campaign, and that's one of the things the team would need to work on if we decide to go that way. Other skills helpful would be in variable output HV power supply design and just an interest in advancing amateur science in this area. Of course, just a need to explore new ground for makers is also most welcome! Web design and ability to put together great videos would also help.

    There is still a lot of ground to cover here, including accessories that need to be designed, built and tested, as well as developing processes and procedures that can be replicated by almost anyone.

    If you're interested, message me and we'll see if you are a good fit for this project, and possibly would make a great team member of a (possible) Kickstarter project.

  • Consumables Used.

    Douglas Miller07/11/2016 at 22:26 0 comments

    Like most hobbies there are a few things that you'll need for electrospinning that wear out or are used up. I thought it was about time I talked about what they are.

    To start with it kind of goes without saying that with a syringe pump, we're going to need some syringes. I'm using 20ml ones I got off of ebay for $14.50. Make sure you get the Luer lock ones. They give a real good seal and hold the tubing with no leaks.

    Next comes the needles. I wasn't sure at the beginning what size would work best, so I just ordered some 18G ones. They work pretty well, but I've since learned that I'll want a variety by the time everything is said and done. I would expect that the viscosity will have an effect on the needle size we use for a given material. The 100 needles I got cost me $7.48.

    To connect up those needles and the syringes we'll need some tubing. I'm using 1/8th" ID tubing. We can go to a smaller ID and waste less material that way, but you have to keep in mind the viscosity of the stuff your going to pump through it. Thicker stuff might strain the syringe pump, but I haven't tested it yet to see if it does.

    Since we'll be pumping some solvents through it, we'll end up will several different kinds of tubing. For some of it I'm actually using some real cheap aquarium tubing. Cost me maybe $5.00. I also picked up some natural rubber tubing, and a few other kinds to test things out. Make sure the tubing you get will stand up to the solvent you're using!

    With solvents, you're going to want some gloves. I'm mostly using some nitril ones, but I have some others to pick from. Again, you need to match the type of glove to the solvent you're working with. There are sources on the web that can tell you what works with what, but I'm planning on putting a list on the Web site I'll be setting up for this project soon. And while I'm on that subject, I plan to have a forum also, so everyone can share all that useful information as we get going.

    I found some Luer lock fittings on Ebay and picked up some of each, male and female. They are made of Nylon, and I paid $8.75 for 25 of the male ones, and $8.25 for 25 of the female. So far the solvents I've been playing with haven't effected them at all, and I'm still using the first couple that I tried. I would imagine that if someone spent any extra cash they had just lying around and picked up some stainless steel fittings, well, they'd last just about forever. Can't really see where we'll be using any solvents that would degrade SS, but I could be wrong.

    The last of the consumables is the solvents. Different materials will require different solvents. Again, I expect we'll start compiling a nice handy list of what solvent to use for what material you're working with. The only two solvents I've needed so far are acetone and some acrylic cement. I'll note that there are times when you might want some pure solvents, but a lot of the time if purity is not important you can buy products with the solvent in it off the shelf at a store near you. Paint strippers come to mind, and there are others. ALWAYS FOLLOW THE SAFETY WARNINGS when preparing your materials for electrospinning. It's not worth your health to get in a hurry and skip the safety precautions. Just do it right, okay?

View all 44 project logs

View all instructions

Enjoy this project?

Share

Discussions

davidberton wrote 06/03/2016 at 17:11 point

Hi Douglas,

I tried importing the .stl files you've posted for the syringe pump into Solidworks, but it has trouble importing them well (it splits all curved faces into polygons, for example). I don't suppose you have file types that might play more nicely with Solidworks? Thanks for all your help!

  Are you sure? yes | no

Douglas Miller wrote 06/03/2016 at 18:10 point

Well, that ain't good.

No, I do not have any other file type of them. At least not at the moment. They were all designed in 123D Design, and exported from there into repetier host for printing. And STL is about the only format 123D will export to. :(

I'll have to go see what I need to do to get them into a Solidworks friendly format.

I'll warn you now, a couple of the parts are going to be revised soon. I'm running the machine now, and the more tests I run the more I'm having trouble with the slide on the syringe. Nothing major, it works, but I'm seeing some things I can do better. That's what prototyping is all about, right? 

  Are you sure? yes | no

Peter Walsh wrote 06/03/2016 at 18:40 point

I just downloaded his files and tried to open a couple of them in a different program (not solidworks), with no problem and they visually seem to be OK.

If you're having difficulty with a specific file, let me know and I'll check that one out. 

I've got a range of programs to deal with STL files and might be able to suggest a work-around for you.

  Are you sure? yes | no

davidberton wrote 06/01/2016 at 15:52 point

Hi, I started building this syringe pump: https://hackaday.io/project/1838-open-syringe-pump which looks very similar to yours (maybe you based yours on this?). However, I've realised that the way you set up your code is much better suited to electrospinning. I was wondering how compatible you think your code is with their setup?

Also, are you controlling the arduino on the syringe pump directly from a computer through USB? Noticed some buttons attached to it in one of the pictures, what are those about? 

Thanks!

  Are you sure? yes | no

Douglas Miller wrote 06/01/2016 at 16:16 point

   I had taken a look at that project before I started mine, but decided to go with my own design. Mostly to try and get the cost down even more. I haven't looked at his code but from what I see the stepper driver he is using is being driven by just two pins, for step and direction. If that's the case my software would work with it just fine.

   For the most part he's may be an even better match for the project right now, mostly because mine is still a work in process and his has been out for while. I'd say go for it.

   Yes, I am driving the machine via a USB to a computer. The main reason I chose to do that is cost. The goal of this project is to make it as cheap as I can and still do the job, so I wanted to avoid the display, switches and anything else needed to drive it standalone.

    That in no way means it can't be done that way, and I fully intend to do so. But not until this one is done and fully tested. 

    The buttons you saw in the photo were there just for testing while I worked on the syringe, before I had expanded the software to handle the rest of the machine. They are gone now.

  Are you sure? yes | no

Douglas Miller wrote 06/01/2016 at 16:55 point

I just took a look, and there 'may' be a reason to go with his. The stepper driver he's using allows for 16 microsteps, and the gshield only goes to 8. From the tests I ran the other day I really don't think that will matter (mine kept up easily with the extrusion rates I was running) but this is the early days with this machine. So who knows, maybe someday I'll find that for some reason that's a needed feature. Don't think so, but who knows???

  Are you sure? yes | no

Peter Walsh wrote 05/30/2016 at 18:03 point

I just gave you a shameless plug on the blog site. Check it out. 

http://hackaday.com/2016/05/30/hackaday-prize-needs-you-build-for-citizen-scientists/#comment-3037614

(Wondertwin Dopamine powers - activate!)

  Are you sure? yes | no

Douglas Miller wrote 05/30/2016 at 19:21 point

Shameless plug? I like shameless plugs! :D

  Are you sure? yes | no

Douglas Miller wrote 03/29/2016 at 16:21 point

Well, ain't that a hoot!  What could be better than combining 3D printing and high voltage? Just think of all the 'spits and sparkens' we can create!  I see you're having the best luck with ABS, and as that's what I print with the most, you're project could come in handy. Thanks for pointing your project out to me, and you have another follower. :)

  Are you sure? yes | no

DeepSOIC wrote 03/29/2016 at 14:40 point

Hi!

Seems similar to my #High-voltage assisted 3d printing project. Similar configuration, but different goals.

  Are you sure? yes | no

Similar Projects

Does this project spark your interest?

Become a member to follow this project and never miss any updates