 Brenda Armour
Yes I have left my previous attempt for Voice Commands behind. I installed Alexa from Amazon on the raspberry pi 2. If you want to add voice command to your project then you should try this out. There is no cost and you do not have to give out credit card info. It performs better than what I expected. Alexa is chatty but does provide detailed info from my questions. My only issue remaining is extending WIFI. Okay have another week for that.
STEP 1 VNC SERVER
Install VNC Server
VNC is a graphical desktop sharing system that will allow you to remotely control the desktop interface of your Raspberry Pi from another computer. This will come in very handy as you get rid of the external monitor connected to your Pi. Type:
sudo apt-get install tightvncserver
Start VNC Server
To start VNC Server, type:
tightvncserver
You'll be asked to set a password to access the Pi. The password is maximum 8 characters,
Run VNCServer at Startup
You want to make sure the VNC Server runs automatically after the Raspberry Pi reboots, so you don’t have to manually start it each time with the command tightvncserver through SSH. To do that, type the following in the terminal:
cd /home/pi cd .config Note the '.' at the start of the folder name. This makes it a hidden folder that will not show up when you type 'ls'.
mkdir autostart cd autostart Create a new configuration by typing the following command:
nano tightvnc.desktop Edit the contents of the file with the following text:
[Desktop Entry]
 Type=Application
Name=TightVNC
Exec=vncserver :1  S
tartupNotify=false
Type ctrl-X and then Y, and then press Enter to save the changes to the fThe next time you reboot, the VNC server will restart automatically.
Connecting to Raspberry Pi via VNC
I’m on a Windows 10 Laptop and now need to install a VNC client. The machine is 64 bit so I will be installing the Windows (64-bit) version.
http://www.tightvnc.com/download.php
During installation you'll be offered the choice of Typical, Custom or Complete. You only need the VNC client and not the server, so choose Custom. Then select TightVNC Server and choose Entire feature will be unavailable. Click Next. Uncheck the option about Windows Firewall and click Next again, then Install.
Once the installation is complete you should find TightVNC Viewer under the start menu. When you run it you'll be presented with the dialog below. You will need to enter the IP address of the Raspberry Pi followed by the screen number (:0 or :1). For example: 192.168.0.6:1
Click on connect and you should see your raspberry pi desktop
Install VLC
Get VLC media player by typing:
sudo apt-get install vlc-nox vlc-data NOTE: If you already have VLC installed, you will need to remove two conflicting libraries by running the following commands:
sudo apt-get remove --purge vlc-plugin-notify sudo rm /usr/lib/vlc/plugins/codec/libsdl_image_plugin.so Unable to fetch errors If you run into some "Unable to fetch" errors while trying to install VLC, try the following:
sudo apt-get update sudo apt-get upgrade sudo apt-get install vlc-nox vlc-data
Test that VLC is installed correctly
Type the following into the terminal:
whereis vlc This will provide you with the installation path.
vlc: /usr/bin/vlc /usr/lib/vlc /usr/share/vlc /usr/share/man/man1/vlc.1.gz
Set the environment variables for VLC
Type the following into the terminal:
export LD_LIBRARY_PATH=/usr/lib/vlc
export VLC_PLUGIN_PATH=/usr/lib/vlc/plugins
Check if the environment variables were set successfully
echo $LD_LIBRARY_PATH > /usr/lib/vlc
echo $VLC_PLUGIN_PATH > /usr/lib/vlc/plugins
STEP 3 Apply for a free Amazon Developer Account
Get a free Amazon developer account if you do not already have one.
STEP 4: Download the sample app and dependencies on your Raspberry Pi
Download the sample app zip file from the Github repo. Please note that by downloading this package, you are agreeing to the Alexa Voice Service Agreement.
Copy and expand the .zip file on your Raspberry Pi
- Unless you downloaded the zip directly onto your Pi, copy and then expand the zip file on your Pi to/home/pi/Desktop/alexa-avs-raspberry-pi-master/. I downloaded from my laptop and moved the file using FileZilla.
Download and install Node.js
Type:
sudo apt-get update&&sudo apt-get upgrade Set up the apt-get repo source:
curl -sL https://deb.nodesource.com/setup | sudo bash - Install Node:
sudo apt-get install nodejs Install NPM Change directories to /home/pi/Desktop/alexa-avs-raspberry-pi-master/samples/companionService
cd /home/pi/Desktop/alexa-avs-raspberry-pi-master/samples/companionService Install the dependencies:
npm install Install Java Development Kit
You need to have Java Development Kit (JDK) version 8 or higher installed on your Pi. To make things easier, we've included a script that will install the latest version of JDK on your Pi and remove older JDK versions.
cd /home/pi/Desktop/alexa-avs-raspberry-pi-master/samples/javaclient Run the installation script:
./install-java8.sh You will get a message from Oracle Java installer that you must accept the Terms of Service for Java SE Platform, press Enter. Then, press Tab, and then Enter to say “Yes” to the Terms of Service.
Verify your version of JDK
Now verify the commands with the -version option:
java -version >> java version "1.8.0_91"
>> Java(TM) SE Runtime Environment (build 1.8.0_91-b14)
>> Java HotSpot(TM) Client VM (build 25.91-b14, mixed mode)
javac -version
>> javac 1.8.0_91
Make sure your JDK and ALPN versions match
Using the File Manager on the Pi, navigate to the following directory:
/home/pi/Desktop/alexa-avs-raspberry-pi-master/samples/javaclient
In a text editor, open pom.xml and locate <alpn-boot.version>xxx</alpn-boot.version>. Confirm the ALPN version matches your JDK version using the table located at eclipse.org/jetty. If the versions match no further action is required. If the versions do not match, update the pom.xml file with the correct ALPN version and save. My version was fine.
Install Maven
Download Maven
Download the Binary tar.gz file apache-maven-3.3.9-bin.tar.gz from maven.apache.org Again I used FileZilla to upload the file to the Raspberry Pi.
Extract the contents
Goto:
cd /home/pi/Downloads Extract the contents of the tarball to the /opt directory
sudo tar xvf apache-maven-3.3.9-bin.tar.gz -C /opt Tell your shell where to find maven
You’ll do this in the system profile settings so it is available to all users.
Create a new file /etc/profile.d/maven.sh, by typing the following in the terminal:
sudo touch /etc/profile.d/maven.sh
sudo nano /etc/profile.d/maven.sh
In the editor, add the following to maven.sh:
export M2_HOME=/opt/apache-maven-3.3.9
export PATH=$PATH:$M2_HOME/bin
Type ctrl-X and then Y, and then press Enter to save the changes to the file.
Log out and back into the Pi so the profile script takes effect. You can test that it is working with the following command:
mvn -version >> Apache Maven 3.3.9
STEP 5: Generate self-signed certificatesInstall SSL
Get openssl:
sudo apt-get install openssl
Verify install
whereis openssl > openssl: /usr/bin/openssl /usr/share/man/man1/openssl.lssl.gz
Change directories to
cd /home/pi/Desktop/alexa-avs-raspberry-pi-master/samples/javaclient
Step 2: Run the certificate generation script:
./generate.sh
You will be prompted for some information:
These must be entered exactly as they appear below.
- When prompted for a product ID, enter my_device
- When prompted for a serial number (DSN), enter 123456
- When prompted for a password, press enter to leave it blank.
A private key would be generated for you.
STEP 5: Getting started with Alexa Voice ServiceRegister your product and create a security profile.
- Login to Amazon Developer Portal - developer.amazon.com
- Click on Apps & Services tab -> Alexa -> Alexa Voice Service -> Get Started
- In the Register a Product Type menu, select Device.
- Fill in and save the following values:
Device Type Info
- Device Type ID: my_device
- Display Name: My Device
- Click Next
Security Profile
- Click on the Security Profile drop down and choose “Create a new profile”
- General Tab
- Security Profile Name: Alexa Voice Service Sample App Security Profile
- Security Profile Description: Alexa Voice Service Sample App Security Profile Description
- Click Next
Client ID and Client Secret will be generated for you.

- Now click on the Web Settings Tab
- Make sure the security profile you just created is selected in the drop-down menu, then click the "Edit" button.
- Allowed Origins: Click "Add Another" and then enter https://localhost:3000 in the text field that appears.
- Allowed Return URLs: Click "Add Another" and then enter https://localhost:3000/authresponse in the text field that appears.
- Click Next
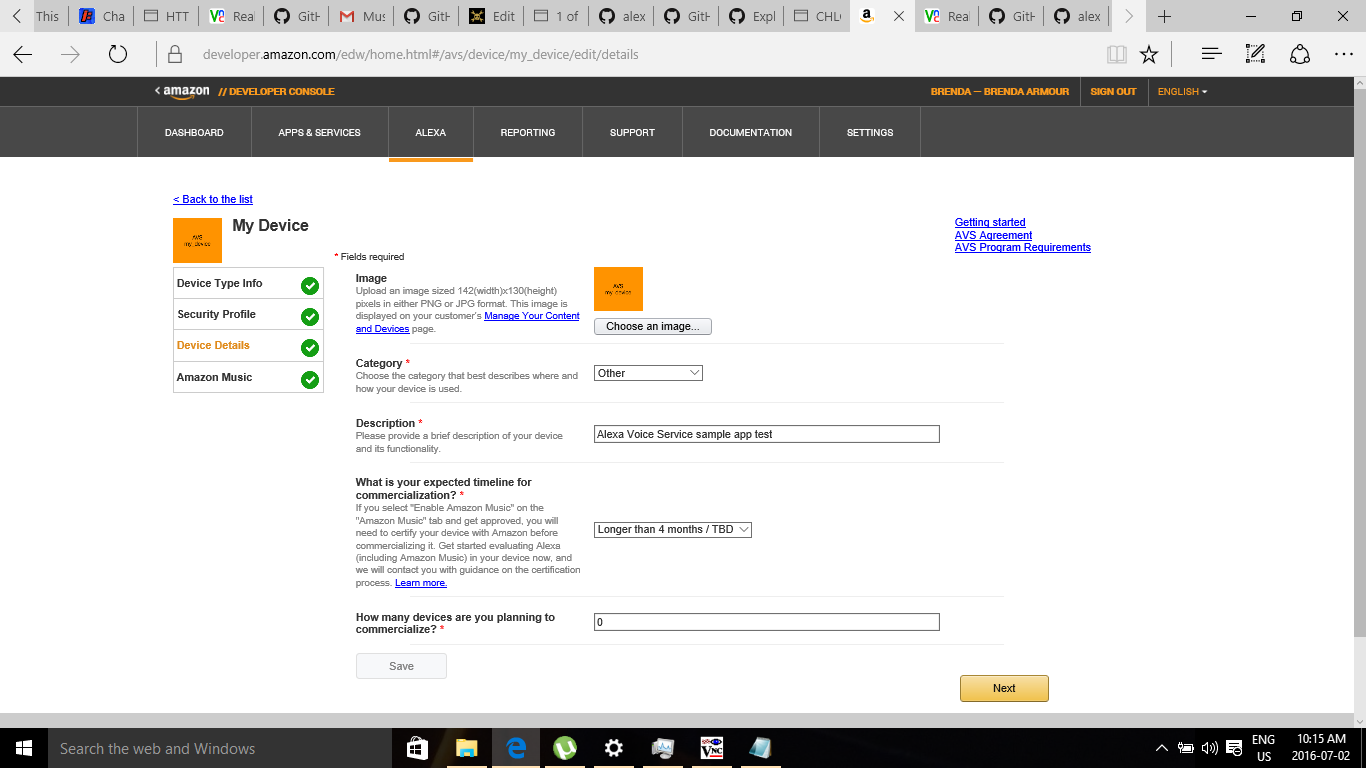
Device Details
- Image: Save the following test image to your computer, then upload it:
- Category: Other
- Description: Alexa Voice Service sample app test
- What is your expected timeline for commercialization?: Longer than 4 months / TBD
- How many devices are you planning to commercialize?: 0
- Click Next
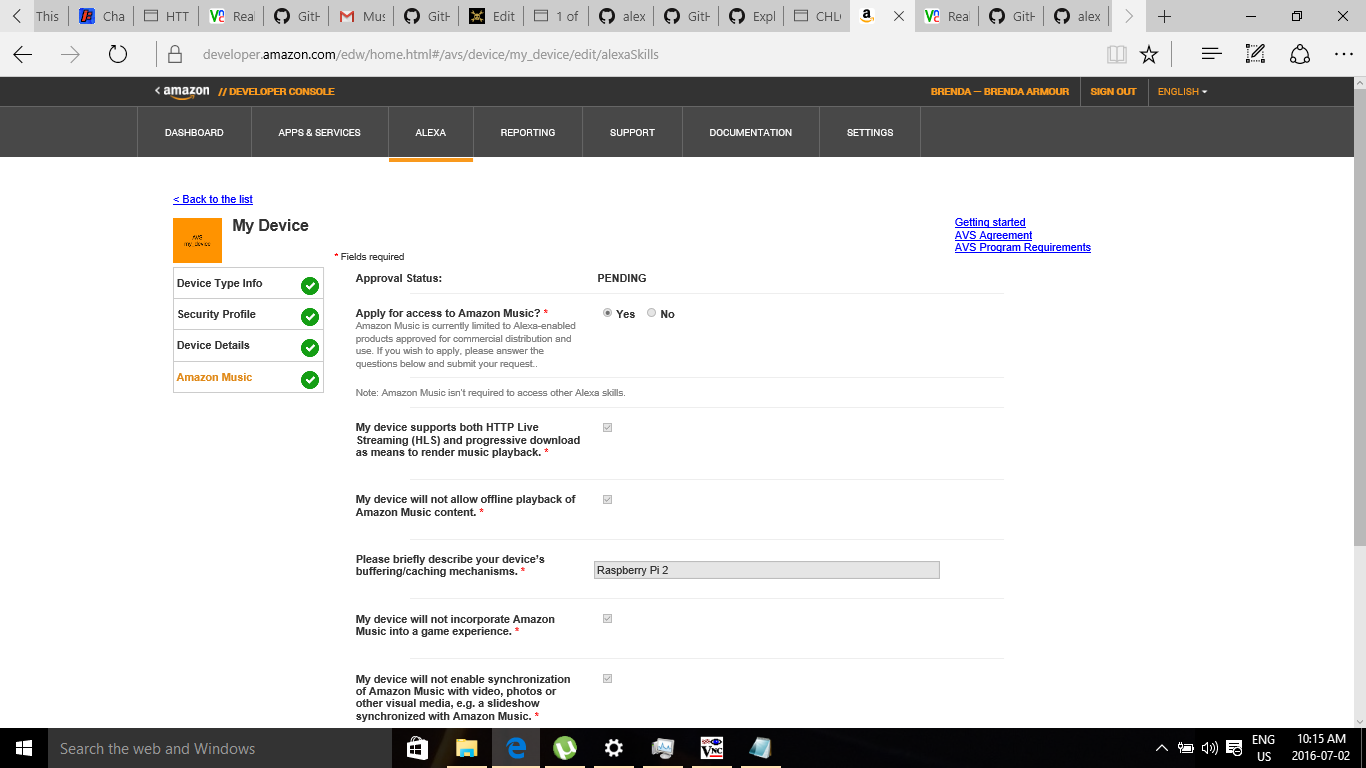
Amazon Music
- Enable Amazon Music? Yes. Because music is a significant part of the project I did apply. Status is pending.
- Click the Submit button
You are now ready to generate self-signed certificates.
STEP 6- Enable Security Profile
- Open a web browser, and visit https://developer.amazon.com/lwa/sp/overview.html.
- Near the top of the page, select the security profile you created earlier from the drop down menu and click Confirm.
- Enter a privacy policy URL beginning with http:// or https://. For this example, you can enter a fake URL such ashttp://example.com.
- [Optional] You may upload an image as well. The image will be shown on the Login with Amazon consent page to give your users context.
- Click Save.
- Next to the Alexa Voice Service Sample App Security Profile, click Show Client ID and Client Secret. This will display your client ID and client secret. Save these values. You’ll need these.
Login to the Raspberry Pi via VNC
Open config.js:
nano /home/pi/Desktop/alexa-avs-raspberry-pi-master/samples/companionService/config.js
Edit the following values:
- clientId: Paste in the client ID that you noted in the previous step as a string.
- clientSecret: Paste in the client secret that you noted in the previous step as a string.
While pasting the values, be careful to enclose them in single quotes.
Type ctrl-X and then Y, and then press Enter to save the changes to the file.
STEP 8 Run the serverIMPORTANT: This must be done via VNC, not SSH. So, make sure you’re logged into your Pi via VNC.]
Login to the Raspberry Pi via VNC
In your terminal window, type:
cd /home/pi/Desktop/alexa-avs-raspberry-pi-master/samples/companionService
npm start
The server is now running on port 3000 and you are ready to start the client.
STEP 9 Start the clientIMPORTANT: This must be done via VNC, not SSH. So, make sure you’re logged into your Pi via VNC
Open a new terminal window/tab (SHIFT+CTRL+T in Raspbian) and navigate to:
cd /home/pi/Desktop/alexa-avs-raspberry-pi-master/samples/javaclient Build the app
Download dependencies and build the app by typing:
mvn install When the installation is completed, you will see a “Build Success” message in the terminal.
Run the client app:
You are now ready to run the client app by typing:
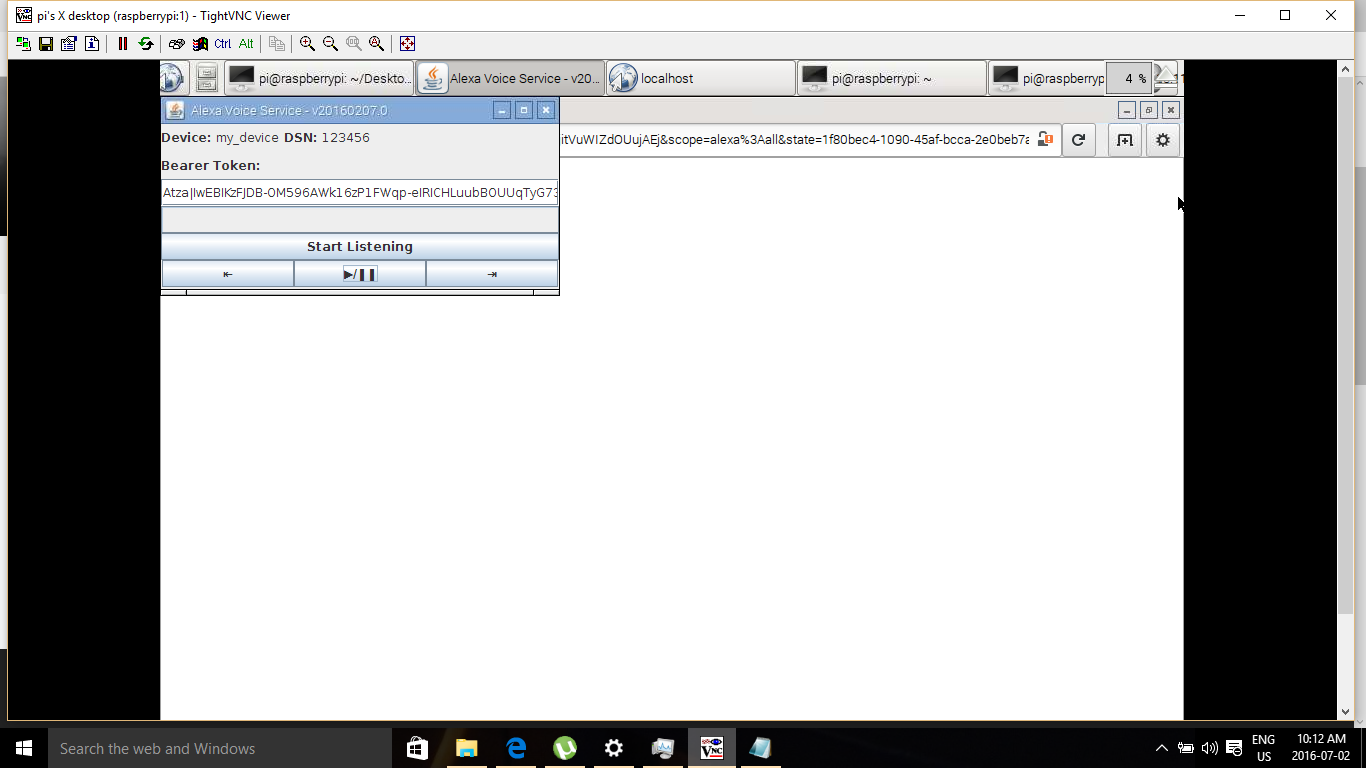
mvn exec:exec Obtain Authorization from Login with Amazon - When you run the client, a window should pop up with a message that says something similar to:
Please register your device by visiting the following website on any system and following the instructions: https://localhost:3000/provision/d340f629bd685deeff28a917 Hit OK once completed.
DO NOT CLOSE THIS WINDOW YET
Copy the URL from the popup window and paste it into a web browser. In this example, the URL to copy and paste is https://localhost:3000/provision/d340f629bd685deeff28a917.
NOTE: Due to the use of a self-signed certificate, you will see a warning about an insecure website. This is expected. It is safe to ignore the warnings during testing.
- You'll be taken to a Login with Amazon web page. Enter your Amazon credentials.
- You'll be taken to a Dev Authorization page, confirming that you’d like your device to access the Security Profile created earlier.
Click Okay.
- You will now be redirected to a URL beginning with https://localhost:3000/authresponse followed by a query string. The body of the web page will say device tokens ready.
- Return to the Java application and click the OK button. The client is now ready to accept Alexa requests.
- Click the Start Listening button and wait for the audio cue before beginning to speak. It may take a second or two before you hear the audio cue.
Press the Stop Listening button when you are done speaking.
Discussions
Become a Hackaday.io Member
Create an account to leave a comment. Already have an account? Log In.