Close
0%
0%

Monoprice MP Select Mini E3D Hotend Adapter

Puts an e3d hotend on the famous $200 printer

Similar projects worth following
So, the hotend on your MP Select Mini 3D printer crapped out? You should have printed one of these out before you pushed your printer too hard.

The Monoprice MP Select Mini is the best 3D printer for the money, with one problem: you can't buy replacement hotends. Hotends are consumables, and eventually the hotend on this $200 printer will break.

Right now, the solution to a broken hotend on this printer is to spend another $200 to buy another printer. That's absurd, and any company that does that will quickly go out of business.

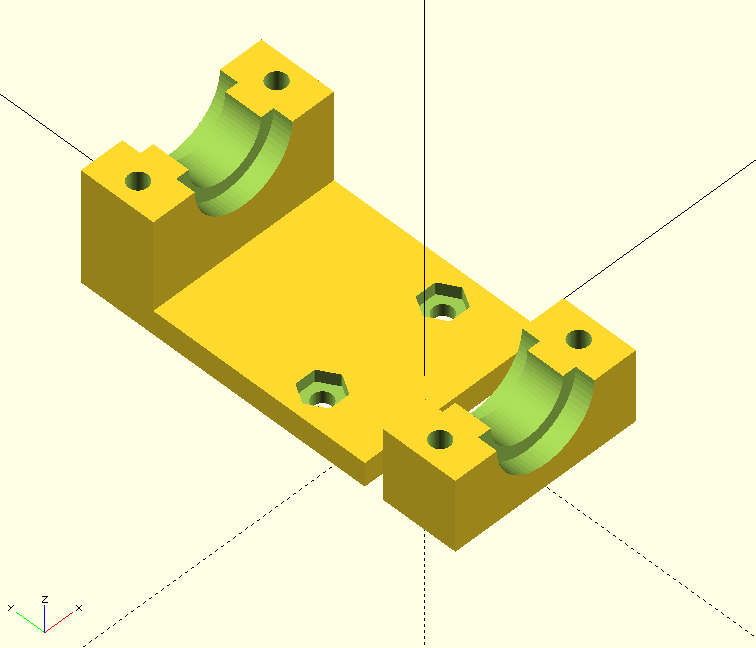
The solution? A 3D printed hotend adapter for the E3D V6. This should be the first thing you print on the MP Select Mini.

The print has been tested, it works. You'll need some M3 nuts and M3 socket head screws (M3 x 20mm or thereabouts).

The stock heater cartridge and thermistor can be reused with the e3d hotend. If you're looking for a 'buyer's guide', here you go:

The total comes to £41.40. I guess the adapter would work with a chinese e3d clone, so if you only have $10, get one of those.

scad - 2.47 kB - 07/04/2016 at 20:04

Download

  • 1 × Printed parts STL in project files
  • 4 × M3 nuts
  • 4 × M3x20 socket head screws

  • Hot End Mount

    Benchoff06/11/2016 at 19:35 1 comment

    This should be the first thing you print on the MP Select Mini.

    .STL available in the project files. Four M3 nuts and four M3x20 bolts are required.

    Just print this out and tape it to the back of your machine.

    ASSEMBLY

    Because the MP Mini uses a standard thermistor and heater cartridge, you can reuse the stock thermistor and heater cartridge in an e3d hotend. This means a better hotend is a drop-in replacement, without needing any firmware updates or anything.


View project log

  • 1
    Step 1

    Print

  • 2
    Step 2

    Install

View all instructions

Enjoy this project?

Share

Discussions

kirk.mccann wrote 07/02/2023 at 19:59 point

one of the parts links is no longer available.

  Are you sure? yes | no

Peter Fales wrote 12/06/2018 at 04:01 point

What does this need to made of?   Reading between the lines, I'm guessing that PLA won't work and people haven mentioned PETG.   Does it have to be PETG?

  Are you sure? yes | no

Tachyon wrote 07/18/2018 at 18:58 point

I just snagged one of these printers for $135 USD on a Prime Day Sale!

Am I glad I found this project before it arrived. I'll be my first "serious" print after it gets here.

  Are you sure? yes | no

Tachyon wrote 07/21/2018 at 07:32 point

My Lucky Cat came out well so I started this printing. We'll see in the morning how it turned out. Looks good so far. Here's hoping I won't actually need it in the near future. Though I am anxious to upgrade and mod a few things on the printer. 

Thanks again for making this and sharing it!

  Are you sure? yes | no

Kevin Sebesky wrote 02/17/2018 at 18:02 point

Would anyone happen to know of a parts source in the US?  The shipping alone from the UK is a real killer.  Still, I want to make sure I'm getting the right parts for the mod.

  Are you sure? yes | no

* jon hendry * wrote 01/24/2018 at 19:09 point

Two questions. 

1. The mount isn't tight enough to prevent the hotend from rotating in place. Is that normal? 

2. When I send the machine to Home, the nozzle is a bit lower in Y than the stock hotend. It's even beyond the leveling screws. Is there a way to adjust the firmware to move it back up?

  Are you sure? yes | no

jacques.bourdouxhe wrote 01/22/2018 at 11:54 point

Thank you Benchoff for that project. It 'll be   one of the first upgrades on my new MP select mini. I'm confused because  one picture shows     a fan an a fan shroud but your article doesn't mention that . 

  Are you sure? yes | no

Blecky wrote 01/06/2018 at 02:55 point

Here's a version of the files that fixes the "hex nut gap in side of adapter" issue on some slicers. It's just a slightly wider (1mm on each side) version of the adapter. Note you will have to sand down the sides a little to make it fit as it is wider, so only use this if you have a gap near the hex nuts on the back.

https://drive.google.com/open?id=14-mBpWTrJzFiU55D3VWbSs6osLoH_cPs


Also this adapter works with the E3D Lite. The only difference between the E3D Lite and the E3D is that the E3D is all metal, whereas the E3D lite has a replaceable PTFE-liner inside it. This means you can only print up to 245oC (PLA and ABS) and your print speed is slightly limited.

More info here - https://e3d-online.com/blog/2015/04/01/lite6-for-all/

  Are you sure? yes | no

Robert Poole wrote 07/27/2017 at 21:11 point

I bought a MP Select Mini recently, and am currently upgrading to an E3D hotend.  It seems that this is one of those V1 models that was manufactured right around the time the V2 came out, so it has a weird mix of internals from the V1 and V2 (and the firmware cannot be reflashed or updated currently because it is radically different from what the V1 originally had).  The adapter piece that mounts to the carriage appears to be too tall -- there's a horizontal plastic piece on the carriage that prevents me from fitting the adapter properly.  I'm going to need to modify the model to shorten up the plastic under where the two hex nuts are installed.  That should be easy enough to do, and once I get it dialed in, I can publish the modified STL file.

  Are you sure? yes | no

Douglas M wrote 06/18/2017 at 17:36 point

Going to go ahead and buy a E3D V6 hotend but don't know if I need the long or short version.

  Are you sure? yes | no

Douglas M wrote 06/18/2017 at 17:34 point

Do I need the long or short version of a E3D V6 hotend?????

  Are you sure? yes | no

Jamie wrote 02/10/2017 at 02:01 point

How come ever since I installed the new hotend my printer boots up saying immediately that the hotend is at 320 Celsius? What am I doing wrong? I need help ASAP

  Are you sure? yes | no

samhinton22 wrote 01/08/2017 at 06:01 point

Will the fan that comes with the printer work with the E3D V6 hotend or do you need a different fan?

  Are you sure? yes | no

jon wrote 01/01/2017 at 00:50 point

For anyone trying to figure out how to remove the original heatsink, there are two bolts behind the horizontal band.  If you remove the small spring tensioner  on the band then there is enough wiggle room to push the black band down and insert a hex wrench without tearing the entire printer apart.

  Are you sure? yes | no

Tom Smith wrote 11/03/2016 at 02:35 point
Could you please share your slicer settings for running PETG on the MP Select? The stuff in the project photos looks great, but so far I've been getting unsatisfactory to abysmal results with Makergeeks filament.

  Are you sure? yes | no

Milkey Mouse wrote 08/23/2017 at 06:50 point

I've been using a 60 degree heated bed and 240 degree extruder with the cooling fan disabled and a low (30m/s) print speed. It's worked fine for the few parts I've printed.

  Are you sure? yes | no

will wrote 10/04/2016 at 21:31 point

Got a new bracket printed for when the hotend fails.  Thanks for the work in making it available.  Makergeeks PETG was a great suggestion!  I have reprinted a few things already just so it would be make of the better plastic. Mainly the filament pressure control arm (which everyone should print now as well since my was cracked and they really are not that strong to begin with).  I am curious if you have a layer cooling fan on your Monoprice mini.  Or do you just use the blue one that came with the hotend without a layer cooler?  Thanks for your info

  Are you sure? yes | no

carlos.j.hidalgo wrote 04/14/2017 at 18:24 point

Where did you get the .stl file for the pressure control arm?

  Are you sure? yes | no

Owen wrote 09/03/2016 at 05:04 point

I'm completely new to all of this, but gauging my level, as a complete noob, what does the full replacement look like? I'm excited but worried about possibly ripping this printer apart, but I definitly don't see any screws on the stock heat sink, how would I remove that?

  Are you sure? yes | no

Zach Reneau wrote 08/15/2016 at 18:53 point

The adapter required some massaging to get it to fit. It was a bit too tight around the heat spreader, but it worked. What I found though is that E3D recently moved to a custom thermistor, so it's not quite a drop-in replacement hotend. I really recommend that if when you order your kit, you just get the deluxe kit with all parts and avoid the headache of paying/waiting on two shipments from England.

  Are you sure? yes | no

Stephen wrote 07/22/2016 at 04:25 point

Where can I get some of that green filament used in the photos?

  Are you sure? yes | no

Benchoff wrote 07/22/2016 at 04:28 point

That color is MakerGeeks PETG 'Green Grass'. Yeah, the MP mini prints PETG

http://www.makergeeks.com/pefibymafi1h.html

  Are you sure? yes | no

Stephen wrote 07/22/2016 at 04:30 point

Thanks! I am printing the part as I type

  Are you sure? yes | no

Stephen wrote 07/22/2016 at 04:31 point

Is it normally around ~$30? It says it is on sale from $80!

  Are you sure? yes | no

B M White wrote 07/16/2016 at 14:23 point

I printed at 20% infill and 0.1 layer height. Is that sufficient?

  Are you sure? yes | no

Benchoff wrote 07/16/2016 at 23:54 point

Should be.

  Are you sure? yes | no

stevegigl wrote 07/11/2016 at 00:36 point

Um, did an older version get posted?  The holes on the base part don't line up with the smaller bracket part.  Currently downloading OpenSCAD to see if maybe Cura is doing something wrong.

  Are you sure? yes | no

Benchoff wrote 07/11/2016 at 01:06 point

There was an older version with messed up holes. I just downloaded the current version, and it's correct. Can I see a pic?

  Are you sure? yes | no

stevegigl wrote 07/11/2016 at 01:31 point

Hey, look at that, when I re-download today I get what looks like the right hole pattern!  Sorry for the confusion.

  Are you sure? yes | no

Similar Projects

Does this project spark your interest?

Become a member to follow this project and never miss any updates