 mcmasterp
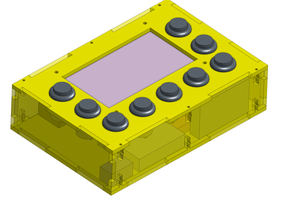
I started with files from thingiverse for the body and modified them. I made my own control layout to match my needs which included more buttons, a volume knob, and usb port for pi. the volume knob is attached to the potentiometer unsoldered from the pcb on a pair of amazon desktop speakers. I also made slight changes for my monitor size. The biggest change was altering the slot sizes and positions to use 3/4" MDF instead of 1/2". My versions aren't perfect, the dogbone is too large but it was easier to putty after.
The software is recalbox, similar to retropie but with a more resilient os based on buildroot which means better on a sd card based pi3. Also recalbox is developed by a much more strict set of developers than I'm used to seeing so things are more well implemented when they are. There are a few things to get used to like no editable splashscreen but a small price to pay.
I added an led strip inside the 1/2" slot left at the top after adjusting for monitor and mdf thickness. I cut a piece of 1/4" acrylic, sanded the inner side to defuse the light and applied some red vinyl to the front for it to light up. to keep the led strip in place I glued it to a piece of scrap acrylic and put 3/4" foam insulating strip on the back. when I put it up in the cavity from the inside it wedges and sticks the led strip bar in place as well as seals out light leaks into the back.
A second strip attached to the same power supply runs to the front and is pinned between the control panel and the front/murphcade acrylic piece. it edge lights the acrylic.
Recalbox comes ready for a power led, reset momentary button, and on off toggle switch. while not perfect since their actions are handled in software it almost perfectly allows you to put the pi to sleep. it can get confused as to the switch state since it's not the pins state but the change in ground that triggers the standby mode or back fully on.
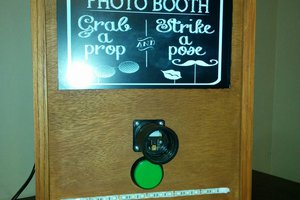
I 3d printed a fake coin door that could be backlit on the red coin buttons. It also had a fake key slot and another button spot which conveniently fit my toggle and push button switches. The lit 25c wording is cut from black vinyl with a laser ( I am aware of and you should be too that pvc vinyl will give off poison gas when laser cut. vent correctly or better yet don't risk it)
A sainsmart 4 relay board is controlled by the toggle switch. it in turn toggles all four relays, one each for: the pi, the speakers, the led lighting, the monitor power. That way you can have the lights off, power drain at a minimum, and no speaker noise when you want it "off". I could have invested in more advanced pi power switch solution which would allow a fully off state but standby pi with no other draws should do just fine.
The top pinstriping and lettering is all laser cut as well using the same mpcnc.
In addition to the control panel I also plugged in a wireless usb game controller as a player 2 option. recalbox will in the next version have support for the pi3 bt so ps3 controllers will be an option.
Recalbox has Kodi in the menu so you can load a full fledge media center which is nice but arcade and game controls aren't very media center so recalbox features to the rescue! you can setup lirc quickly so I found an old media remote with usb dongle. cracked open the dongle and desoldered the ir diode dealie. installed it hidden above the monitor and wired directly to the pi3 pins, I have it programmed to control kodi perfectly.
A piece of pegboard is cut to size for a back. It looks like the real thing to me, the holes add more ventilation, and its cheap!
Speaking of ventilation, the wooden parts go together with a slight gap between each piece. At first I was going to redesign it away but then I thought a "drafty" design would work well for a pi3 based system and allow me to go fanless.
Recalbox has to web interfaces, one on port 80 allows you to admin the roms and config as well as monitor the pi for temp and file size etc. the other on port 8080 is a sweet virtual...
Read more »

 Craig Hissett
 Saul Cozens
 Jack Flynn
Even better. Someone else that will appreciate the work.