Close
0%
0%

Alarm-Activated Curtains

A project to automatically open my curtains when my alarm goes off in the morning

Similar projects worth following
I set up a servo controlled by an Arduino to open my curtains in the morning. My alarm clock app, Sleep as Android, sends its alarm status to a server, which is then read by an ESP8266. This then sends a signal to an Arduino to operate a servo and open the curtain.

I have trouble waking up in the morning. The bed is so darn comfy, and it's nice and dark in the morning with my blackout curtains. I strove to take away one of those comforts with an automated curtain system! When my alarm sounds, the curtain opens, letting in the sun and kickstarting my day!


Code and Communication:

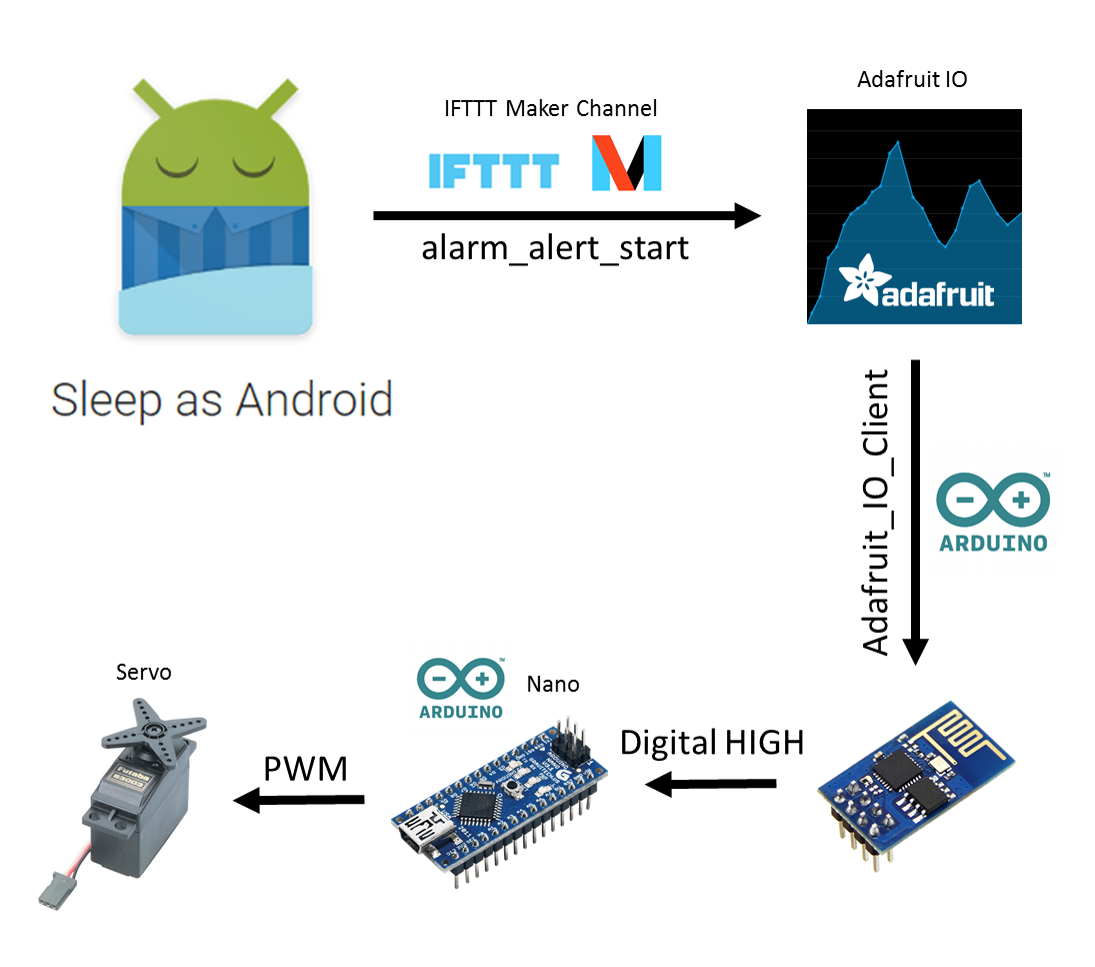
My alarm clock app, Sleep as Android, has the ability to interface with IFTTT. This is an awesome system that takes care of API calls for you and talks to hundreds of different services.

Sleep as Android >>> Adafruit IO

When the alarm goes off, Sleep as Android sends "alarm_alert_start" to a Maker channel feed. Using the Sleep as Android documentation, I created an IFTTT recipe that looks for this message, and writes a "1" to an Adafruit IO feed. When the alarm is disabled, "alarm_alert_dismiss" is sent, and a "0" is written to the data feed.

Adafruit IO >>> ESP8266

On the hardware side, I have an ESP8266 checking the Adafruit IO feed. I followed the basics of the Adafruit guide to get set up. When the feed returns a "1" the alarm is sounding, and the ESP8266 then lets the Arduino know it's time to open the curtain.

ESP8266 >>> Arduino

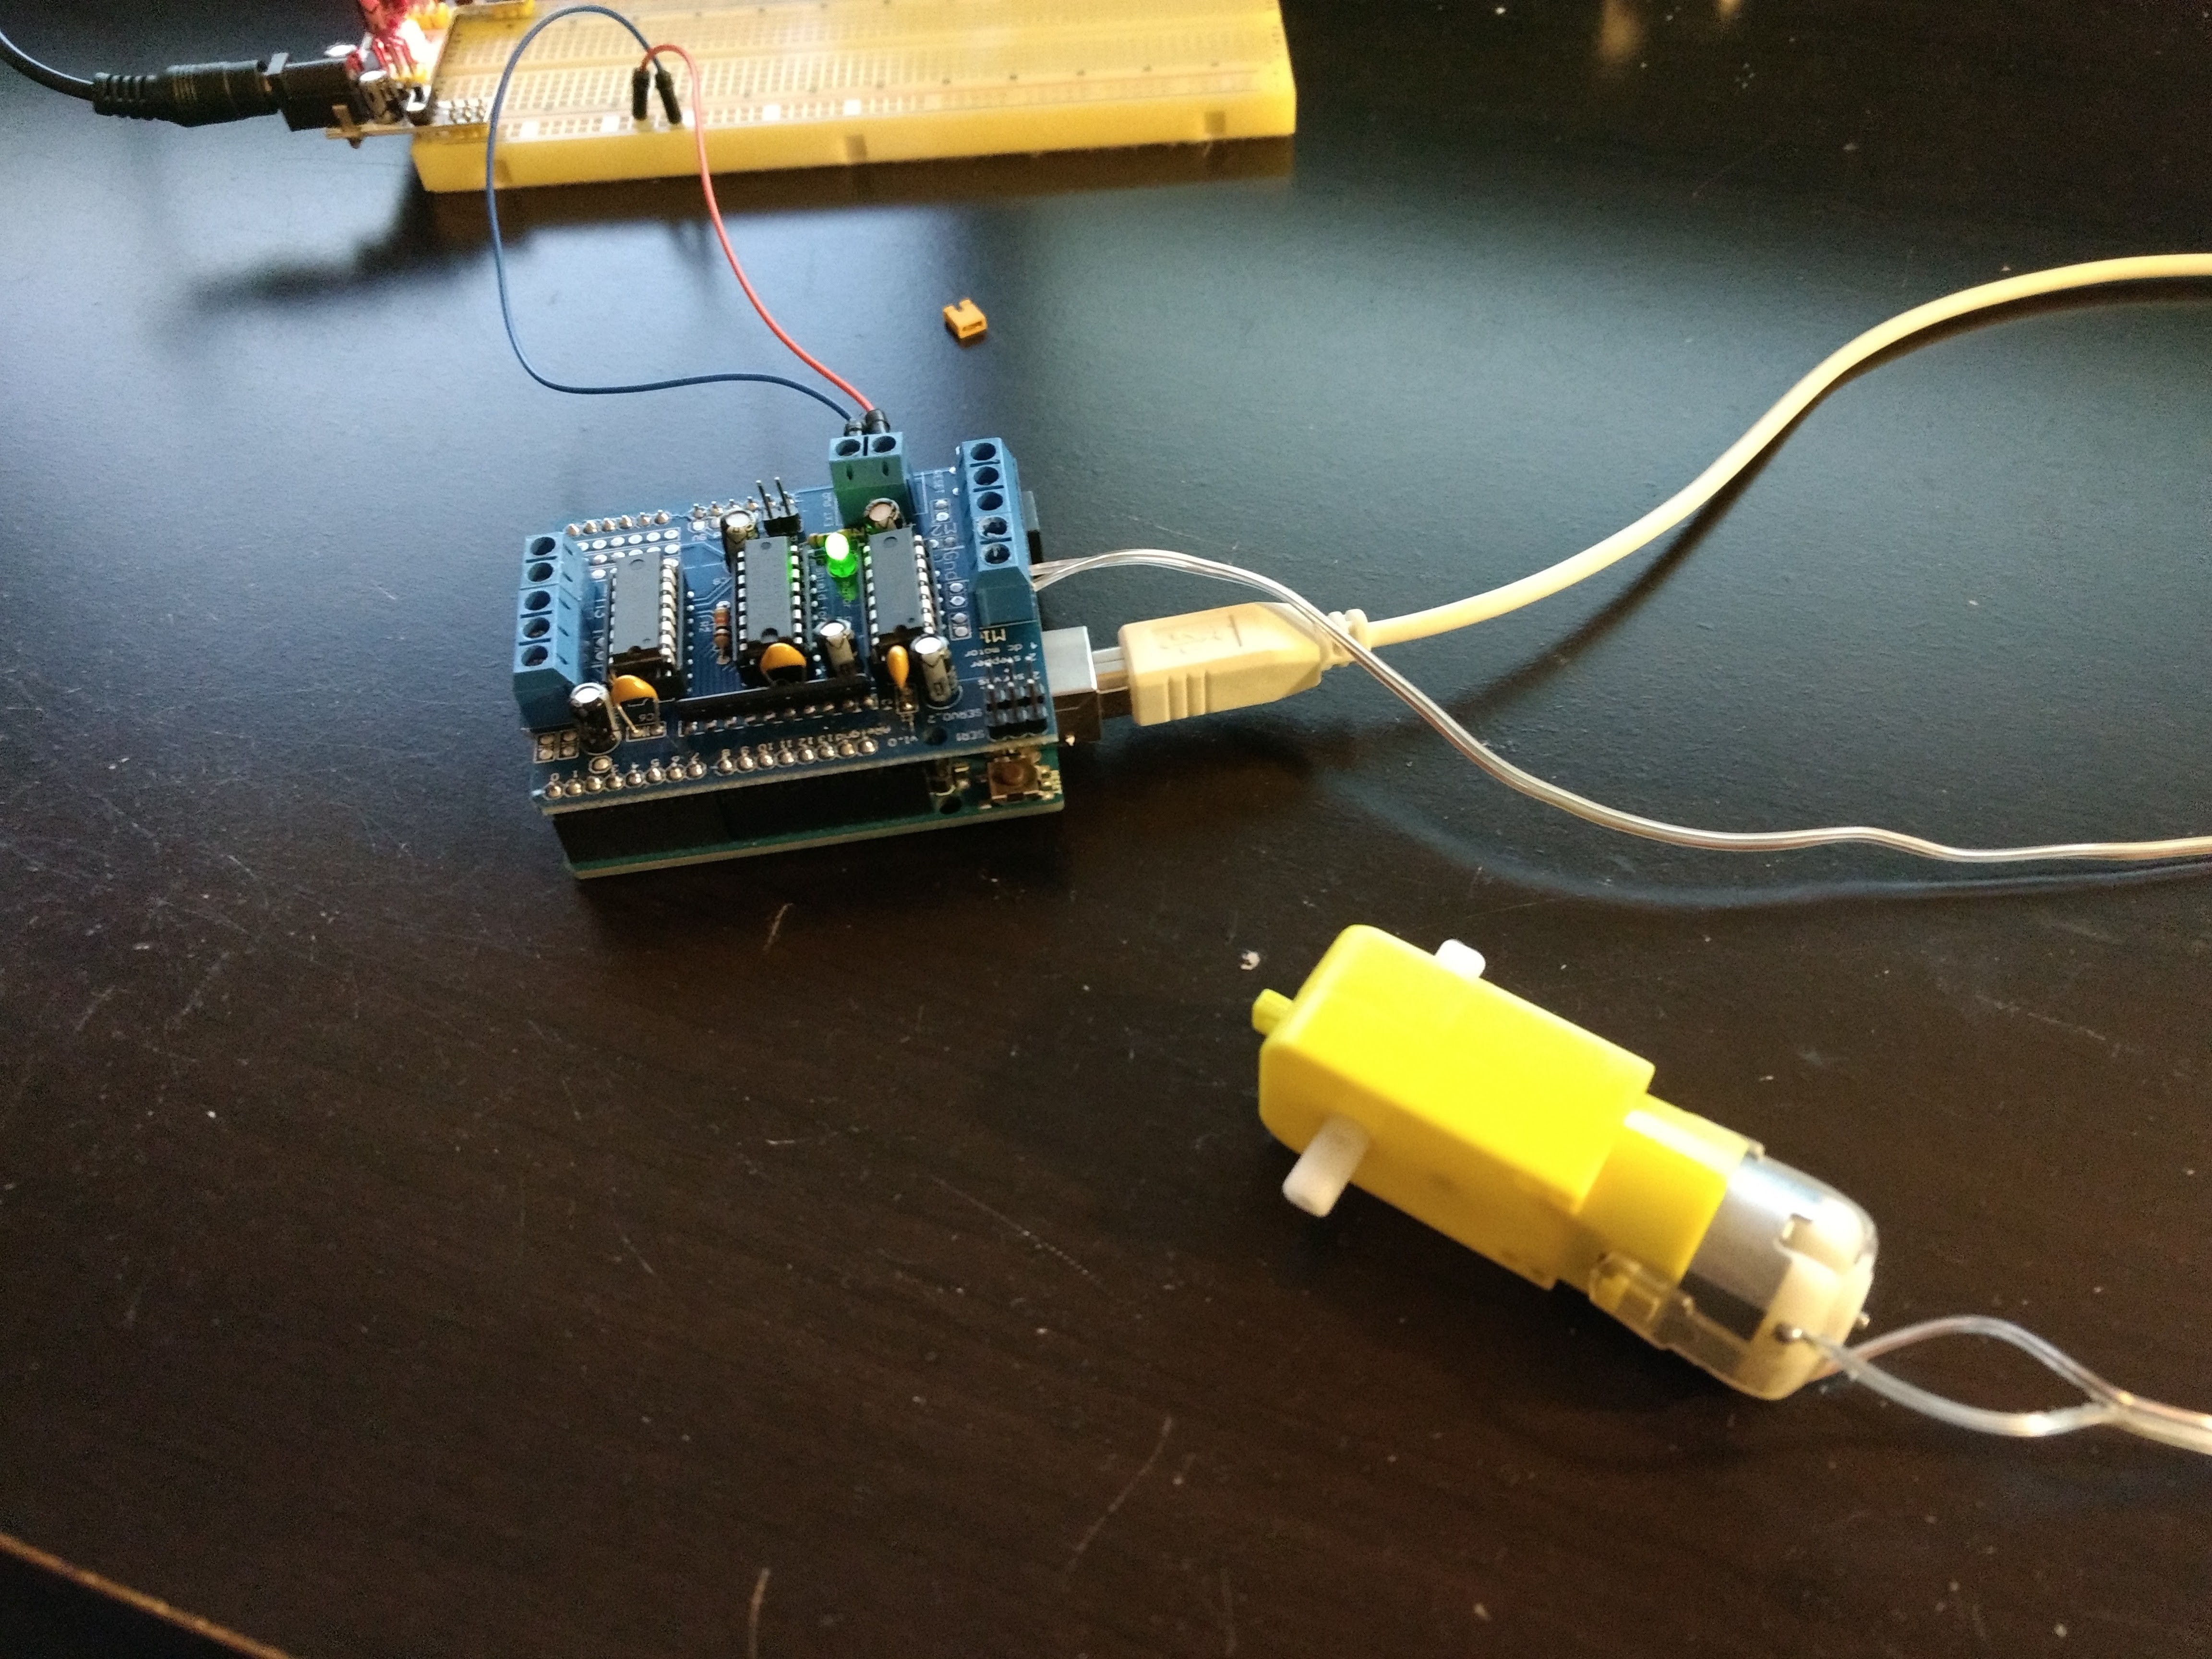
The connection between the ESP8266 and Arduino is very basic, just an on/off digital signal. When it's time to open the curtain, the ESP8266 writes a HIGH value on the digital line connecting the two microcontrollers.

Arduino Code

When the digital input is HIGH, the Arduino operates the servo to open the curtain, pauses, and then retracts the cord so that the curtain can be closed in the evening. The Arduino also has two buttons attached to it that allow the servo to be manually moved in either direction. These buttons also interrupt the automated open/close operation in case anything unexpected occurs.

The Arduino code also has a timeout (2 hours for now) during which no other alarm events will trigger the curtain opening. This avoids snoozing triggering the curtain multiple times in one morning.

The ESP8266 and Arduino code can be found on the repository.

Wiring:

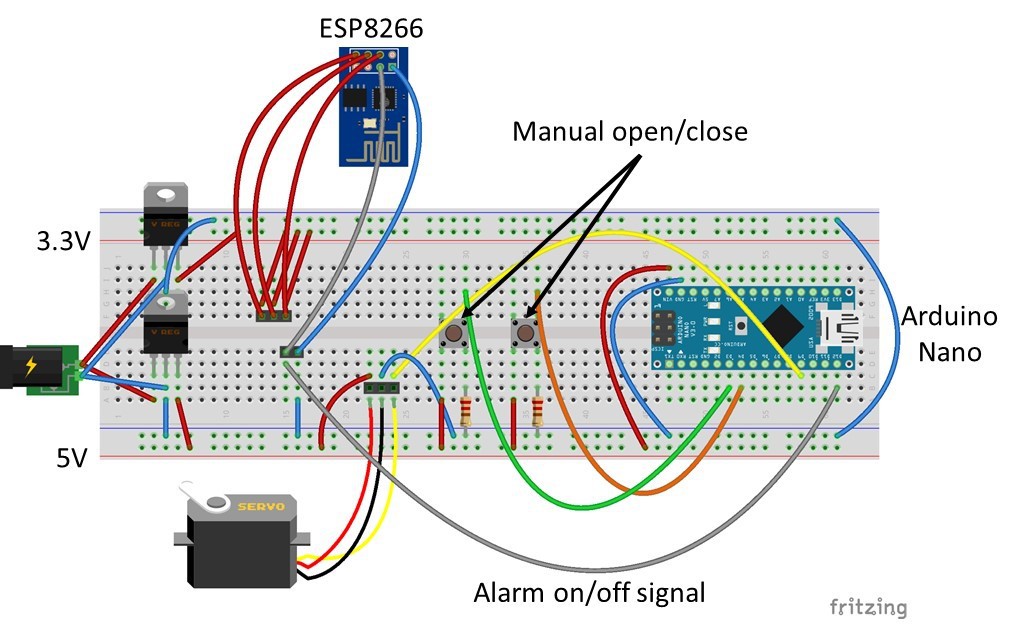
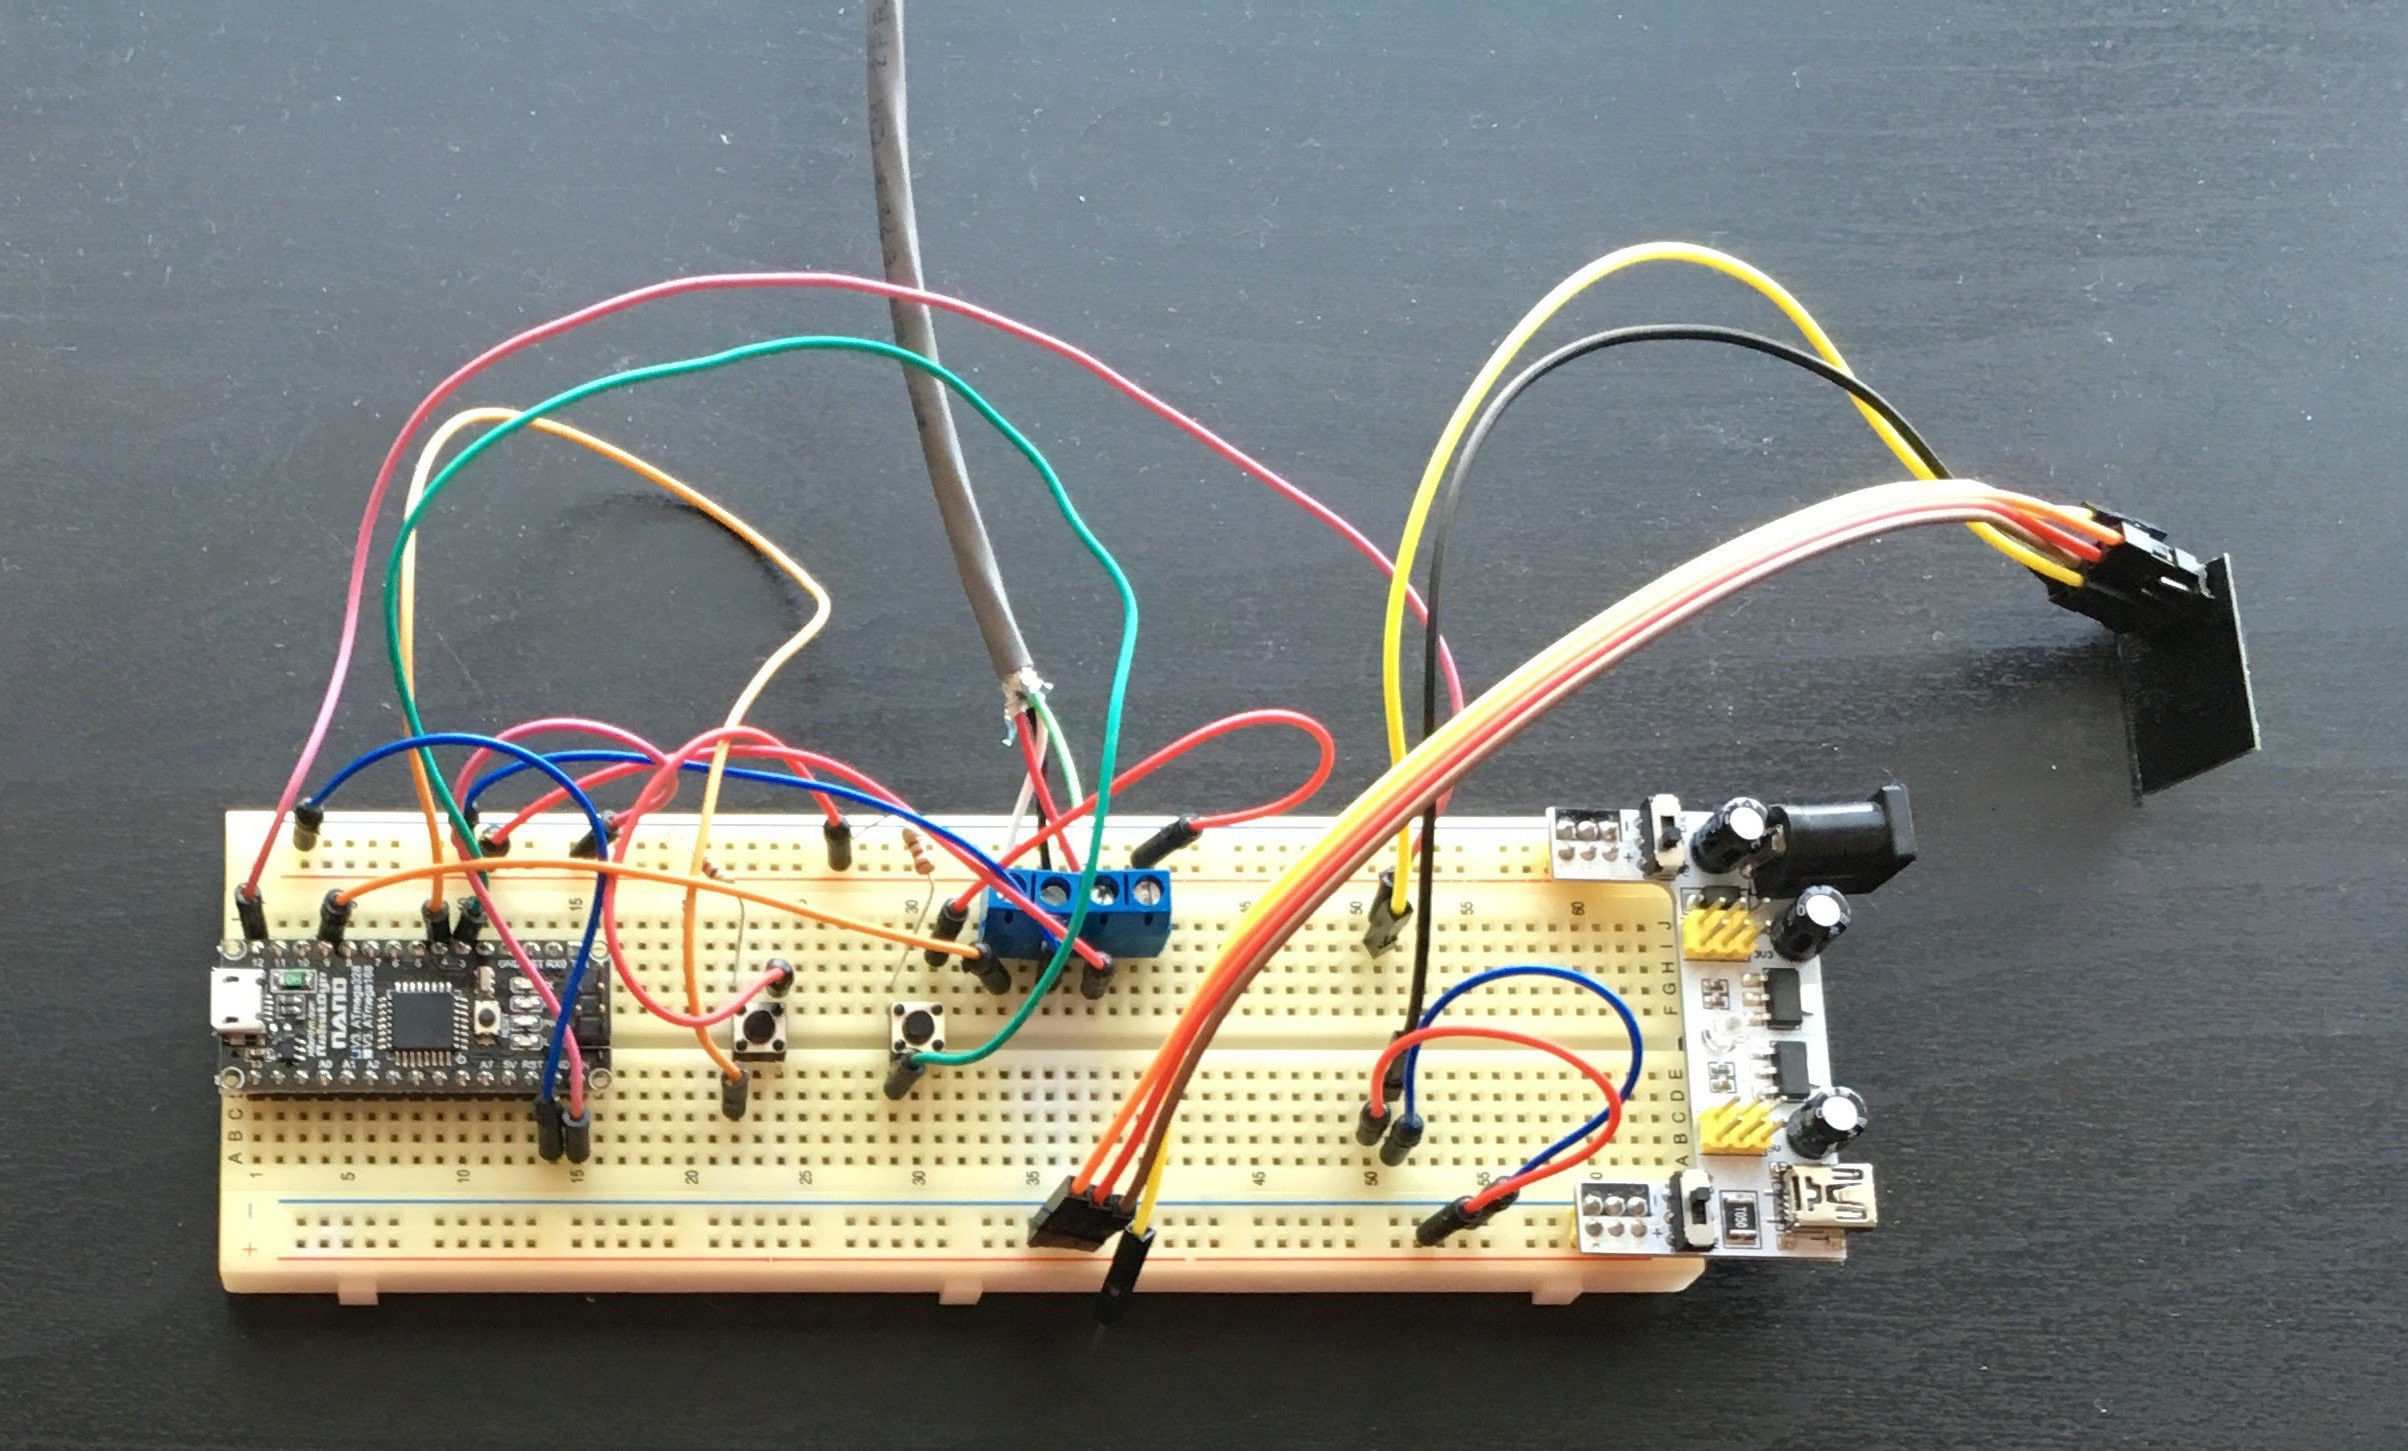
Thanks to ydonnelly for the ESP8266 Fritzing part!

(The Fritzing design file for this breadboard layout can be found on the repository)

Mechanical Setup:

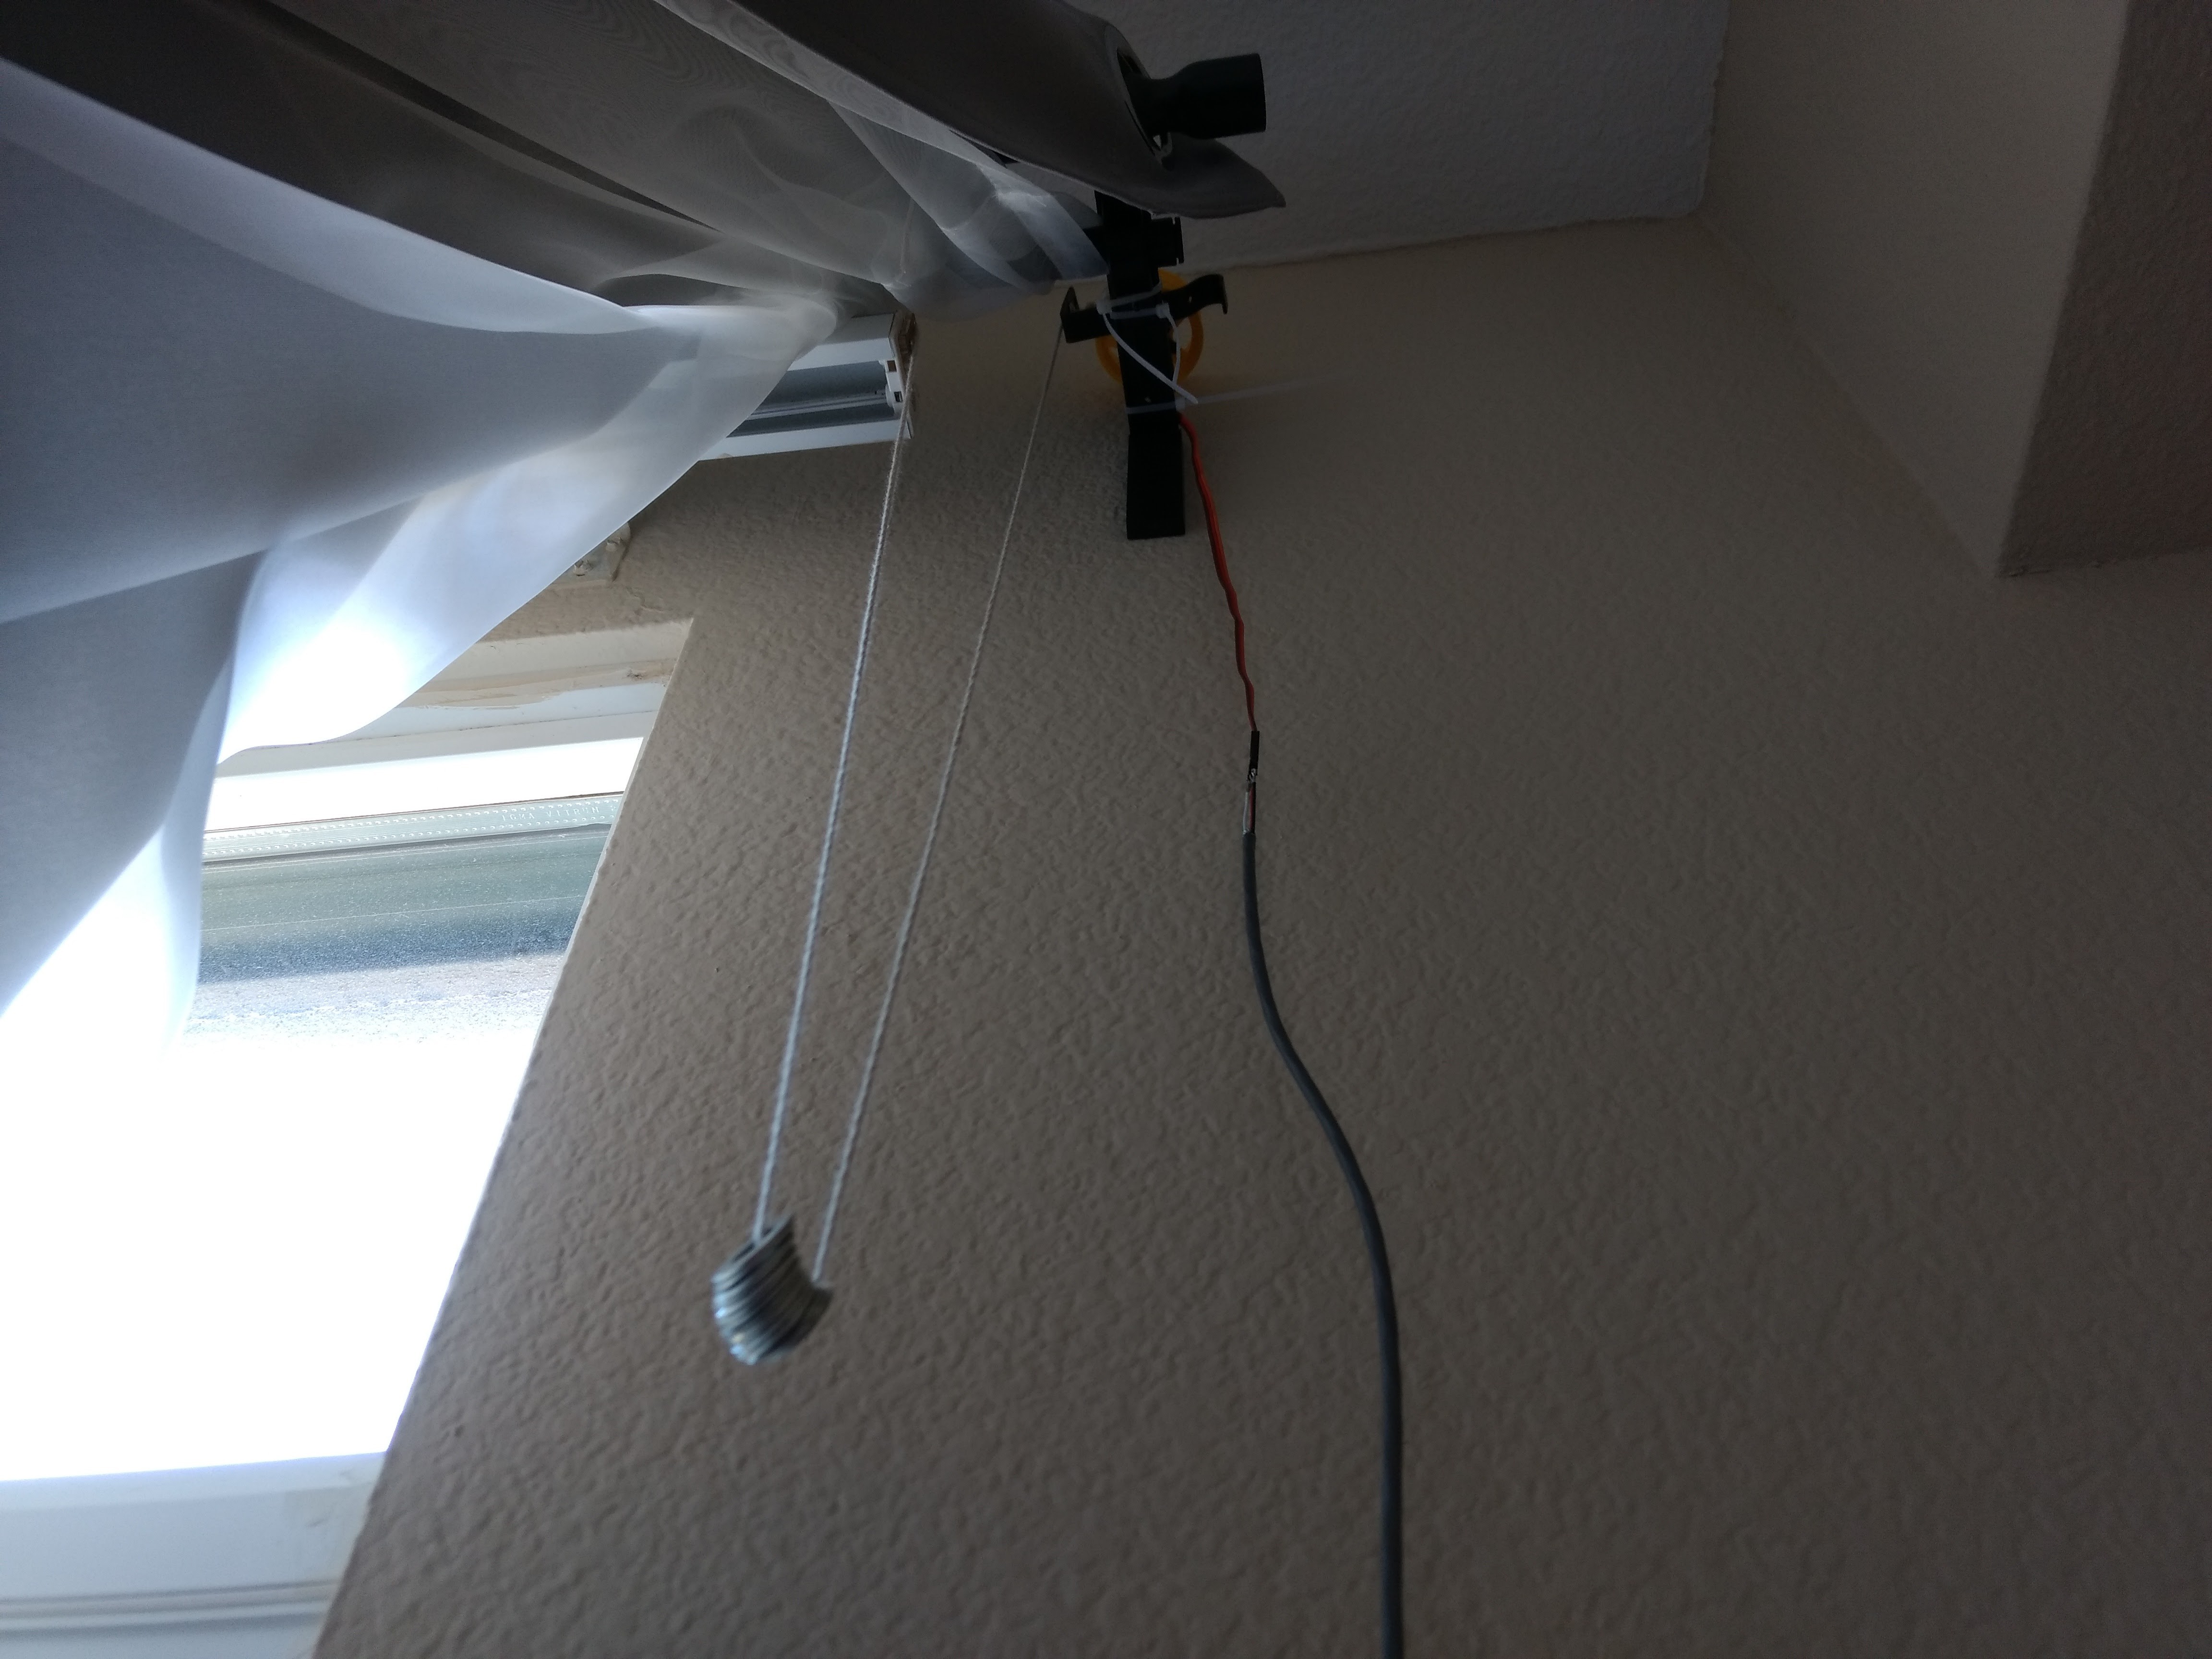
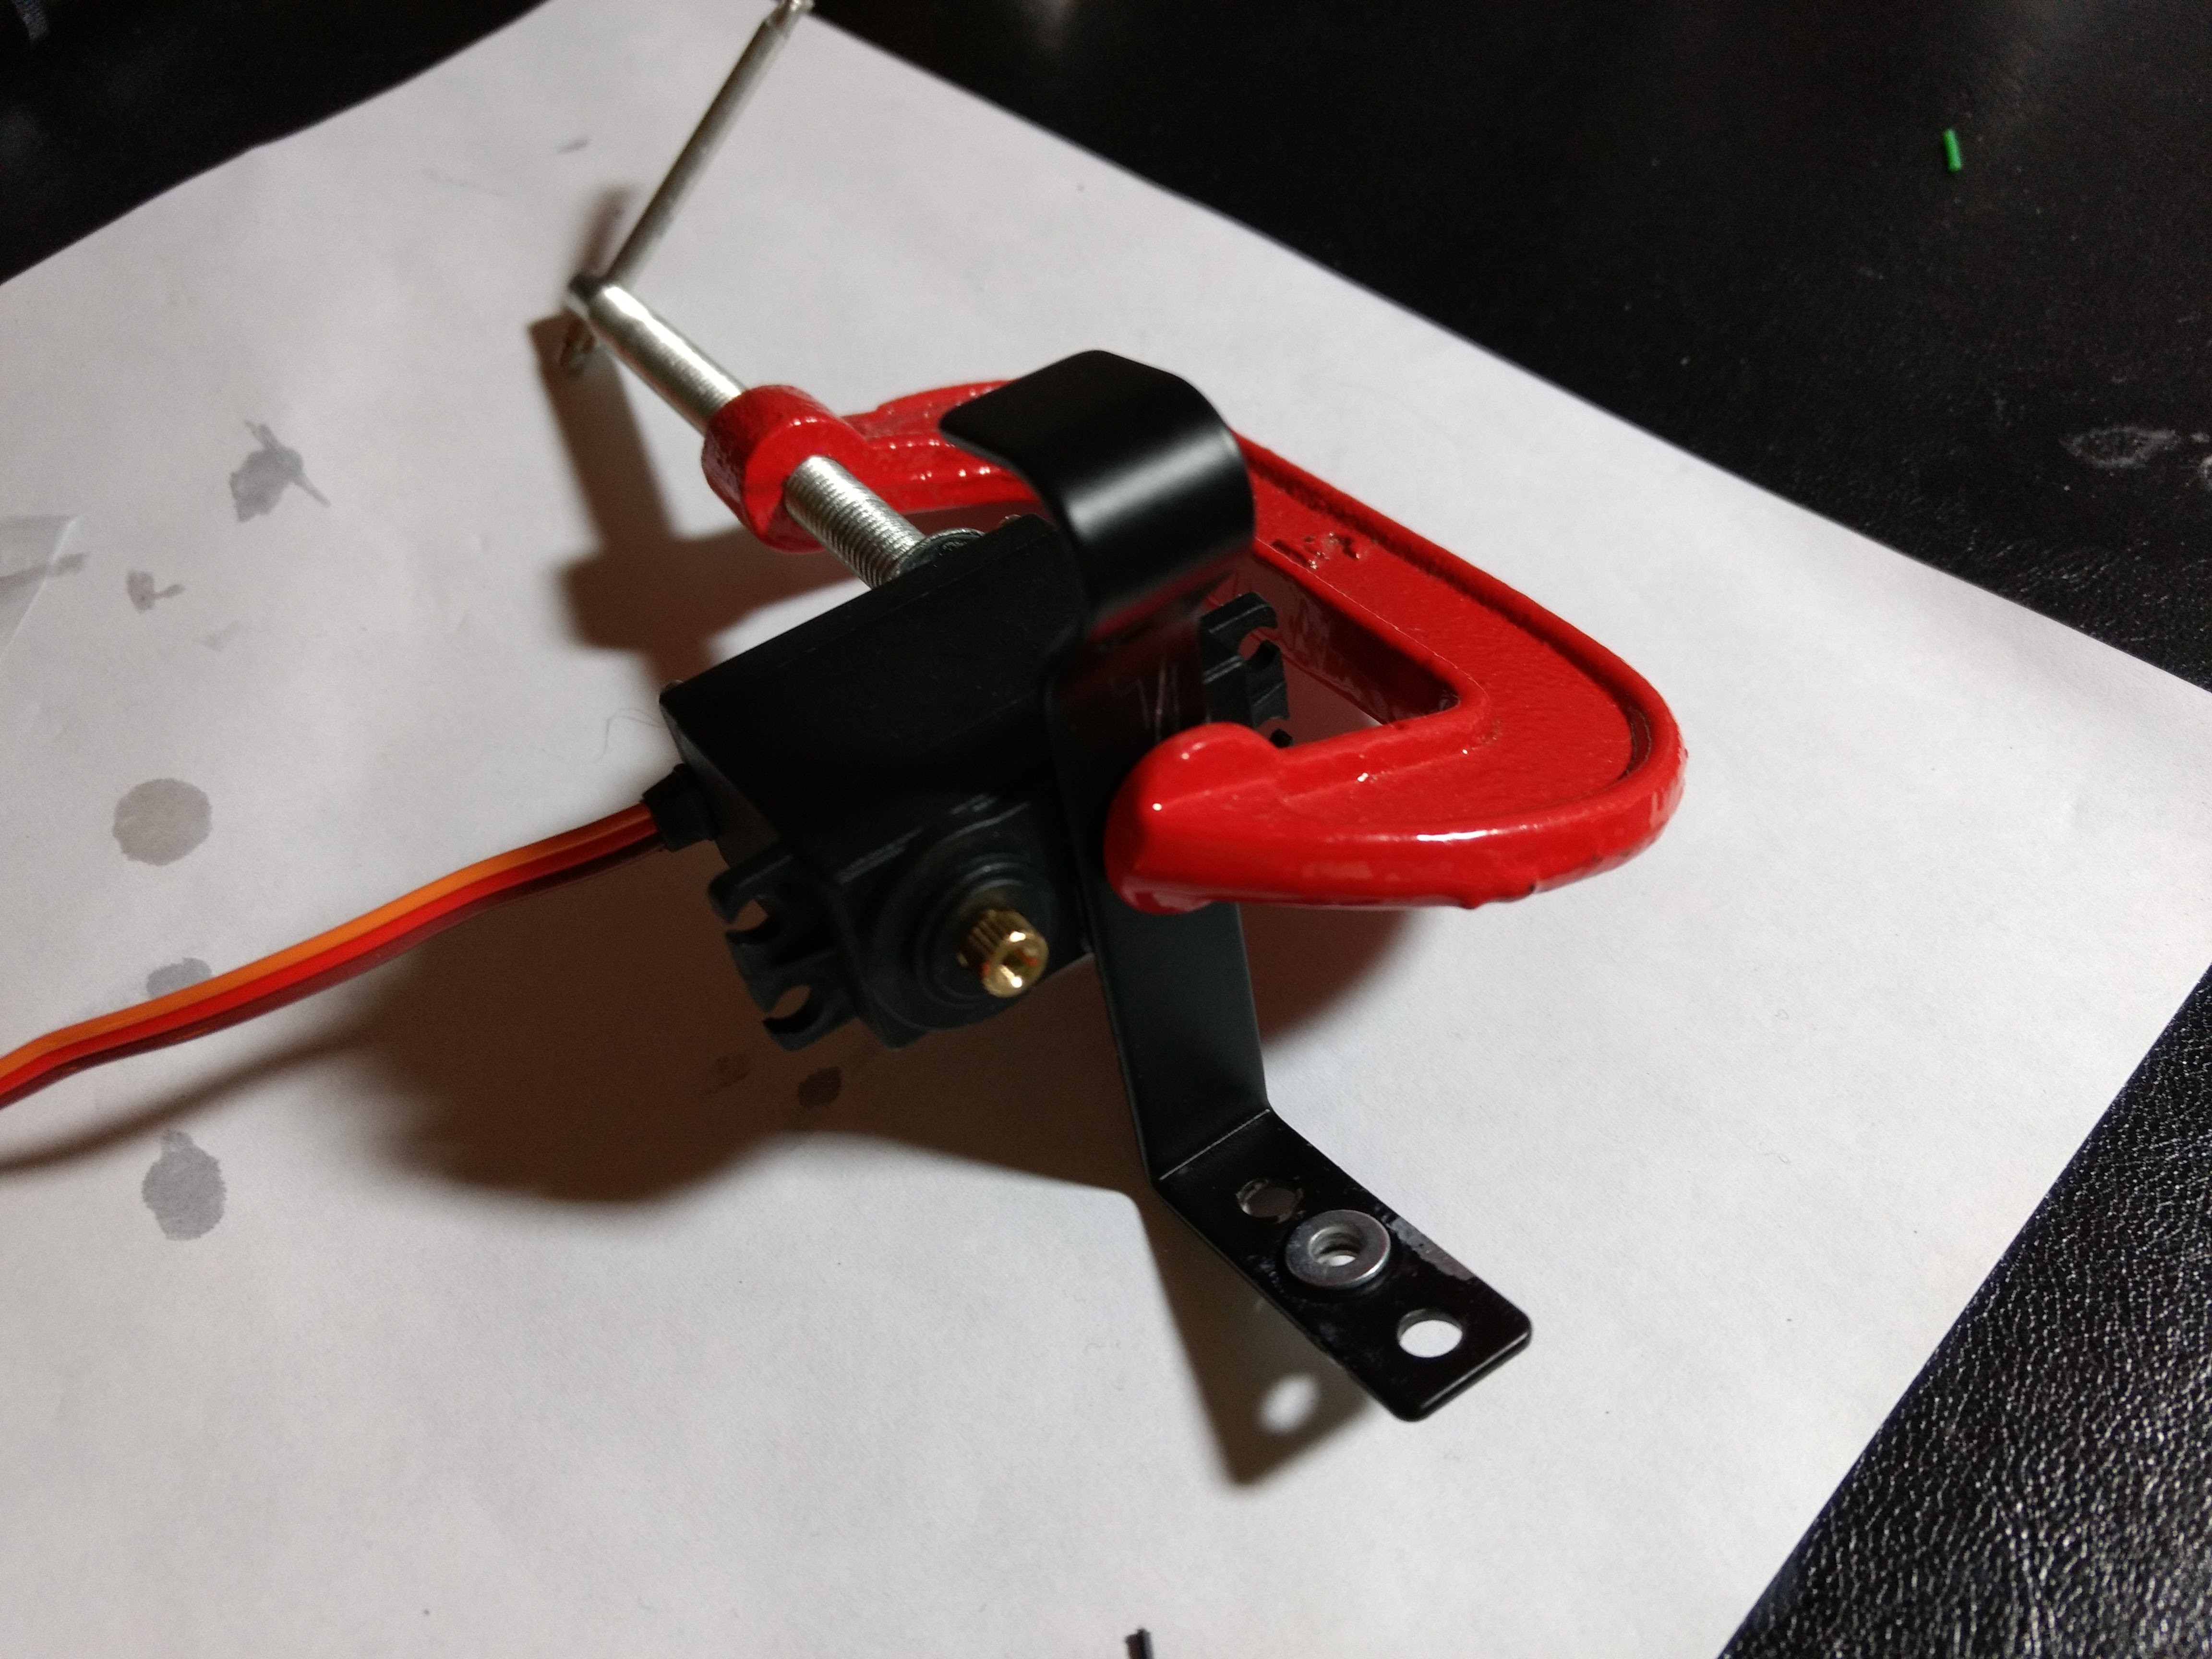
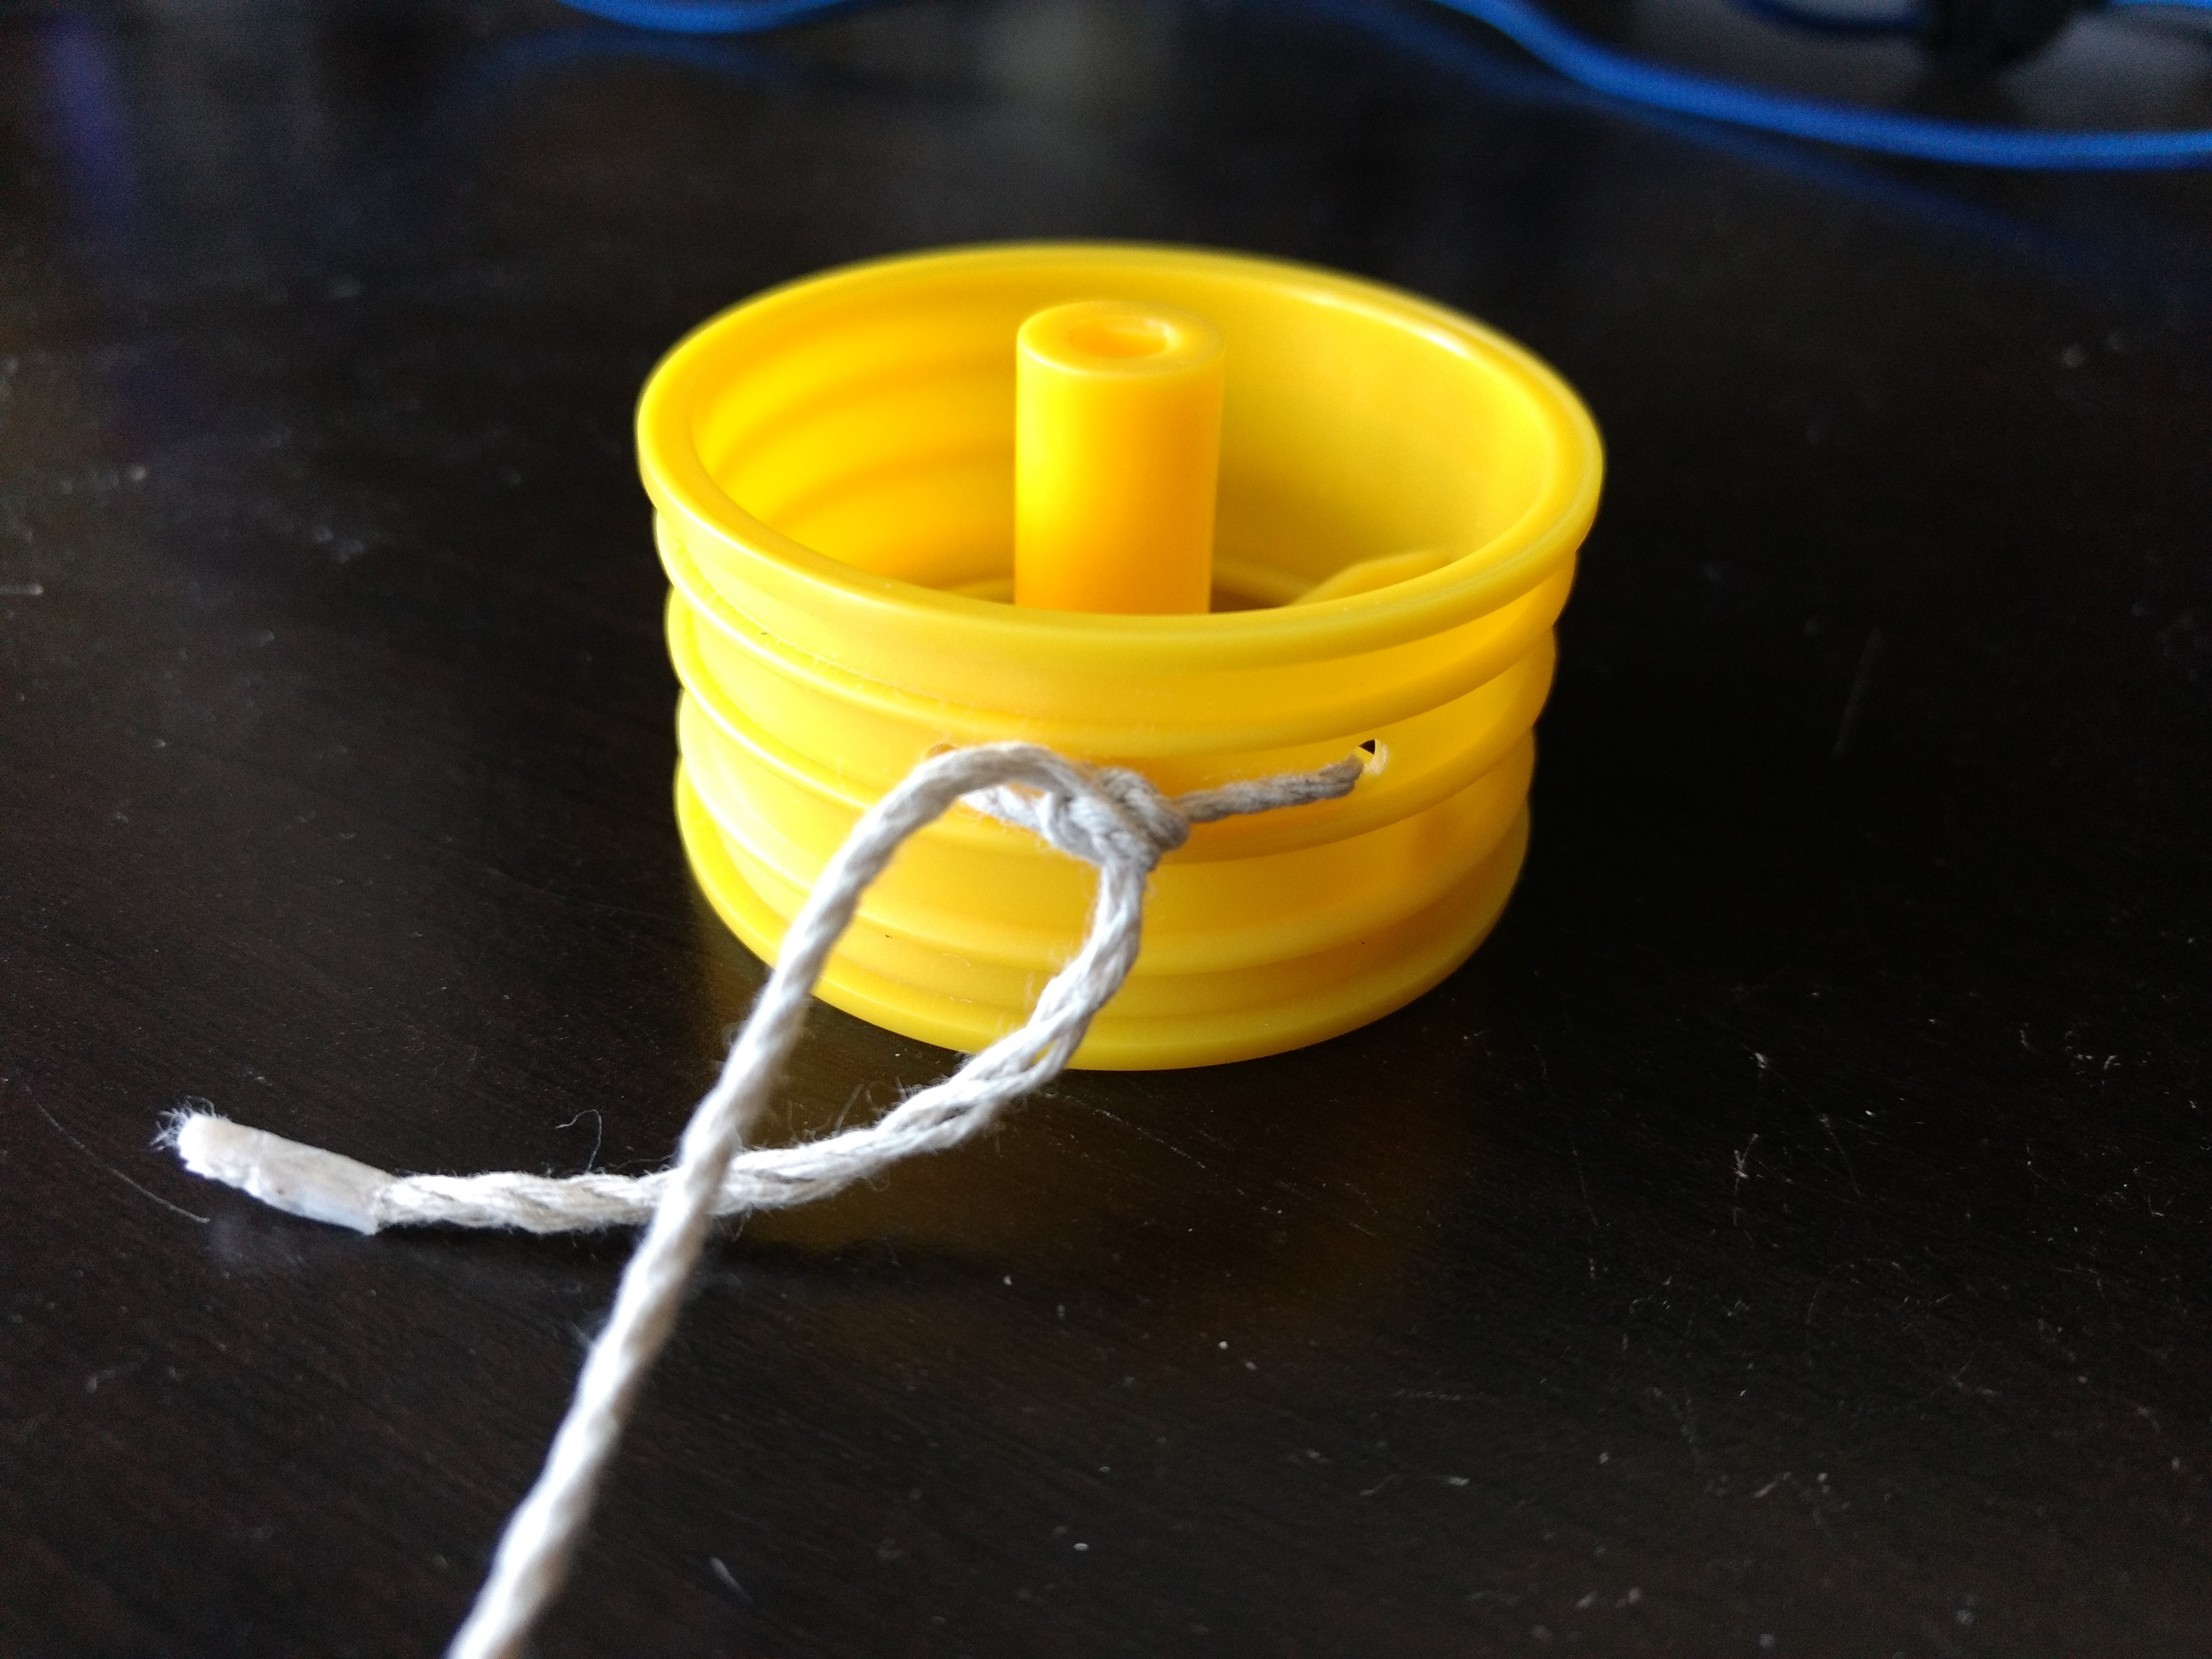
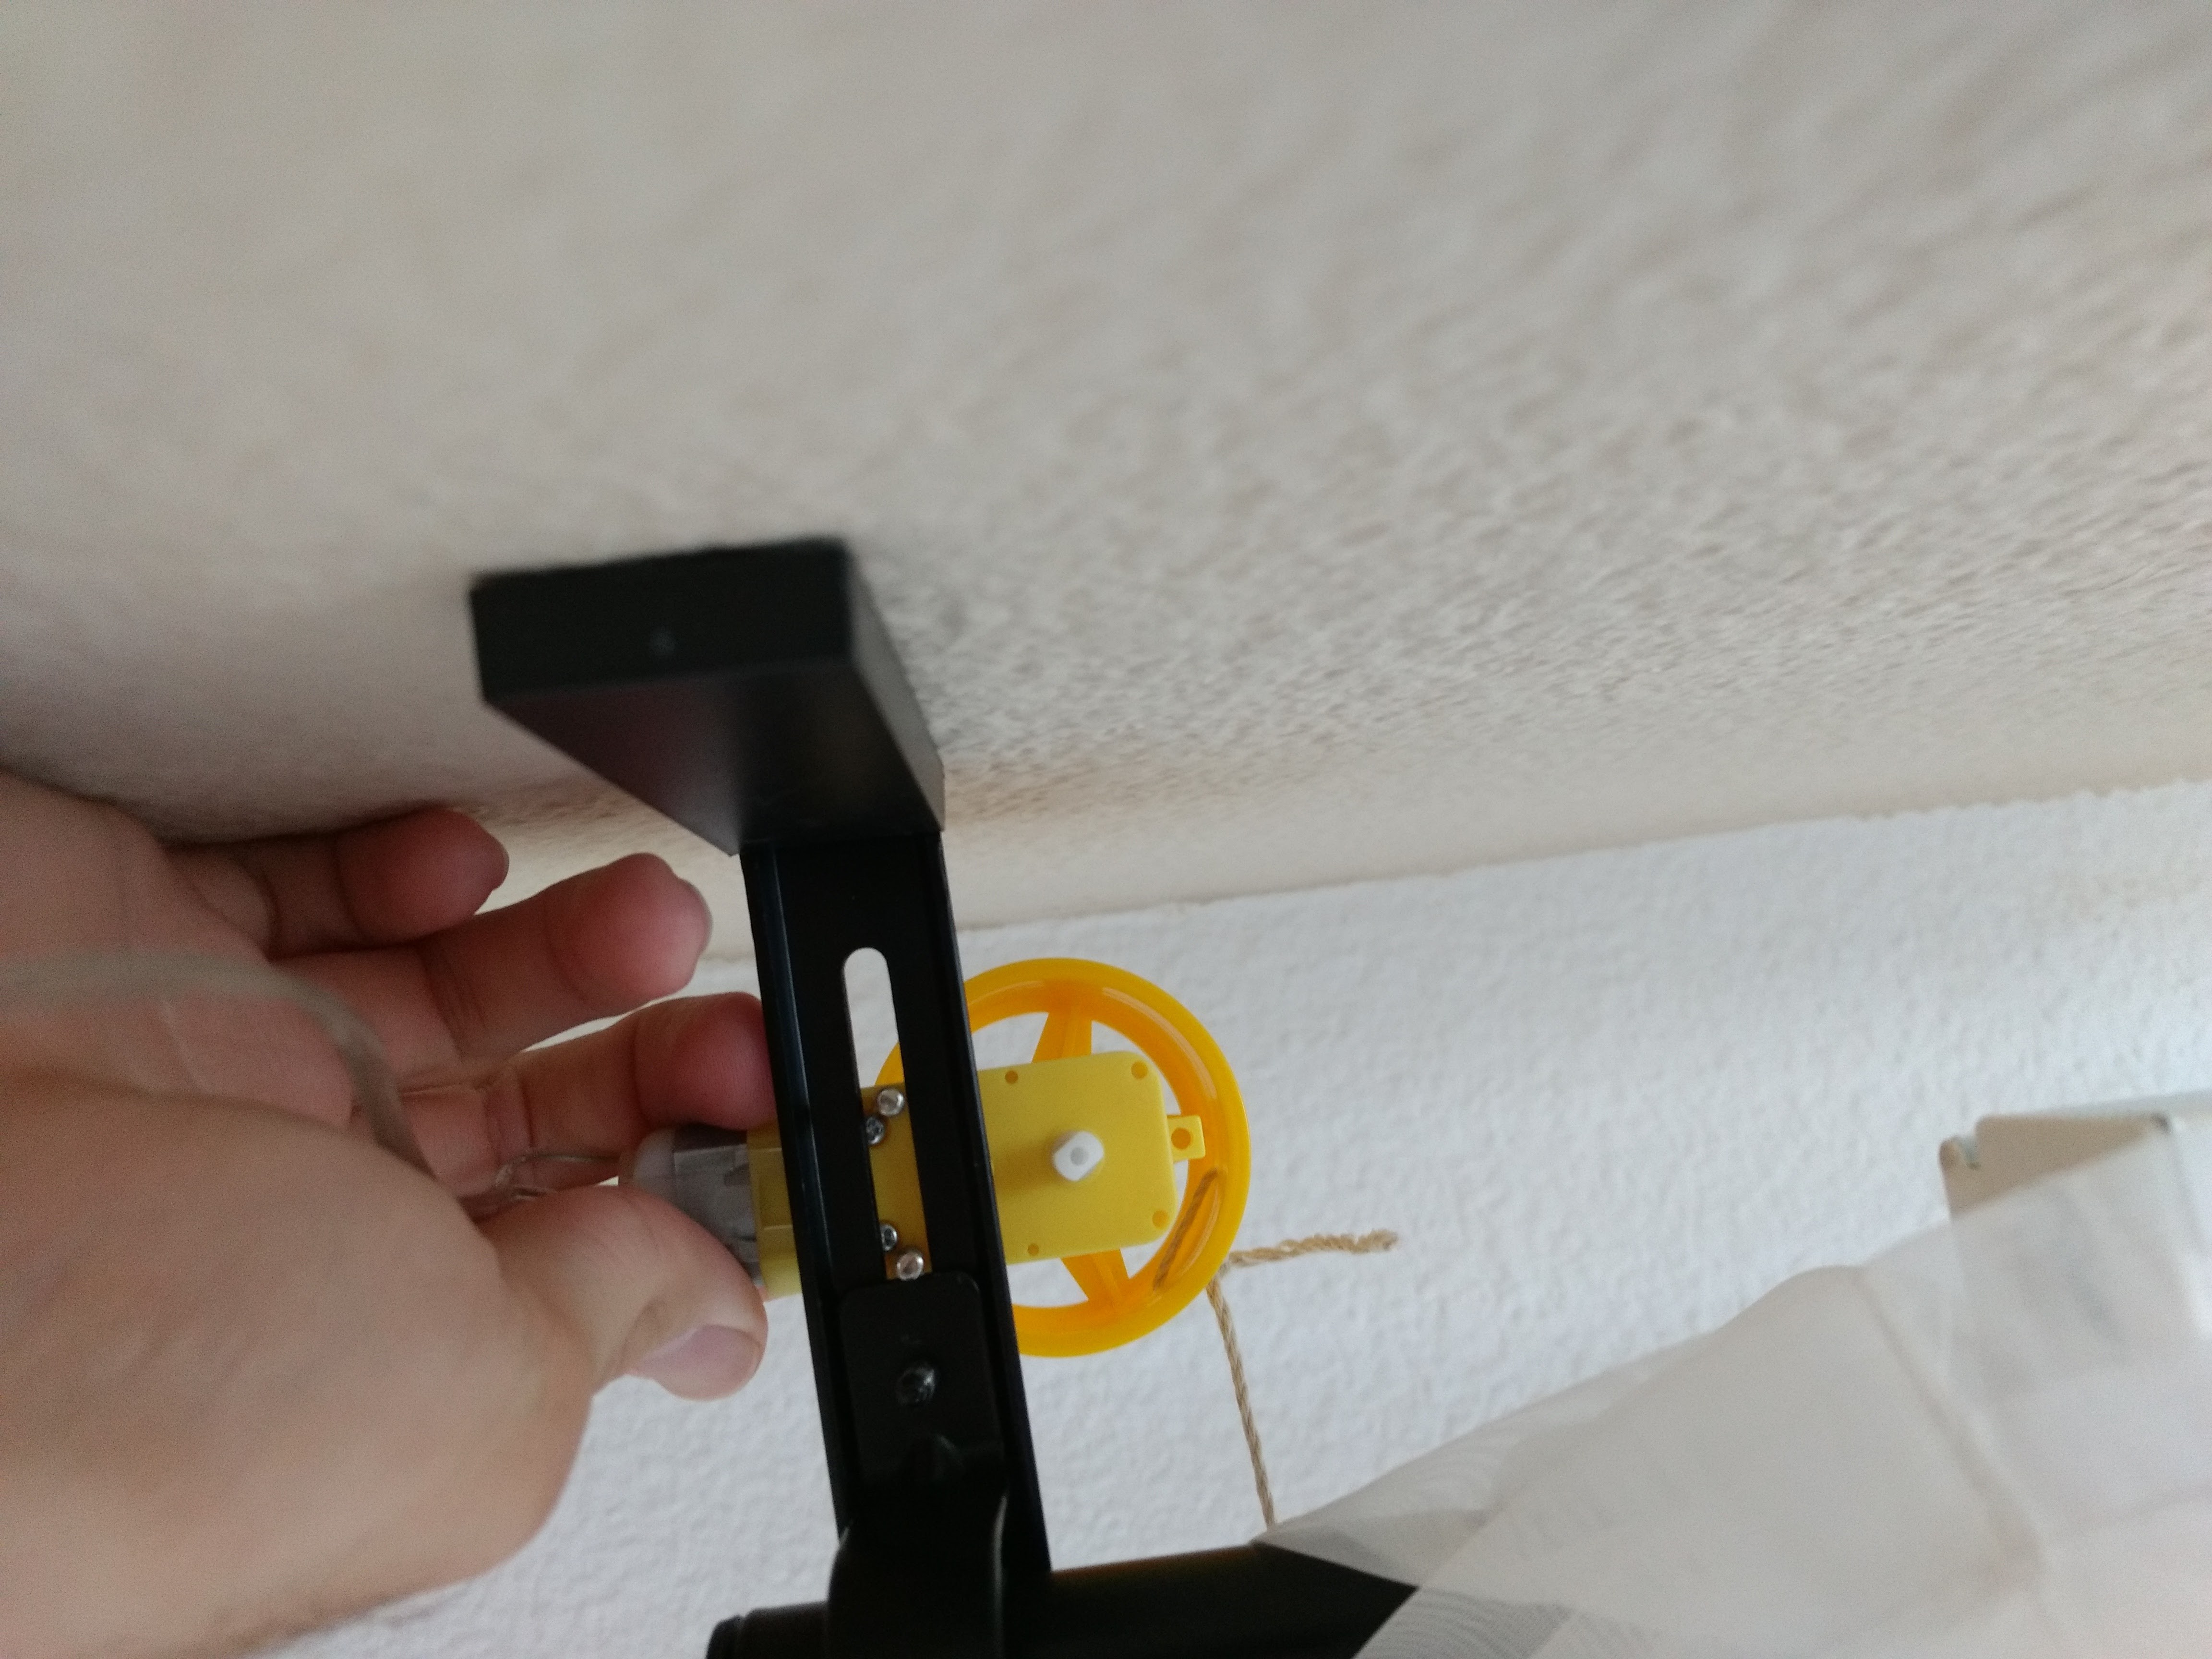
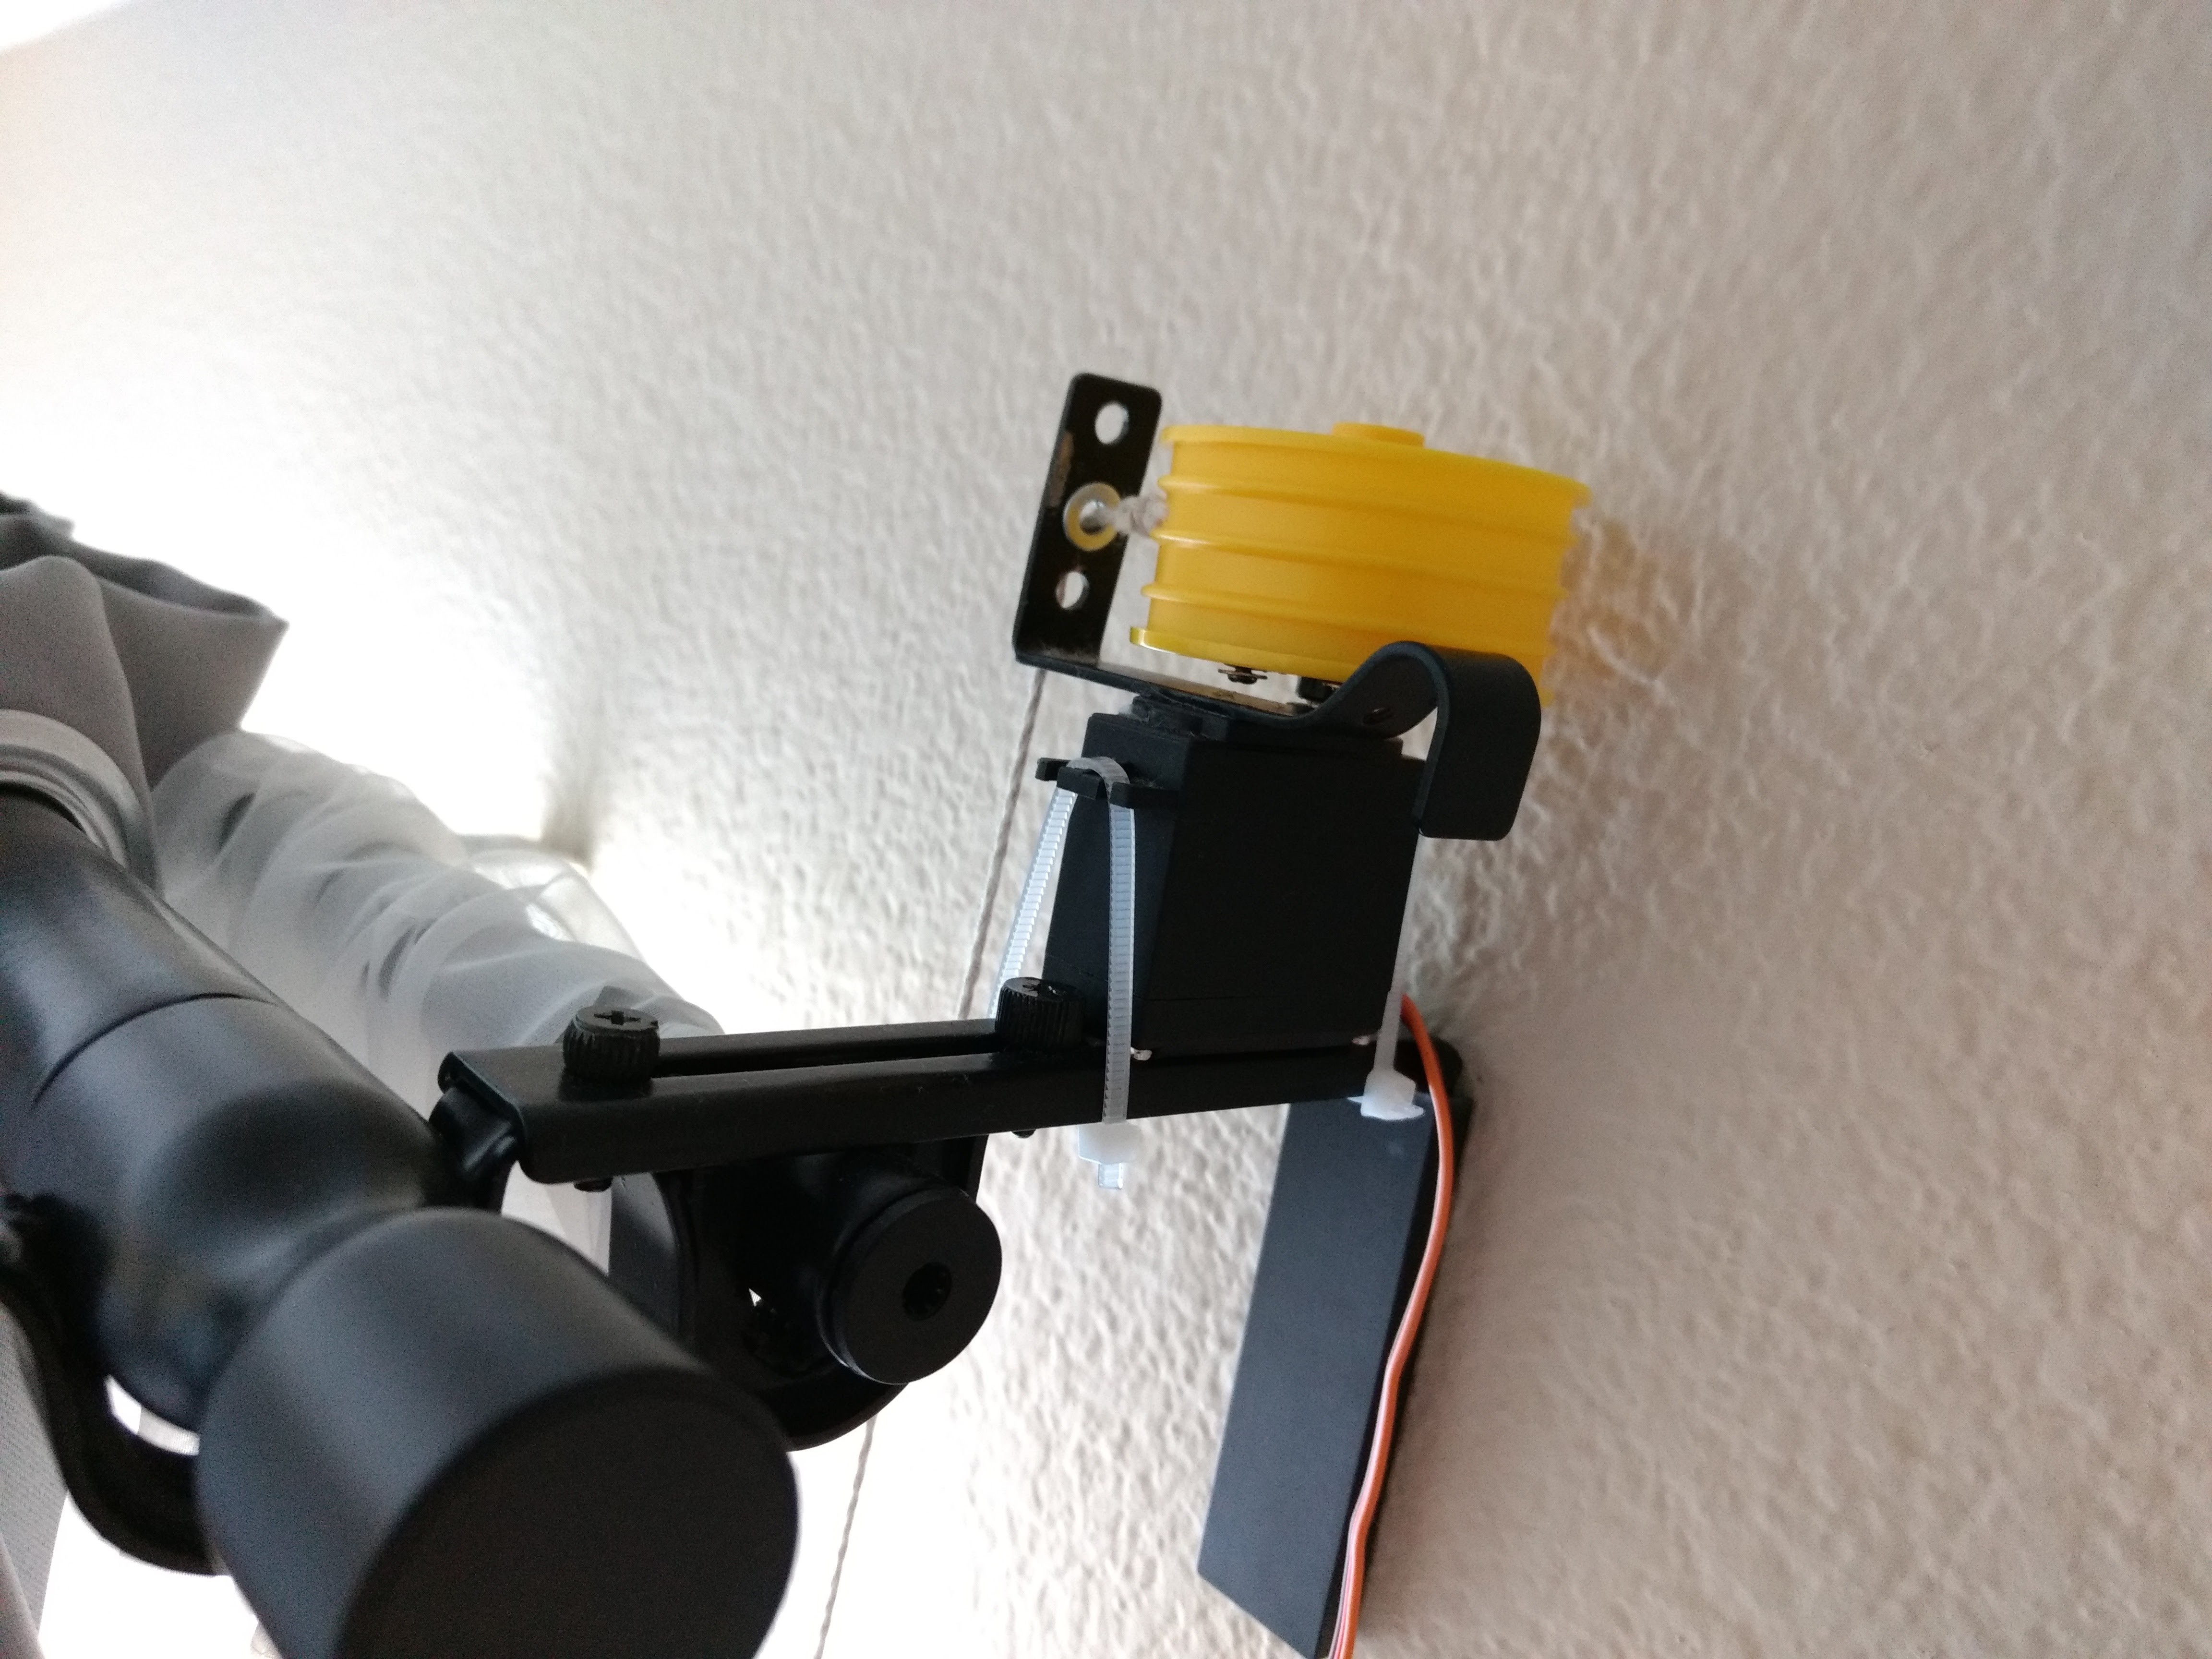
The servo is mounted on the curtain rod, and has an old plastic wheel as a spool. As the servo turns, the spool reels in the string. The string is attached to the end of the curtain, so as it is pulled onto the spool, the curtain is dragged open.

The string has a bunch of washers along it such that there is tension when it unspools. The software will automatically unspool the string a few seconds after the curtain is dragged in so that the curtain can be later closed.

Future Work:

  • Motorize the second curtain
  • Solder up a PCB once all the bugs are worked out
  • Mount the buttons on the wall for easy control
  • Make the alarm on/off data transmission more robust
  • Add feedback to servo rotation for more precise movement

Automated Curtains Jeremy Wilson is licensed under a Creative Commons Attribution-NonCommercial 4.0 International License.

  • 1 × Continuous rotation servo A servo that has had its potentiometer modified to allow for continuous rotation
  • 1 × Plastic wheel/spool
  • 1 × Arduino Nano
  • 1 × ESP8266
  • 1 × Hook-Up Wires

View all 9 components

  • Alarm-activated curtains!

    Jeremy Wilson08/21/2016 at 20:34 0 comments

    After a night of troubleshooting, I finally got the stretch goal of my project working. Now, when my alarm goes off, my curtain will automatically open!

    Check it out in action:

    When the alarm goes off, Sleep as Android uses the Maker channel of IFTTT to send a status to an Adafruit IO feed. The ESP8266 checks this feed, and if it sees an alarm status, it will trigger a digital output which is read by an Arduino. This Arduino then begins the process of operating the servo to open the curtain.

    Documentation is coming soon!

  • Servo Motor Success!

    Jeremy Wilson08/20/2016 at 22:29 0 comments

    After getting the servo up and running and getting the spool attached, I zip-tied it to my curtain rod and tied the other end of the string to my curtain.

    It's hard to tell what's going on in the photo, but the video makes it a bit clearer:

    The servo turns, rotating the spool which pulls in the string which is tied to the end of the curtain. After the curtain is drawn in, I then retract the string by rotating the motor in the opposite direction.

    However, without any tension on the string it would just bunch up and get all tangled. So I added a bunch of washers along the string to keep tension on the string and allow it to be fully unspooled and ready to be closed in the evening.

    So far, the setup is working well! I modified the code to be time-based. I played with the times such that it opens the curtain, and when it retracts the string, the spool is in about the same position as when it started.

    You can see the version of the code I used here: https://github.com/jerwil/Automated_Curtains/blob/9ef1e2785eba0738966c18f9046a9eb7b6032e48/Automated_Curtains.ino

    If I have time I hope to make this more sophisticated with feedback-based control. For now, I'll be testing out the time-based control to note any drift.

    Next step is to be able to set a time so that the curtains automatically open when my alarm goes off!

  • Servo Motor Setup

    Jeremy Wilson08/20/2016 at 22:04 0 comments

    After trying out a weak DC motor to no avail, I rigged up a continuous drive servo motor to try to open a curtain.

    I started off by supergluing an old curtain rod holder to a servo. This guides the string onto the spool and makes for much smoother operation. Below you can see the gluing process and the first test of the Servo motor with the spool:

    I wrote some basic Arduino code to turn the servo forwards/backwards using two buttons. You can check out the commit here: https://github.com/jerwil/Automated_Curtains/commit/0a2c84b8c485c43f2e53a2dcb1959fb2c830cd2b

  • Initial test - DC motor

    Jeremy Wilson08/20/2016 at 21:51 0 comments

    This was my first time controlling a motor using Arduino! As the "Hello World" for this project, I used a motor control shield to move a DC motor forwards and backwards.

    This motor is actually from a robot platform kit, and thus includes some plastic wheels. I re-purposed this as a spool which will be used to pull in the curtain using a string. I drilled a couple holes in the wheel and tied the string to it.

    I then mounted the DC motor to my curtain rod and tied the other end of the string to my curtain.

    Unfortunately I didn't get many good images of this setup as it failed: the motor just wasn't strong enough to pull the curtain along!

    Thankfully I had ordered a couple of high-torque continuous rotation servos, and they just arrived a couple days after trying out the DC motor! So onto attempt #2...

View all 4 project logs

Enjoy this project?

Share

Discussions

Trey wrote 05/16/2020 at 18:36 point

I love this!

  Are you sure? yes | no

Similar Projects

Does this project spark your interest?

Become a member to follow this project and never miss any updates