mikrotron
-
Ultrasonic ping-pong
08/23/2016 at 11:12 • 0 commentsAll this time we were busy getting the system to work, making it light on battery usage, making it presentable to our clients - so much so that we kinda forgot to delve deeper into the problem of ultrasonic distance measurement!
When one thinks about it, possible problems are blatantly obvious - sound is a wave and waves bounce and interfere. There may be multiple paths your sound ping can take in a given environment, and you may or may not measure the one you'd actually want to.
After messing around with the sensors a bit, we found two critical problems, and a blessing in disguise.
Problem 1: Some sound paths may take quite a long time to hit your sensor. Thinking about it, one can say "Well why is that a problem if I only want the shortest one (the one directly in front of the sensor?" and be completely right.... If all you want is one measurement. But what if you don't trust your sensor completely, so you'd like several measurements to gauge reliability? Well, what happened to us was, we were trying to get multiple measurements too fast one after another. So fast in fact, that the next measurement would occasionally catch an echo of the previous ping and, obviously, return nonsense. This was easily fixed simply by increasing the time delay between individual measurements. Since we're not dealing with a particularly fast process, we can afford to take our time checking the trash cans.
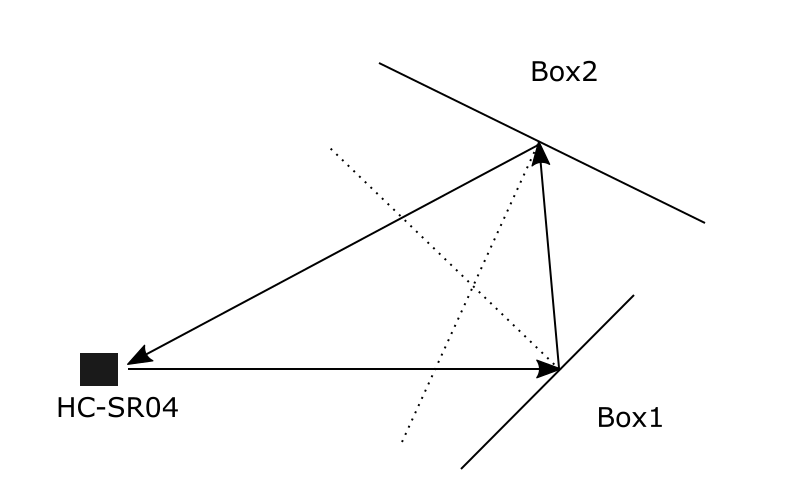
Problem 2: Reflection. We used a hard cardboard box as our target for measurements. When sending the wave perpendicular to the flat surface of the box, all sensors returned expected values, but put the box at an angle and things get weird very quickly. A basic knowledge of university level physics lets one assume that this is likely to happen when sound waves hit hard flat surfaces, but we still wanted to verify it. Here's the setup we used:
![]()
What one's desire in this situation is, is to measure the distance to Box1, but if sides of boxes are reflective enough, one actually measures the time it takes the ping to go around the entire triangle, which leads to our measurement returning half the circumference of it rather than the distance to Box1.
One can't predict the kinds of silly things people will throw in the trash, so how do we fight this? Turns out the situation isn't as dire as this example can make it look. For one, we can estimate the worst case error! Since trash is actually deposited some distance below the sensor even when the container is full, we can estimate that the difference in distance from sensor to boxes 1 and 2 isn't all that different. This means that our error will amount approximately to half the distance between the two boxes. Assuming "box 1" and "box 2" are thrown into our can in the worst possible way, that is so that one sits below the sensor and aims the sound signal at a corner where the other is readily waiting to execute their vicious plan - our maximum error is a quarter of the diagonal of the bottom of our trash can (they're square... ish).
But what about all the bounces that are not so well aimed? Well, turns out the trash bag is as good a dampener as one can wish for - the scenario where an entire trash compartment rings with ultrasonic goodness, sending nearby dogs on a bloodthirsty Hitchcock-style rampage is highly unlikely.
Mind you, this is the worst case scenario! Now we know the extent to which we can (dis)trust our sensors.
Summary: one problem dealt with, another compensated for. Today was a good day.
-
Demo Web App
08/20/2016 at 12:11 • 0 commentsOnce we got our hardware working and sending data to server, it's time to show the data to users. It was clear from the beginning that we would represent data on a map, because position is very important part of information in this project. After some research, we opted for Geomajas - open source platform for web GIS applications. Of course, we're not building a full featured GIS application, we only need data representation, but everything that Geomajas offers, both server and client side, will make our life much easier. And plugins and widgets support means that we can only use what we need, making our application agile, but at the same time we'll be able to add much more to it if needed.
Also, being Java developers ourselves, we like the fact that Geomajas is Java based, with GWT, Hibernate, Spring, and many other things under the hood. Finally, there is a great quickstart application that we used as basis for our demo.
As we needed only to demonstrate how the application would work once it's deployed, we used just the client part for demo, so we turned the preconfigured layers off, leaving Open Street Map layer as background, zooming in on part of Croatia where demo will be presented, and adding our prototype as a red dot on the map. Since we didn't use server, we had to add a piece of code that transforms GPS coordinates (EPSG:4326, also known as WGS84) to Open Street Map projection (EPSG:3857, aka EPSG:900913 - yes, it spells 'google' on 7-segment display :-) ):private Coordinate toProjection(Coordinate point){ double x = point.getX() * 20037508.34 / 180; double y = Math.log(Math.tan((90 + point.getY()) * Math.PI / 360)) / (Math.PI / 180); y *= 20037508.34 / 180; return new Coordinate(x, y); }Than we added code to read last data received for given station from our server, using callback implementation of RequestBuilder to receive JSON from server (FetchRequest class). Now, when user clicks on a station on the map, dialog box pops up, displaying the latest information received from that station. You can see it in action here, using real data from out prototype.
So, to make things work the way we wanted, we just had to add few classes (FetchRequest, StationManager, DemoDialogBox) and make some changes to existing class ApplicationLayout and mapMain.xml configuration file. Thanks, Geomajas!![]()
-
Project in a Box
08/19/2016 at 13:21 • 0 commentsTime has come to put everything in a box, and then to put a box in a trashcan :-) Of course, it has to be quite strong box, trash isn't handled with care. But first we have to organize our components efficiently - we have to draw a floor plan. Easier said than done, because there is no or little data on dimensions of our components, so we had to measure and draw them all by ourselves. You can find these drawings in our github repository in .dxf format, drawings are millimeter based, and can be viewed or edited in any CAD software (e.g. LibreCAD).
Finally, we can make our controller box floor plan, and after some arranging and re-arranging we came up with this (you can download .pdf version from project files - EcotronControllerBoxEN.pdf):
![]()
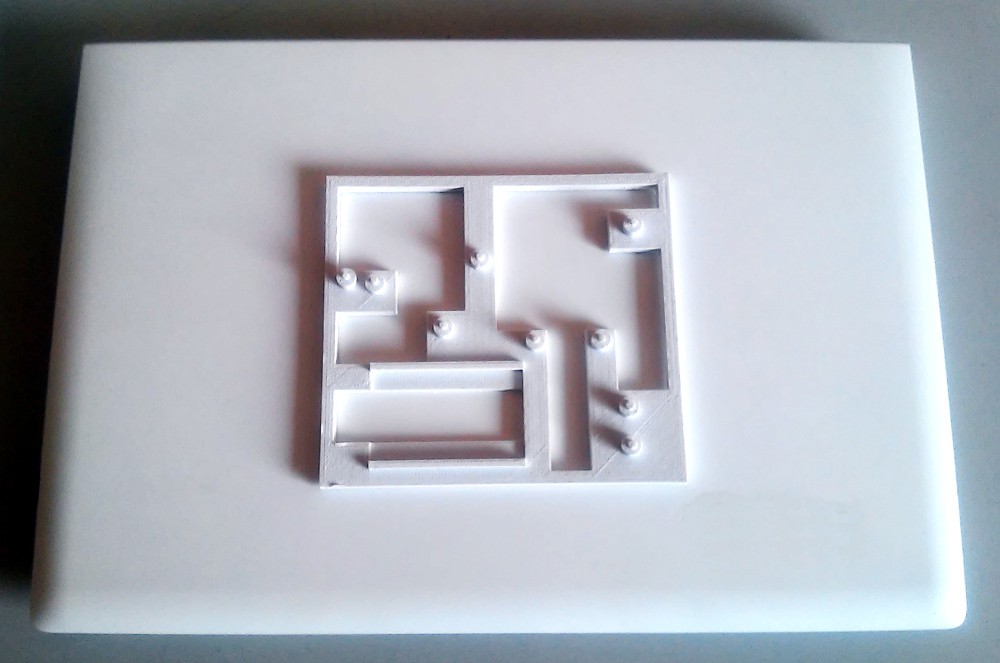
Now we just have to check if this is going to work: quick import to SketchUp, removing everything but mount plate and mount hole positions, adding 3rd dimension to the model, putting some holes in mount plate to speed up printing, export to .stl file, import to Slic3r, export to SD card, putting the card in a 3D printer (Prusa i3, with build volume 200x200x180 mm), and one hour and 49 minutes later there it is:
![]()
Our test mount plate, ready to be used! This picture shows it on top of 15.6" notebook just to give you a sense of scale, we won't be putting notebook in a trashcan ;-)
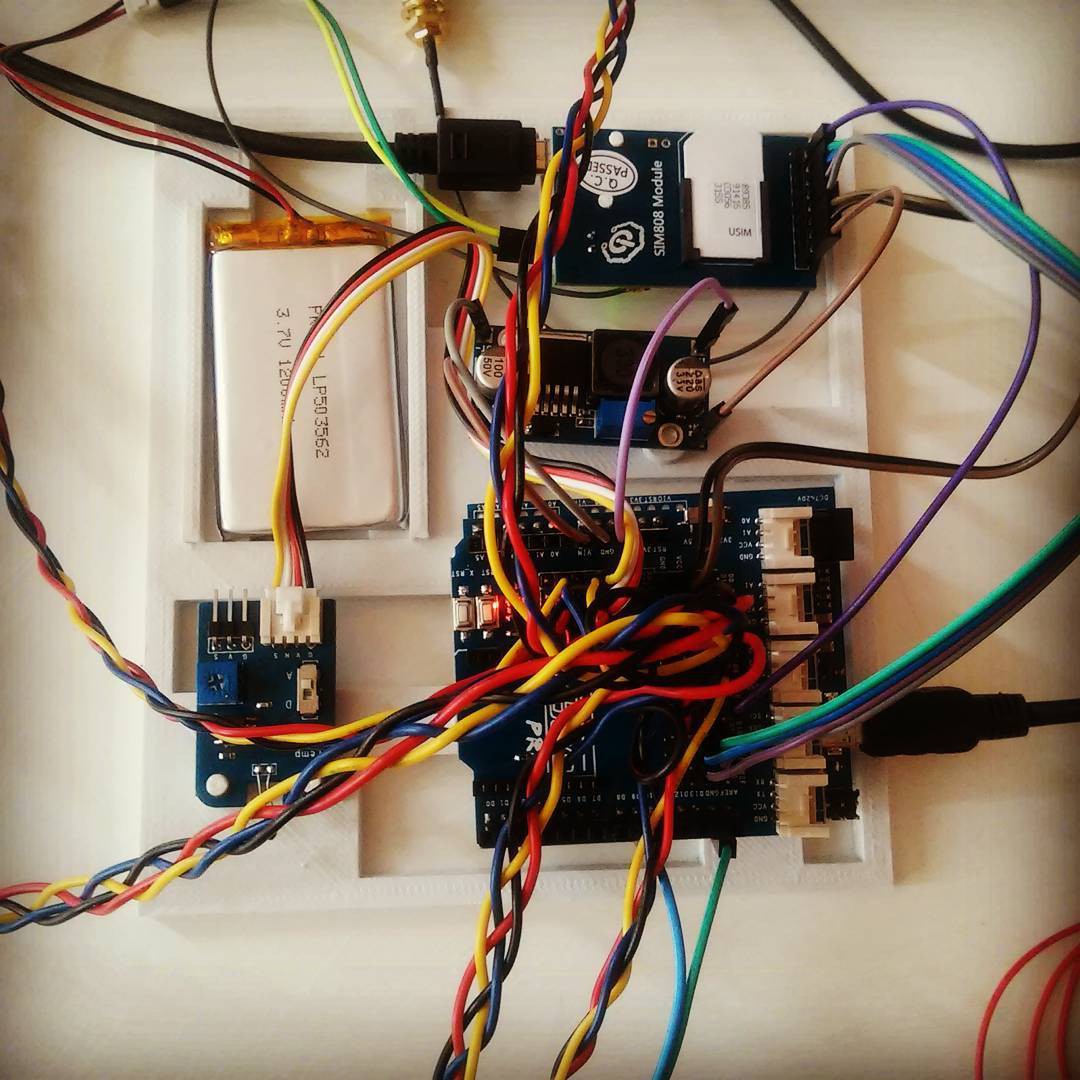
So, finally, we put all the pieces together, and they fit! As you can see, our floor plan works, design of controller box can begin. Of course, five small boxes have to be made for HC-SR04 housing, but that is a much easier task.
![]()
-
Server software
08/18/2016 at 12:29 • 0 commentsWhat, SIM808 has AT command to monitor battery status ?!
Cool!
But now I have to modify the server, to accept it, store it, and display it.OK let's get to it.
Command: AT+CBC
Response: +CBC: <bcs>, <bcl>,<voltage>
Where
bcs = charge status, 0 not charging, 1 charging, 2 charging finished
bcl = battery connection level, percent, 1-100
voltage = millivoltsLet's add another parameter, say, batInfo, just like we do with gpsInfo, but without parsing - we're just going to store the string received to the database, whatever it is.
The server source resides in server/src directory, and all the classes are in eu/diykits/ecotron subdirectory.
Our database consists of one table, GenericEntry. In memory, it's represented by GenericEntry class, which resides in eu/diykits/ecotron/db. The class consists of a number of public fields, and two constructors: empty one, used when hibernate loads the object from the database, and one with argument, that creates new object from a web request.
This is the source: https://github.com/mikrotron-zg/ecotron/blob/master/server/src/eu/diykits/ecotron/db/GenericEntry.java
To add another thing to it, I just need to add a public field, like this:
/** battery level info */
public String batInfo;OK that's done.
Let's see, what else I need to implement and configure?
Well, nothing.
GenericEntry constructor takes all the parameters and maps them one-to-one. That is, whatever exists in GenericEntry, is a legal parameter to upload servlet request.
Object/relational mapping is generated automatically, and database structure modified automatically when web app starts.
Furthermore, download servlet will automatically include new field to generated CSV and JSON.
This is all done by two magic class I've been dragging around for 10+ years: HibernateDB, and DBObject.
HibernateDB handles database connections, transactions and queries, while DBObject generates textual representation of itself, either CSV, JSON, or custom.
Together, they allow for real fast prototyping.
However, full explanation of features is out of scope of this log, and project.Let's just rebuild and redeploy our new app.
Build: ant war
Deploy: copy ecotronserver.war to your tomcat's webapp directory.
Let's check it out:
www.mikrotron.hr/ecotronserver/download?stationId=alfa
Yep, it contains batInfo string, with value null; guess that's it.
-
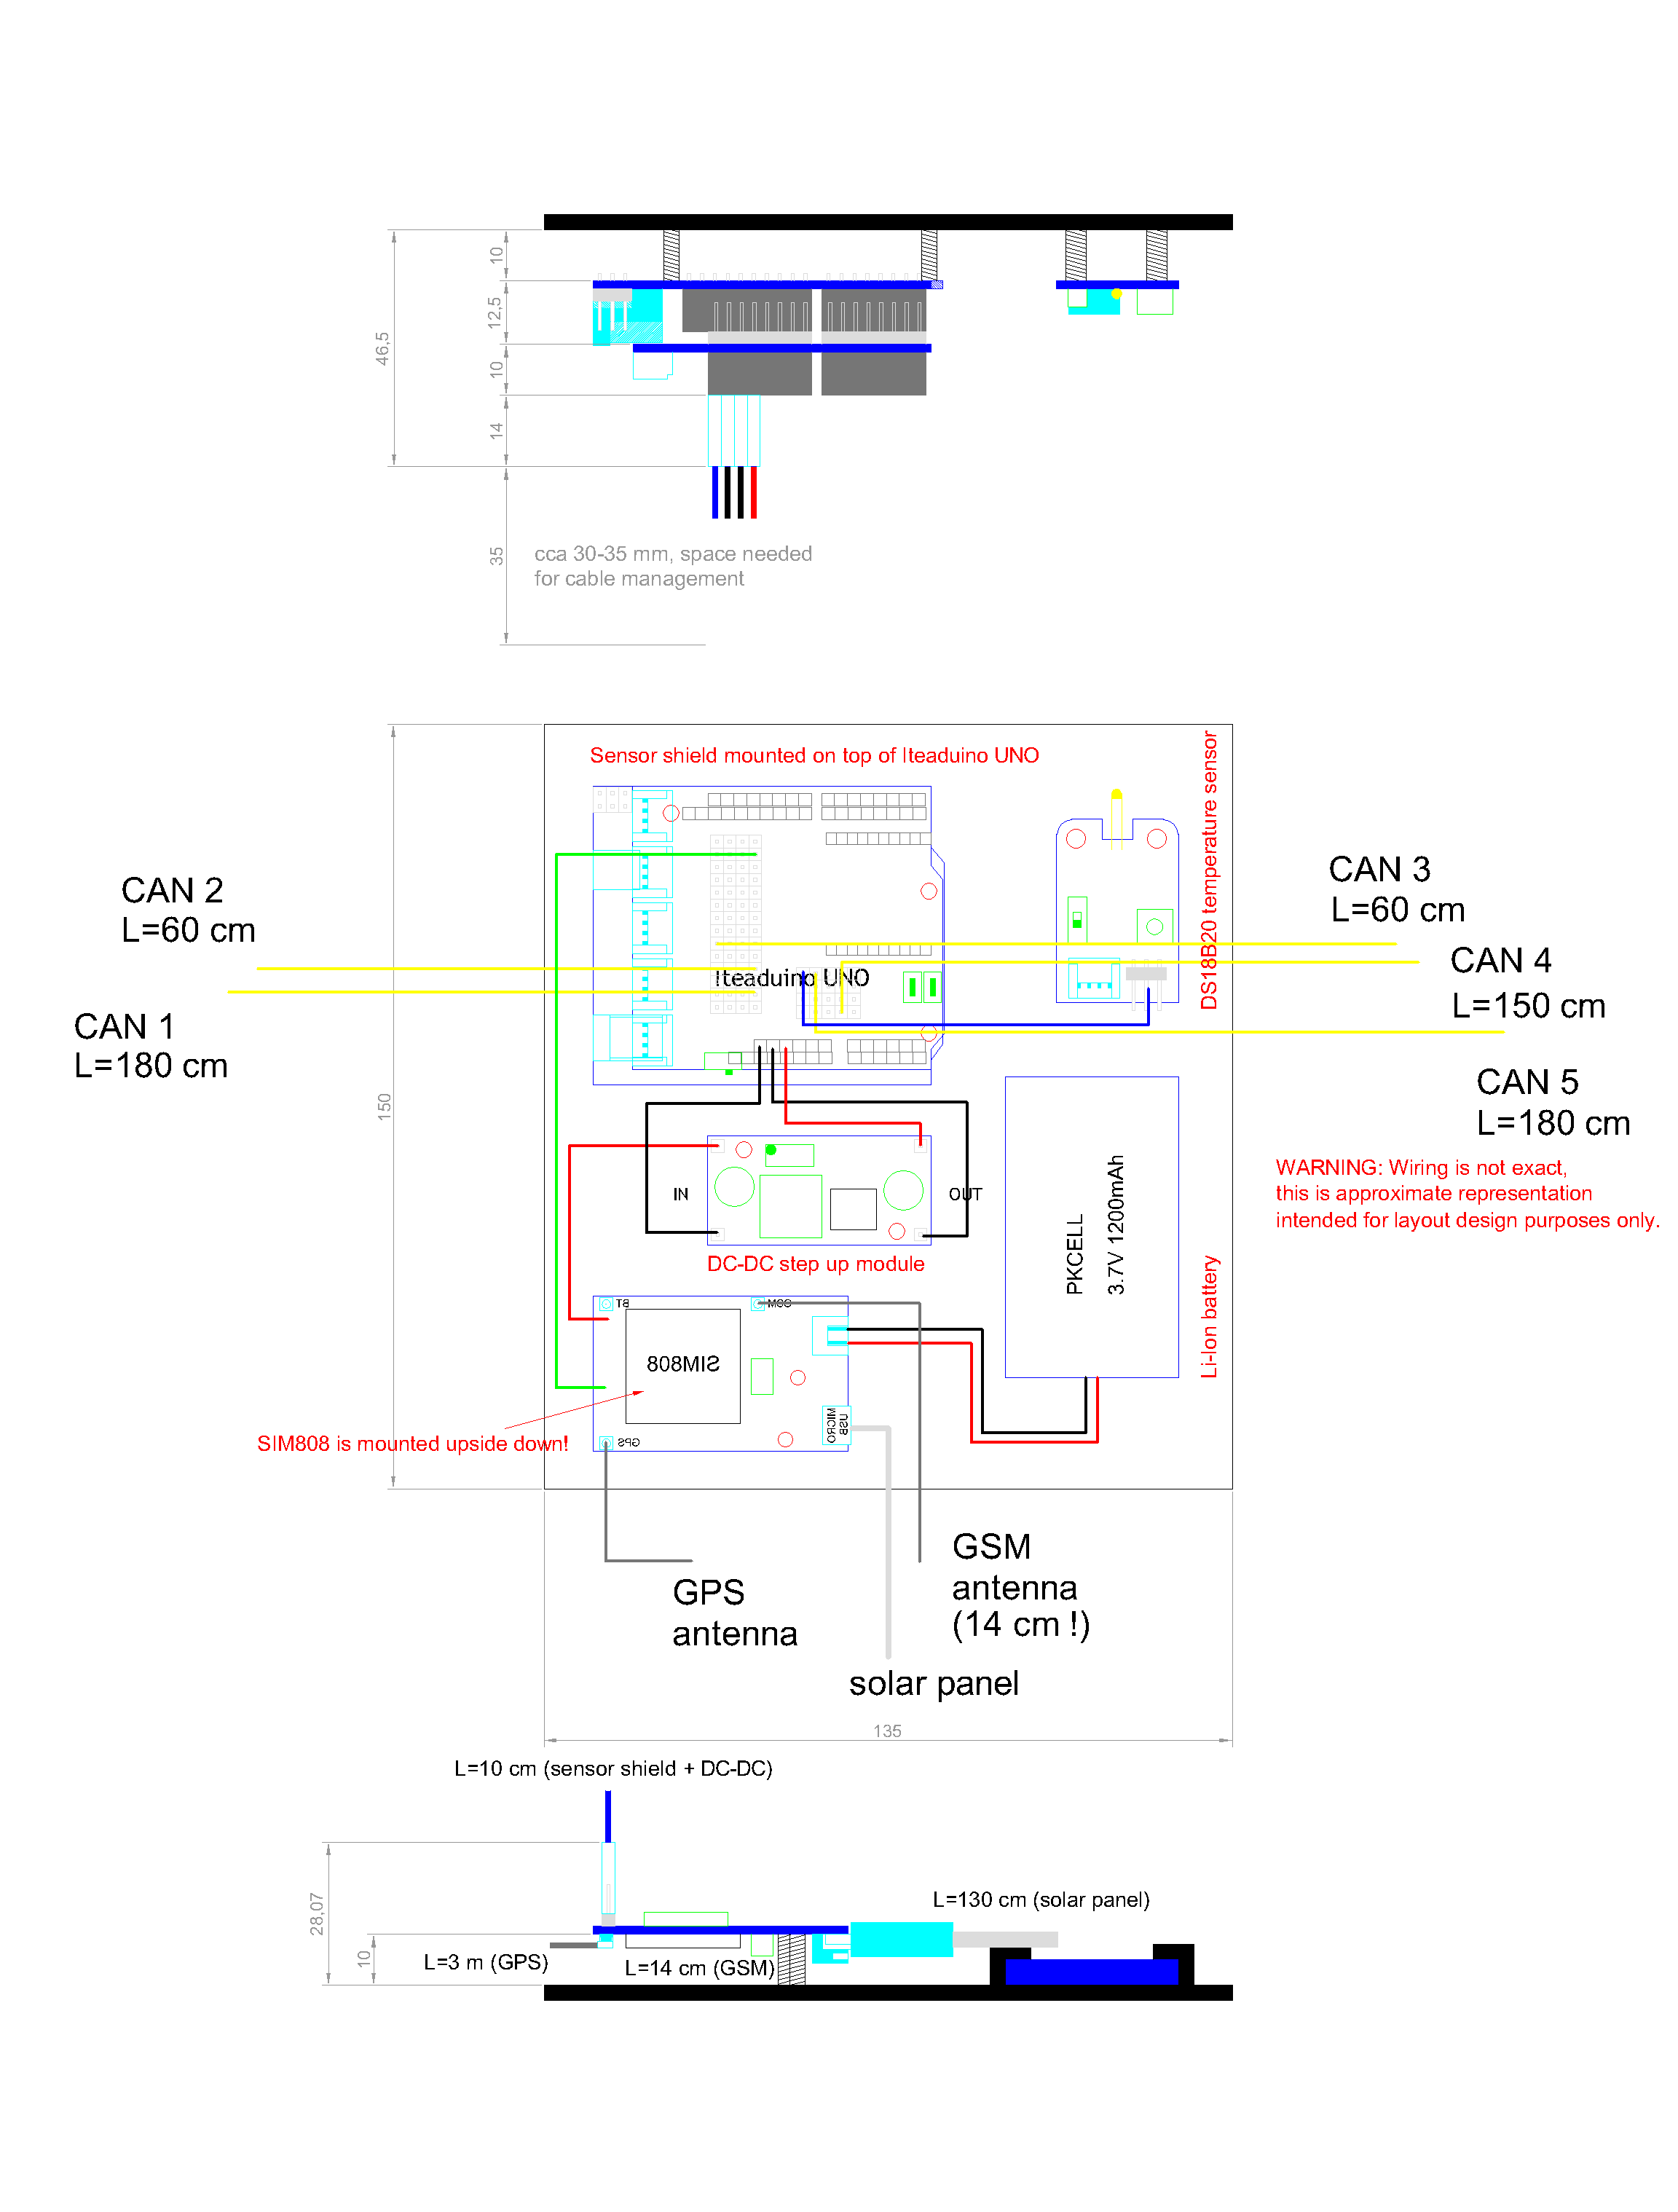
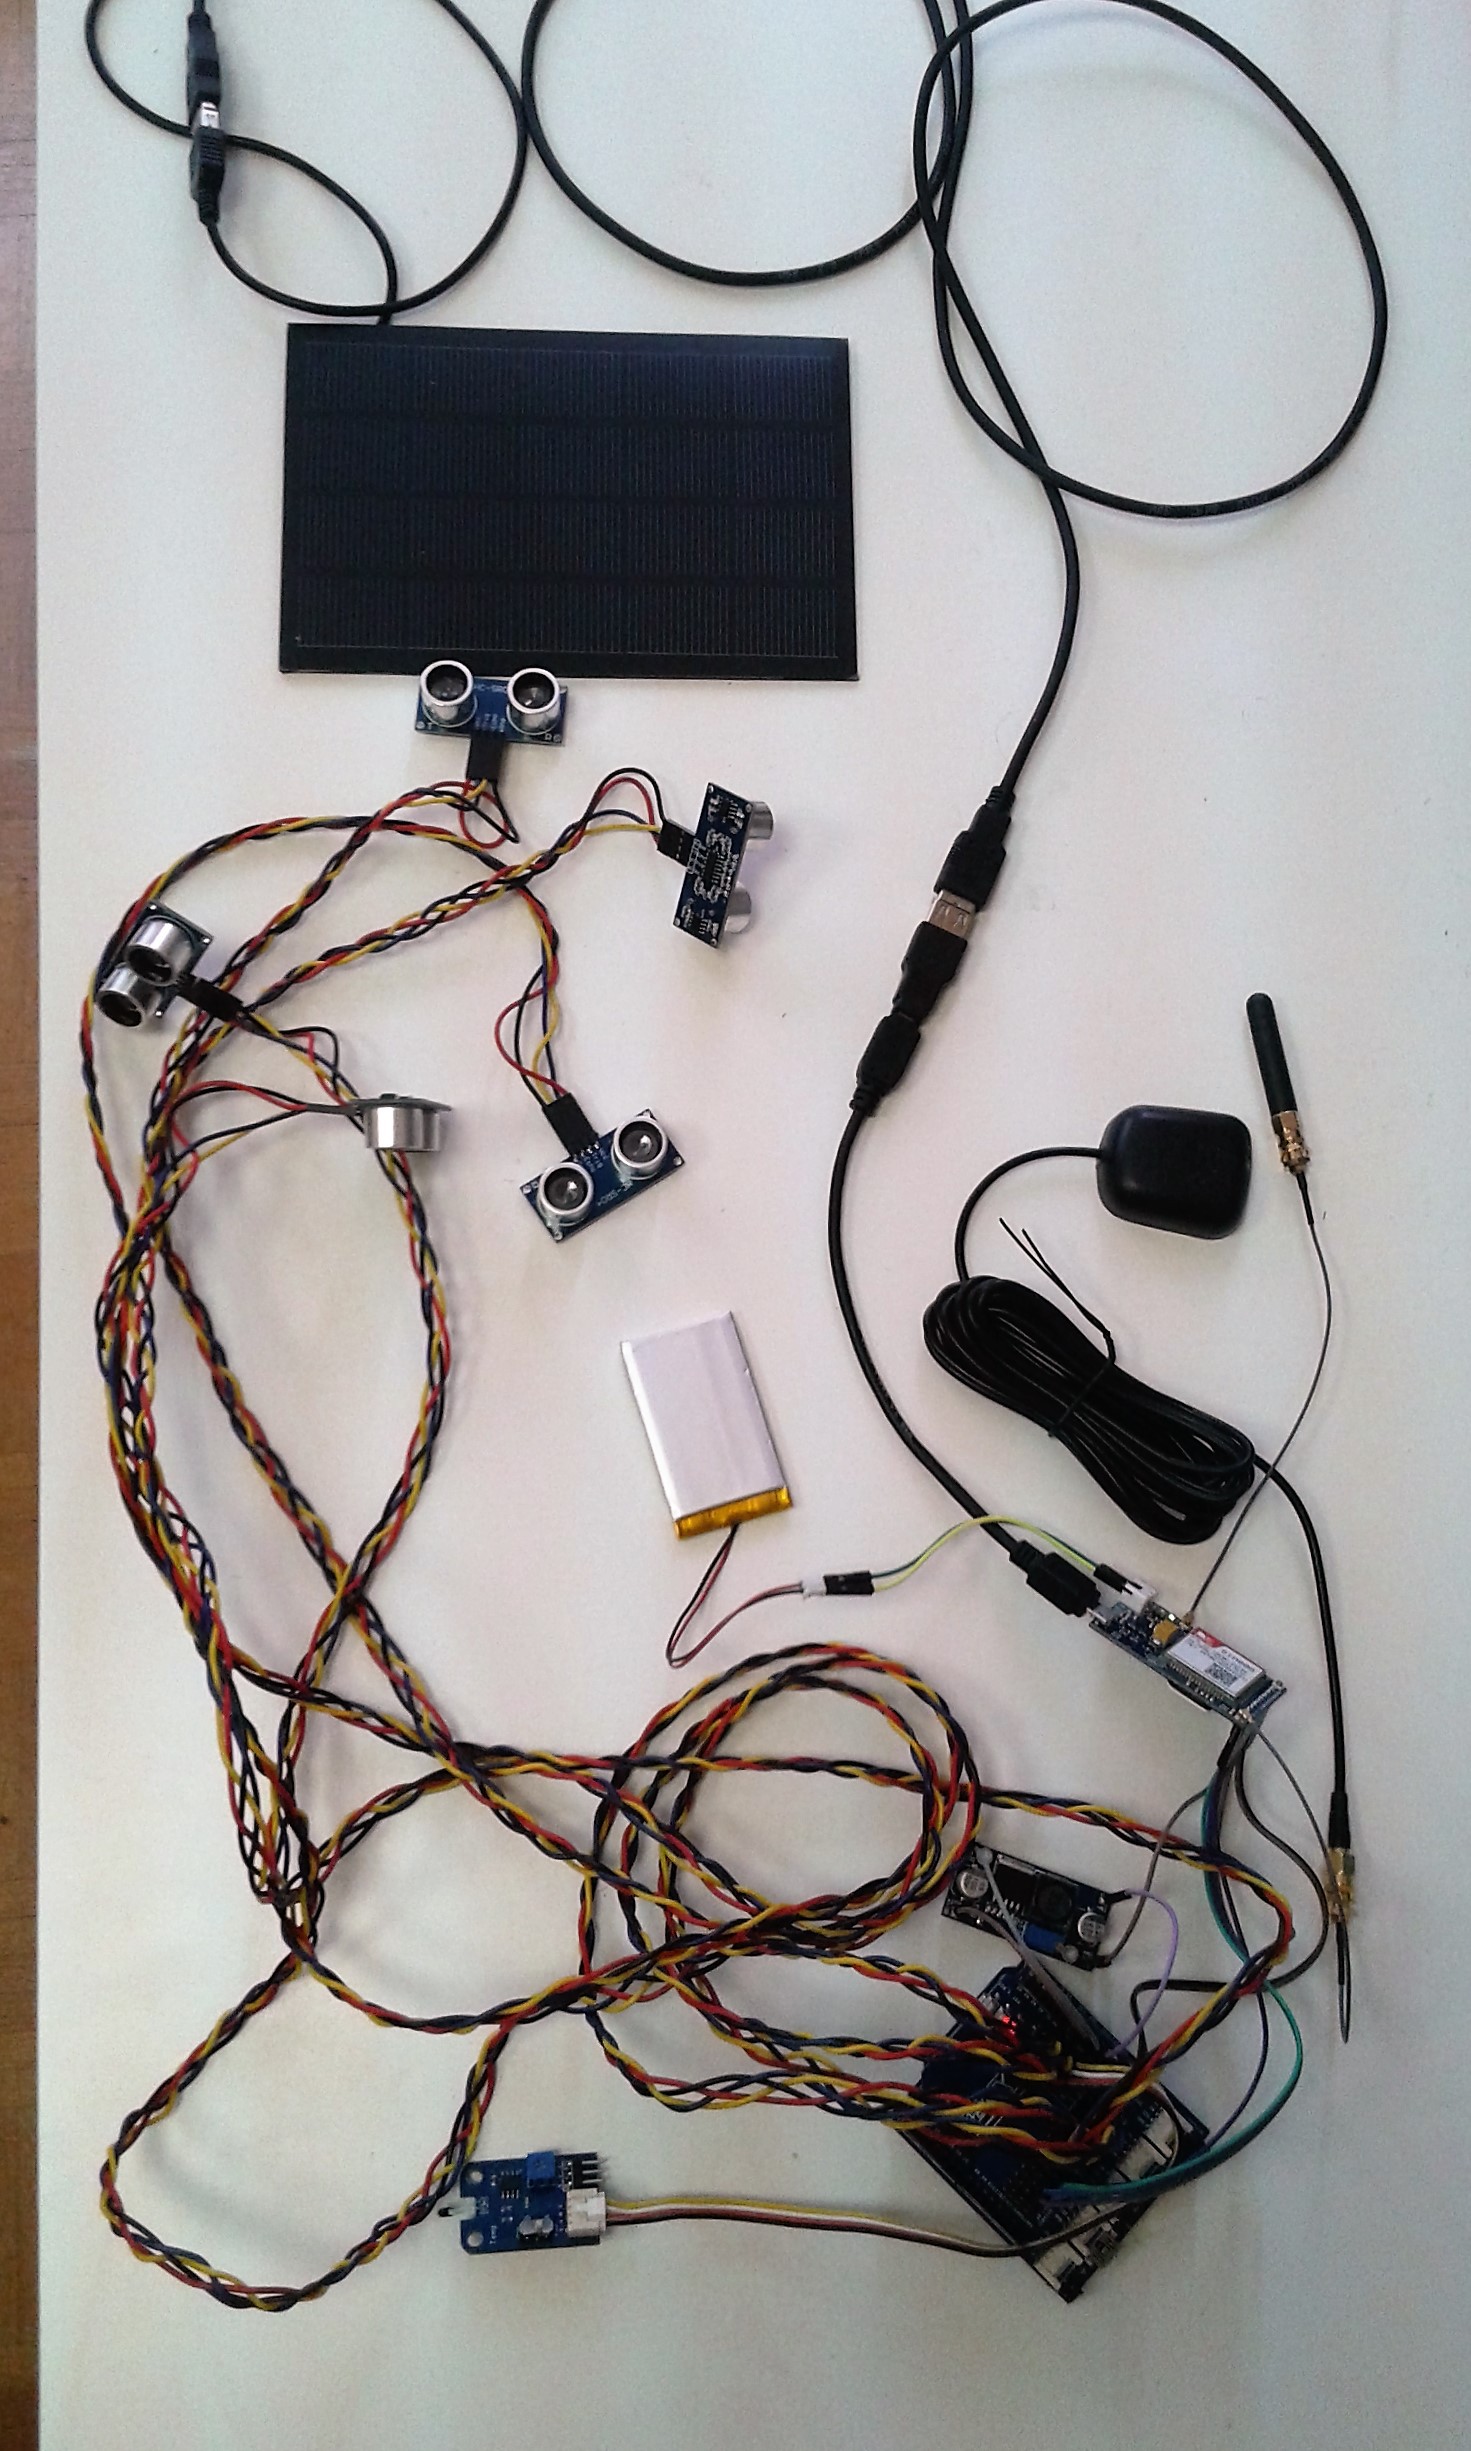
Lots of wires
08/17/2016 at 11:37 • 0 commentsThe prototype is finally ready for trash. Laid out like this, it looks to me like a ripped-out spinal cord of some cool trash can monster. Bizzare and disturbing. It belongs in the trash.
![]()
From top to bottom:
1. Solar panel connected to battery charger on sim808 breakout via USB.
2. 5 ultrasonic distance sensors connected to the Iteaduino via hand-braided cables. I braided those myself and it was the best hour of my life. Everyone should try braiding cables once in their lifetime.
3. GSM and GPS antennae connected to the sim808 breakout.
4. Li-ion battery connected to the sim808 breakout.
5. Sim808 breakout itself, connected via multiple data pins to the Iteaduino, and distributing power from the battery to the step-up transformer.
6. Cute little DC-DC boost converter which powers the Iteaduino.
7. Iteaduino itself, with a convenience sensor shield on top which provides lots of pins for all the connectors.
8. Temperature sensor connected to the Iteaduino.
-
Functional alpha
08/16/2016 at 12:48 • 0 commentsAfter a week of choosing and trying out the hardware, a fully functional prototype is laid out on my work desk. In its current configuration, it contains an Iteaduino (a convenient Arduino UNO clone capable of both 3.3v and 5v logic) with a sensor shield full of carefully hand-braided 4-wire connectors leading to 5 HC-SR04 distance sensors, a temperature sensor and talking to a sim808 via software serial. Iteaduino controls the sim808 via AT commands and some extra pins such as power switch, reset and state signals. The module itself is sitting comfortably on a convenient breakout board by Itead studio which provides a battery charging circuit, antenna and mic connections.
On the power side of things, a li-ion battery is connected to the sim808 breakout to enable charging via a solar panel we have hooked to its micro USB port. To make things not reset, we had to power Iteaduino through its regulator (duh), so the battery also feeds a DC-DC step-up which then powers our Iteaduino safely.