 Shreyasvi Natraj
The microbiological incubator is deployed in research and industry in a wide variety of applications with living organisms. Cell cultures and micro-organisms must be incubated in a controlled atmosphere.
Incubators are necessary equipment for any laboratory conducting cell culture and tissue culture work. They protect cells from changes in temperature, humidity, CO2 and O2.
Examples of applications in the incubator :
- Growing cell cultures
- Reproduction of germ colonies with subsequent germ count in the food industry
- Reproduction of germ colonies and subsequent determination of biochemical oxygen demand (wastewater monitoring)
- Reproduction of micro organisms such as bacteria, fungi, yeast or viruses
- Breeding of insects and hatching of eggs in zoology
- Controlled sample storage
- Growing of crystals/protein crystals
However there are some disadvantages. They include: - It is expensive to buy an incubator. Most of the incubators are highly priced and not affordable to small scale industries. They usually range from Rs.10,000 to Rs.1,00,000. - It requires a lot of skills in order to manage and maintain an incubator.
Aim : In our project, we have made an incubator using thermocol ( Expanded Polystyrene ) which is cheaper, easily accessible, and can be used by anyone.
Construction and Description :
Our model consists of –
- Peltier tiles
- Arduino microcontroller
- 4 Relay module
- Thermocol
- Power supply (SMPS)
- Temperature Sensor
Peltier tile - Thermoelectric coolers operate according to the Peltier effect. The effect creates a temperature difference by transferring heat between two electrical junctions. When the current flows through the junctions of the two conductors, heat is removed at one junction and cooling occurs.
Arduino microcontroller - The Arduino Uno R3 a microcontroller board based on the ATmega328. It has 14 digital input/output pins (of which 6 can be used as PWM outputs), 6 analog inputs, a 16 MHz crystal oscillator, a USB connection, a power jack, an ICSP header, and a reset button. It contains everything needed to support the microcontroller; simply connect it to a computer with a USB cable or power it with a AC-to-DC adapter or battery to get started.
SMPS - A switched-mode power supply is an electronic power supply that incorporates a switching regulator to convert electrical power efficiently.
Relay module - A relay is an electrically operated switch of mains voltage.It means that it can be turned on or off, letting the current to go through or not. Controlling a relay with the Arduino is as simple as controlling an output such as an LED.
In relation to mains voltage, relays have 3 possible connections :
COM: common pin
NO (Normally Open): there is no contact between the common pin and the normally open pin. So, when you trigger the relay, it connects to the COM pin and supply is provided to a load
NC (Normally Closed): there is contact between the common pin and the normally closed pin. There is always connection between the COM and NC pins, even when the relay is turned off. When you trigger the relay, the circuit is opened and there is no supply provided to a load.
Thermocol – The main benefit of using thermocol is that it is inexpensive and it provides high thermal resistance, so it does not allow the heat to escape out. It can withstand temperature in the range of -50 °C to 75 °C.
As shown in the circuit diagram above, we have an SMPS ( i.e; power supply) which is provided with 4 channels having positive and negative terminals. Using...
Read more »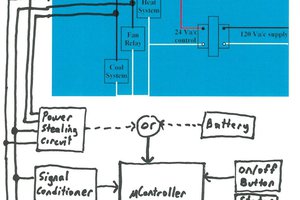
 Quinn
Quinn
 engineerkid1

 Hulk
Hulk