Mike Turvey
-
Going Up!
09/20/2016 at 15:22 • 0 commentsAs my daughter began to meaningfully use her arms with the arm floats, another issue arose. The flats just didn't lift her arms high enough. She could lift her arms 6-8 inches, but the arm floats stopped providing additional support at that point-- and they even prevented her from lifting her arms higher. The obvious solution was just to make the z-rods longer, which would provide for more z axis travel (i.e. arms can go higher).
![]()
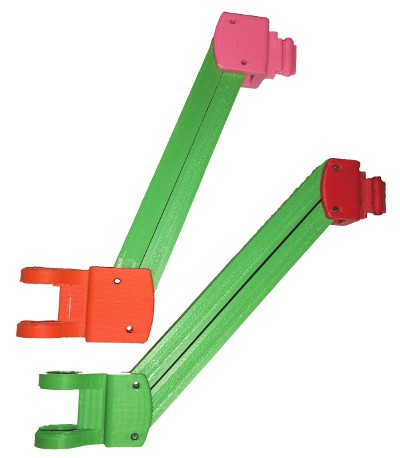
The old design is shown (bottom) along with the new design (top). It's a relatively simple change to offset the hinge points for the two rods. There's a trade-off being made here. While the highest vertical displacement is increased here significantly (which is what we want), we trade that for a restriction in lower vertical displacement. You just can't move your arm down as much after this change. But, as it turns out, that's no big deal. In actual use, we never came close to the lower limit, but we were constantly running into the upper limit. So it's a good trade-off to make.
-
Things Break
09/19/2016 at 06:06 • 0 commentsOver the last few years, these arm floats have broken more times than I can count. Whenever a part breaks, I try and understand why it broke, and redesign it to make it better. That's definitely a huge advantage to the 3D printer for something like this. It's so easy to make a small modification and spit out a new design.
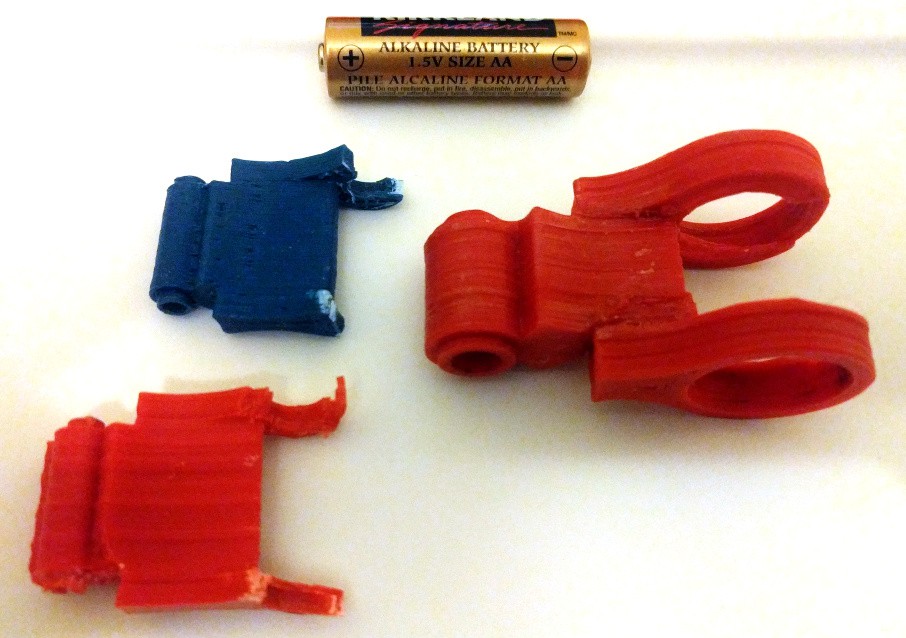
I originally used the same "small" chain design for both the shoulder joint and the elbow. It became quickly apparent that the relatively small plastic pieces simply were not suited to the extreme forces put on the shoulder joint-- with all of the weight cantilevered beyond them.
![]()
Here, on the left, you can see a couple of the older small chain pieces that were previously used for the shoulder joint. They've both catastrophically failed where they hold onto the small bearing. On the right, you can see the newer "big" chain that uses 608Z bearings. These are *much* stronger and can take quite a bit of abuse. But, they're definitely not immune to breakage. As the rest of the arm floats have been upgraded, I've started to see more failures in this part, as well.
![]()
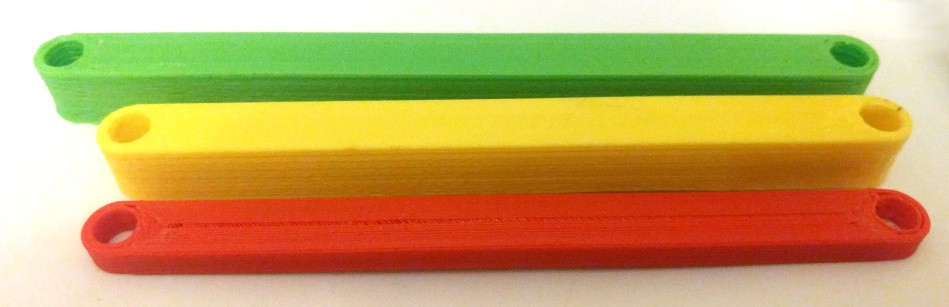
The "z-rods" are also an area that needed some significant improvement. You can see an early version of the rod on the bottom (in red). While the bulk of the load these rods face is vertical, there is also a significant load imposed by the rubber bands that tends to bend and twist these rods. The early z-rods I was using would tend to deflect noticeably, which caused a number of problems. To better handle these loads, I made these much thicker, as you can see in the yellow part in the middle. It's almost three times as thick, and any flex caused by the stresses of the rubber bands is negligible. On the upper image, you can see that the current z-rod is now longer as well. This is mainly to improve the amount of vertical travel in the arm floats.
-
Motion
09/15/2016 at 07:48 • 0 commentsIn the animation below, you can see the motion of the arm floats. It is exceptionally smooth and takes practically no effort at all to move. All joints use bearings to keep friction to an absolute minimum. Rubber bands are used to adjust the force with which the arm is elevated. Ideally, you reach an approximately neutral buoyancy. One of the biggest challenges in this project has been making the entire structure strong enough to not break. While they're plenty strong for my daughter at this point, the various folks who work with her and move her around have proven very talented at identifying the weakest points in the design.
![]()
Antigravity Arm Floats
Wheelchair mounted orthoses to enable someone with very low muscle tone to move her arms without the encumbrances of gravity