 Ahmed Azouz
Step 1: Design
In my opinion the best way to make a life scale product you have Imagine it first, and I designed the controller first on Google SketchUpbecause its a very effective tool to draw your innovation.
Step 2: Tools and Materials

Handtools:
- Soldering iron
- ROTARY TOOL
- Knife - Sandpaper or other sanding equipment
- Screwdriver
- Pliers
Materials:
- Screws
- MDF 4mm 30cm * 21cm
- Male-Female 10cm dupont cables
- Male-Female 10cm dupont cables
- Male-Male 10cm dupont cables
- Shrink Cables
Circuit Components:
- 10k resistor
- LED lights
- Toggle switch 3 pin
- Stop switch
- Joystick Module
- Potentiometer
- On/off switch
- Active Buzzer
- Arduino Uno
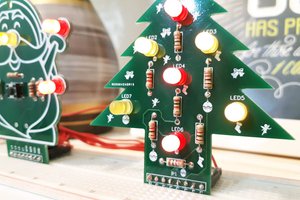
Step 3: Making the Board

I print out the shape on A4 paper, then I cut it out from MDF board as shown. and to give it good look I just cover the wood with printed paper.
Step 4: Installing the Circuit

In the first beginning I started with led lights that works as an indicator while using the controller, then I fixed the circuit components as shown.
 Dixon Selvan
 Silícios Lab