 Sarah Petkus
The PULSE PACK is a wearable computing platform that orchestrates a collection of body augments, all part of the SHE BON project. These augments are individual systems that sense and indicate when the user's body enters an "excited" state. Each system is designed for a particular region of the human body and uses various types of sensors to detect bio-data as input, and then communicate the user's status with electronic and mechanical devices as output.
You can think of the PULSE PACK as a wearable breakout board. Its primary function is to house the master circuit board, called the "Pulse". This heart-shaped Pulse board sends power and data over a network of cables, much like a heart pumping blood to distant organs through a series of veins.
Why would I have the platform which senses and triggers the indication of my arousal be a BIG. TRANSPARENT. PULSING. HEART-DRUM?......Well... it might be a metaphor. ;)

I am defining the cyber-punk reality I wish I lived in by creating my own works of technology and art. Also, there is something satisfying about a wearable that routs wires all over my fleshy bits. Bottom line, this is another meditation in the book of Sarah: body data as a means to communicate the intimate and the unseen.

In this build log I will outline how I crafted a transparent *stitch free* backpack, from vinyl and a 3D printed frame which I designed in Fusion360. This log focuses primarily on the enclosure. I will publish more about the circuit board and how the system works in a separate post!
( This post will outline the build of the *yellow* heart... since I was bad and forgot to take pictures while assembling the *red* one... <3 )

THE VINYL
So, all it takes to create a heart backpack is (3) pieces of vinyl. (2) identical heart shapes for the top and bottom vinyl, and (1) longer strip that will act as the outer wall and body vinyl:
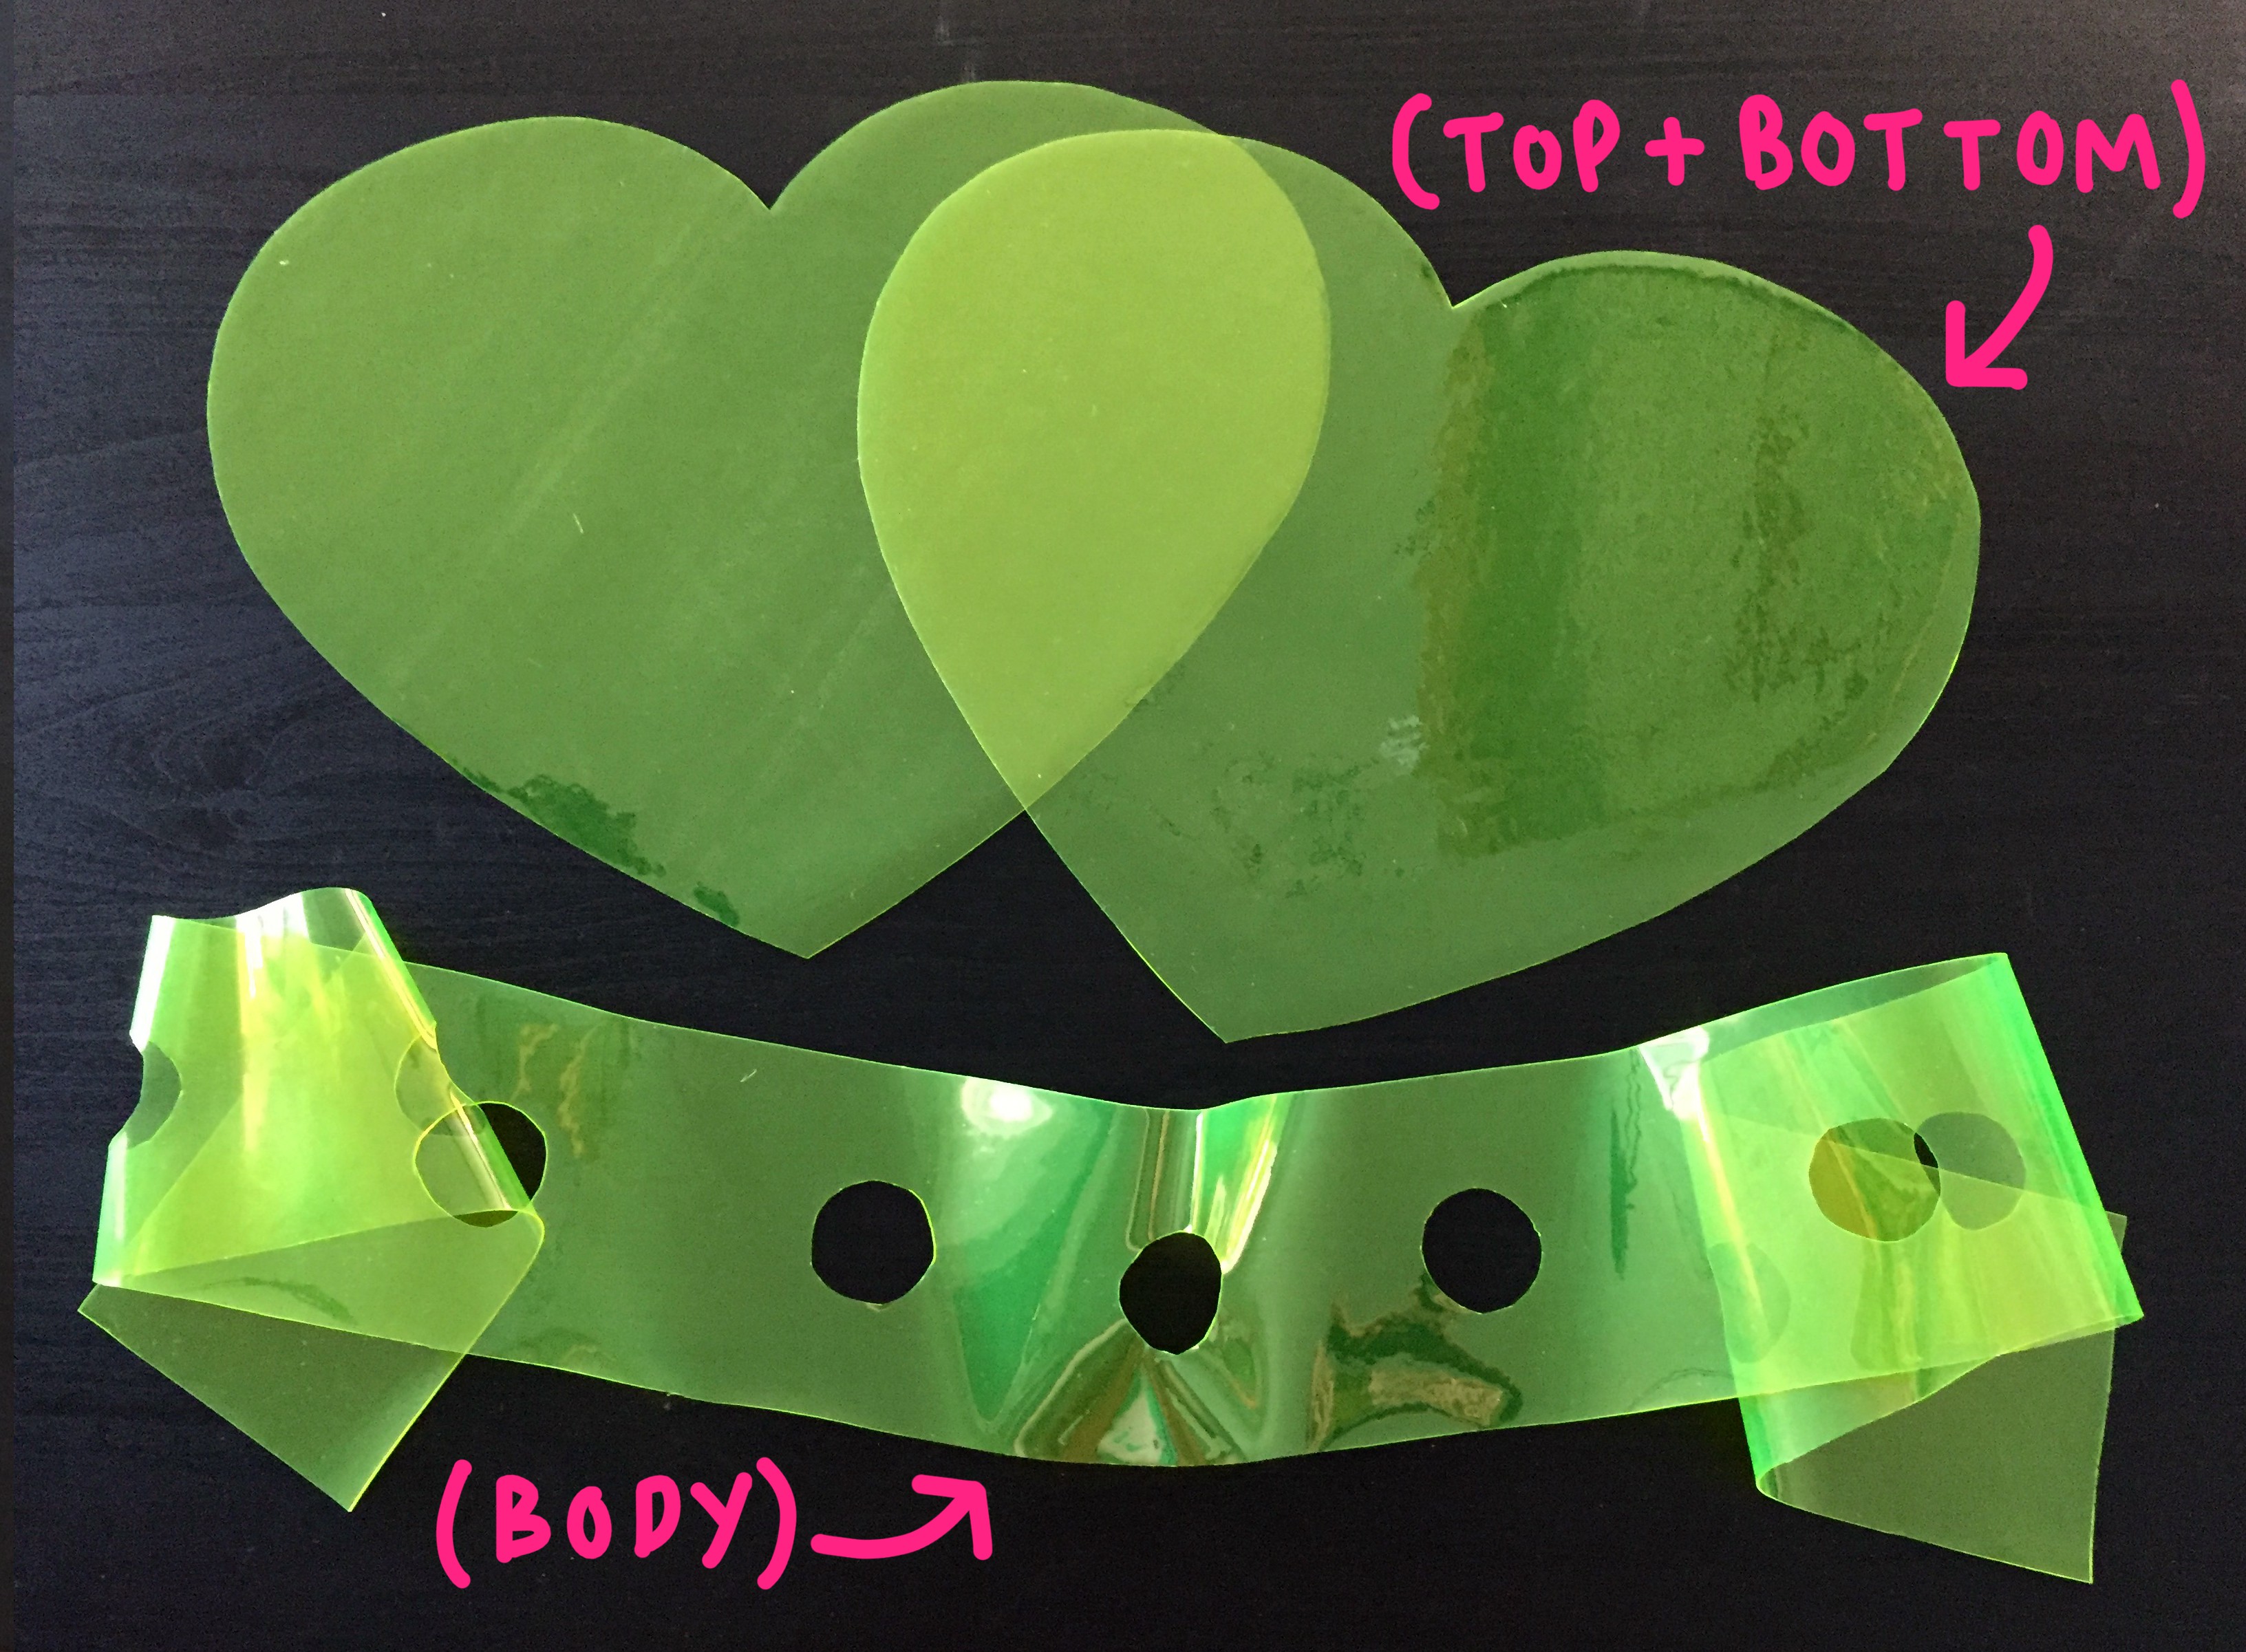
notice: The outer wall piece has some holes in it! These are where the "bulkhead" adaptors mount along the edge of the backpack!
These vinyl pieces mount to the 3D printed frame with plastic rivets which thread through a series of small corresponding holes on the plastic and vinyl. I printed a paper template from a dxf I exported straight from fusion360 to ensure everything was precise:

I used a punch to poke the tiny 2.4mm "rivet holes" and the 4mm "hardware holes" around the edges of each piece:

THE MOUNTING PLATE
This is technically still part of the primary backpack body, but its function has more to do with coupling to the PCB mounted in the center and the harness that's worn by the user. So basically the function of these three parts are as follows:
- back plate: couples to the harness
- adaptor plate: couples to the backpack
- front plate: couples to the PCB

...but Sarah... why does there have to be three separate pieces? Would it be easier if they were design as just one?
-Since all of these pieces bolt onto their respective assemblies with 3mm hardware, layering them this way facilitates in capturing countersunk nuts in between:

back...

The extra top and bottom piece help to capture all of this vital hardware in place and prevent it from falling out when I wish to bolt onto the mounting plate later on

This happily joined (3) piece assembly can be directly mounted onto from the back and the front!
THE PRIMARY ENCLOSURE
As mentioned, the primary enclosure is "stitch free". I designed it this way because I didn't want to attempt hand sewing vinyl fabric at 90 degree angles in less-than-straight lines. To connect the seams of my vinyl pieces, I plastic welded my vinyl to the a 3D printed frame with small rivets made from raw 3D printer filament.
Don't get me wrong, this method likely wasn't any less tedious than hand sewing with a punch and thread... BUT, it felt like I had more control during the assembly process. Once everything was in one piece, the hard frame structure helped define the backpack's overall shape.
The vinyl attaches to the pieces of the frame with tiny plastic rivets to complete (3) separate parts: the top heart,the bottom heart, and the body.
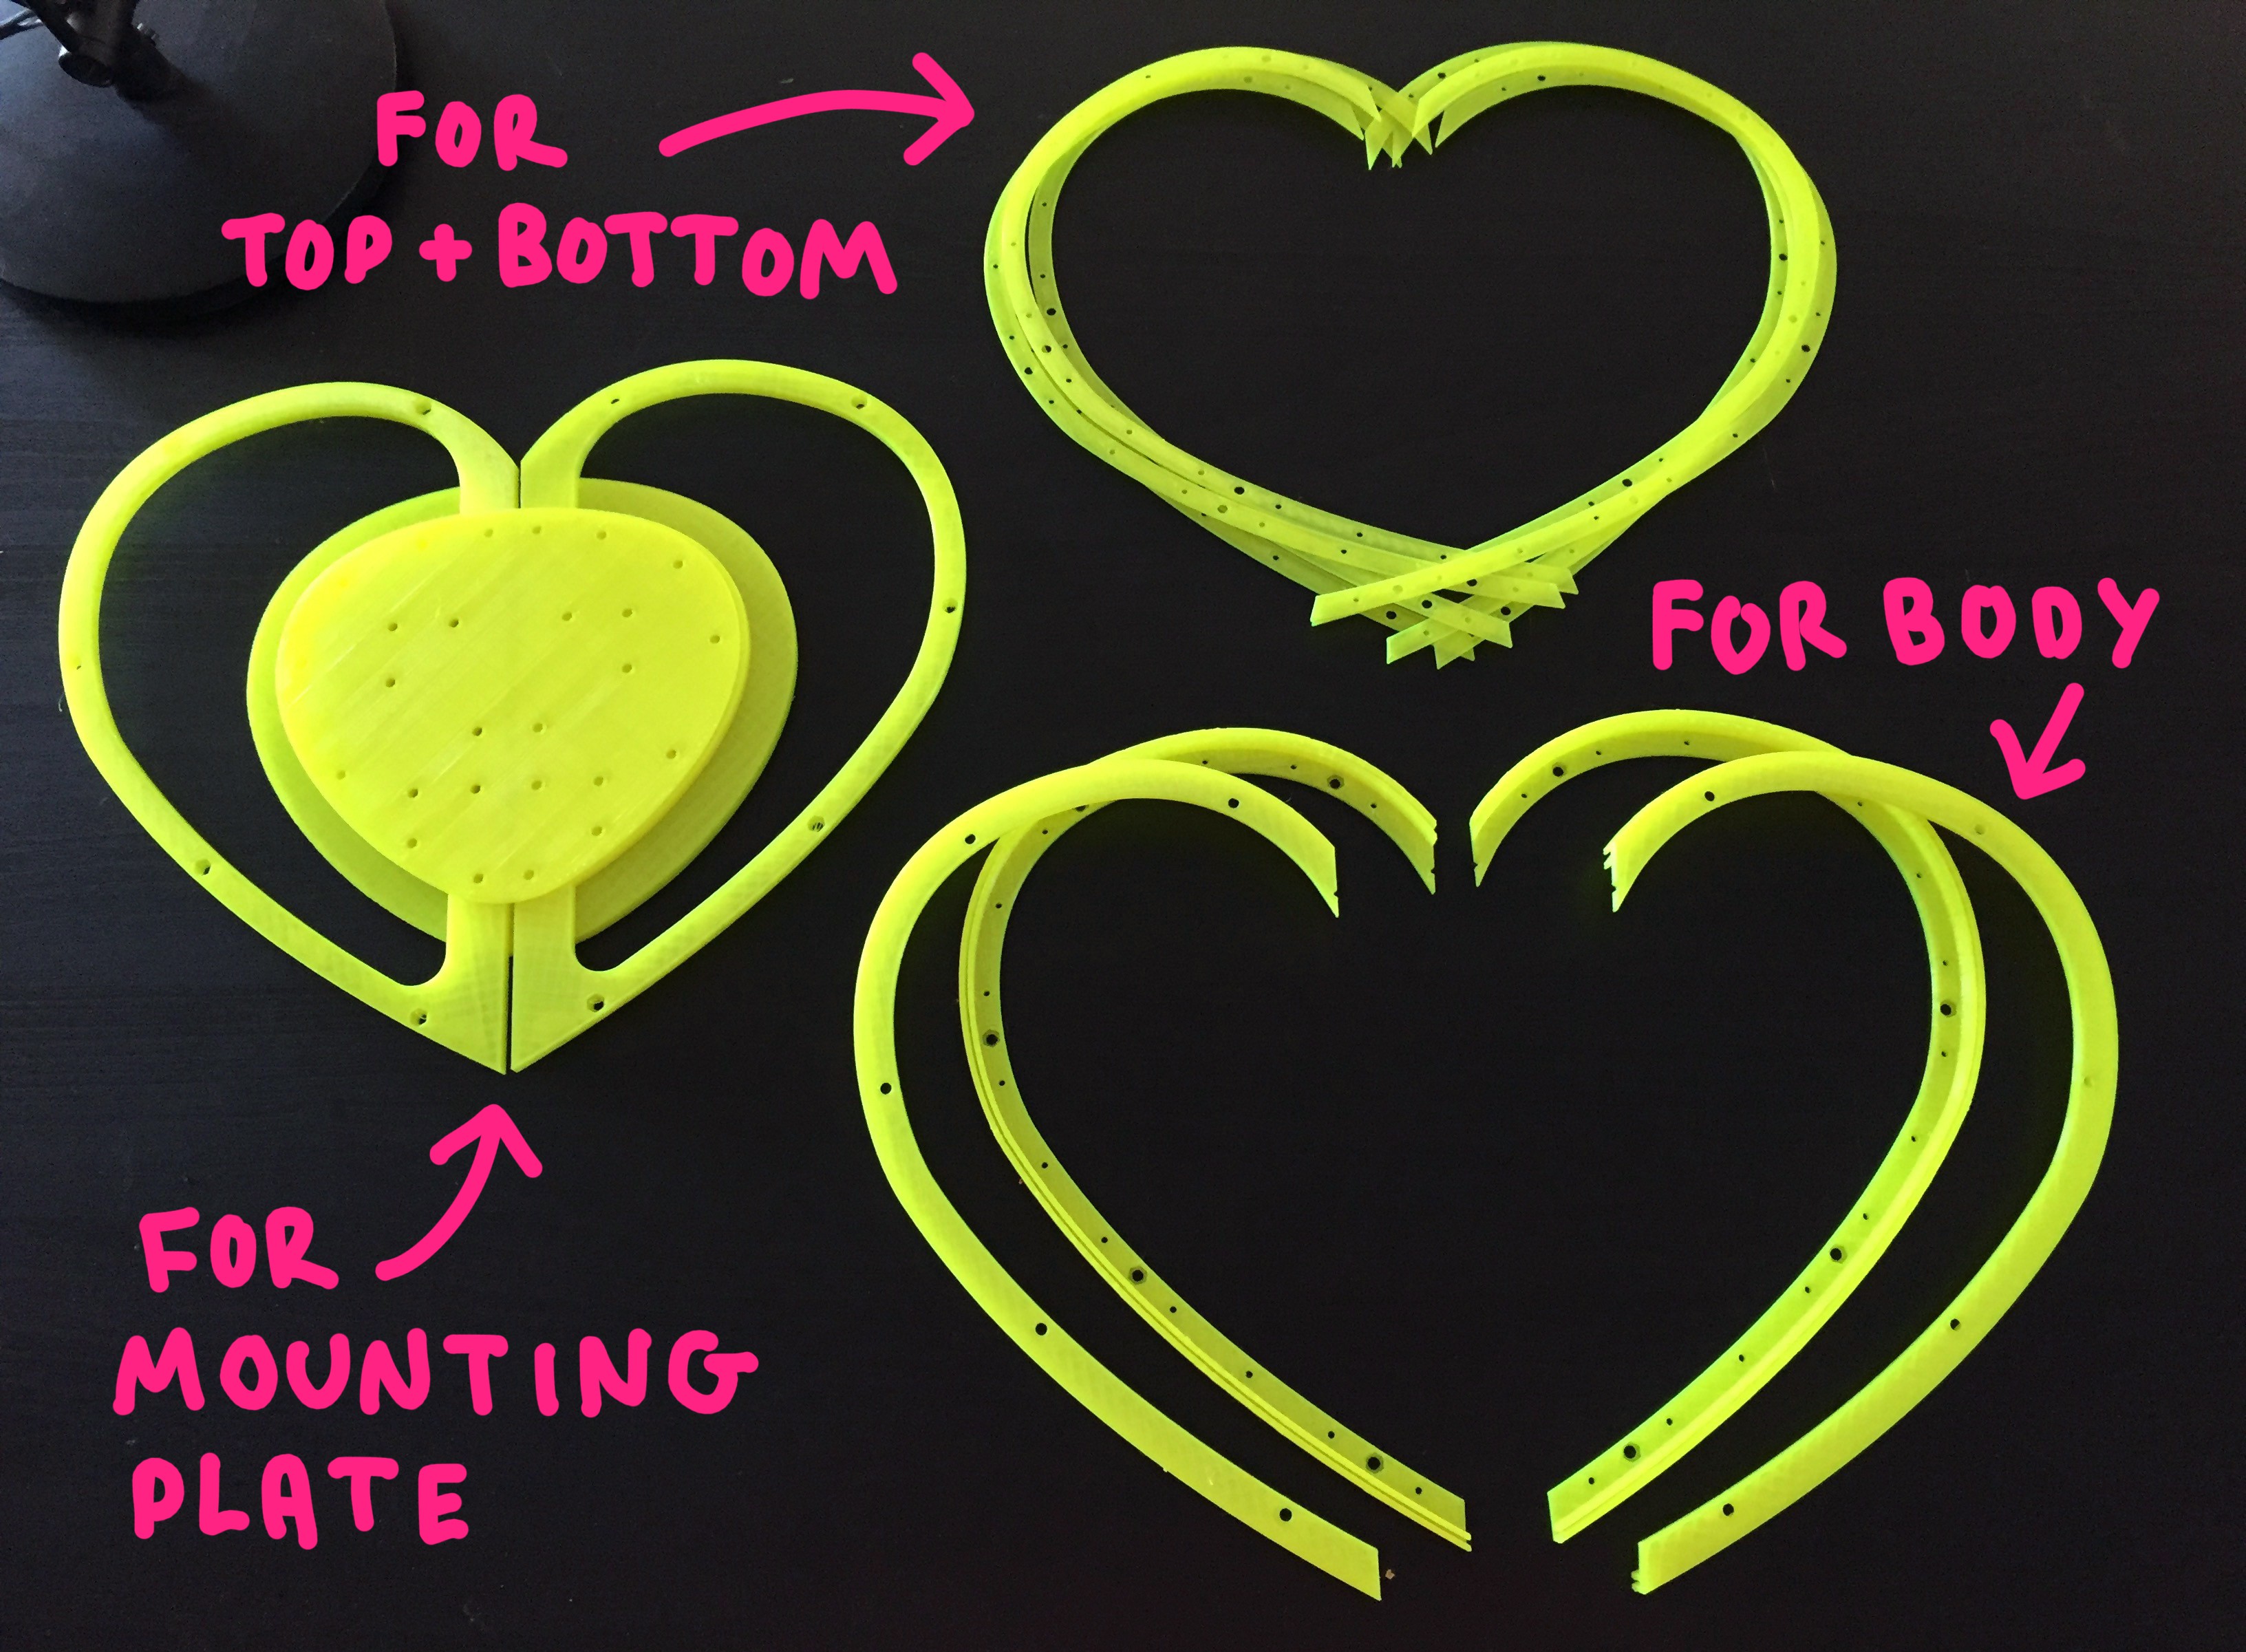
Four pieces total make up the body frame:
- (1) body_front_left
- (1) body_front_right
- (1) body_back_left
- (1) body_back_right

The parts for the body are kinda fancy because they have a channel sticking up at a 90 degree angle which is meant to receive the long strip of vinyl used for the outer wall of the backpack:

There are similarly (4) smaller pieces for the top and bottom frame, making for (8) pieces total:
- (4) topBottom_left
- (4) topBottom_right

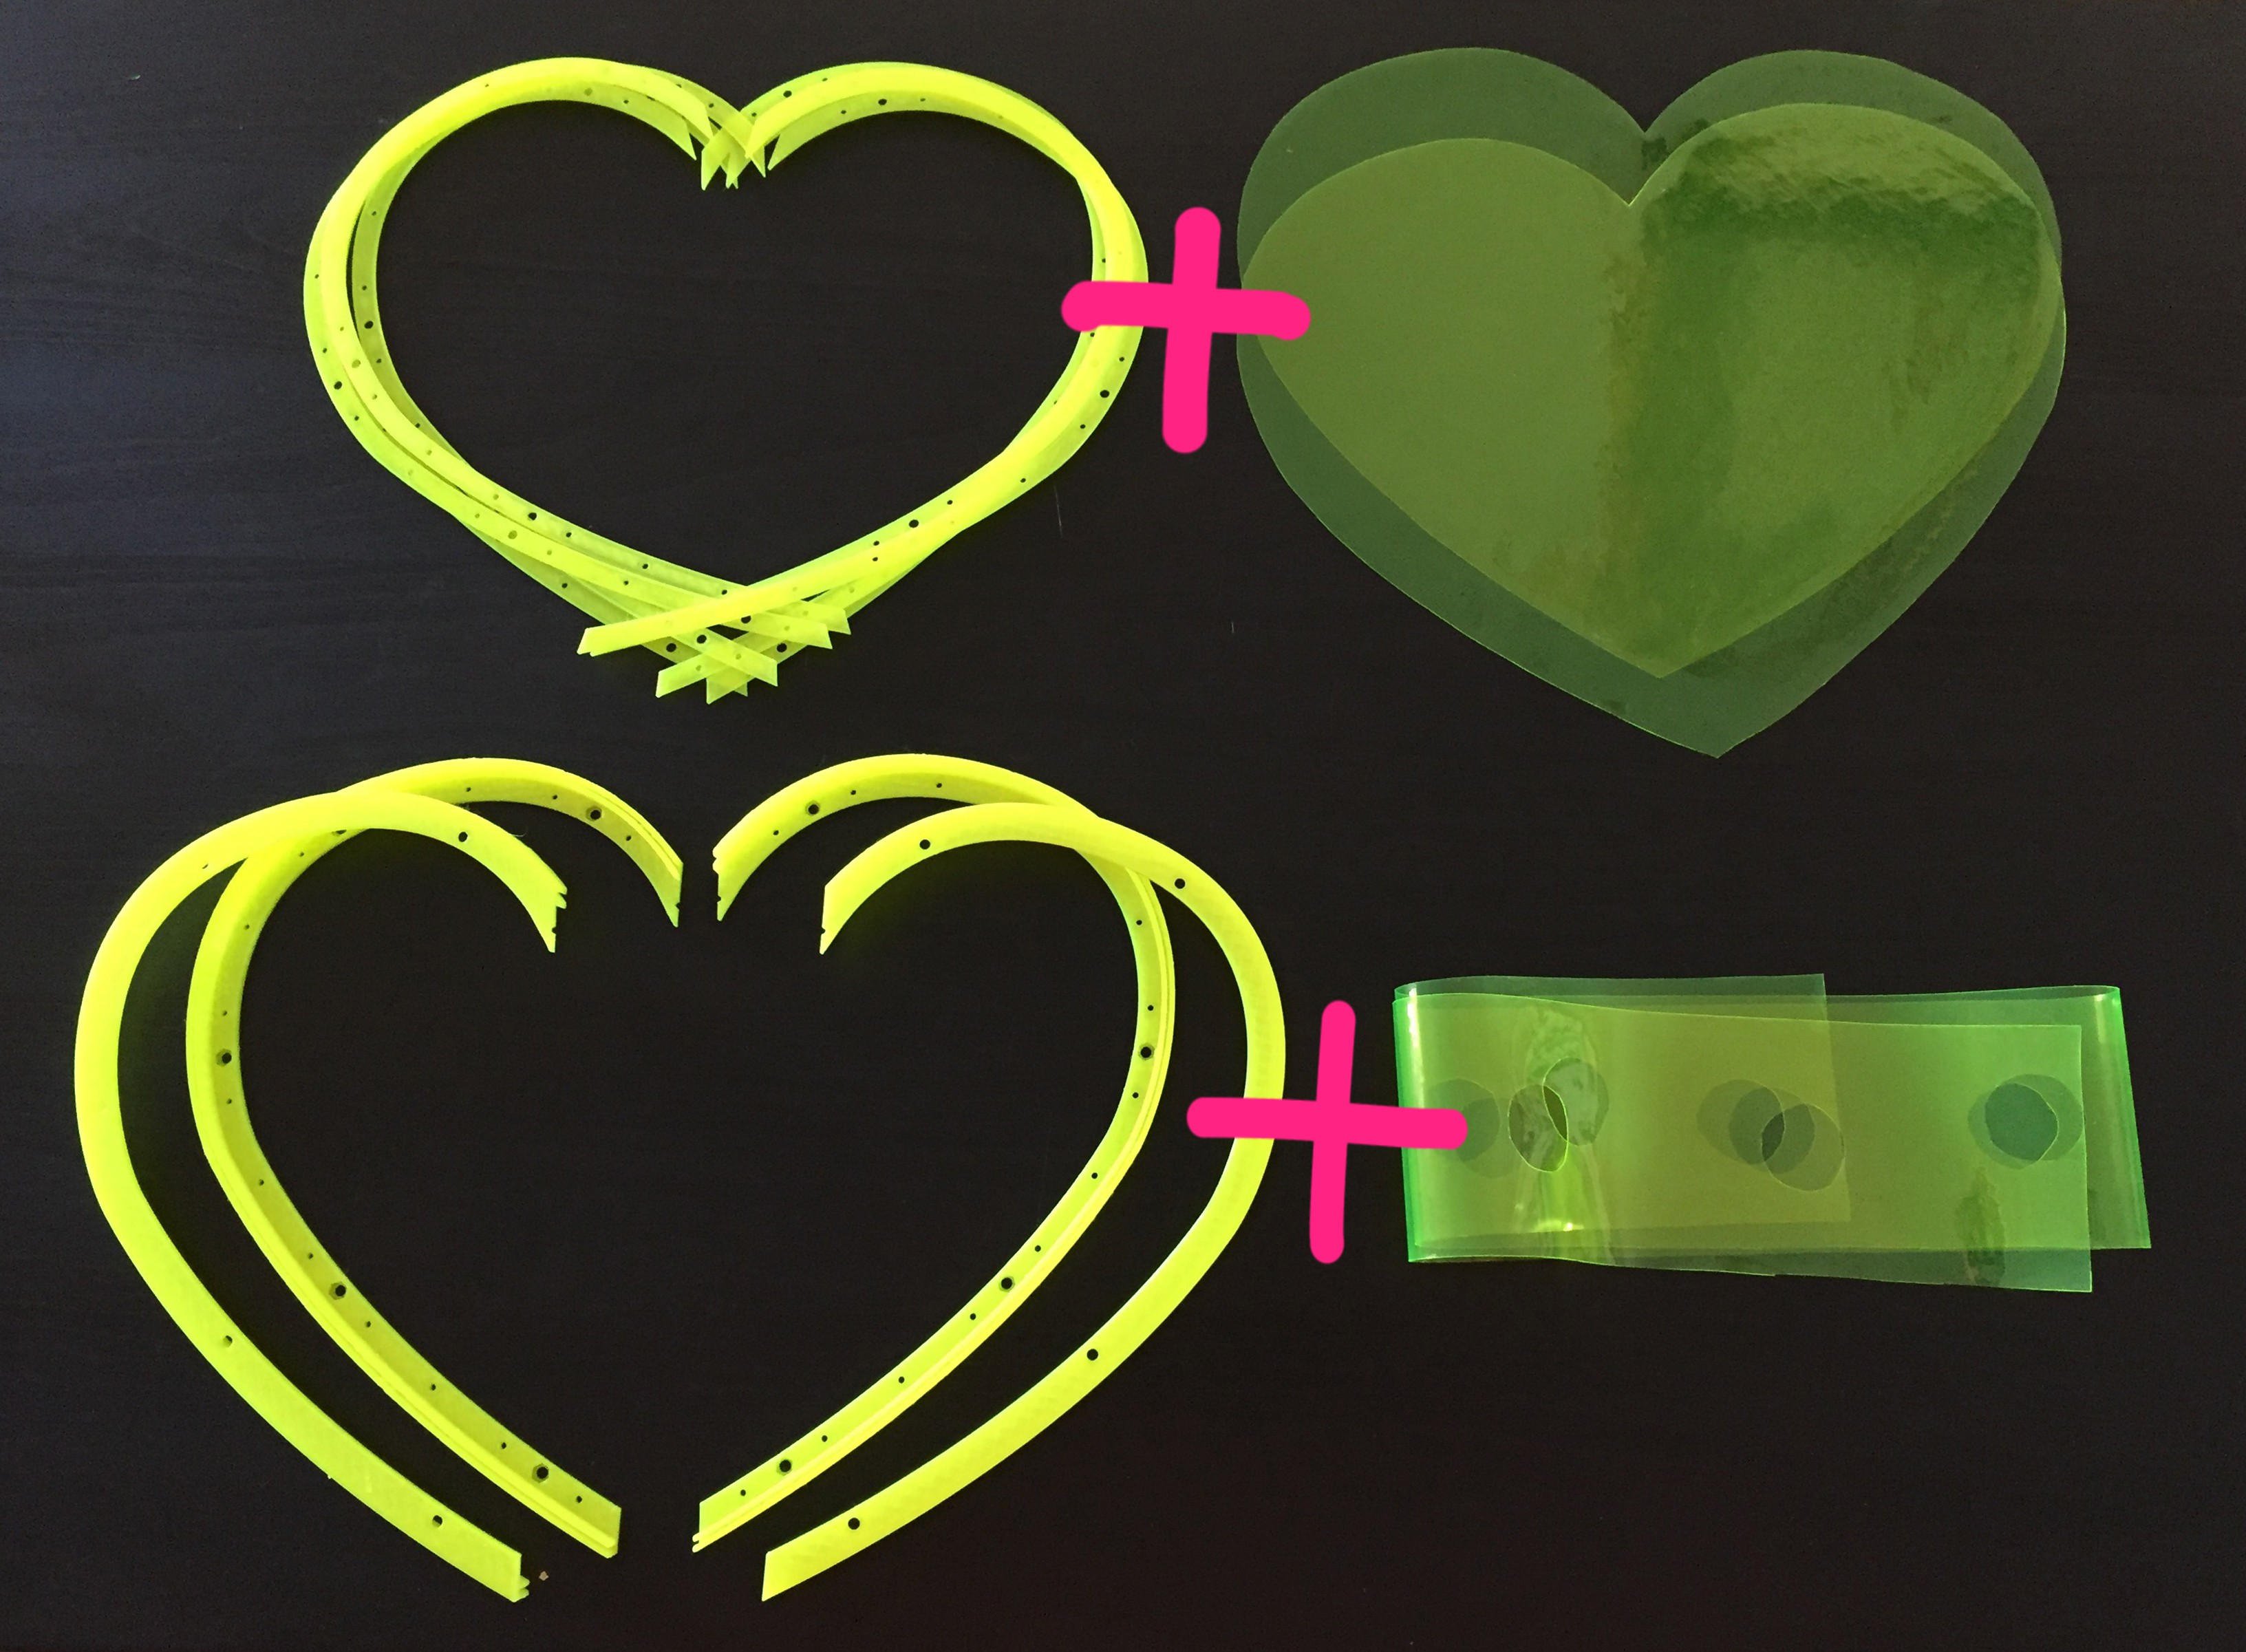
The body vinylgoes with the body framepieces, and the top and bottom vinylpieces mount to the top and bottom framepieces:
PLASTIC RIVETS + HARDWARE
The plastic riveting technique is simple. I cut many 7-10mm pieces of raw 3D printer filament, and threaded them through the corresponding holes of the vinyl and frame, melting a cap on each end to hold it in place. (this is more or less sewing but with plastic).
To prepare the rivets, I cut pieces until I was numb inside:

...I then used my soldering iron on low heat (~280 F) to melt a cap on one end:

I decided to weld the top and bottom pieces of the enclosure together first (since they're a bit easier to do). There are (6) pieces total for each the top and the bottom. They make up two halves of two frames which sandwich the vinyl in between them like two slices of bread. Two smaller joint pieces connect the halves in the middle (because I couldn't fit each frame as a whole on the printer bed!)
I used some 3mm hardware in the larger holes to temporarily hold everything in place while I placed my rivets:

The holes in the frame lined up with the holes in the vinyl! success!:

The smaller holes are begging to be skewered by those rivets!:

I pushed two or three in at a time, and then used my soldering iron to melt and flatten out the opposite end. It's important to keep the cap semi-flush with the frame as to keep everything pressed together tightly.
The steps are the same for both the top and bottom parts of the enclosure.
Lastly, I had to repeat a similar process with the body of the heart enclosure! This involves the meatier frame pieces and the remaining long strip of vinyl with the large holes along the center:

This is slightly trickier than the alignment of the top and bottom, because the long "side wall" piece of vinyl must seat in a long slot that sticks up off the frame at a 90 degree angle:

The length of the vinyl begins in the top "pinch" of the heart shape, runs along the whole diameter of the backpack and then terminates in the same location on the opposite side:

Similarly, there are a series of smaller holes along the frame that line up with the hole in the vinyl... and they want the same treatment:

It's much easier to get a soldering iron to the rivets if they are threaded from the inside of the heart and poking out as seen below:

Once all of those sharp spikes bits are capped off... I had to repeat the same song and dance with the top pieces. It's about as tricky to slot the upper lip of the vinyl into the channel of the frame, so I had to be patient!

Once plastic welded together, the middle of my enclosure was complete (mostly). I now had two frames attached to the outer wall of the enclosure, like an accordion:

Once the plastic welding of the top heart,the bottom heart, and the bodyis complete; the next step is to combine the three fully assembled parts into one. I designed some clamp-like bracketsto do the job!
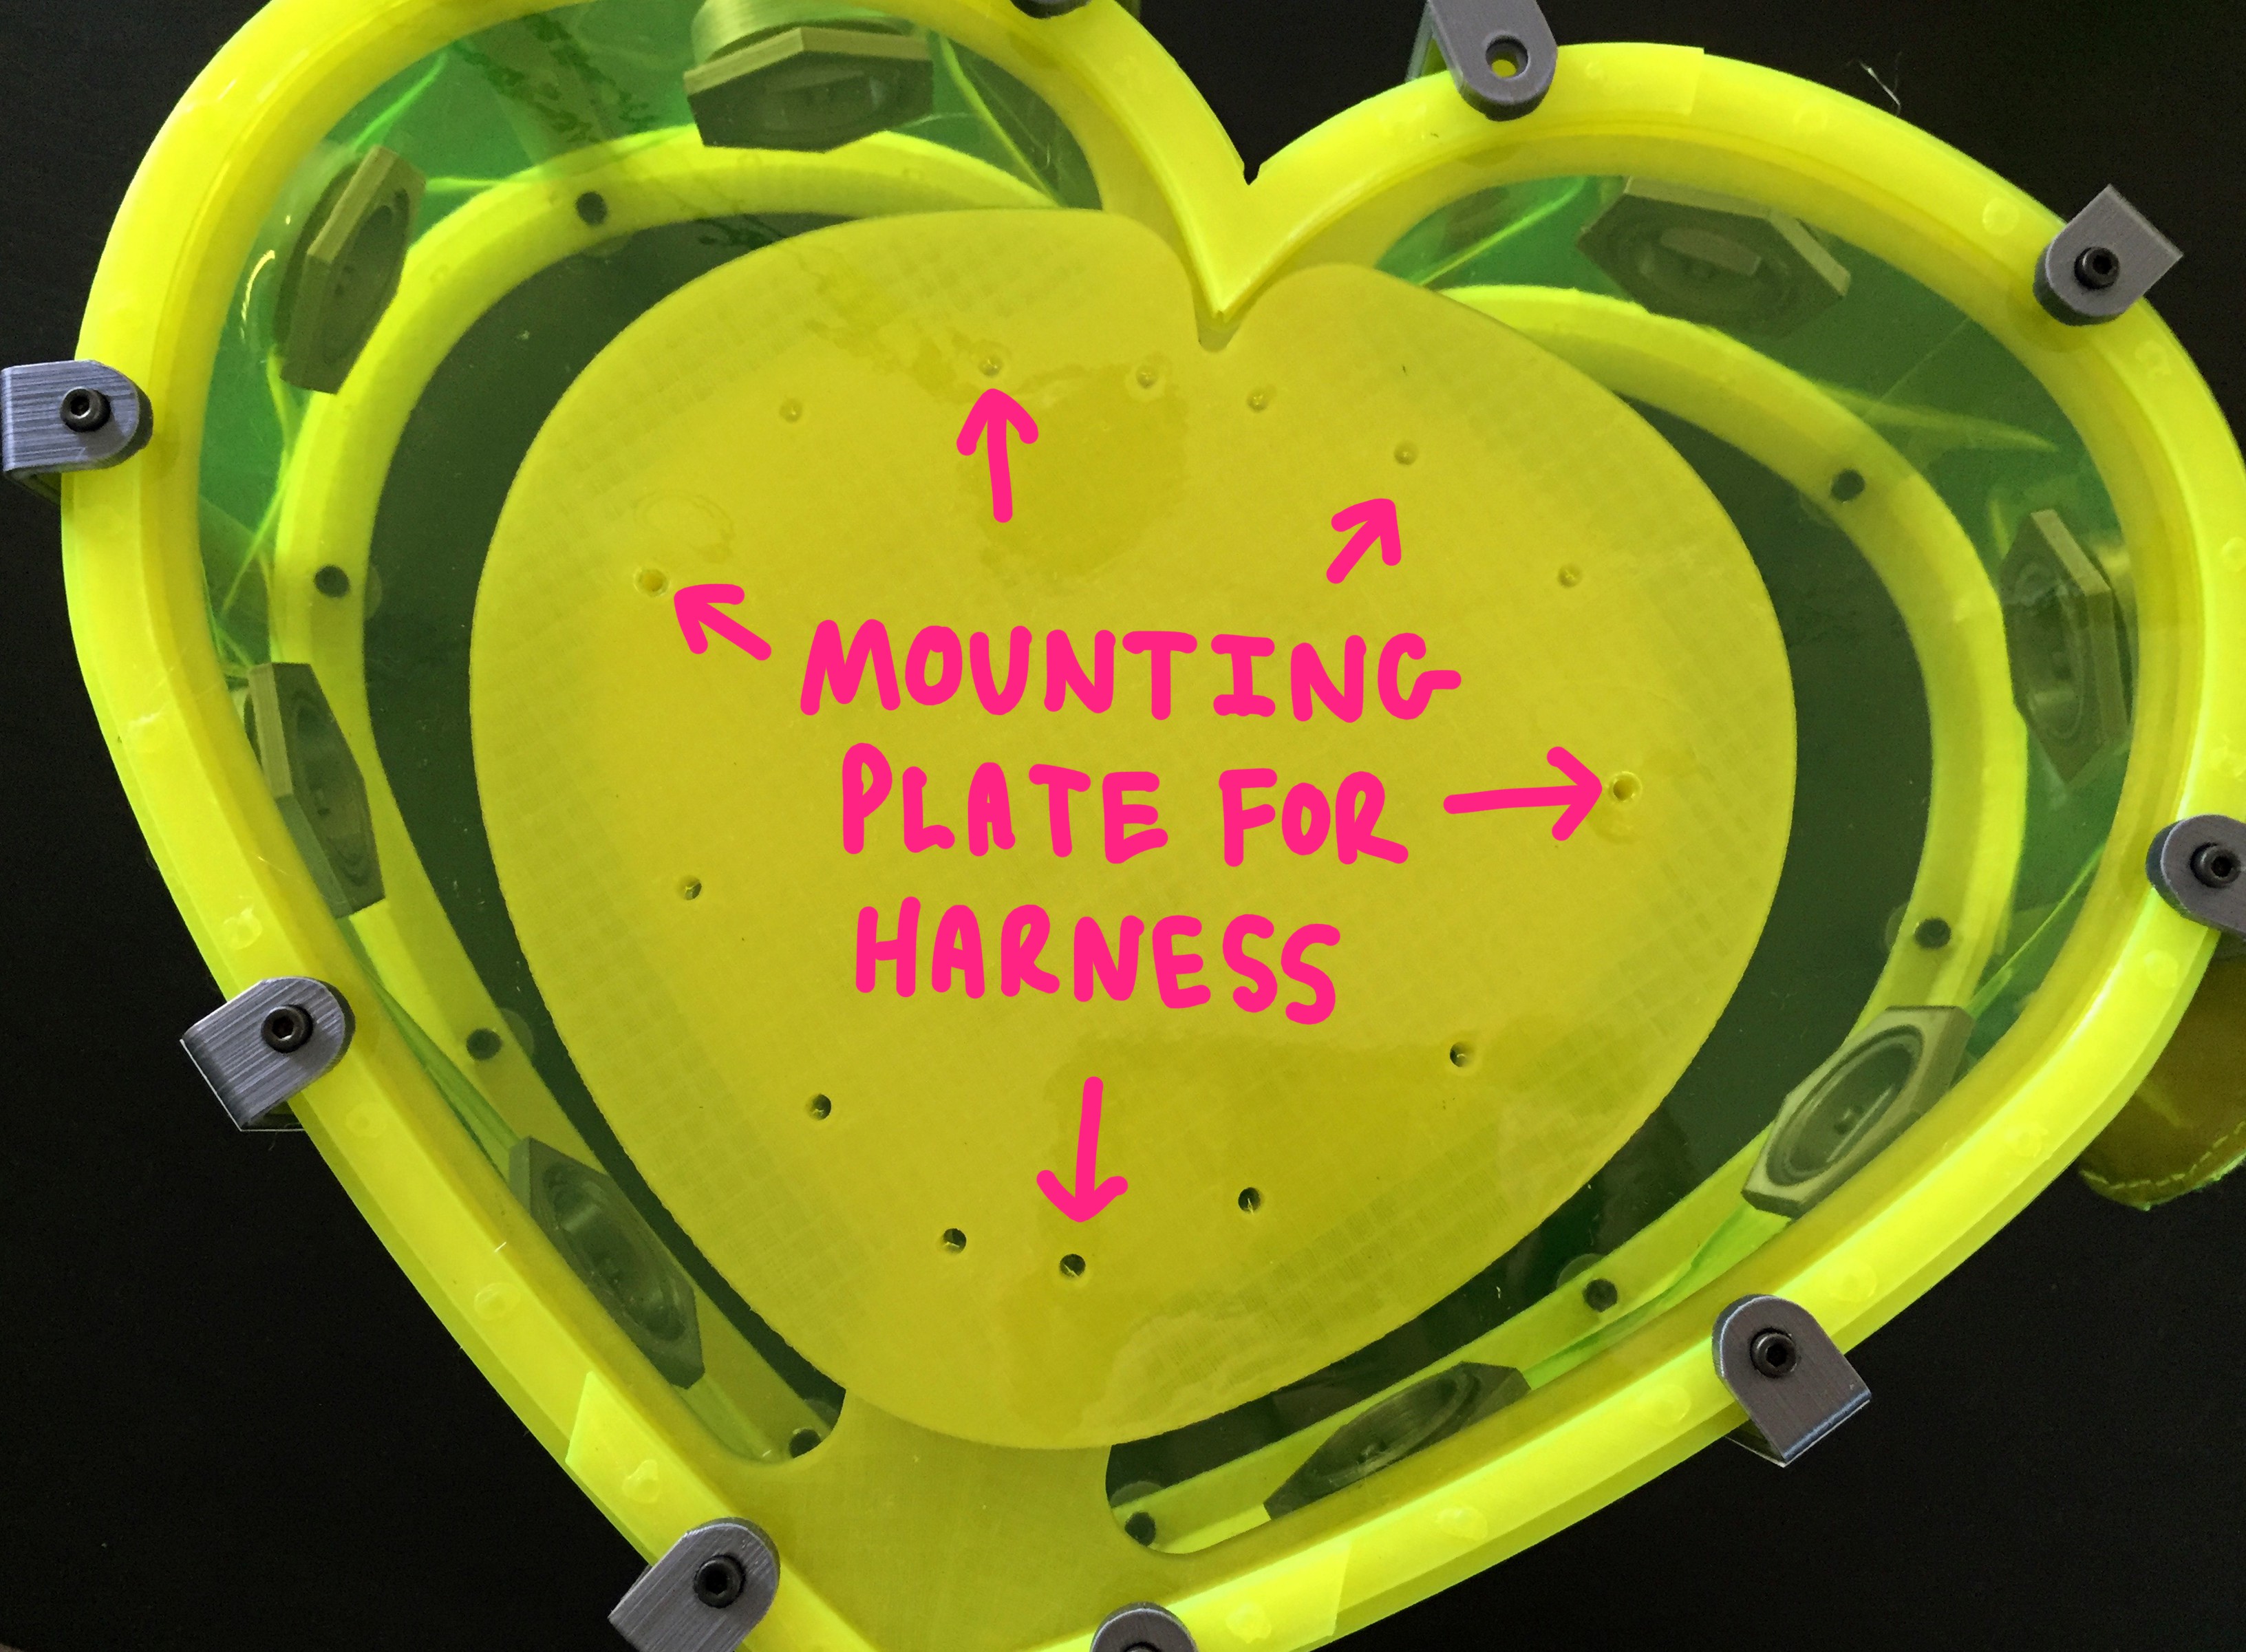
Before adding the structural brackets, I needed to insert the mounting plate! This is super important, as everything critical mounts to this one piece:

Once guided inside, the mounting plate screws into the bottom frame pieces from the back...

This is what the assembly looks like once the mounting plate is in its proper position:

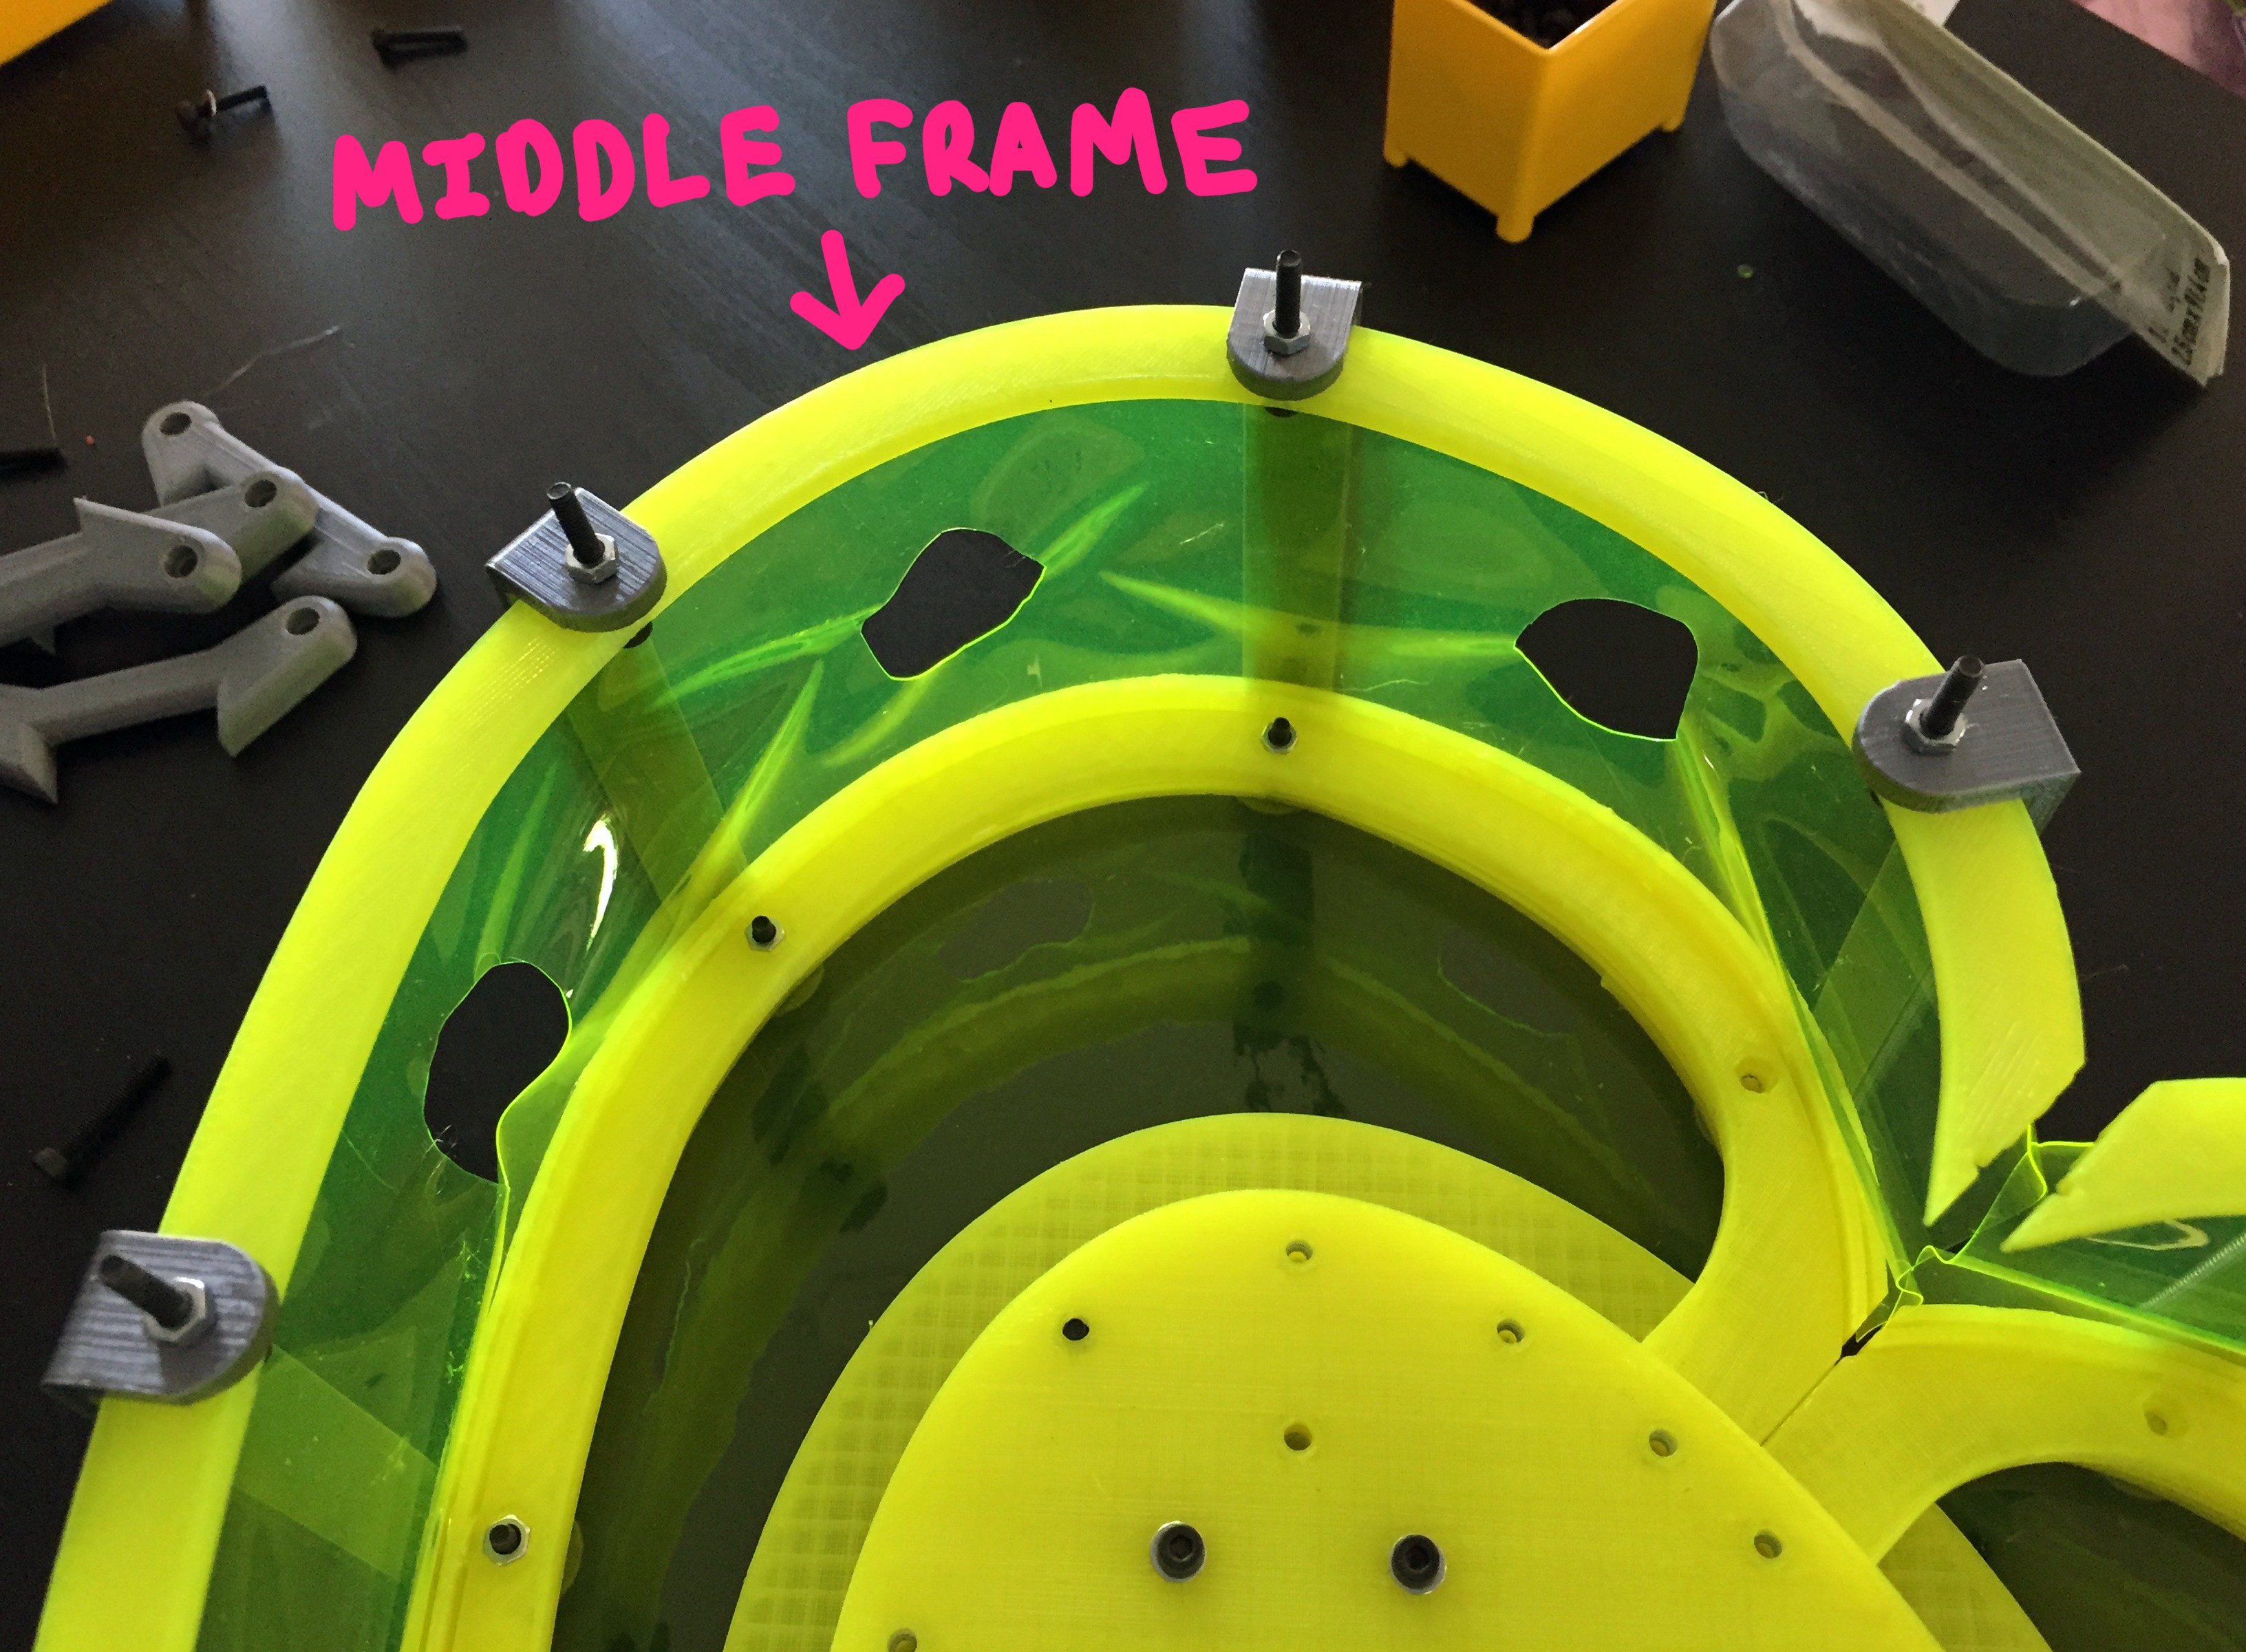
The brackets hold the three pieces of the enclosure together like clamps; sandwiching the topand bottomframepieces to the middle frame piece. The 3mm hardware screws into captured nuts located in the middle frame pieces. In the image below, you can see the hardware going through the bracket, then the bottom framepiece, with a small bit of length left to screw into the middle framepiece of the enclosure:

the top portion of the middle framepiece attaches to the front half of the bracket:
...and the hardware also screws in from the back, so that the meat of the screw is sticking up. I capture the top half of the middle frame in place by adding a nut above the bracket:

The top frame piece drops onto the remaining thread of the hardware now poking up from the brackets! FIRST however, before I close this thing up, I want to install the portals along the wall of the enclosure!

These sad empty holes need to be filled with something! A silver porthole adaptor threads through these gaps and houses a special PCB which converts wires for a molex connector into a cat 5 terminal.

So many holes:

While I print (9) of these "bulkhead" adaptors, I'll dress up my brackets a little :P I picked up some adhesive reflectors from Home Depot!
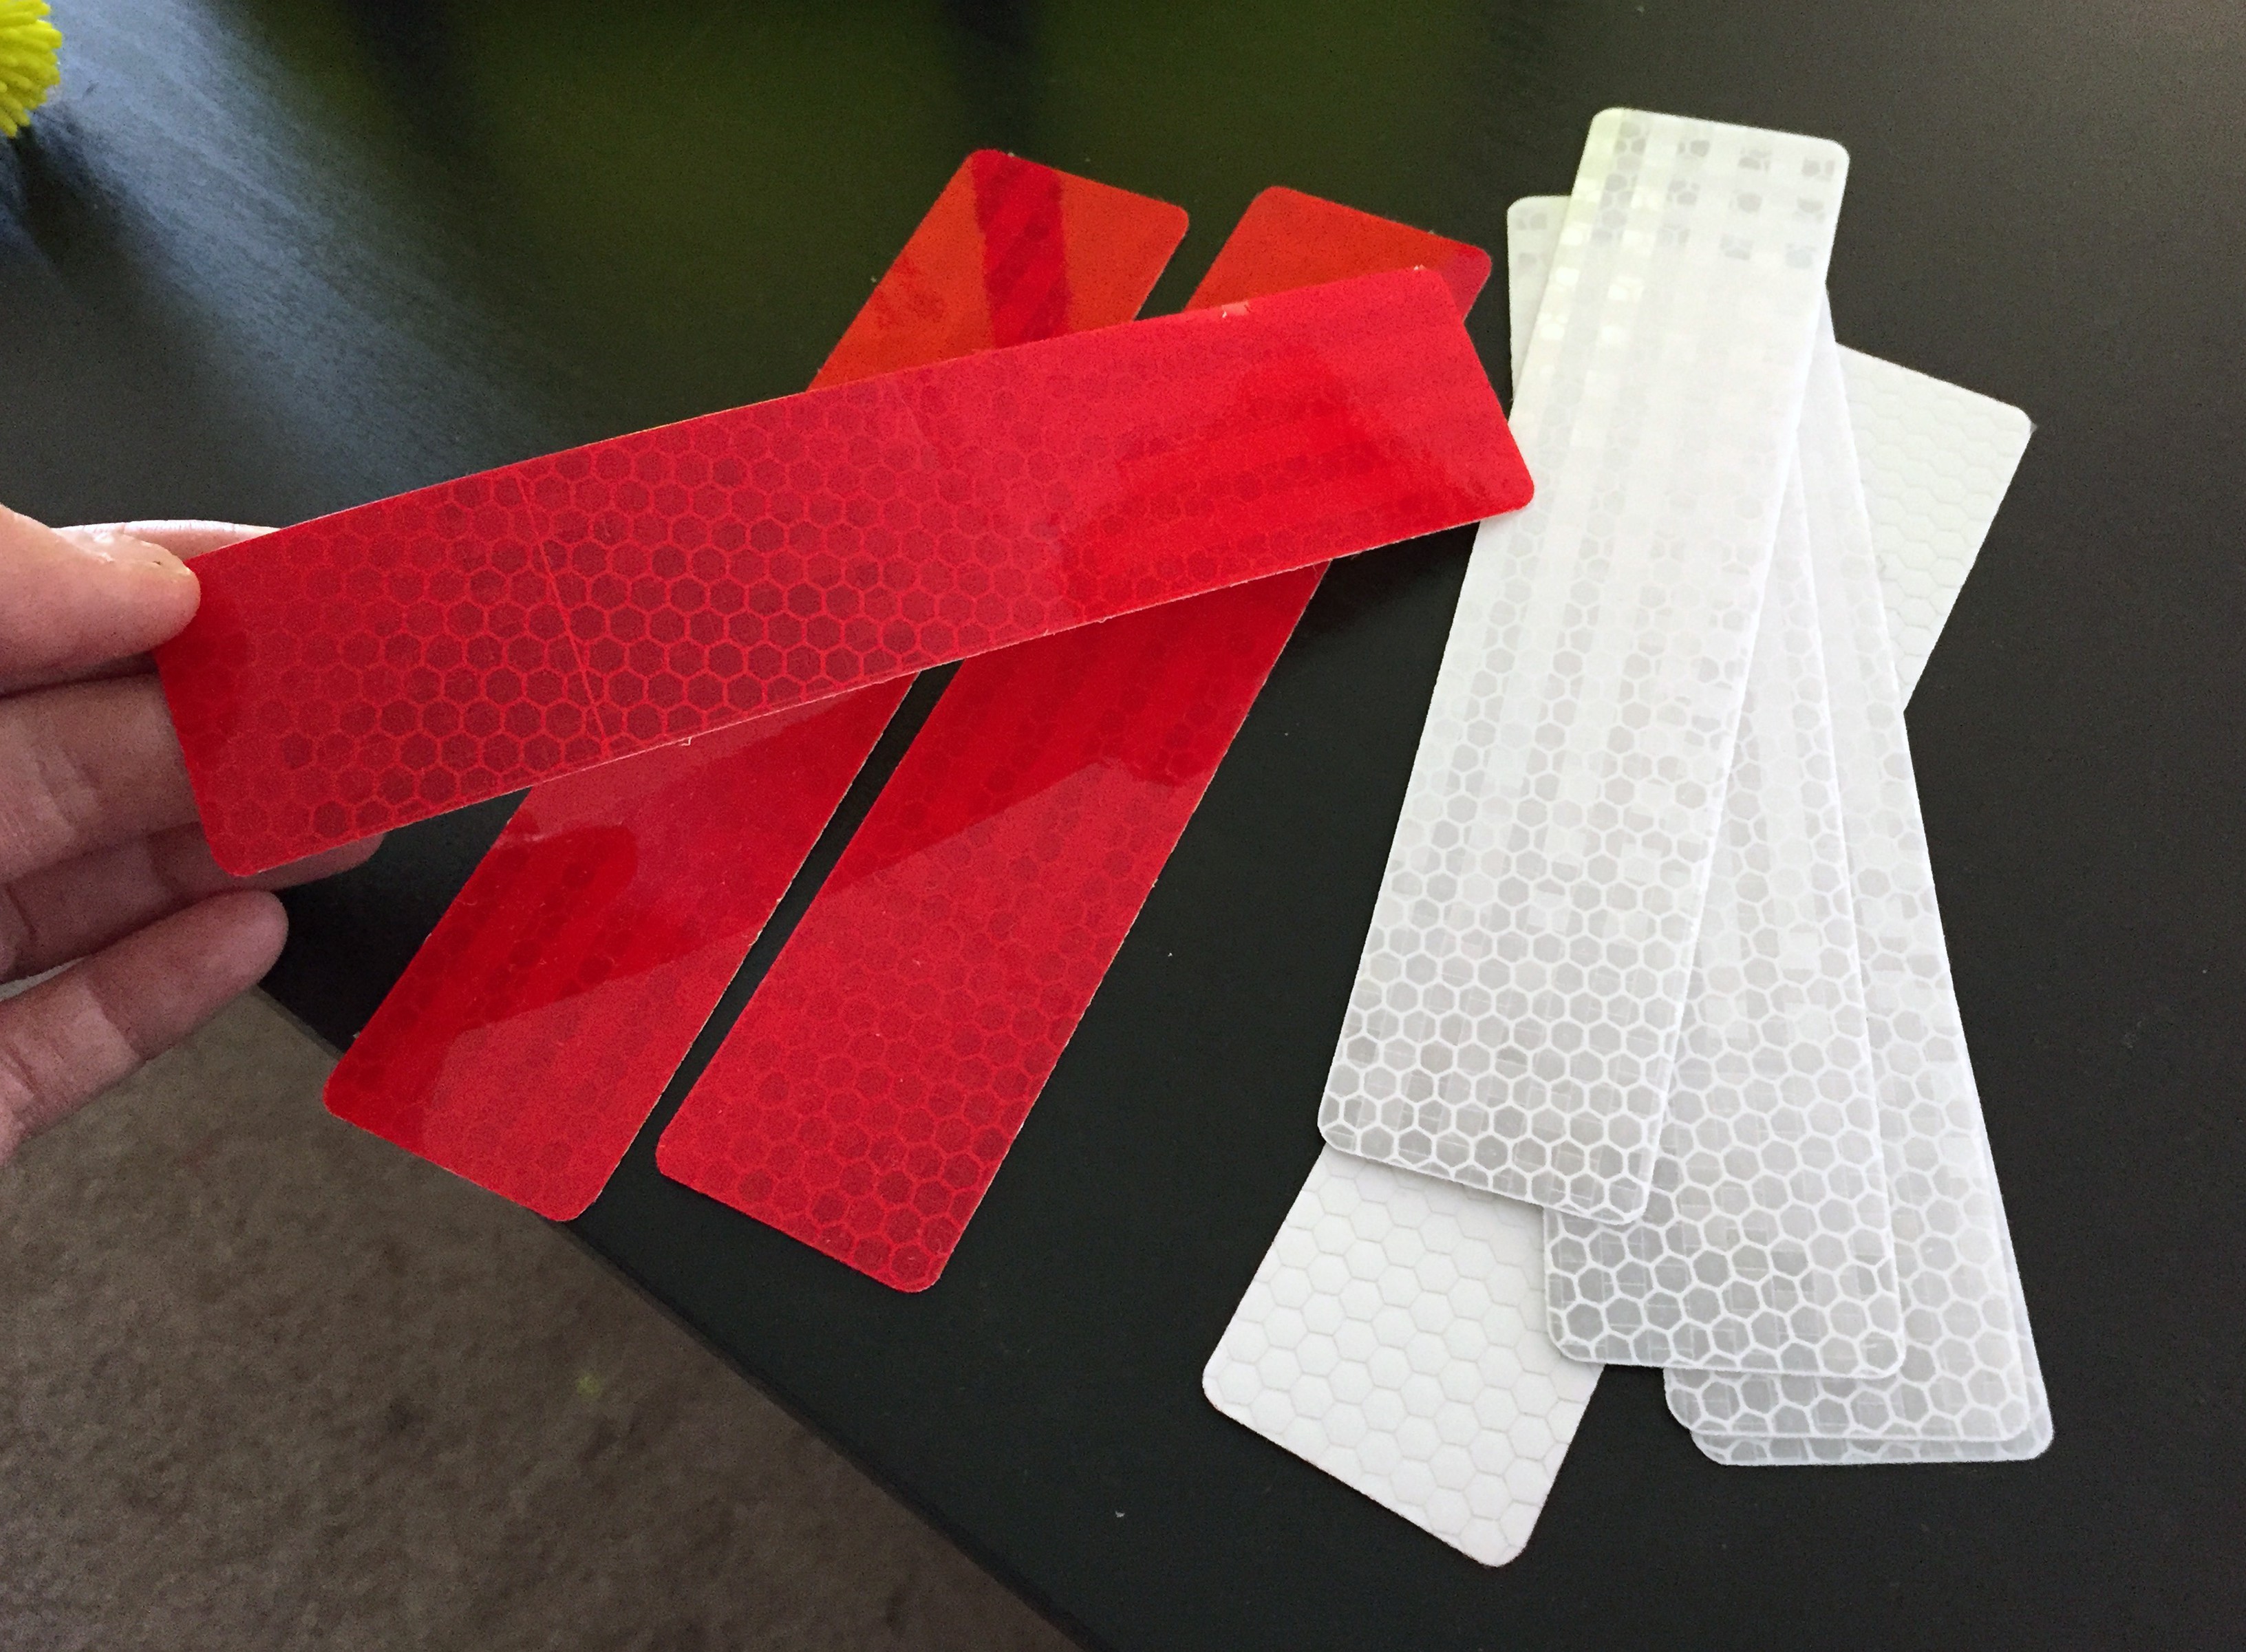
I cut the red and white shinies into small strips to place on every-other bracket:

Around the time I was done with this task, the port-hole pieces and their corresponding nuts were finished printing and ready to go into the outer wall of the enclosure:


THE STRAPS
It was my goal that the straps of the backpack form to the contours of my shoulders. This wasn't hard to do, but I did need Mark's help placing short segments of masking tape directly on my skin to sculpt out the first rough pattern (in blue). The first two versions on the left were blind attempts where I just guessed at the curve needed to pull this off... and both were very much unsuccessful. The two on the right were the result of adhering tape directly to my body. You can see how off my first attempts were: =P

I chose to use an old roll of shelf liner material for my straps. This particular beige-colored fabric was slightly thick and had a spongy quality which I thought would be comfortable to wear. Most importantly, it doesn't deform when stretched or pulled, even with significant force:

I used my handy template to cut my straps in the beige material, as well as in vinyl. Since I wanted the vinyl to wrap around the edges of the shelf liner, I added a quarter inch margin past the template.
In order to fold the margin around the edge of the shelf liner, I had to cut out small wedges at the apex of each major curve (if you aren't sure where to cut them, just do so every inch or so on average!):

Next I folded the tabs down and taped them in place using some micro-pore paper tape. This shit is awesome because its incredibly thin, but sticks very well to pretty much everything! Since its soft, thin, and fabric-like, I am able to leave it permanently inside my straps instead of worrying about finding a way to remove it later:

To make the straps of the backpack a bit more comfortable to wear on my shoulders and chest (and to cover up this unsightly abomination of secret tape), I added neon yellow fleece to the back side:

I even got some matching neon yellow thread to stitch the seams together with:

A short loop of elastic at each end will allow the harness to give slightly while I'm trying to get the backpack on, and will also help me mount them to the adaptor plate seen below:

THE HARNESS ADAPTOR
Theharness adaptor screws directly onto the mounting plate within the main enclosure. It is also the thing that the harness attaches to directly:

I skinned the adaptor plate in the same fashion as the harness; with vinyl on the front, and fleece on the side which makes contact with my body:

fleece do:

Basically, the harness and the adaptor are their own separate assembly

COUPLING THE HARNESS TO THE ENCLOSURE
The harness adaptoris mounted to the back of the main enclosure, directly onto themounting plate:

The hardware used to make the connection screws into the nuts that are captured on the other side of these holes pictured below:
Once bolted down, this is what the back of the heart enclosure looks like:

Flip it around to view the whole assembly from the front, and you're now looking at this:

Here is the shiny new yellow next to the seasoned red backpack:

so pretty!


THE PULSE PCB
The circuitboard running the show is called the PULSE, and for the time being... it is more or less a repackaged Arduino MEGA. As mentioned, there will be (is) a separate post all about it. For this build, all you need to know is that this heart-shaped thing mounts in the center of the backpack on some standoffs =P

the red PCB looks pretty sharp mounted in the new yellow enclosure, me thinks:

MOLEX TO CAT 5
I think first and foremost, the concept evolved around the aesthetic of having large chunky cords stemming form a central location at the core of the body, and feeding out to other locations, like veins.
In some miscellaneous daydream of mine early this year, I imagined this being something transparent and heart-shaped. Once my mind saw it, that was what it had to be.
From the PCB mounted inside the enclosure, I saw many delicate wires terminating at the edge of the fabric, grouping together into bundles and then feeding out in all directions. I knew early on that I didn't want wires stretching all the way to parts of my body directly off the main board. That'd be silly, right?
The initial solution was to use a common connector, like molex, to come off the primary circuitboard. It would then terminate at the edge of the backpack and switch to something else at this junction. The "what" is still largely undecided, but for this first iteration of the backpack I went with CAT5. Its what I have an abundance of in the lab.
I designed a tiny little PCB that has the six wires from my molex connector going in one side, and a cat5 connector on the other side:
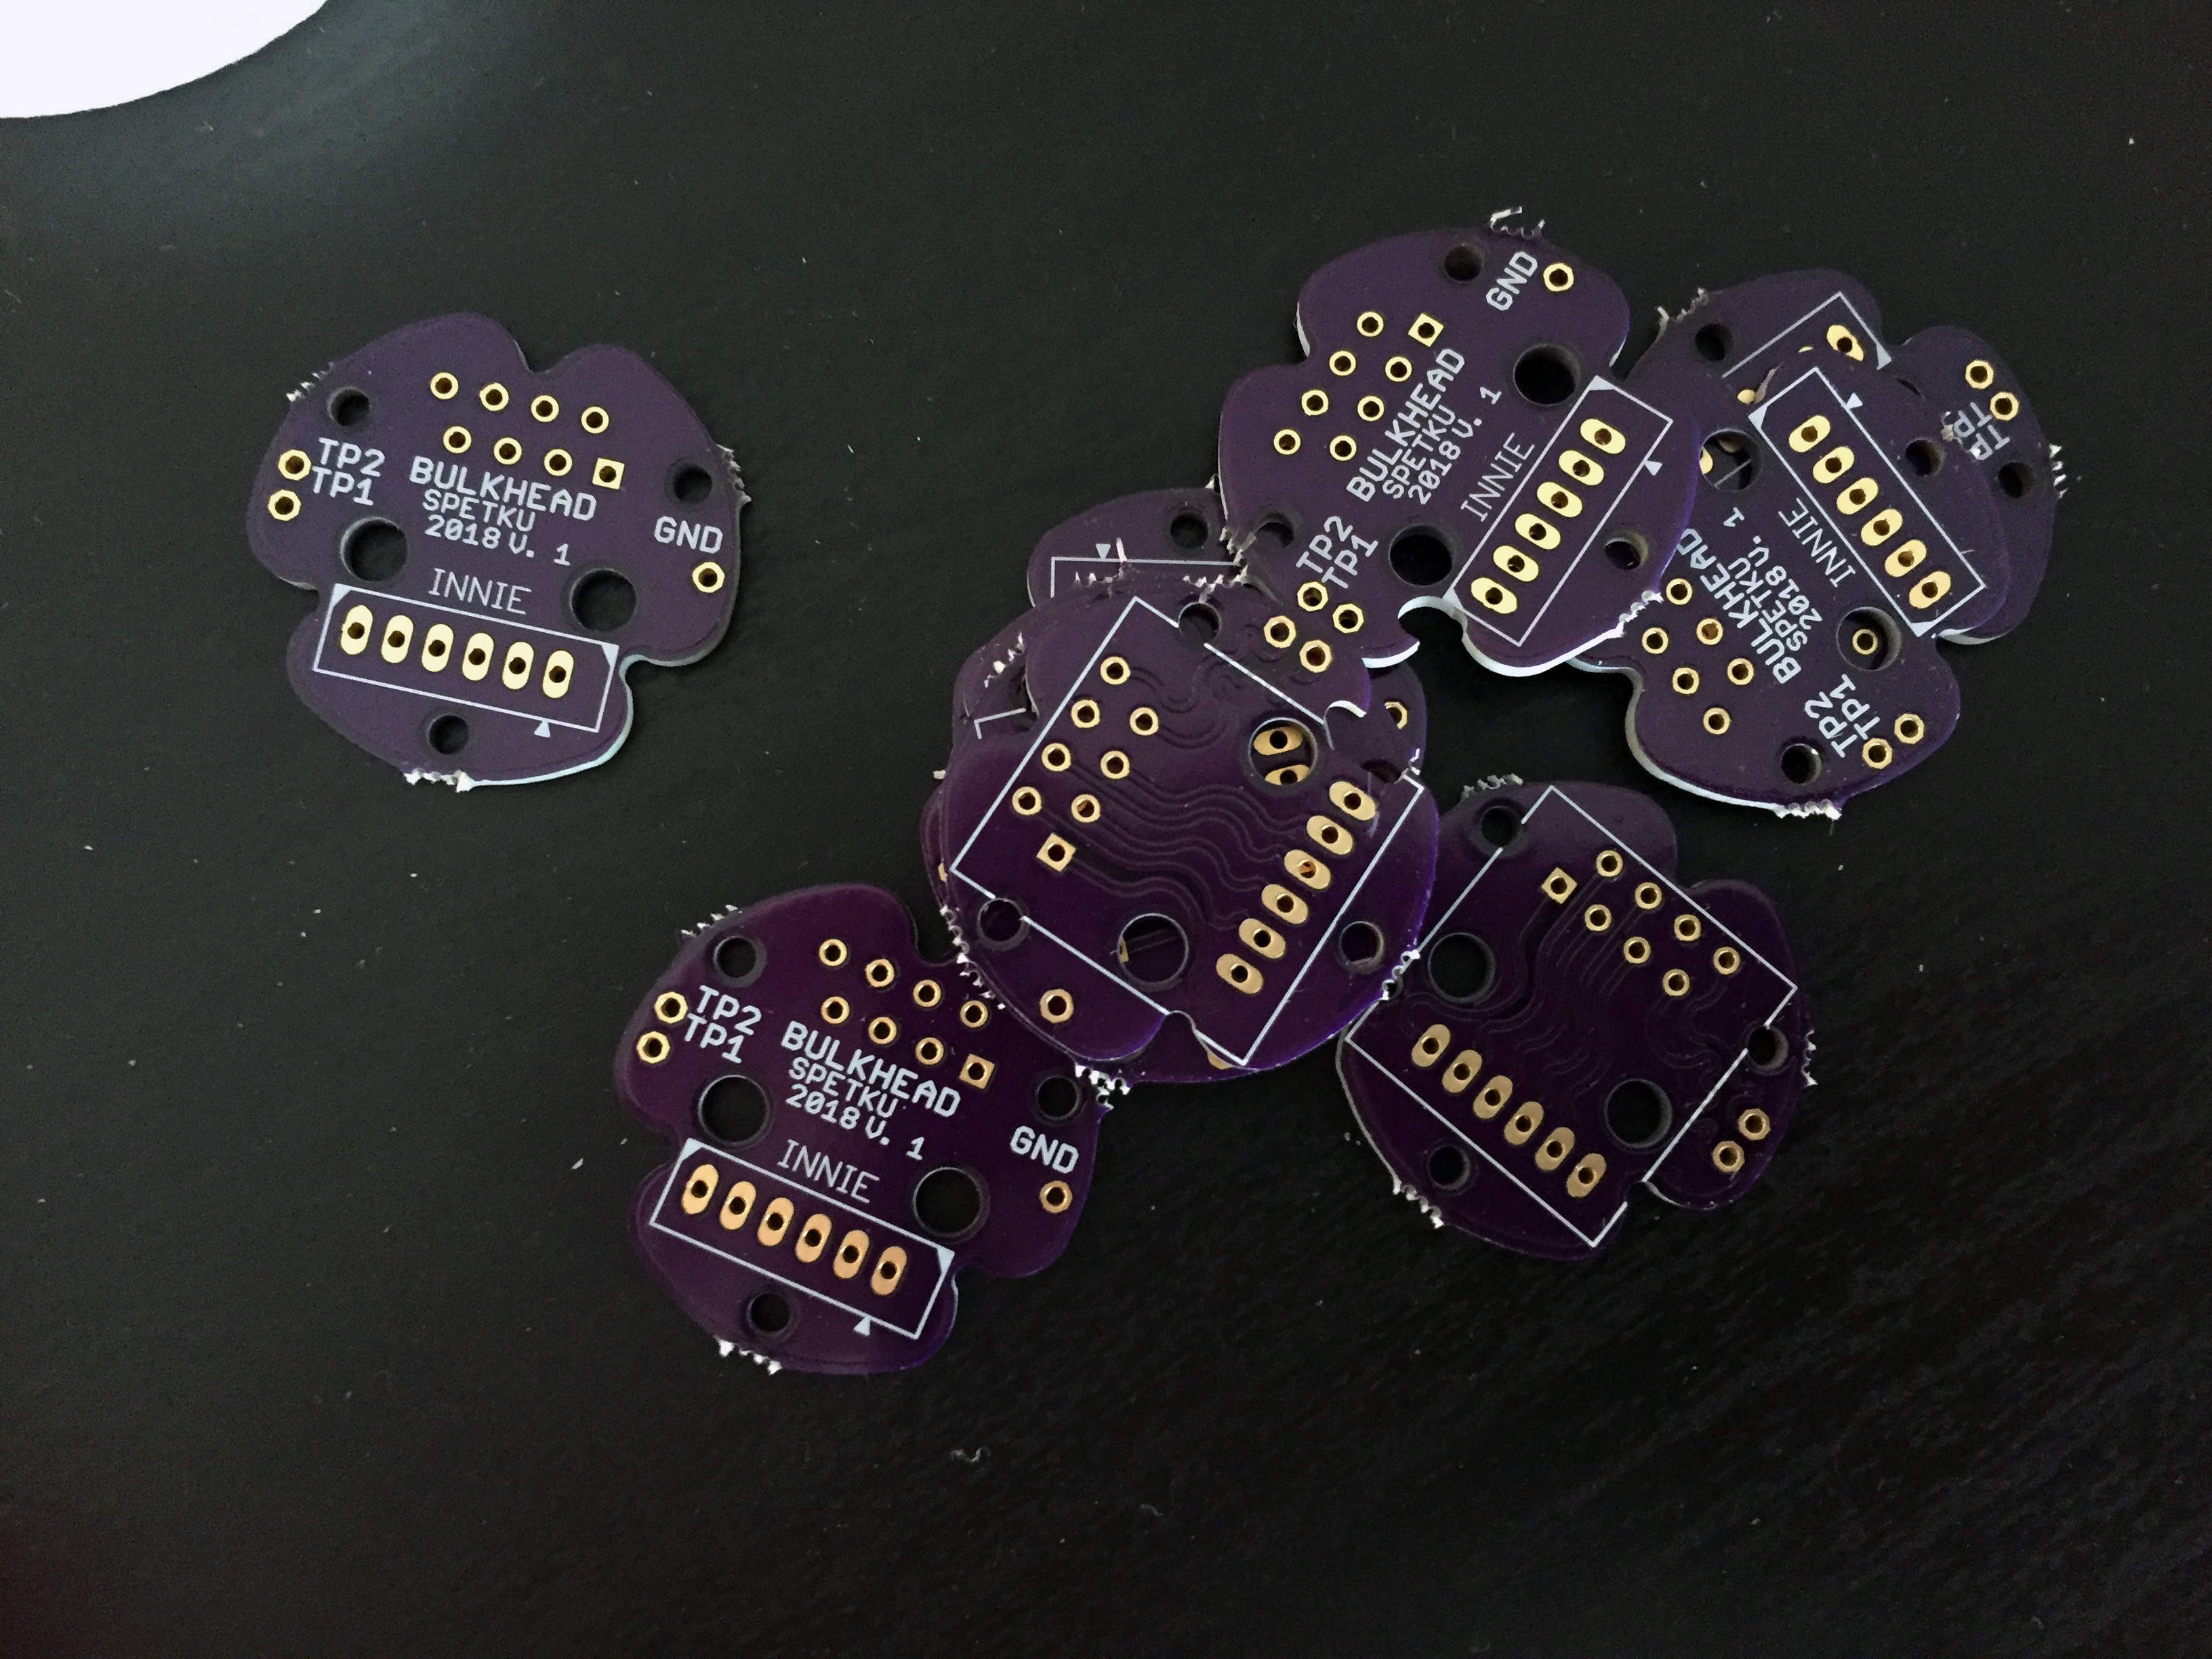
Once everything is soldered onto these little guys, they slide into those silver bulkhead adaptors like so:

Here is a closeup of the wires terminating into the BULKHEAD:

...and becoming a CAT5 socket on the other side of the outer wall of the backpack:

Once rigged up, the nervous system looks something like black spaghetti:

USB POWER
For now, v. 1 of the PULSE board receives its power from a rechargeable USB brick. There are (14) LEDs on the back side of the PULSE, so in the case that nothing is jacked into any of the sockets, it can at the very least pulse with colored light and look pretty:

NOW WHAT...
I now have two core systems: one in red and one in yellow! I can wear whichever hue suites my current mood. That's the beauty of it. <3

If any of this inspires you to develop your own platform; if not to sense arousal per-se, but maybe something else about your physical status that you'd like to communicate out in the wild- I hope you choose to create it!
In closing: the point of this whole project is to get people talking about how we can use the technology we create to communicate better with one another (through new forms of self expression). This project focuses on intimacy, but really... a dialogue about anything matters just the same to me. =)
Keep creating the things you wish to see exist, AND be the person who makes the experience of living more interesting for everyone. <3
Discussions
Become a Hackaday.io Member
Create an account to leave a comment. Already have an account? Log In.