 Ellie T
Followed some online instructions to setup the 'headless' Raspberry Pi 3's Raspbian Lite OS (I forgot if it was the Jessie or Stretch version) in an 8GB SD card. But I didn't have a HDMI cable with me, so tried to connect to the Pi over Ethernet or Wifi using secure shell (SSH) with a software called PuTTY.
When I connected the Pi to my Windows 10 via an ethernet cable, the supposed IP address I got from IPCONFIG or any network properties tabs were not correct. Tried some forum suggestions to set a static IP within cmdline.txt which was in the Pi's SD card but it didn't work. Created 'SSH files' in the boot drive (which should enable SSH according to online forums) but that didn't work too. Tried disabling firewall as well....
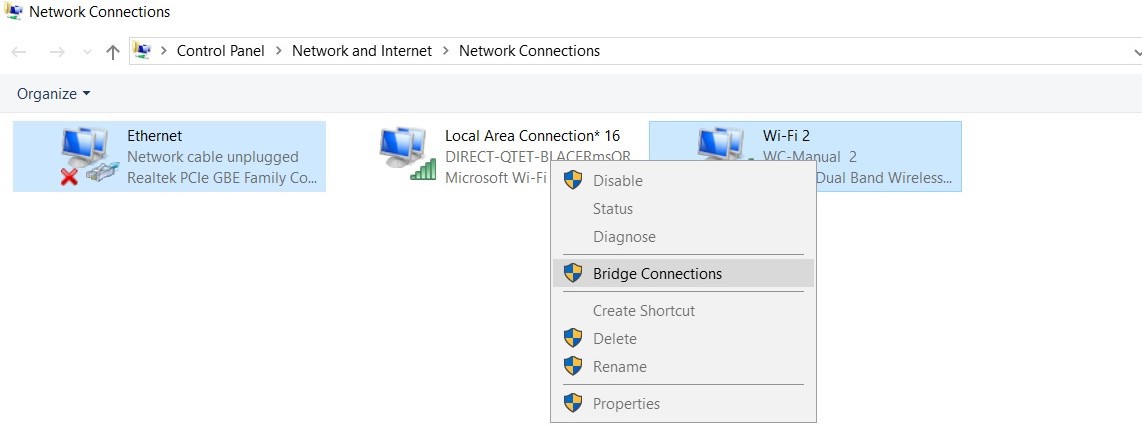
After many hours of crawling through forums to get the Pi to talk to the laptop, finally found a solution that worked: create a bridged connection between Ethernet and Wifi! With that, now the IP address of the Pi showed up on the Advanced IP Scanner software with 192.168.0.xxx. Why did I have to this? Not quite sure. Brice didn't seem to have that issue on his Mac.
This is how one would bridge connections to get the Ethernet working:
To make future connections easier, I learned how to set a static LAN IP in a configuration file with this:
sudo nano /etc/dhcpd.conf
Also set up the Pi to automatically connect to my phone's Mobile hotpot so that I can control the Pi with my phone (with an app) or act as a router for a laptop to SSH into the Pi (via PuTTY). But I also wanted the Pi to connect to a local WiFi network, so I set the WiFi connection priority in /etc/wpa_supplicant/wpa_supplicant.conf so that it would connect to my hotspot if detected, but default to the local network otherwise:
country=us
update_config=1
ctrl_interface=/var/run/wpa_supplicant

network={
        ssid="Mobile Hostpot Name"
        psk="passwordhere"
        priority=2
}

network={
        ssid="Open WiFi Without Password"
        key_mgmt=NONE
        priority=1
}
Had a Raspberry Pi v1.3 camera lying around, so plugged the white ribbon into the CSI Camera Port and enabled camera in raspi-config. Did a quick test with the command:
raspistill -v -o imgtest.jpg
...and was delighted to find an imaged saved on the Pi! Next step would be to figuring how/what to code to control the camera better.
Discussions
Become a Hackaday.io Member
Create an account to leave a comment. Already have an account? Log In.