Close
0%
0%

Expense Tracker App

A hybrid mobile platform application that enables users to keep track of their daily spending.

Similar projects worth following
A hybrid mobile app (build on ionic 3 ) that helps to keep track of user’s spending habits. The users have to key in their spending details which include: date, amount, spending category, description of the spending. All these details will form as one record. Then users will be able to visualize their spending details on the graph. Users are able to set a budget that they want to monitor for their spending Furthermore, they are also allowed to make use of barcode scanner and capture the details for the product that they have purchased which make it more convenient.


This work is licensed under a Creative Commons Attribution-NonCommercial-ShareAlike 4.0 International License.

Project source code: https://github.com/lili53012/ExpenseTracker


Introduction

This project is built with the ionic 3 frameworks. It is a hybrid mobile development platform that allows users to run the application on multiple platforms such as Android, IOS and web-based platform. The language that I used is typescript. The database used is firebase. 

Purpose for making the application

The reason that I want to do create this app is that I feel that financial planning is very important. This is because young adults nowadays, often get into impulsive spending. Therefore, I am thinking to make this application to help the user to monitor of their own spending. A hybrid mobile platform will allows the application to be accessible across different platforms with the same set of codes. Therefore, this application is design with the aim of helping the user to monitor their spendings and the processes should be easy to follow and use.

Making Process:  Please refers to the instructions section of the project or you can directly access through this link: https://hackaday.io/project/162180/instructions


Reflections

How does the application works ?

  1. Users have to register a new account with their email  and password.
  2.  User login with the account.
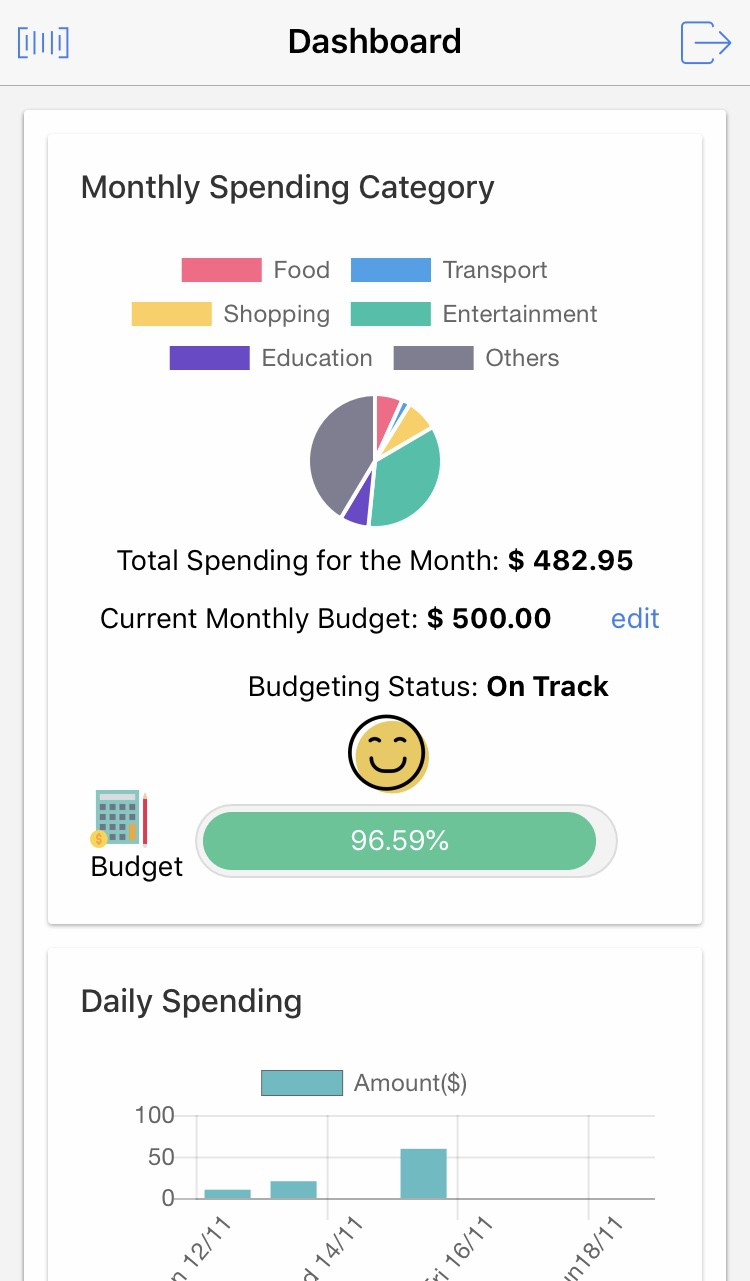
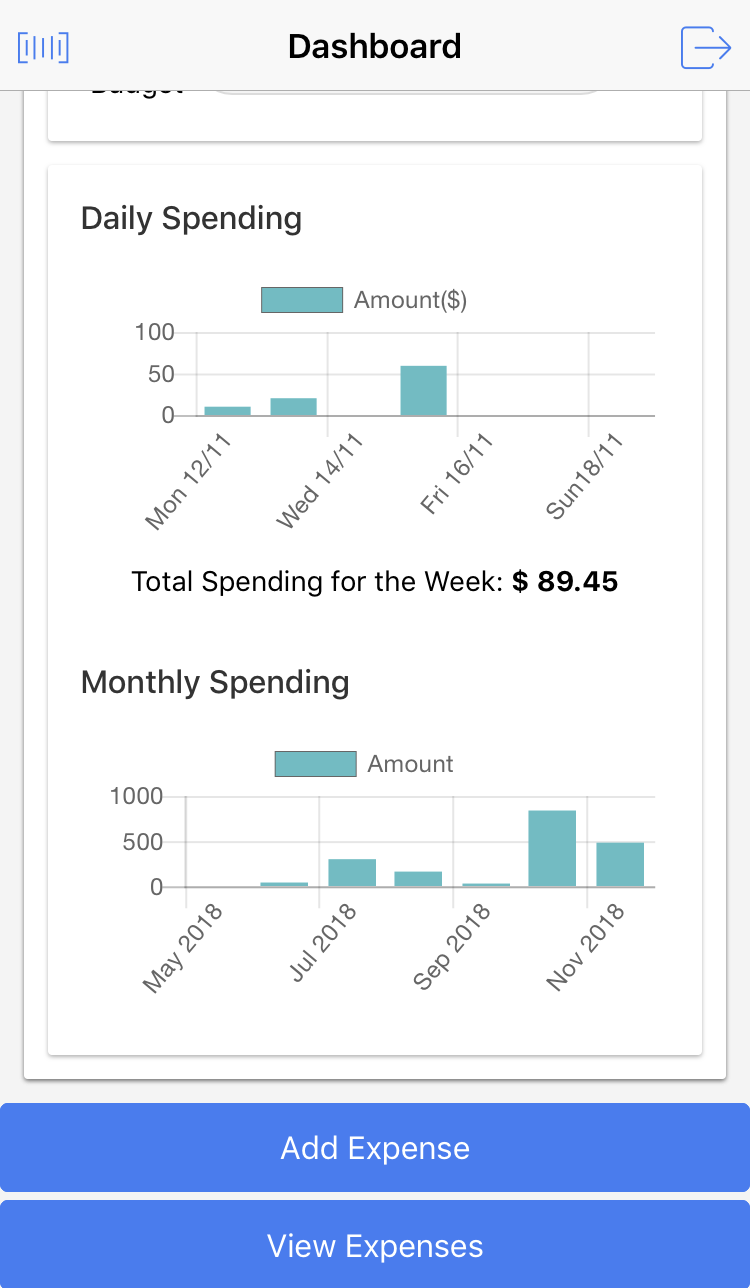
  3.  The Home page is the Dashboard page which displays all the spending details using visual graph
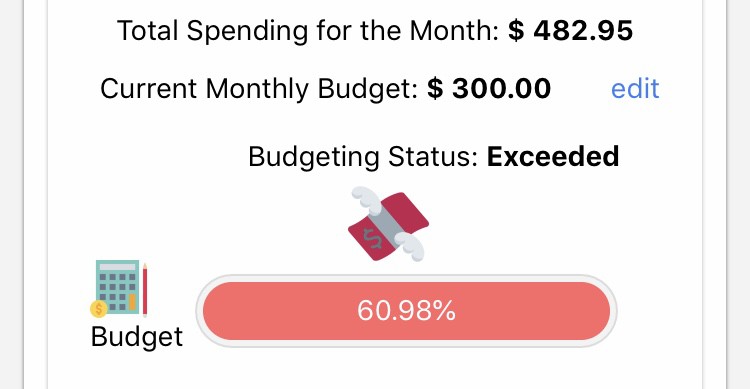
  4.  Users are allow to set/edit their budget for the month and different status will display different colours with different icons.
    • red colour - exceeded their budget and shows a "money flying" icon
    • green colour - on track of their budget and shows a smiley face icon
    • grey colour - if they have not set any budget amount  and shows a unhappy face icon
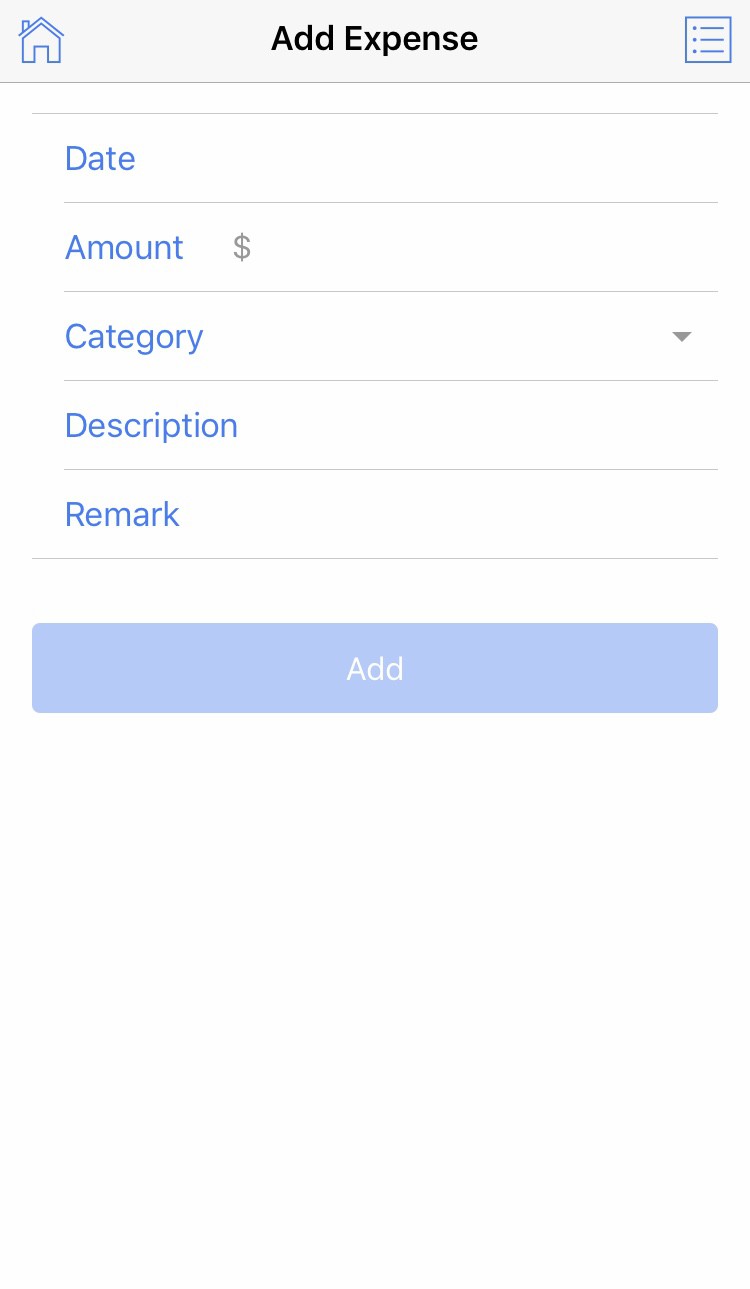
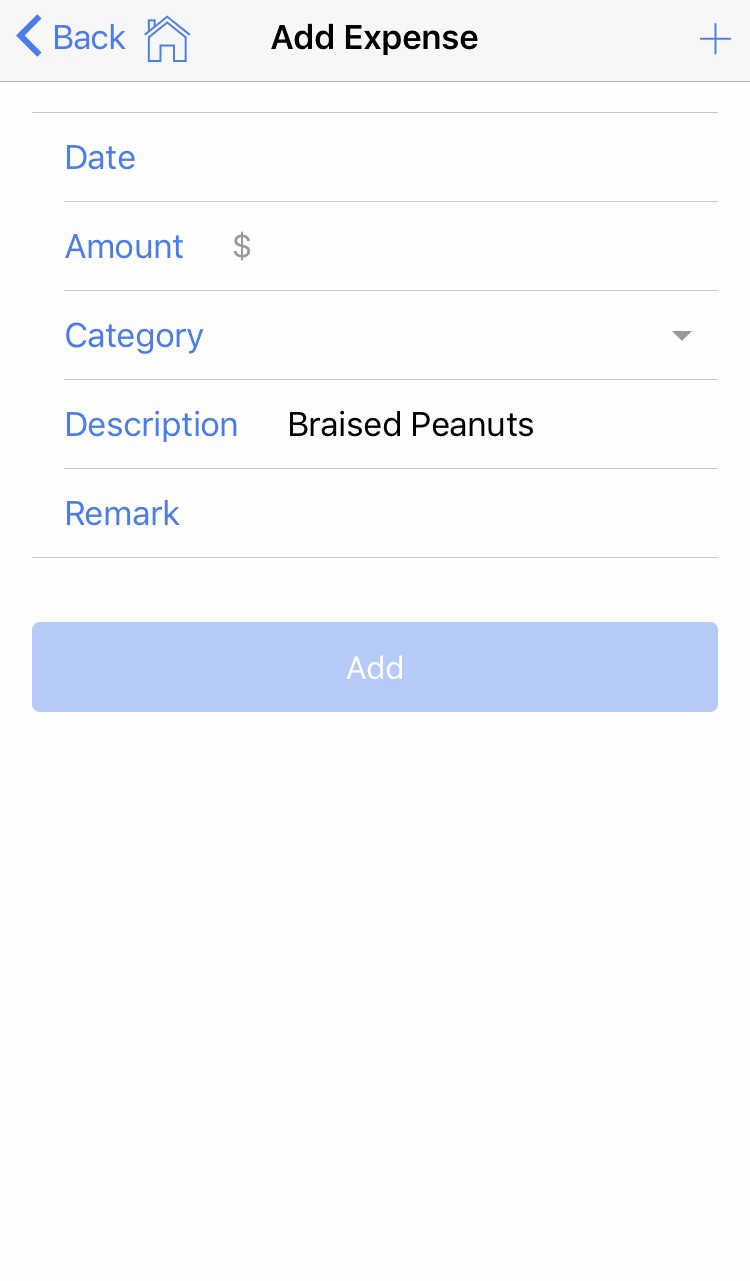
  5.  Users are allowed to insert a new record by clicking on the "Add Expense" button.
    • users have to key in all the necessary details and this record will be stored into the firebase
  6. Users view their spending record
    •  able to perform search function on the record.
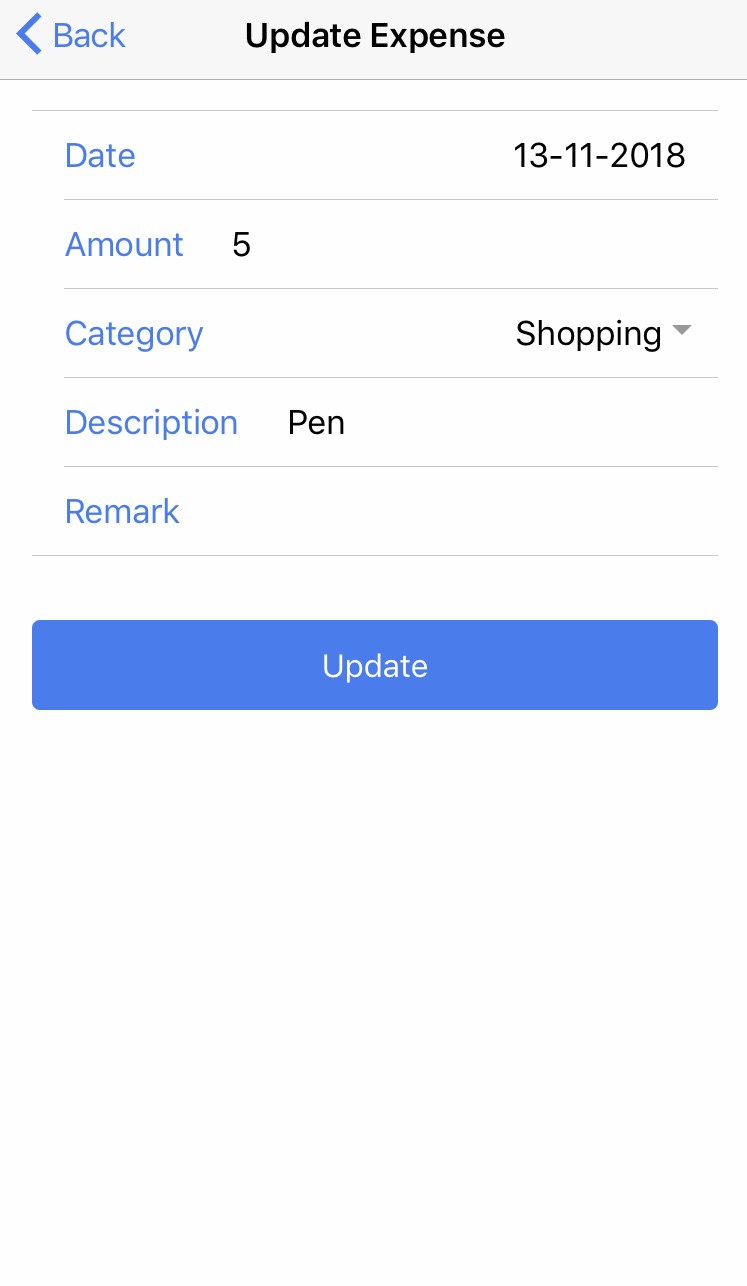
  7. Allow updating the records by clicking on the specific record.
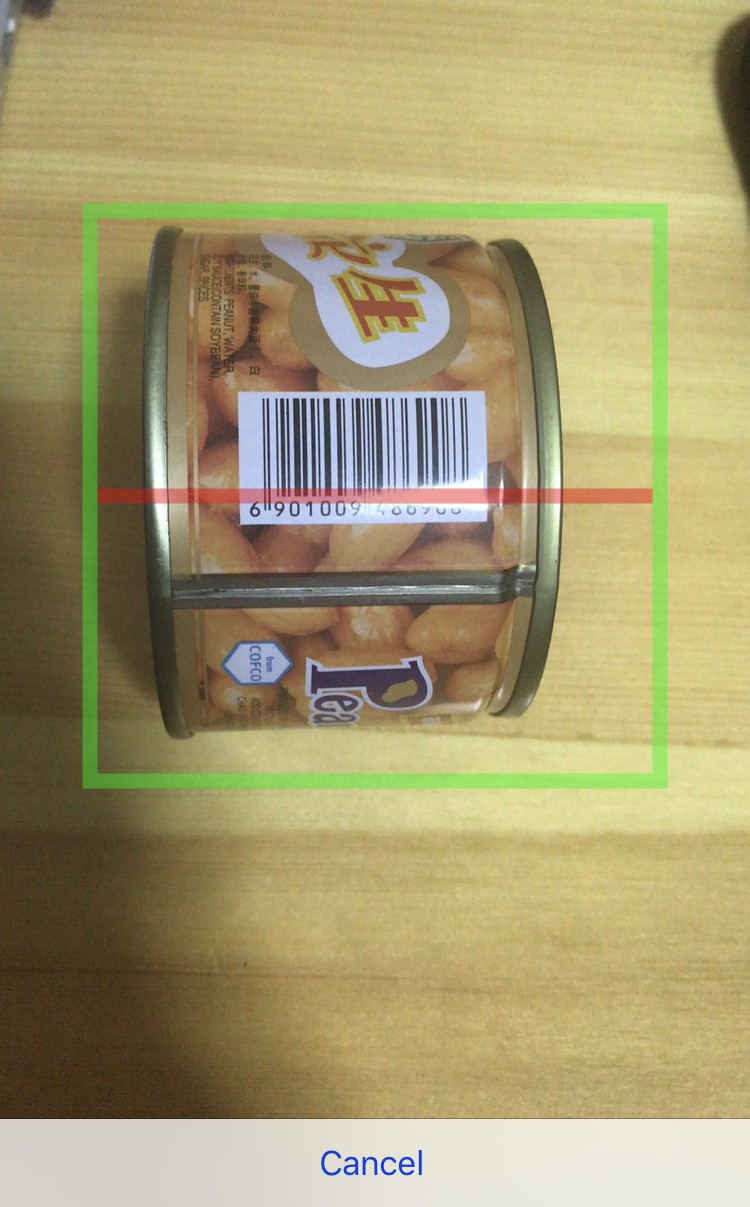
  8. Scanning of barcode which enables capturing of the product details in the REST API
  9. With the detail captured, users then insert the record into the firebase.


Possible future enhancement 

There are much possible enhancement for this application. However, due to time constraint I did not manage to implement all my ideas. It can be expanded into tracking of the user’s dietary habits by taking into account the food that they have purchased. In fact the online REST API (the product database) allows user to key in the calories details of the item that they have purchased. It can also make a peer to peer comparison on the spending habits of the different users, therefore users are provided with further insights into their financial status as compared to other users. For the current version, the pulling of barcode product data is only able to capture the product’s brand and description because such a product database is hard to find in Singapore. Therefore, future version can implement a database that stored all the information required for spending.

Alternatively, function like allowing the user to add a new record in the application itself to the online database is also possible, therefore it will reduce the hassle for user to enter the website and enter the the product into the database ....

Read more »

  • 1
    Setup Ionic application development environment
    • Ionic apps are created and developed primarily through the Ionic command line utility (the “CLI”) and use Cordova to build/deploy as a native app. Therefore, we need to install a few utilities to get developing.
    • Node.js
      • download and install the latest version of node.js
    • Open terminal window(Mac) or command prompt window (Windows)
      • install Cordova and Ionic with the following command:
        • npm install -g cordova ionic 
          Note: for Mac user can add "sudo" in front of the command depending on the system configuration
      • Create an ionic app with the following command
        •  $ ionic start helloWorld blank

           Note: "HelloWorld" will be the application's name and it is build with a blank template. There are many different types of starting template available on ionic framework. 

        • List of templates provided by ionic:

          • tabs - a simple 3 tab layout

          • sidemenu - a layout with a swipable menu on the side

          • blank - a bare starter with a single page

          • super - starter project with over 14 ready to use page designs

          • tutorial - a guided starter project

    • In this case the template that I am using is blank template so is easier for me to customise my UI deisgn
    • Type the following command to cd into the folder that was created and run with the serve command

  • 2
    UI Design

    The source code above consist a full set of ionic 3 components and sample. Therefore, I make use of the examples and design the following UI pages for my project.

    Sign up Page

    Sign up Page
    • User sign up with their email account and set a password
    • Validation: 
      • Verify on email address and password with at least 6 characters. 
      •  Email must not be the same as the existing user's username. 

    Login Page

    Login Page
    • User login with their registered email account and their password
    • Validation:  
      • validate email address (must be registered user) 
      • the length of the password must be 6 character


    Dashboard

    • Monthly Spending Category
      • Users are able to view their spending amount on each of the categories and they are allowed to click on the legend to filter and click on the graph to view the exact amount spent. Information such as the Total Spending for the current month and the Current monthly Budget is shown to the user directly so they are able to capture this information quickly. The progress bar is use to monitor their budget effectively. 
    • There are 3 different Budgeting Status as shown below:
      • No Budget is Set - the progress bar will turns into dark grey color.
      • An icon of unhappy face is shown above the progress bar.
      • Budget On Track - the progress bar will turns into green color and displays the percentage of the current spending amount over the budget amount set. This is to keep track of current spending amount with relation to the budget set. 
      • An icon of smiley face is shown above the progress bar to show that they are on track of the budget.
      • Budget Exceeded - the progress bar will turns into red color and displays the percentage of the exceeded amount as compared to the budget.
      • An icon of "money flying" is shown above the progress bar to show that they have overspent their budget.
      • Daily Spending
        • Users are allow to view their daily spending over the week from Monday to Sunday
      • Monthly Spending
        • Users are able to view their past 6 months's spending record, included their current month's spending, so they can compared their spending over the months. 
      • Edit their current month's budget
        • User are able to set their current month's budget amount hence this will derive the budgeting status.

      Add an expense record

      • In order to create an expense record, user have to key in the following details:
        • Date
        • Amount Spent
        • Category of the Spending
        • Description
        • Remark (Optional field)


      Retrieve list of Expense Record

      • Users are able to view the their Expense Records and display the above details and the amount spent.
      • Users are also allowed to perform a search function over the description, remark and amount spent, so that they can navigate to a specific record quickly when is needed.


      Update Record

      • Allow users to update specific expense record.


      Barcode Scanner


      • Barcode Scanner which allows the user to scan the barcode on the item that they have purchased and retrieve the details. Note that currently, I only managed to find an online database that helps to manage the product data which only able to retrieve the description of the product. Therefore, other information still required the user to key in. The online database allows people across worldwide to add the product's barcode details and item details. Further details will be provided in the Code Implementation.
    • 3
      Set up firebase and login with firebase authentication
      import { ExpenseProvider } from '../../providers/expense/expense';

      I have make use of the following reference to set up my firebase: https://javebratt.com/ionic-firebase-tutorial-intro/

      • Command to install firebase:
      $ npm install firebase --save
      • Go to the src/app/app.component.ts and import the firebase with following code:
      import firebase from 'firebase/app';
      • Enter into the constructor of the app.component and call the initialise app function:
      firebase.initializeApp(); 

       This function takes a config object as a parameter, and the config object has all the API keys to connect to Firebase.

      • To get that config object for the app, go to the Firebase’s Console,  and click on "Add Firebase to your web app". Every database will have different configuration for this. 
      var config = { apiKey: "", 
      authDomain: "", 
      databaseURL: "",
       projectId: "",
       storageBucket: "",
       messagingSenderId: "" }; 
      • Enable the firebase authentication by enter into Authentication > Sign-In Method > Email and Password and enable the Status for email and password.
      • Create Authentication Provider to handle the authentication related interaction between the application and the firebase. We can create multiple providers to manage the communication between the firebase and the application. Therefore, I have also created an expense Provider and Profile provider to manage the program. The following is an example of how the provider works:
      • Create the Auth provider:
      $ ionic generate provider Auth 
      • Go to the folder providers/auth/auth.ts to and add the following codes:
      import {Injectable} from '@angular/core';
      import firebase  from 'firebase/app';
      import 'firebase/auth';
      import 'firebase/database';
      
      @Injectable()
      export class AuthProvider {
        constructor() {}
      
      
        loginUser(email: string, password: string): Promise<any> {
          return firebase.auth().signInWithEmailAndPassword(email, password);
        }
      
        signupUser(email: string, password: string): Promise<any> {
          return firebase
            .auth()
            .createUserWithEmailAndPassword(email, password)
            .then(newUserCredential => {
              firebase
                .database()
                .ref(`/userProfile/${newUserCredential.user.uid}/email`)
                .set(email);
            })
            .catch(error => {
              console.error(error);
              throw new Error(error);
            });
        }
        resetPassword(email:string): Promise<void> {
          return firebase.auth().sendPasswordResetEmail(email);
        }
        logoutUser(): Promise<void> {
          const userId: string = firebase.auth().currentUser.uid;
          firebase
            .database()
            .ref(`/userProfile/${userId}`)
            .off();
          return firebase.auth().signOut();
        }
      
      }
      • Explanation
        • LoginUser(email:string, password:string): Promise<any> {}
        • This function make use of the firebase signInWithEmailAndPassword(email, password) method, which takes in an email and password and logs the user into the application. The way that firebase works, it does not have a regular "username" login, therefore, user have to register with their valid email as the username. All the authentication error messages will be handle by firebase such as checking for existing user record when new user register check for the match record when user login.
      • signupUser(email: string, password: string): Promise<any> {}
        • This function takes in the email and the password from the user input and created a new user record in the firebase.
        • The portion of the code .ref(`/userProfile/${newUserCredential.user.uid}/email`).set(email); is a reference to the userProfile node inside the database. The reference is creating a new node inside the userProfile node and the UID identifies the node, the UID is firebase automatic id generated for the user and it is the unique identifier. Therefore, it add a new node of "email" under every registered user.
      • logoutUser():Promise<;void>{}
        • This function basically check for the current user and log the specific user out.

    View all 8 instructions

    Enjoy this project?

    Share

    Discussions

    Similar Projects

    Does this project spark your interest?

    Become a member to follow this project and never miss any updates