Close
0%
0%

Skeleton Attiny85 Handheld

I2C OLED connected to an Attiny85 and a Charlie-plexed button matrix

Similar projects worth following
The most minimal handheld I could think of. 6 buttons that will probably do weird stuff, when you press more than one. Coin cell powered, I saw people use the oled and an attiny on a coin cell before. Never had an OLED on an Attiny85 before, so that was a good project for it. Always loved to look at the free form soldered things.

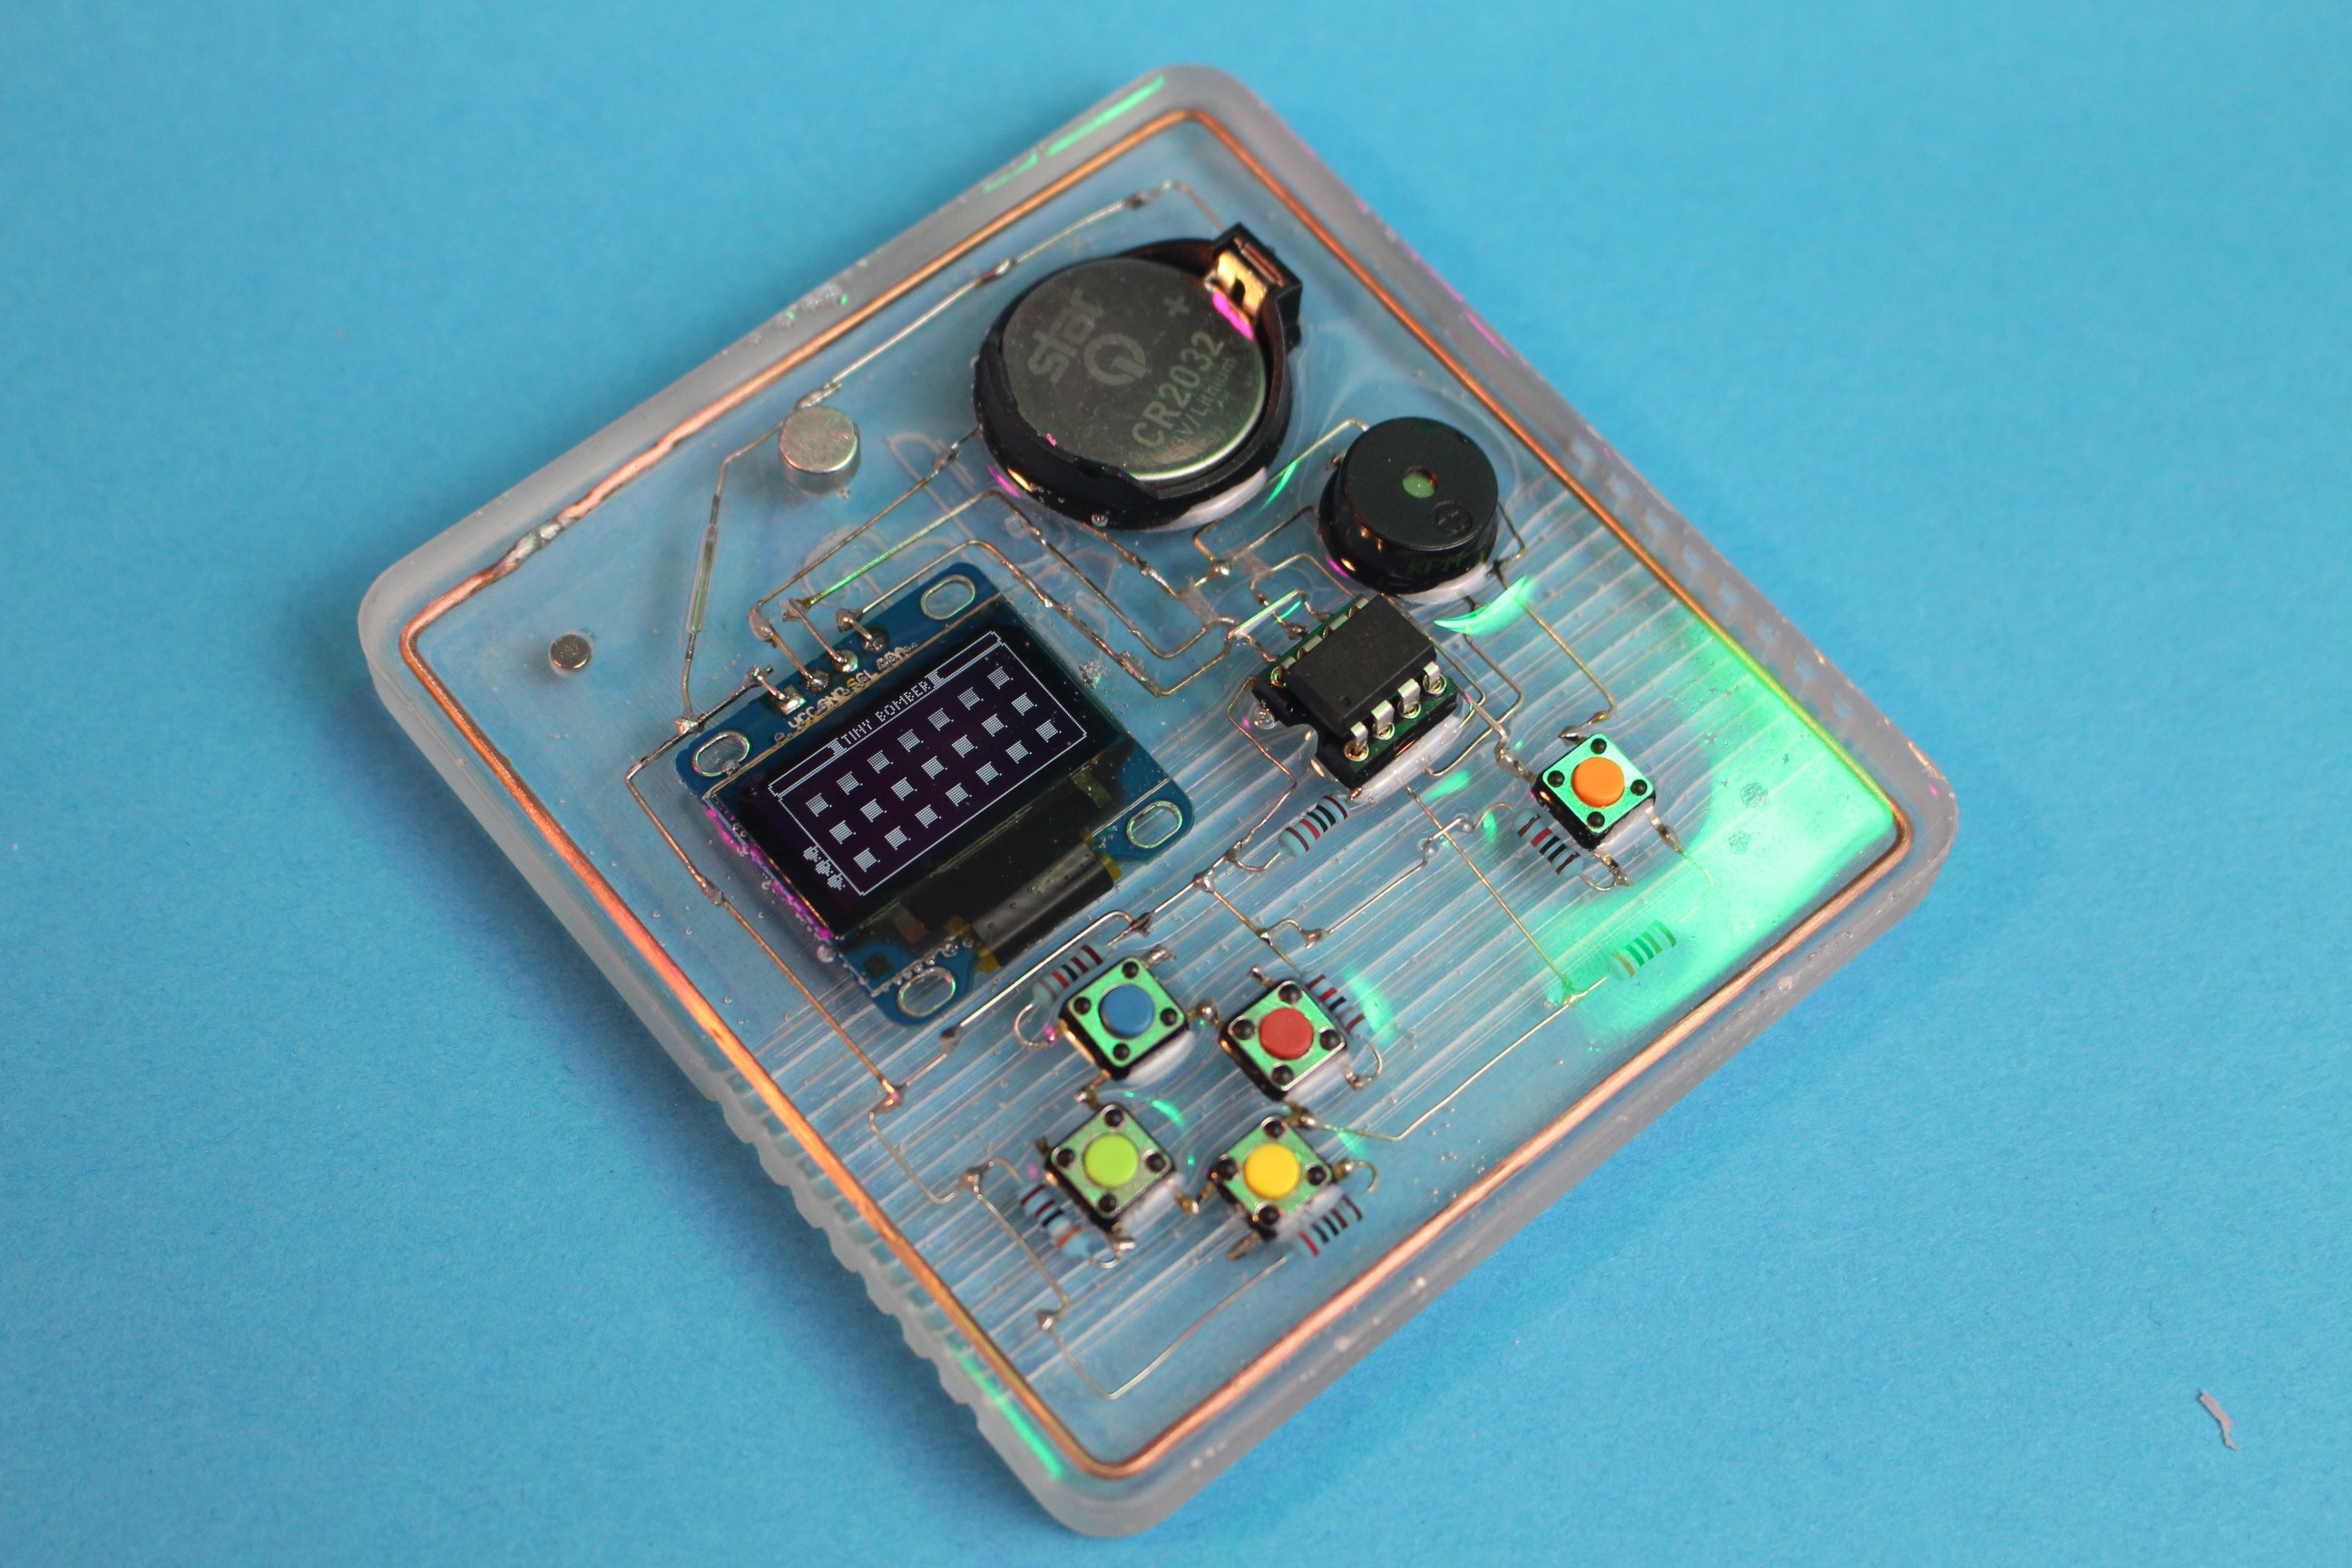
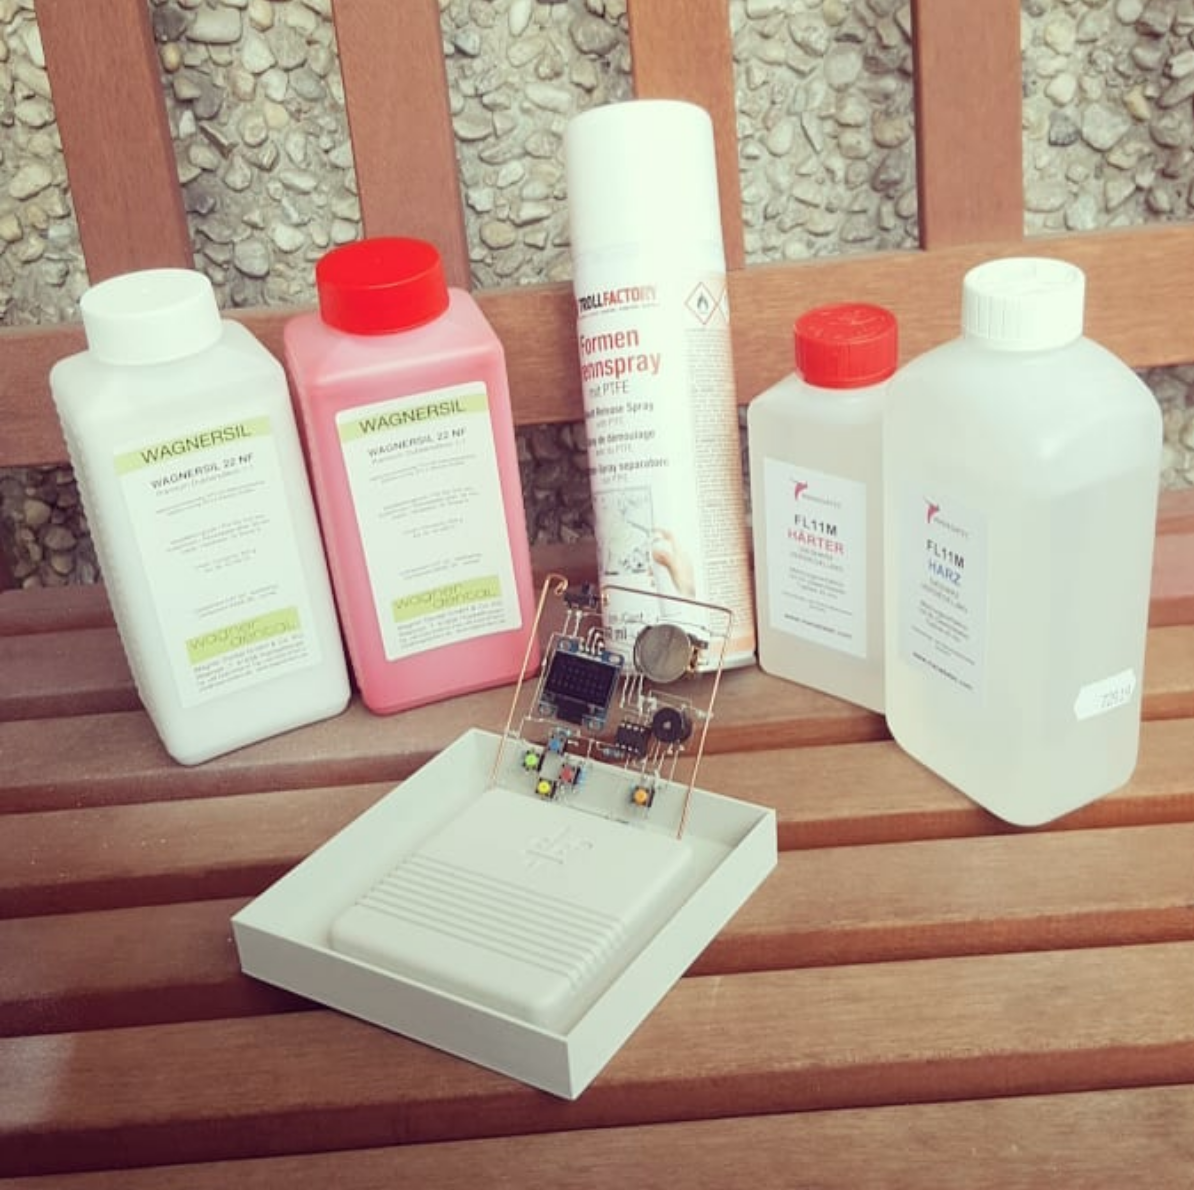
Realtalk: I thought I'd probably send an idea in, grab some likes and then forget to actually build it :D Not this time though - I was determined to build this and make it work. I still need to show that the buttons work and replace the oled, because it's broken. 

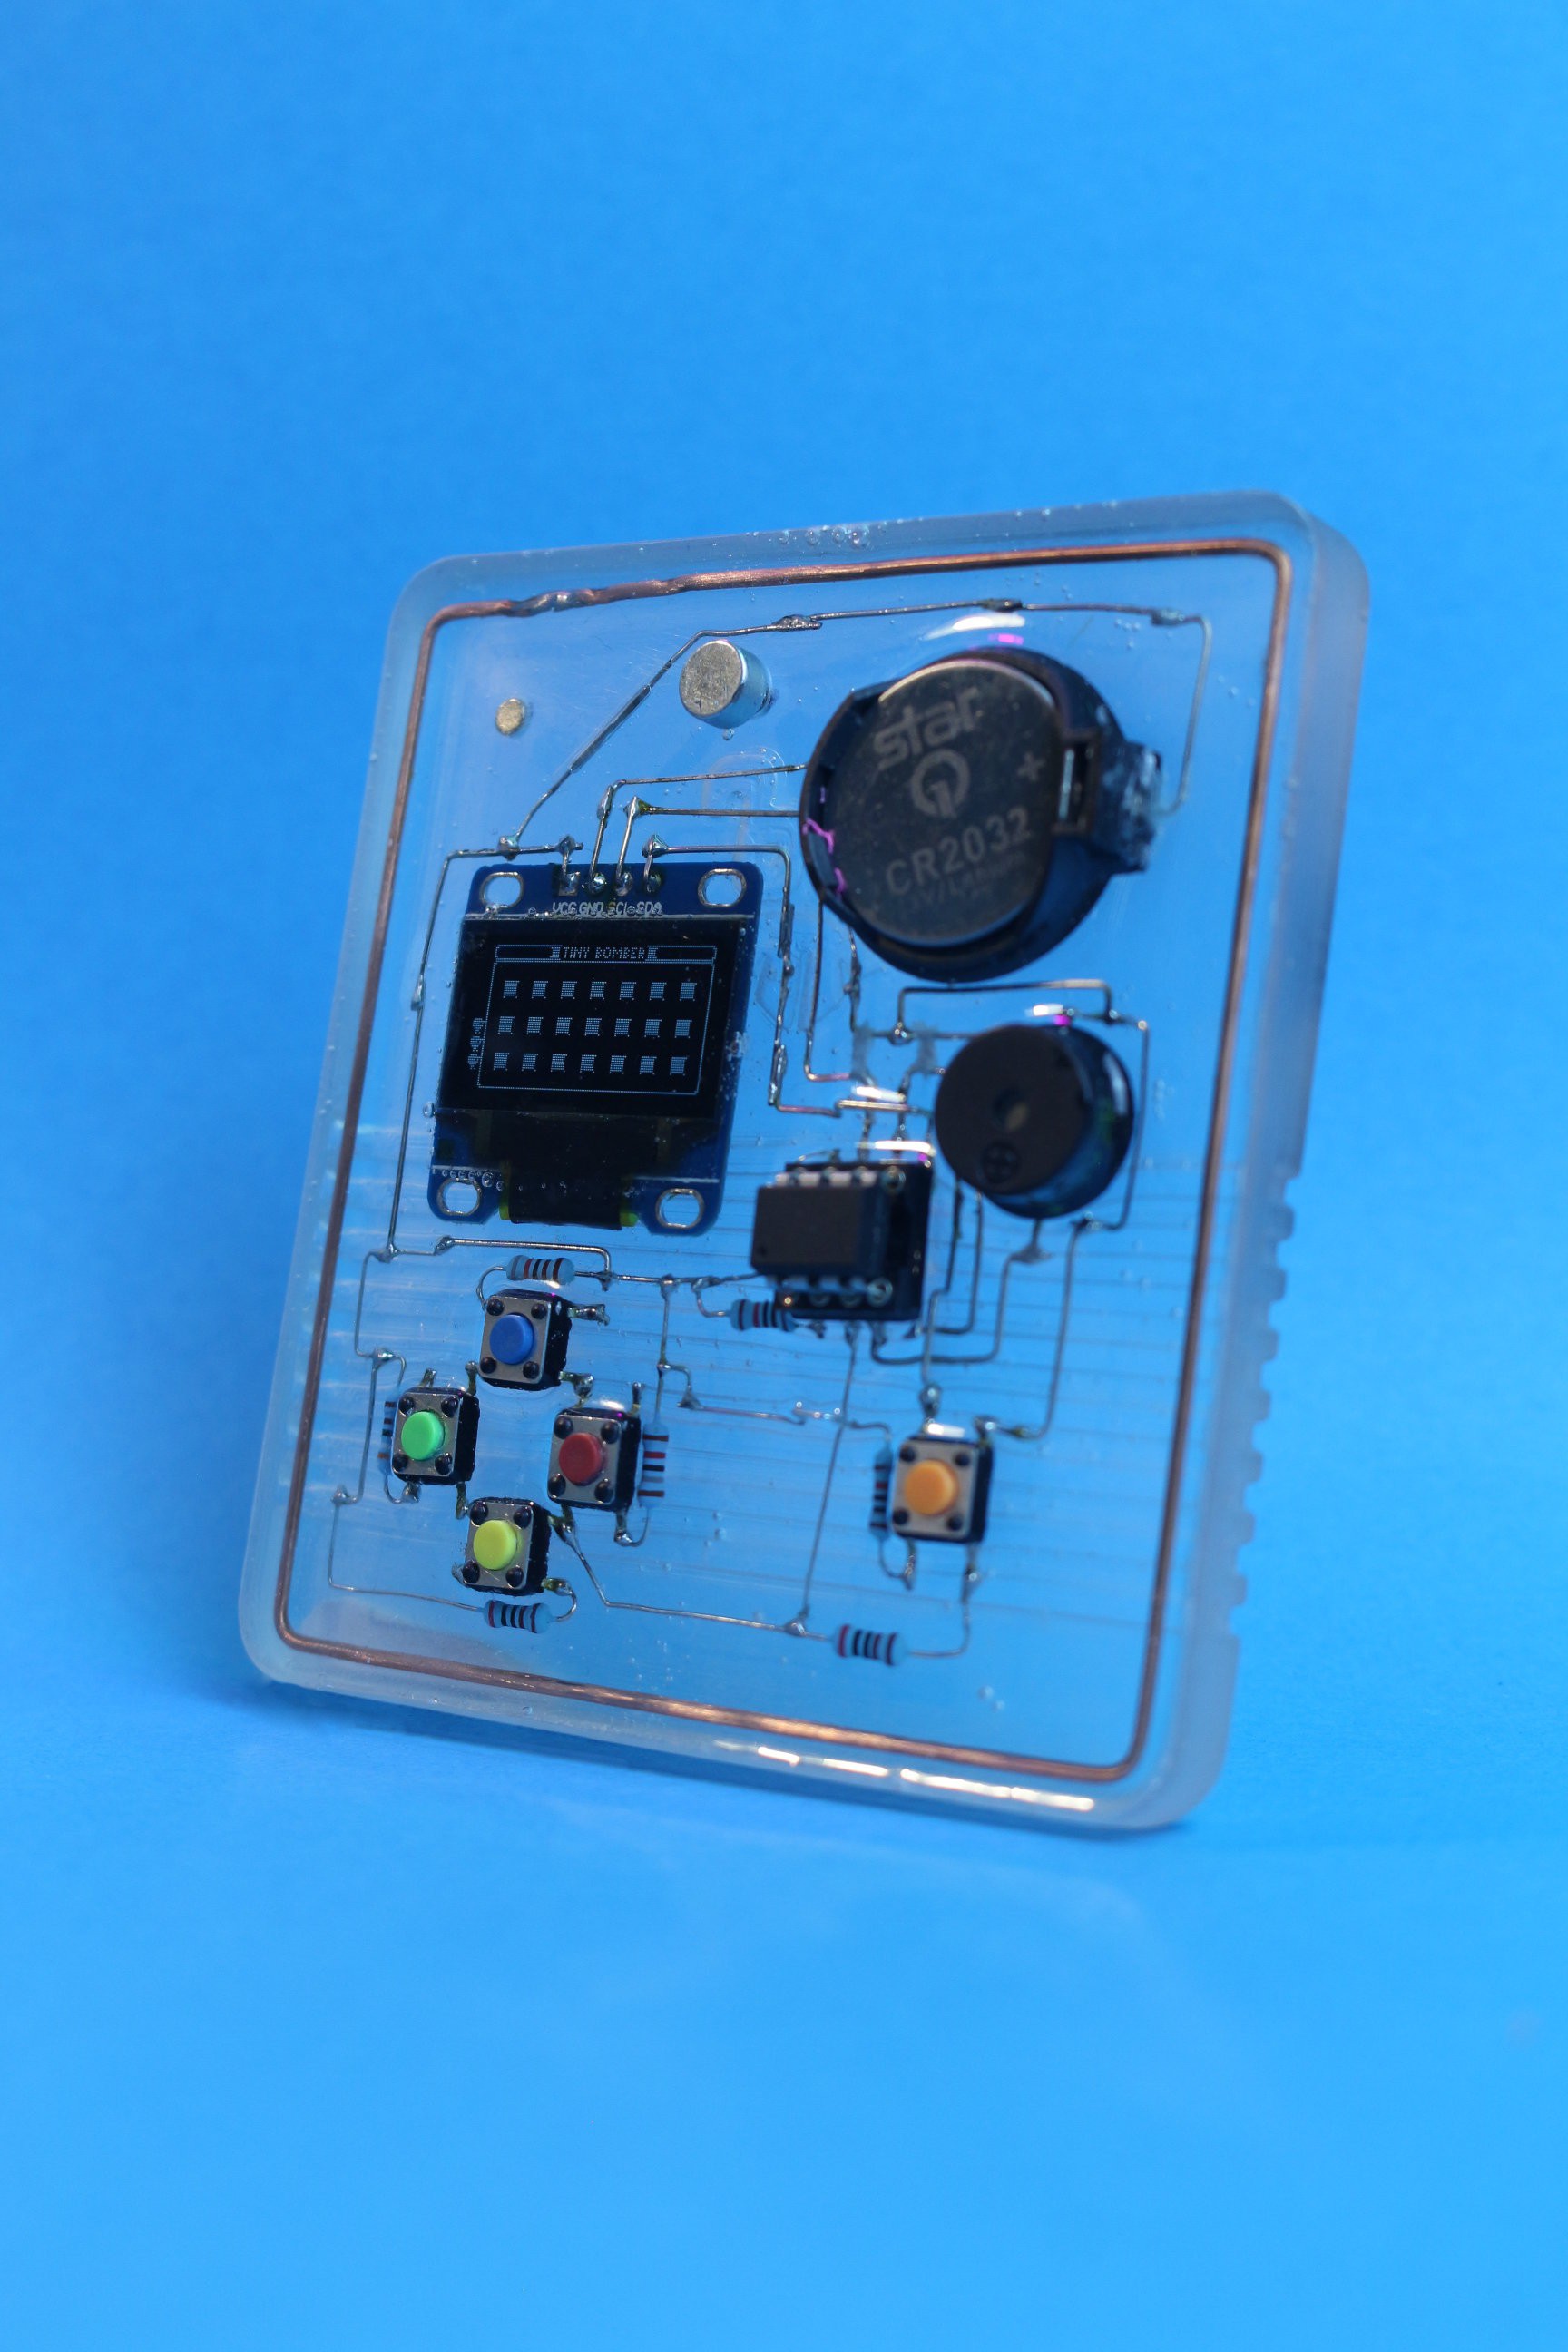
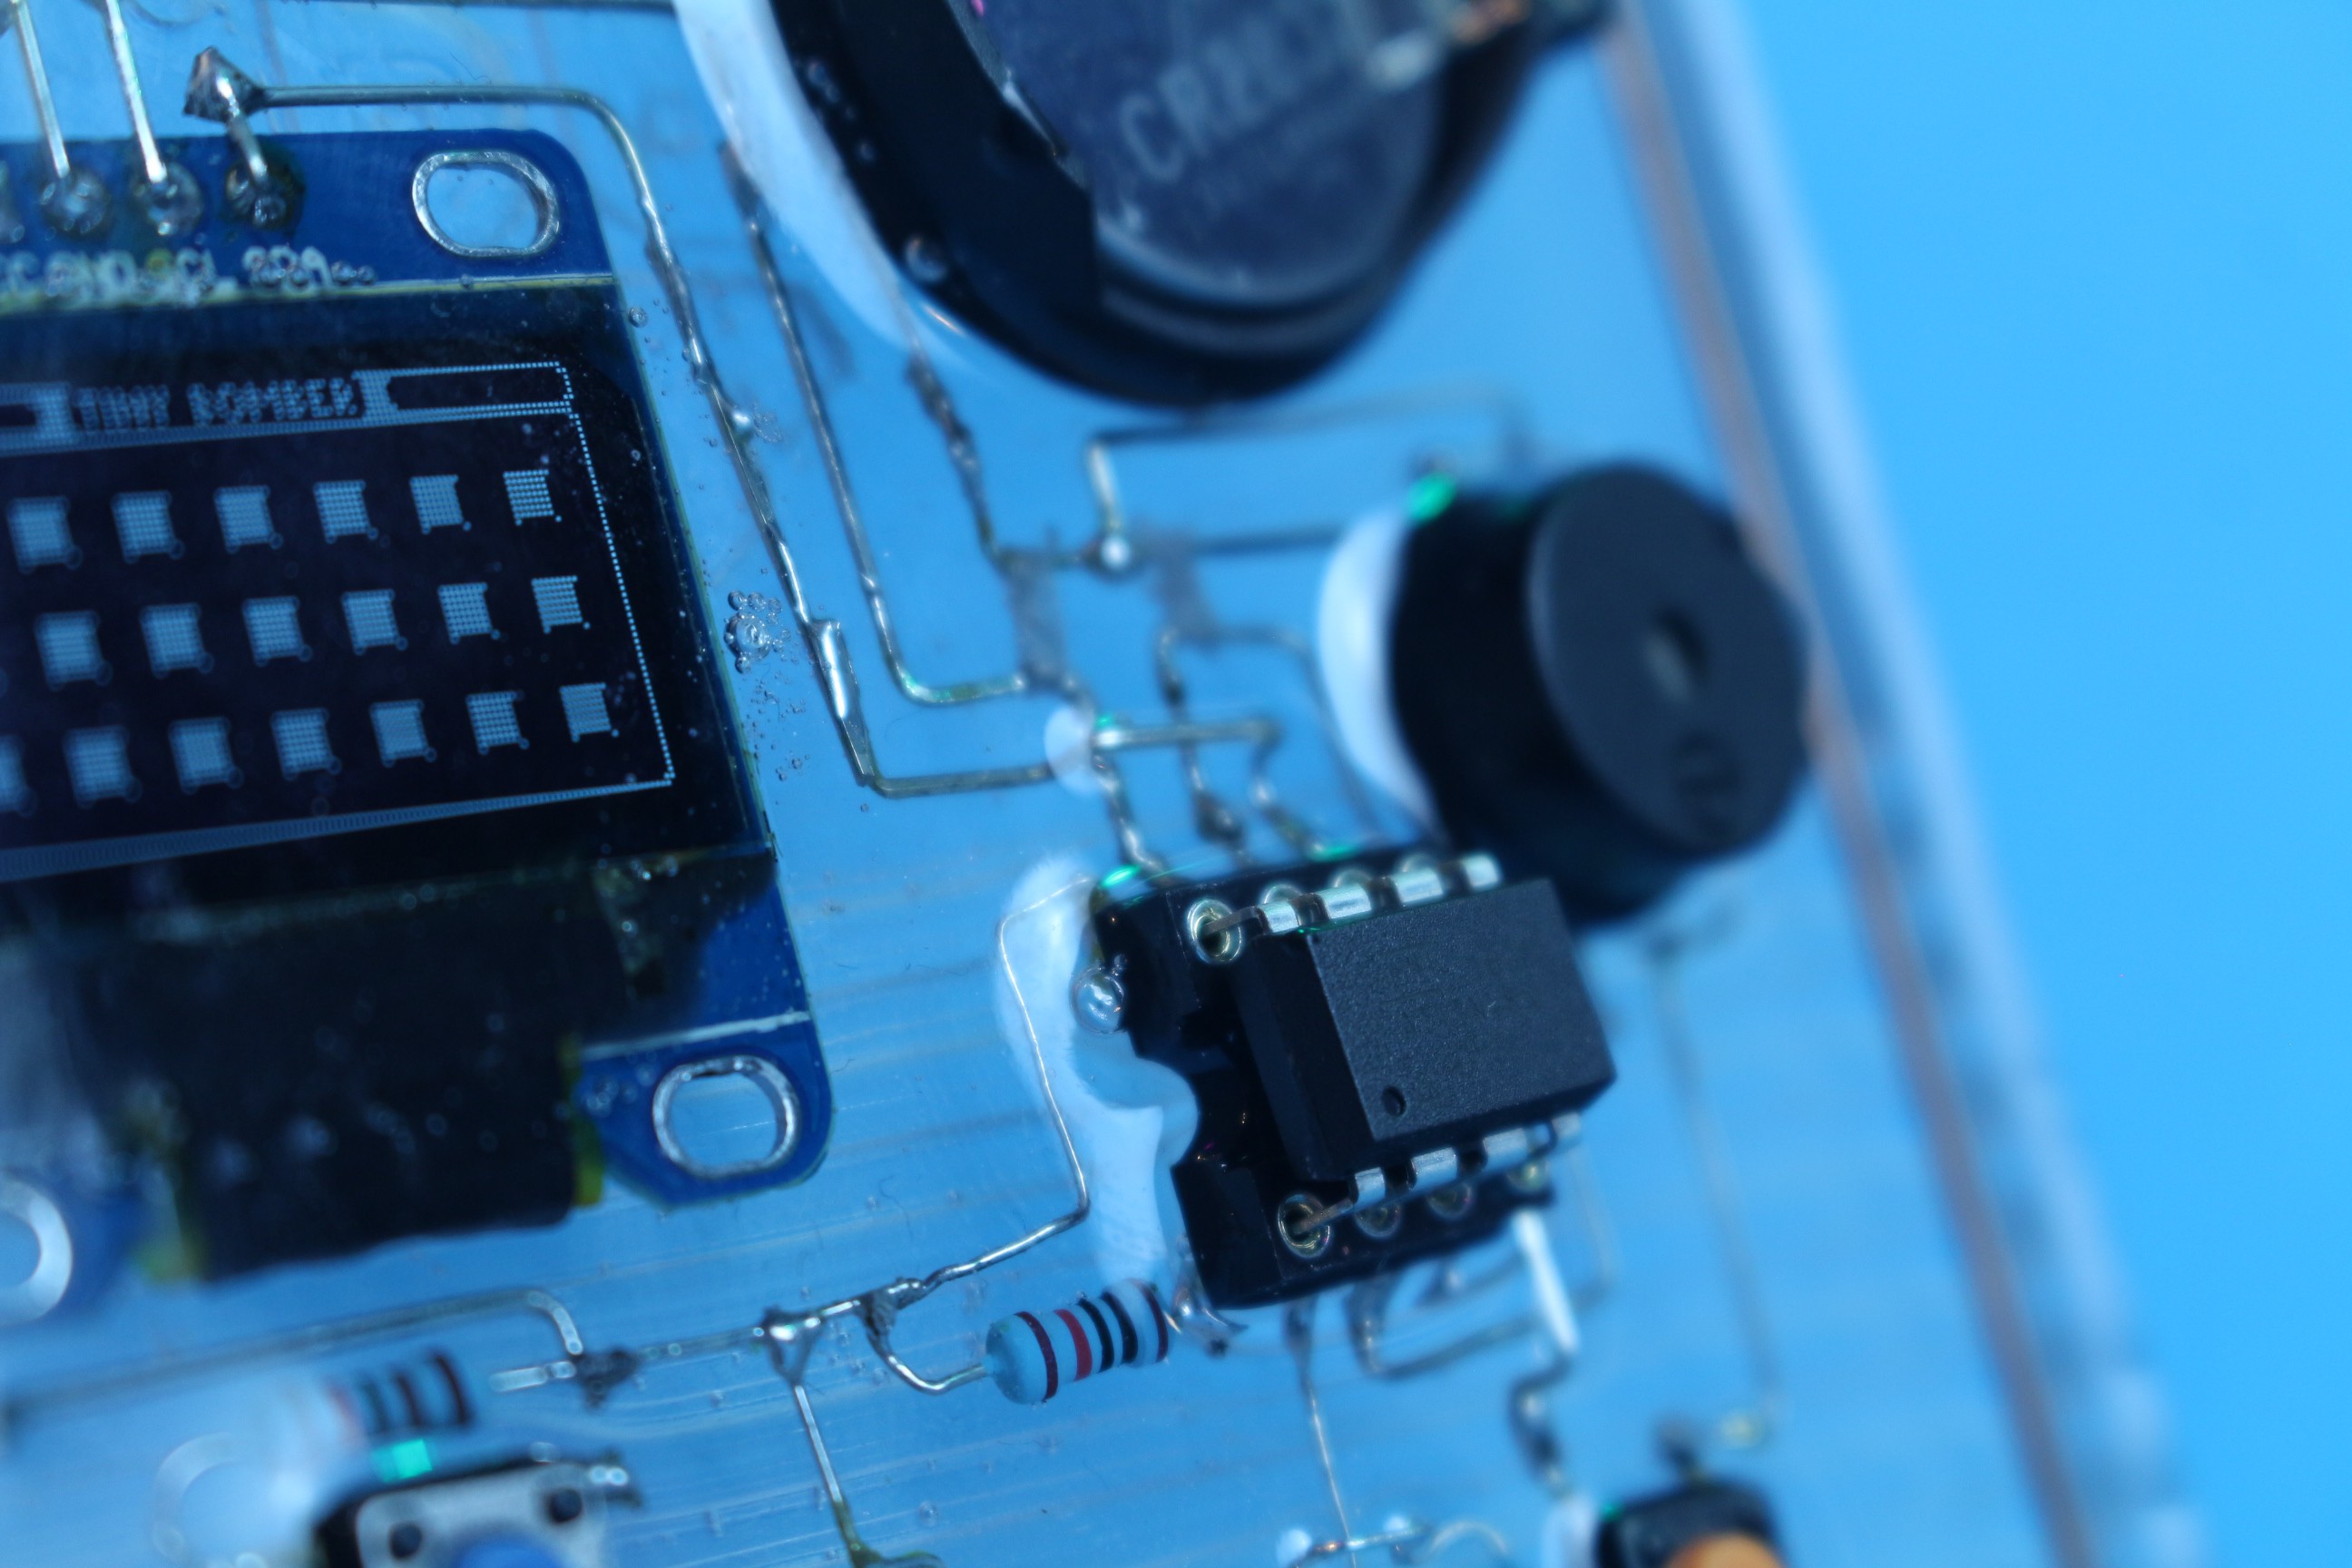
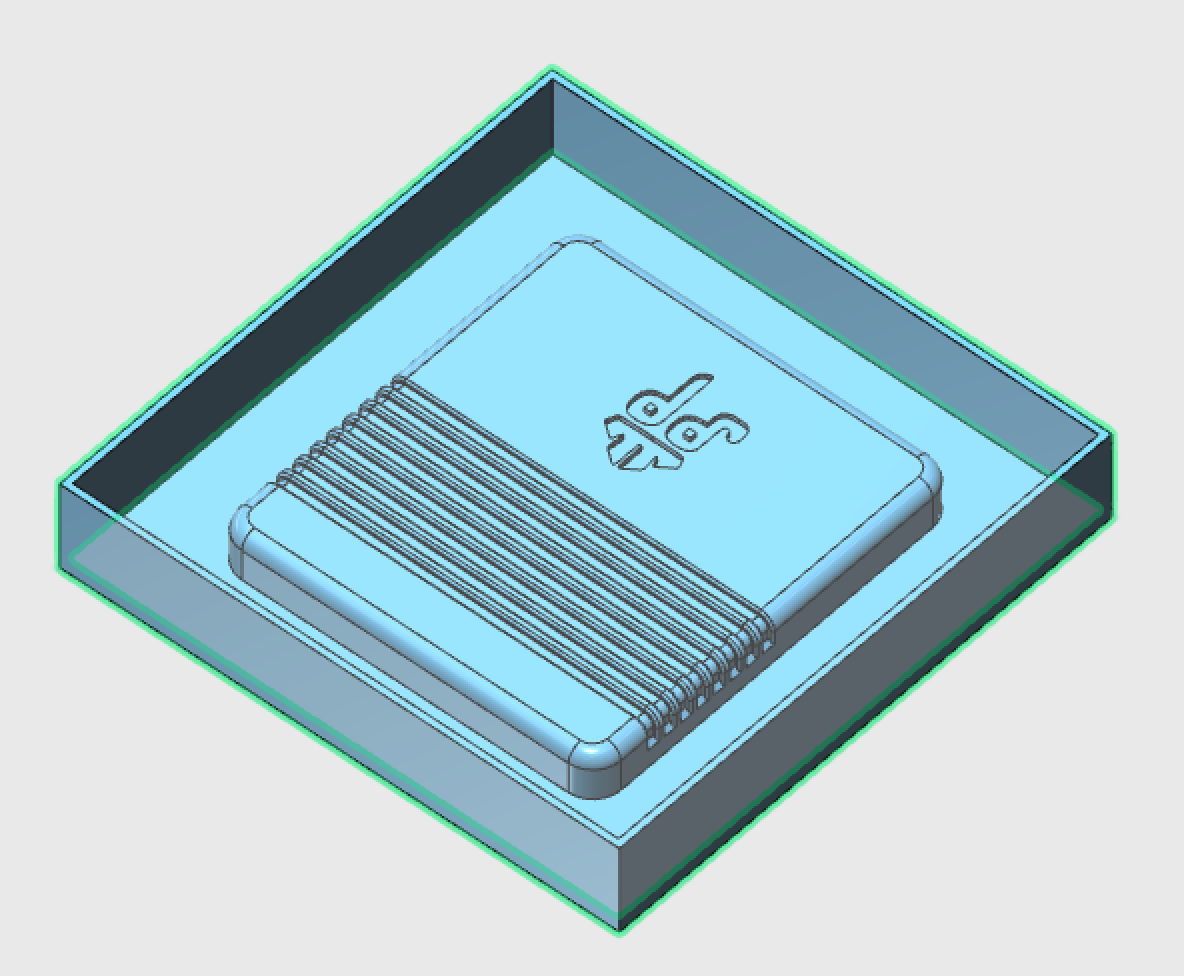
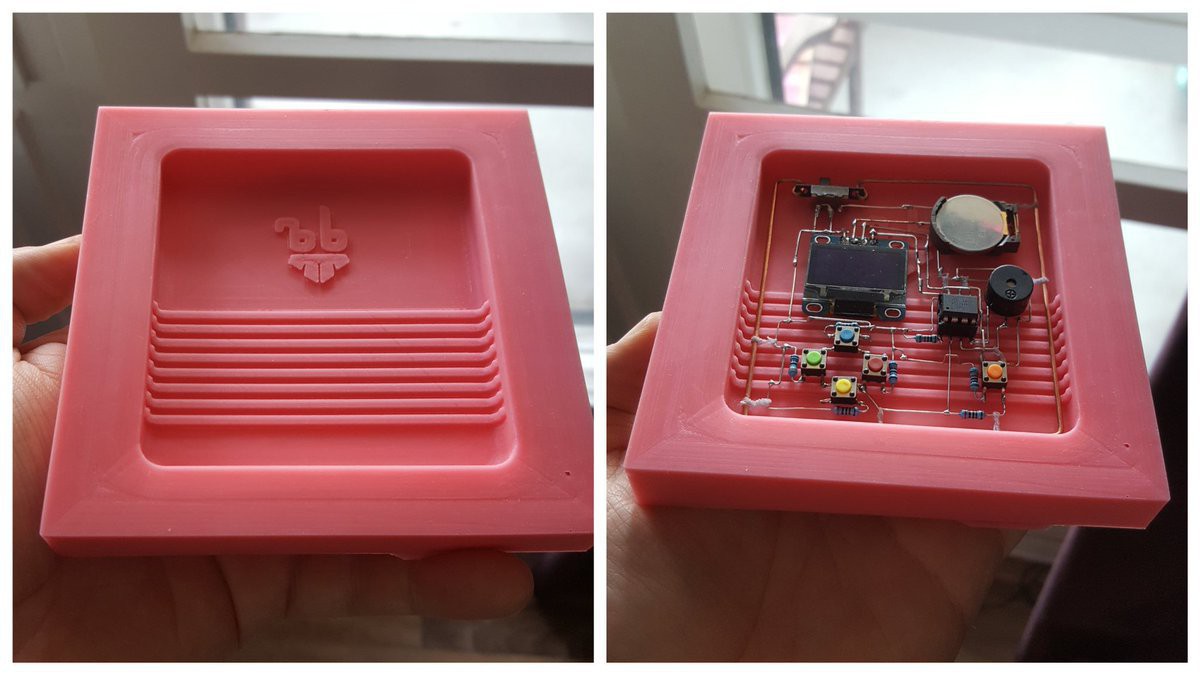
It was important to me that you can see all the "air wires" and that they not hide behind parts - except for the battery holder I managed to do exactly that. Otherwise I could have made it a bit more compact. 

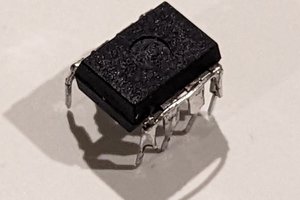
I'm also a cheap person, so I didn't solder in an Attiny85 but a DIP socket. That also helped with programming and testing it, without attaching any debug wires.

I like handhelds - but actually not like to game that often. It's just the thing itself that fascinates me.

For other hardware versions checkout this:

#Tiny Joypad 

#Multi game console 

Adobe Portable Document Format - 16.03 kB - 12/24/2018 at 13:05

Preview
Download

  • Boom, resin!

    davedarko04/11/2019 at 15:45 8 comments

    done! :)

  • encasing it in resin

    davedarko03/23/2019 at 17:35 2 comments

    I bought a bunch of things as a result of the feedback in the video comments and what people said before that already - basically a whole set for casting stuff in resin. Then I designed a case mould in 123D Design where I would cast the negative silicone mould in. The silicone came out wonderfully, but when I tried to pre-seal the switch and IC socket, the resin got into the parts, meaning I have to resolder them. It also seems as if the ratio wasn't mixed 100% right, as the resin is still very liquid, although it has been poured 3-4 hours ago. If it is not hard tomorrow morning, then I will mix up a new batch and remove the first layer of resin to start over. 

  • Revision for element14presents

    davedarko03/09/2019 at 18:51 6 comments

    So I made a revision of this project for my first episode for element14 :)  

  • Conclusion

    davedarko01/08/2019 at 21:15 4 comments

    At one point I had a thought that I could vary the time between asking the charlieplexed buttons and add a piezo buzzer to one pin to get some noises out of the little handheld. But then you would have to have sound all the time, because you want to scan the buttons as well.

    It would make much more sense to have the buttons connected via a bunch of resistors to the ADC, so you get free pins and a way to add a buzzer. The project I named in an earlier log is a way better basis to do so. 

    It was fun to solder up the prototype and build a charlieplexed "keyboard" for the first time, but programming a game for it wasn't really on the time table sadly. I enjoyed the positive feedback from everyone on social media though and might think of something at a later point. Thanks for having this contest, hackaday people!

    Hehe... just noticed the countdown said "since" and not "until". Anyways, nice to add some thoughts afterwards then!

  • Working with the charlieplexed buttons

    davedarko01/08/2019 at 21:08 0 comments

    I admit it was a bit trial and error development, but it worked out in the end.

    #define pin_1 1
    #define pin_2 4
    #define pin_3 3
    
    #define B_UP 0
    #define B_DN 1
    #define B_LF 2
    #define B_RT 3
    #define B_A 4
    #define B_B 5
    
    boolean pinChanged = false;
    uint8_t pinstate = 0;
    uint8_t pins[3] = { pin_1, pin_2, pin_3 };
    uint8_t switches[6][2] =
    {
      { pin_2, pin_1 },
      { pin_1, pin_3 },
      { pin_3, pin_1 },
      { pin_1, pin_2 },
      { pin_3, pin_2 },
      { pin_2, pin_3 }
    };


    void setup()
    {
    }
    
    void loop()
    {
      if (pinChanged)
      {
        pinChanged = false;
        if (pinstate & (1 << B_UP))
        { 
        }
    
        if (pinstate & (1 << B_DN))
        {
        }
        
        if (pinstate & (1 << B_LF))
        {
        }
        
        if (pinstate & (1 << B_RT))
        {
        }
        
        if (pinstate & (1 << B_A))
        {
        }
        
        if (pinstate & (1 << B_B))
        {
        }
      }
    
      for (uint8_t i = 0; i < 6; i++)
      {
        deactivate_all();
    
        // set pin states for button
        pinMode(switches[i][0], INPUT_PULLUP);
        pinMode(switches[i][1], OUTPUT);
        digitalWrite(switches[i][1], LOW);
    
    
        if (pinstate & (1 << i))
        {
          if (digitalRead(switches[i][0]) == HIGH)
          {
            pinstate &= ~(1 << i);
            pinChanged = true;
          }
        }
        else
        {
          if (digitalRead(switches[i][0]) == LOW)
          {
            pinstate |= (1 << i);
            pinChanged = true;
          }
        }
      }
    }
    
    void deactivate_all()
    {
      for (uint8_t i = 0; i < 3; i++)
      {
        pinMode(pins[i], OUTPUT);
        digitalWrite(pins[i], HIGH);
      }
    }

  • Making the Attiny85 work with OLED in Arduino

    davedarko12/23/2018 at 13:40 0 comments

    You need this to make the Arduino IDE be able to flash ATTINY based boards

    https://raw.githubusercontent.com/damellis/attiny/ide-1.6.x-boards-manager/package_damellis_attiny_index.json

    And this worked for me when trying to make the OLED run

    https://www.instructables.com/id/ATTiny85-connects-to-I2C-OLED-display-Great-Things/

  • so it begins

    davedarko12/11/2018 at 12:38 0 comments

    nice start so far :) I will try to port the games from @Daniel Champagne for the #Tiny Joypad by @megazoid to this handheld, because I made the buttons work yesterday! With a trick I might be able to add some sound, but not like them. I really enjoy their take on the attiny85 handheld and the 3D printed case with a swappable / rotating display.

    The broken OLED is replaced, I've added some more of the threads that I made stronger with the help of liquid super glue! The tweet that I almost deleted because I feared spamming people got pretty crazy in comparison of my usual tweets.

    https://twitter.com/davedarko/status/1072076882957484033

View all 7 project logs

Enjoy this project?

Share

Discussions

Elliot Williams wrote 03/11/2019 at 20:15 point

I knew him before he was famous!  :)

Nice vid!

  Are you sure? yes | no

davedarko wrote 03/12/2019 at 08:58 point

haha, thanks Elliot! I'm happy with the result and that it does more than when you were holding it at 35C3 ;)

  Are you sure? yes | no

Jan wrote 03/09/2019 at 19:17 point

Congrats on finishing your handheld! Your Element14 video is really well produced. Keep the awesome projects coming :)

  Are you sure? yes | no

davedarko wrote 03/09/2019 at 19:39 point

thank you! :) I'm so happy about how people seem to like the video! Making videos for another channel is a good motivation to tackle these projects.

  Are you sure? yes | no

not jason wrote 01/17/2019 at 16:24 point

the future of pagers is now

  Are you sure? yes | no

davedarko wrote 01/17/2019 at 16:48 point

Okay Jason.

  Are you sure? yes | no

CooperRC wrote 01/16/2019 at 14:35 point

Saya ingin sekali menjadi seorang HACKER

  Are you sure? yes | no

davedarko wrote 01/17/2019 at 11:36 point

Di sini Anda hanya belajar menyolder.

  Are you sure? yes | no

Xasin wrote 01/16/2019 at 08:47 point

I'm really sorry to hear that this project didn't even get mentioned. It's really creative to use such a small microcontroller to do so much, and it's even cooler to see it all without a PCB and just well placed wires!
Even if you didn't get the contest, you got me interested in making these types of devices. I hope that counts as some sort of success for you.

In any case, keep up the good work, and don't be discouraged by this :c

  Are you sure? yes | no

davedarko wrote 01/16/2019 at 10:14 point

Thank you! I think winter got to me a bit. I still received a lot of of positive feedback for this projects and learned something / did something I haven't done before (wire frames and charlieplexed buttons). That's something that should be more important than winning. Also thank you for writing that it sparked your interest, that's valuable to me, too!

  Are you sure? yes | no

Xasin wrote 01/16/2019 at 10:56 point

Your Charlyplexed buttons certainly are something I haven't seen before! And I have a feeling they could be very helpful with ESP32 projects, their chips sadly don't have many IO pins. I was thinking about building a smart little DSKY replica based on the chip and am still not sure how to handle the keyboard.

  Are you sure? yes | no

davedarko wrote 01/16/2019 at 12:56 point

@Xasin I would suggest using IO expander for that, makes it easier to switch MCUs as well, just connect the panel over I2C or SPI then.

  Are you sure? yes | no

Xasin wrote 01/16/2019 at 13:12 point

That was the idea, yeah.
I wanted to build a "portable", miniature version of the DSKY with protected connections for UART, I2C, SPI, maybe CAN, and use it as a sort of retro-style debugger. The ESP32 as MCU would be soldered on, so I won't be changing the MCU.

I wanted to use WS2811 for the 14-segment displays, and then maybe an I2C I/O expander for buttons :>

  Are you sure? yes | no

Emily Velasco wrote 01/18/2019 at 15:27 point

I was also really surprised you didn't place :/  Your project was a lot more technically advanced than mine. 

In any case, I think the project is great. Yours was the first one I saw submitted to the contest, and you inspired me to get going on mine. 

  Are you sure? yes | no

davedarko wrote 01/18/2019 at 16:29 point

@Emily Velasco thank you! I'm glad it pulled people to the contest and I'm happy for you and your project :)

  Are you sure? yes | no

Elliot Williams wrote 01/17/2019 at 10:47 point

Good news / bad news: Dave, you didn't get disqualified.  

(And this was _far_ from the only amazing project in this contest.  I mean, that tower Z80?!?! Respekt.) 

I got to play with this at 35C3, and it's awesome. When we judge the contests, though, great projects run into arbitrary judging criteria. As much as we try to make the criteria align with what's simply awesome, it's never a perfect fit.

One of the really cool things about this project (the button matrix) just isn't relevant to the contest, and so it doesn't help your score because we didn't have a criterion like "cool tricks that might come in handy in other applications" to judge you on.  

My 0.02€, if contest-winning is a more important goal than doing something cool and creative: think hard about what the judging criteria are going to be and optimize around them.  My advice, if you want to be a happy person, doing good creative work, is to forget about the above. 

I really liked that one bit where the VCC line jumps over another signal just by the reset resistor looparound, which is also very clever. The little hop into the 3rd dimension is somehow "cute".  (I anthropomorphize copper wires.  What is my problem?)

And now to make the longest comment longer: an e-mail got lost between Mike and I, and I have a long "honorable mentions" post to write up in the aftermath of this one. I hope it'll come out next week.

  Are you sure? yes | no

davedarko wrote 01/17/2019 at 11:35 point

Thank you Elliot, that is in fact good news for me - to know I wasn't disqualified! I hope I made it clear that I also think that the other projects fairly deserved everything - thank you for explaining it more to me, though! I was really happy with the outcome of the project and the responses. Winning wasn't something I aimed for, but I was kind of surprised that I "ended up with nothing" - just the contrast of resonance vs. outcome was surprising.

Might be nice to prepare short messages for everyone, like: "Thank you for taking part, sadly you didn't do X or you were disqualified because Y or you did fine but sadly.." - just to communicate what went "wrong".

Thanks again!

  Are you sure? yes | no

Sophi Kravitz wrote 01/15/2019 at 20:46 point

This is really well done, congrats for finishing (I guess that's what a log called conclusion means). I love the gallery! More pics and a video?? <3

  Are you sure? yes | no

davedarko wrote 01/15/2019 at 20:53 point

There was no log rule posted. But I was an hour late to finish writing something about a project I considered PoC days before deadline

  Are you sure? yes | no

davedarko wrote 01/15/2019 at 21:06 point

I'm just grumpy with myself that I didn't took the time to write another log earlier. When I finally did I checked the countdown and thought I had another hour - but then noticed it was already an hour over. Then I looked for the famous 3-log rule and it really isn't there, but also see that everyone else winning deserved that. So I'm pretty disappointed by myself and this thing that reminds me of that - probably gonna leave it in it's box and never take another look at it. 

Also it's winter here. Meh.

  Are you sure? yes | no

morgan wrote 01/15/2019 at 21:41 point

Yeah, I'm in the same boat, I took so long building that I ran out of time on a write up and better pictures.

  Are you sure? yes | no

davedarko wrote 01/15/2019 at 20:13 point

I guess likes aren't everything :/

  Are you sure? yes | no

deʃhipu wrote 01/15/2019 at 23:41 point

Let's face it, you had very fierce competition there!

  Are you sure? yes | no

davedarko wrote 01/15/2019 at 23:52 point

no argument there - really. I'm just surprised since the feedback overall was very positive. Got me +1k likes on twitter and all. Seems like I was knocked out because of the log rule that I can't find - which would annoy me, since I could have written everything earlier and more. Just didn't took the time and was busy with other things.

  Are you sure? yes | no

davedarko wrote 01/15/2019 at 23:58 point

I know I sound like all the whiny nonwinners from the price. But I came from 1k tweet + like leader down to not even a mention on the blogpost. I'm just disappointed and surprised by that hard crash. And its winter here. Meh.

  Are you sure? yes | no

Jeffrey Jacques wrote 01/16/2019 at 01:01 point

You're not the only one disappointed. Several projects got featured multiple times and the article just seems lazy/short when #badgelife gets a 4 part tome... Some of the entries are really good and deserved a win but a lot I'd chalk up to subjective taste. My entry got featured on hackster's insta and got lots of likes but not even a mention here, so not gonna sweat it. If there's some unwritten log entry rule the editors should really be upfront about it.

  Are you sure? yes | no

davedarko wrote 01/16/2019 at 08:27 point

You had one of my favorite projects for this contest :/ I think you might got kicked because of that 3 log rule that wasn't defined for the contest, but kind of is an unwritten rule at this point, since it was given in every other contest. 

Let's stay positive though, otherwise this will become an even suckier winter :D

  Are you sure? yes | no

Elliot Williams wrote 01/17/2019 at 10:48 point

Just to be clear: there was no log requirement for this contest.

And Hypnobutt made my honorable mentions list, which got lost in an e-mail snafu.  (Mike sent me a link via some Google-hosted spreadsheet crap, I replied to it like a noob from 2008.)  So it's gonna have to get written up next week.

The feet-as-9V adapter thing was awesome!  

But: 

a) some truly amazing entries

b) judged on criteria

F'rinstance: I loved the minimalism of the circuit, but that didn't help with the "function" criterion because in the end it just blinked and blooped randomly. And while it was a strikingly accurate Hypnobutt, the choice of motif doesn't scream "art" as loudly as it screams memes.  So there's 2/5 criteria working against you in the harsh world of judging.

So we can't just pick our favorites, because that would be way too arbitrary, but that also handcuffs us to the criteria we started out with.  Stay tuned for my "honorable mentions" article next week where I game the system.

  Are you sure? yes | no

davedarko wrote 01/17/2019 at 11:41 point

almost looked over that comment @Elliot Williams  - thanks for the input on the meme vs. art judging criteria, looking forward to that blog post

  Are you sure? yes | no

Jeffrey Jacques wrote 01/17/2019 at 16:22 point

Thanks for the explanation Elliot. Yeah I had no expectation of winning, honestly have no recollection of what the prizes even were or cared. I admit my submission was mostly for laughs / fun and the chance at the meta reference as the source of the dickbutt meme is a comic about wasting resources and my project was made from mostly reused scrap. The debate of memes as a subject matter being a form of art or not is probably a job for future people to decide. Look forward to the followup.

  Are you sure? yes | no

Jan wrote 01/16/2019 at 08:10 point

Man, I really hoped your project will make it. Everything seemed like it would. Can totally undertand your dissapointment!

  Are you sure? yes | no

davedarko wrote 01/16/2019 at 08:27 point

thank you

  Are you sure? yes | no

Elliot Williams wrote 12/14/2018 at 13:58 point

1) Awesome!

2) Moar dimensions!

  Are you sure? yes | no

Tillo wrote 12/13/2018 at 20:32 point

A beautiful project, as always.

  Are you sure? yes | no

Peter wrote 12/13/2018 at 01:39 point

Very cool project and wonderfully executed.

  Are you sure? yes | no

davedarko wrote 12/13/2018 at 12:23 point

thank you very much!

  Are you sure? yes | no

Florian wrote 12/12/2018 at 09:02 point

Hey Dave, it looks so pretty ;) Can you upload some details (like source, circuit diagram) on github? I want to build it, too.  Very nice work. Thank you for sharing.

  Are you sure? yes | no

Daniel wrote 12/12/2018 at 17:58 point

if the schematic does not mirror the layout of the wires I will be severely disappointed :)

  Are you sure? yes | no

davedarko wrote 12/12/2018 at 19:46 point

hehe, thanks! It might be better to try that with the #Tiny Joypad  project instead, because they have sound and games going already. It looks like the part count is almost the same. 
I will definitely share schematics (technically @Daniel Rojas is right :D)  of this build and the code to make it work in the coming days! 

  Are you sure? yes | no

Jan wrote 12/12/2018 at 20:08 point

Ha, why bother? The schematic is right in the picture!

  Are you sure? yes | no

Florian wrote 12/12/2018 at 21:37 point

Thank you. I know that the schematic is already right in the picture but i was confused about the transistor on the left side. A second thing, i dont know the size of the resistor at the attiny.

  Are you sure? yes | no

davedarko wrote 12/13/2018 at 00:16 point

there's not really a transistor. Top left is the on off switch, there's an OLED display, a 10k pullup resistor for the reset pin of the attiny85. Then 6 diodes and six buttons and one battery holder :) there are two "jumpers", where I've bend the wire above another. I wanted all the wires to be visible from the top, nothing is hidden behind a part.

  Are you sure? yes | no

davedarko wrote 12/24/2018 at 13:11 point

Hey @Florian - I've added some schematics in image and pdf form

  Are you sure? yes | no

Florian wrote 12/24/2018 at 13:48 point

Thank you very much and merry christmas.

  Are you sure? yes | no

Mike Szczys wrote 12/10/2018 at 19:11 point

So beautiful. I'd bend this think like crazy with my button mashing!

It would be a really fun project to encapsulate in clear resin.

  Are you sure? yes | no

davedarko wrote 12/10/2018 at 19:28 point

Thanks :) I might do the resin treatment at one point, but I it's tricky to not end up with buttons and switches full of resin, right? thought about partially having it in resin... don't know. I'm happy that I found a way to stabilise the frame with thread dipped in liquid super glue :)

  Are you sure? yes | no

Jarrett wrote 12/10/2018 at 20:08 point

That just sounds like another problem to be worked out :)

Maybe do it in two stages - Tape up the side of the switches and then use viscous resin around it. Then let it cure, and resin up the rest.

  Are you sure? yes | no

deʃhipu wrote 12/10/2018 at 20:28 point

I think you could cover the buttons in butter, or something similar, and wash it out after encapsulating.

  Are you sure? yes | no

Morning.Star wrote 12/11/2018 at 07:58 point

Peelable solder mask, Dave. Just paint the tops of the buttons and sockets etc, wipe the sides and fill to it. Pick the rubber back out with tweezers and trim. ;-)
IMO definitely worth taking the time to make it sturdy, its beautiful. :-)

  Are you sure? yes | no

Dr. Cockroach wrote 12/09/2018 at 19:21 point

Ahhh, my kind of wiring. Looking good :-)

  Are you sure? yes | no

davedarko wrote 12/09/2018 at 21:51 point

thanks :) 

  Are you sure? yes | no

Morning.Star wrote 12/08/2018 at 15:15 point

Are you deadbugging that Dave?

It sure looks that way... :-D

  Are you sure? yes | no

davedarko wrote 12/08/2018 at 16:35 point

well that's what the circuit sculpture contest is about ;)

  Are you sure? yes | no

Morning.Star wrote 12/10/2018 at 07:11 point

Nice build dude, very tidy :-)

Loving that copper wire :-D

  Are you sure? yes | no

Similar Projects

Does this project spark your interest?

Become a member to follow this project and never miss any updates