The schematic was captured in KiCad. I used the ATmega32U4 because it has a built-in USB port, which makes things pretty simple. Of course I could have used a much less expensive microprocessor.
Two capacitive sensors are used to control the flame intensity. The capacitive area is simply a small copper plane on the PCB. This worked out very well, and is actually easier to use than pushbutton switches.
I laid out the PCB on a Monday morning and uploaded it to PCBGogo (China) by about 1PM. They reviewed it later that evening (I'm on EST), I paid for it, and they started building. I had boards in my hands 5 days later on Saturday! PCBGogo is amazing. Great price.
The parts came from DigiKey. I built the boards by hand with 0603 parts. I'm guessing about 5 hours total build time for all 10 boards. It's a pretty simple board, and most came right up and started working.
First step was to burn a bootloader. I used the Arduino software platform, which made things very easy. The FastLED library is great for driving a string of APA102s, and the CapacitiveSensor library was very easy to use as well.
There are 3 3D printed parts:
- Shadow box, which also holds the PCB
- A rim around the shadow box, which also holds the vellum a few millimeters away
- A cap/rim over the top, to give it a nice finished look
These 3D printed parts are held together (and the PCB held on) with black high temp hot melt glue.
I used a right-angle USB connector, bent straight out and soldered to the back of the board, for support. The whole thing is light enough to be supported by that USB connector, using a standard wall-mount USB power supply.
The messsage was drawn with colored pencils. The wick and candle outline is charcoal.
 Abhishek
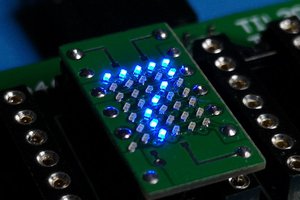
 Mile
Mile
 Chris Miller
 Steve Pomeroy