Close
0%
0%

Dual Axis Solar Tracker V2.0

Track the sun in X and Y with this simple Arduino Project

Similar projects worth following
Due to the success of our original Solar Tracker project, youtube video, and the kits we were selling we received a wide range of feedback from a wide range of users. Most of it good, some of it annoying, and quite a few that were along the lines of "wiring this thing up is really darn complicated so please spend an hour on the phone with us to figure it out." With that in mind we spent several months redesigning the project from the ground up to make it a much more streamlined and easy activity.

In this write up you'll find information about our upgrades, how solar trackers work, a parts list, links to our Open Source hardware, Open Source code.

Our original 2015 Solar Tracker was more concerned with physical mechanics than it was about electronics and this proved to be its biggest downfall. When we started redesigning this project we made the decision to change our wiring from a 'bundle of wires' approach to an easy 'plug and play' approach since our audience tended to be students. 

* Full disclosure, we do sell kits and parts for this on our website. This project is 100% Open Source and you never need to spend a penny on us if you don't want to.

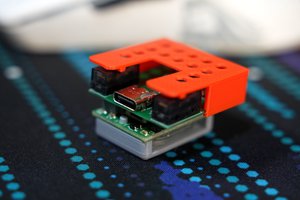
The first thing we did was create a custom Arduino Shield for plugging in the servos and sensors. The original design used a generic Arduino Uno Sensor Shield that worked well for the Servos but not well for the Sensors. Our Shield is nothing special overall and it was by far the most simple aspect to design. (We've also used it for other projects where we needed to plug in a simple sensor and a servo.)

To keep the sensors in place we designed a very simple sensor holder that could easily screw down to the wood. A set of pin headers then allowed us to connect the sensor PCB to the shield with female jumpers. Trouble shooting this setup is far easier than our original 'bundle of wires' or a breadboard.

Lastly we went over our design and changed quite a bit of the wood from quarter inch to eighth inch to cut down on weight. While we never had any reports of people having issues with their 9G Servos burning out the less weight they were moving the better. This also cut down on cost and shipping weights for us since we tend to ship a lot of kits internationally.

All the files for this can be found on our GitHub Repo. This includes the PCB files for the Shield and Sensor holder, the laser cut wood, and all our old V 1.0 files. A savvy eyed builder might also see that we have an Arduino Nano PCB designed for this project as well, however it remains untested. Theres no reason why it wouldn't work we just decided not to go that route with our kits.

  • 2 × 9G Metal Gear Servo
  • 1 × Arduino Uno
  • 2 × M6 Screws and Nuts
  • 4 × Rubber Feet
  • 1 × Solar Tracker Shield PCB Along with pin headers and resistors

View all 12 components

  • 1
    Video Guide

    Our video goes over this project pretty heavily.

  • 2
    PCB Creation and Soldering

    If you want to make your own PCBs up you can just grab the files off our GitHub Repo and order them from a small batch PCB company, such as OSHPark.com. Then you just need to solder a few pin heads, light detecting resistors, and four resistors onto the boards and pop the shield on an Arduino.

    Please keep in mind this project is entirely powered by the USB connection to the Arduino. It is NOT self powered.

  • 3
    Laser Cut Files

    The same goes for our laser cut files. We use both 1/8th inch and 1/4th inch baltic birch plywood for this project. We'd recommend standing away from Acrylic because of the weight.

    In our laser cut file we did include a 1 inch by 1 inch cube. Make sure that cube is in fact 1 inch square, because if it's not it's been slightly changed by your graphic design software. 

    We used a small laser cutter to make these parts. I suppose you could use a CNC router for this as well. We have had student groups make this project out of hand cut cardboard or foam board before. They traced out the parts and cut them by hand. If you don't have access to a laser cutter this would be an option.

View all 5 instructions

Enjoy this project?

Share

Discussions

Max jecha wrote 02/08/2019 at 13:55 point

cool

  Are you sure? yes | no

phillicom wrote 02/05/2019 at 01:14 point

I sometimes wonder why solar trackers actually track the sun.  The azimuth of  the sun at any time of the day is known.  The sun's altitude angle at any latitude on any date is also known.   Getting the date and time from a RTC, would permit the calculation of the horizontal and vertical angles without the need for sensors.  In reality,  just a modified,  automated equatorial telescope mount focused on a single star.  The altitude angle need only be changed weekly (or even longer).  The azimuth angle could be updated at (say) ten minute intervals with negligible reduction in energy-gathering efficiency.  Dithering on days of broken cloud would be eliminated resulting in less wear on the mechanism and less energy used in the actual tracking.  

  Are you sure? yes | no

Richard Hogben wrote 02/05/2019 at 19:08 point

Do you think thats what they are using in this mirror: https://www.youtube.com/watch?v=W1VUkFPRqbE

Edit: nope, just noticed the sensor.

  Are you sure? yes | no

BrownDogGadgets wrote 02/05/2019 at 20:09 point

This isn't intended to be practical, it's a small table top unit for educational use. This project is in no way practical for large scale use.

  Are you sure? yes | no

Alexander wrote 02/04/2019 at 19:00 point

This design is uber cool! I absolutely love the fasteners, that is such a neat concept and it gives it a really cool look. The whole time I was watching the video I kept saying out loud "Wow! What a neat design!!!". Simple yet elegant -- what every hacker dreams of.

I totally want to pick one of these up. Good work! I hope this is successful for you. Definitely following for updates.

  Are you sure? yes | no

Similar Projects

Does this project spark your interest?

Become a member to follow this project and never miss any updates