 Owen Trueblood
In the last post I showed how to set up CollisionIK for my Kuka KR 16 robot arm in ROS so that it can be used to solve the inverse kinematics (IK) problem in real-time while handling singularities, collisions, and other issues. I only showed it working in simulation because there were still some issues to overcome before it would be safe to use with the real robot. In this post I show my solutions to those issues and the resulting system being used to control the real 600 lb robot arm based on device and hand tracking data obtained using WebXR on a phone and Quest 2, respectively.
The motion from CollisionIK looked fairly reasonable in simulation, so why couldn’t it it just be plugged straight into the robot? The main reason is safety - nothing was in place to prevent dangerously fast or unexpected motion. In the worst case that motion could hurt someone, or it could damage the robot. In the best case it will cause the RSI interface on the robot controller to throw an error and do an emergency stop. So at the very least we need to constrain the motion sent to the robot just so it will keep doing what we tell it.
CollisionIK contains code to minimize the velocity and acceleration of the robot but nothing to limit those parameters to safe ranges. Due to the nature of the solver - it relaxes constraints to find solutions in situations where other solvers would give up and stop - it’s not really appropriate to implement safety constraints as goals in the CollisionIK objective function.
A Quick Note on Jerk
Another reason we can’t just proceed with the velocity & acceleration minimization included in CollisionIK is that we also need to limit jerk, which is the rate of change in acceleration. For small robots it’s sometimes ok to ignore jerk, but my KR 16 is big enough that ignoring jerk could lead to damage to the internal mechanisms of the robot.
You can get an intuitive sense of why by thinking about what acceleration means in the context of the robot arm’s drive mechanism. By Newton’s 2nd law, force equals mass times acceleration. The mass here is basically fixed. So whatever reasoning we do about acceleration also applies to force. Torque is the kind of force that’s relevant in the robot arm because it’s force applied to rotate an object (the arm’s joints). Now if we look at jerk again we can see that because it is the rate of change in acceleration it is proportional to the change in torque.
So if we have discontinuous jerk we have discontinuous torque. Physically a jump in jerk is like a whack to the input to the mechanism. A light mechanism has little inertia and will respond to the whack by accelerating all together. Like swinging a baseball bat into a baseball. A heavy mechanism with a lot of inertia will respond to the whack by shedding energy into breaking stuff. Like swinging a baseball bat into a brick wall. You might chip the bricks or break your wrists but you will not move the wall in time with the impact. If you keep pushing with all that force eventually the wall will yield, but only after a lot of damage has been done at the interface where the collision happened. This is how I think about what happens inside the robot to its gears when there’s discontinuous jerk.
Jerk-limited Motion with Ruckig
The goal is to limit the velocity, acceleration, and jerk of the motion of the individual joints of the robot arm. At the same time all of the individual joint trajectories need to be synchronized in time so that the tool at the end of the robot follows its target trajectory as close as possible. And these calculations need to be very fast so we can run them in real time, at minimum a few hundred times a second. Lastly, we need to be confident that we will always get a solution in a bounded amount of time. If even a single solution is late then the 12 ms RSI communication contract will be broken and the robot will stop.
Ruckig is a motion trajectory generation library that is a near ideal answer to these challenges. It can generate the jerk-limited motion trajectories we need in a matter of microseconds with guarantees about when we will get them. And it’s a relatively small open source library that is well written and easy to integrate. It has a corresponding paper that explains the theory behind how it works. Having used the Reflexxes library in the past for the same purpose I was blown away when I came across Ruckig. While Reflexxes was very impressive it accomplished less in an order of magnitude more code and was very hard to grok. It’s clear that Ruckig has a bright future ahead of it - it’s being used in the next version of CoppeliaSim and it’s already in MoveIt 2.
Ruckig + ROS Control
To plug Ruckig into Crash I’ve implemented a custom ROS controller that works similar to the Joint Trajectory Controller which is part of the default set of controllers provided with the ROS Control packages. ROS Control is how the low level hardware controllers for robots get integrated into an overall ROS system. It provides abstractions to implement the hardware controllers in a generic way so they can be commanded according to various standard interfaces. For example, in my case I want to provide target angles for the joints. But in another application you might want to provide target velocities instead.
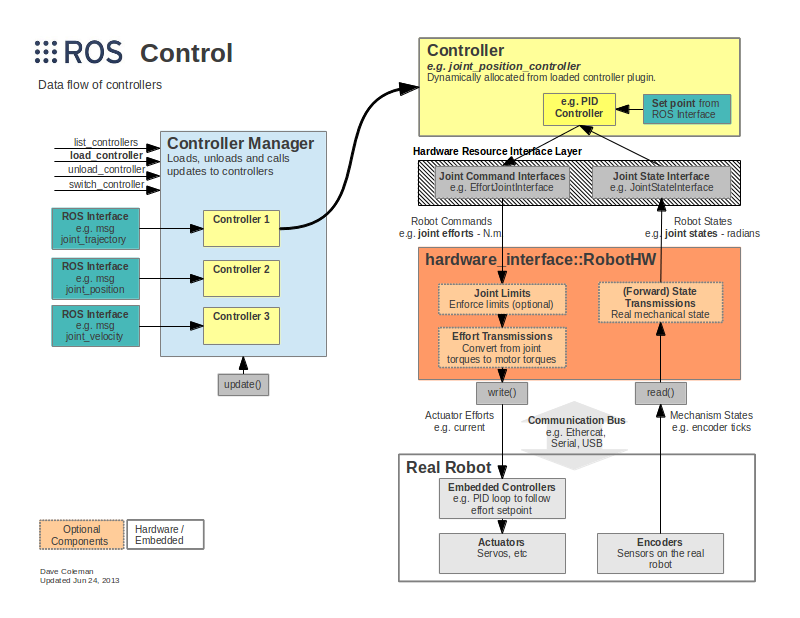
(http://wiki.ros.org/ros_control)
ROS Control provides a framework for implementing the controllers and a system for loading and managing them at runtime. But the sophistication of what it provides creates a barrier to understanding. It took me a good amount of thrashing around before I understood what code I needed to write where to get what I wanted. And bad / sparse documentation caused me to waste a bunch of hours finding the right combination of esoteric runes to inscribe on my package to tell ROS Control to load my custom controller.
While figuring out how to please ROS Control was frustrating, the actual proof-of-concept controller is very simple. It mimics the interface from the Joint Trajectory Controller. It takes in Joint Trajectory messages and feeds their last joint pose into Ruckig as the motion target. Then in its update function Ruckig is invoked to generate the next incremental step towards the target and the joint angles returned by Ruckig are fed to the Kuka RSI Hardware Interface from the Kuka Experimental ROS Industrial package.
Eventually it would be cool to extend this to make a controller that fully works like the Joint Trajectory Controller but uses Ruckig under the hood to integrate new trajectories. I didn’t try to implement the partial trajectory replacement and future planning that that package does because I’m only interested in real time motion for now. I just replace the target with the latest and make no attempt to plan motion into the future. I’ll extend it if I need that but otherwise I welcome someone else to pick it up and run with it.
https://github.com/jmpinit/ruckig_control
Demos
For the following demos I used the WebXR web browser API to get 3D tracking data to stream into ROS as the target pose for CollisionIK. WebXR is still unstable and not available everywhere but it is becoming very viable for producing VR and AR applications on the web. I am planning to use it to build the control interface I want for the art-making workflow that is motivating the development of Crash.
I’ll share more of the details, including code, in a future project log. But basically what I did for these demos was modify the Immersive Web WebXR Samples to stream poses over a WebSocket to ROS. I have a basic HTTPS server in Python to serve the web pages, a WebSocket server, and a ROS node written in Python. Needing to get around the use of different Python versions (3 for the web stuff and 2 for the ROS stuff) I lazily bashed together ZMQ communication between the WebSocket server and the ROS node. So the data flowed like browser —WebSocket→ WebSocket server —ZMQ→ ROS Node → CollisionIK → Ruckig —RSI→ Robot.
Drawing with WebXR on a Phone
Drawing with a Finger using a Quest 2
Next Steps
Now that I have a viable real-time motion control system I’m going to move on to building a tool system that can support the larger art-making workflow that I have in mind. So far I’ve been focused on getting the robot to move, but now I’ll be building a system to let the robot see what it’s doing and adjust on the fly.
Discussions
Become a Hackaday.io Member
Create an account to leave a comment. Already have an account? Log In.