 Samuel
Step 1: Idea planning
First I was looking at the awesome kinds of existing bone conduction glasses and was thinking why don't I make one so I bought a bone conduction speaker from adafruit (https://www.adafruit.com/product/1674) It worked great, but it was way too big to fit in a slim form factor so I bought a smaller module from aliexpress, this module is called a GD02 and is about 12.6*6*4mm.
Next I had to search for abluetooth module to be able to receive the music. I tried to search for an ic that I could put on a a pcb but a friend had his old wireless earphones broken, fortunatly the receiver part and the battry still works so youpie
The glasses desing is based arround old pair of glass from my old glasses
Step 2: CAD Desing
So this has taken so long to make everything fit inside and make the glasses a minimum stylish / comfortable. All the desing have been created using solidwork.
I don't have screenshot of all the diffrents versions I went throught but here is one from the latest version:

After some 3d printing the part came out prety nice:

Step 3: Wiring
Yes it has his own part due to the fact that how much time consuming it was.
First I had to find a way to connect the battery and the left module (Which is on the left branch) to the right branch. The only way that I found to make this work is to get some old chinese ear buds cut the cable remove the rubber insulation and you got 4 isolated wire that is very tiny.
To not make a mess when assembling later on I braided the 4 cables together and cut them to the appropriate size.
Then I disconnected the original wire that where on the battery and replace them with my own wires.
Step 4 Assembly:
Assembly was tricky first I need to pass the cable trought the left branch hole, next I need to pass the left speaker cable to the correct hole and the solder the module. Next I can put the battery inside the hole and close the lid with 2 screws.

Next you need to pass the cable in the middle hole of center part of the glasses

Next we can assemble the right branch. First cut thin cable to solder to the right module and solder them to it, Do the same for the on/off/recall button then cut the wires to size and solder them to the module:

Then trim the wire comming from the left branch while being VERY CAREFUL to not short the battery wire pass them to the hole and solder it to the main board.
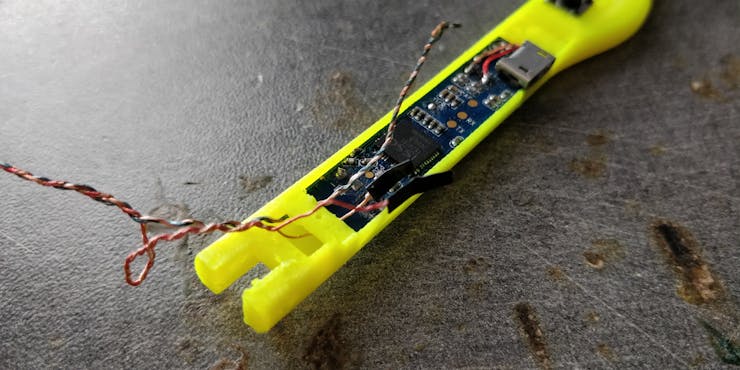
Then put a piece of solid wire to fix the branches to the main body

Charge it and enjoy music I repeat it but it's not very lound but still audible and lacks a bit of bass but overall a great project. Also I didn't expect this but there is not a ton of sound leakage it's relatively quiet. And some other pictures to finish th post:


 Johannes
 Stefan-Xp
 James Fossey
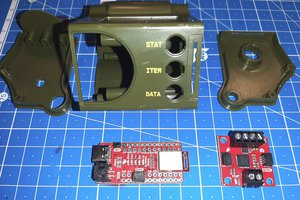
 Vincent
There are no tutorials online how to wire the GD02 Modules, so we're kind of left in the dust here