 Luke Thompson
As with most projects, they go through phases of active work, and long periods of hibernation. This one is no different, but progress has been made since it started.
The initial work was done purely in the esp IDF which has its advantages, but since I would like to make this easy to use and modify for anyone, I decided to switch to the Arduino framework. This also served as an excuses to rewrite a large portion of the code from scratch using what I had learned from the previous attempts. In this project log, I'll focus on the debugging framework that I wrote which uses websockets to display real-time variables and allows variables to be adjusted on the fly.
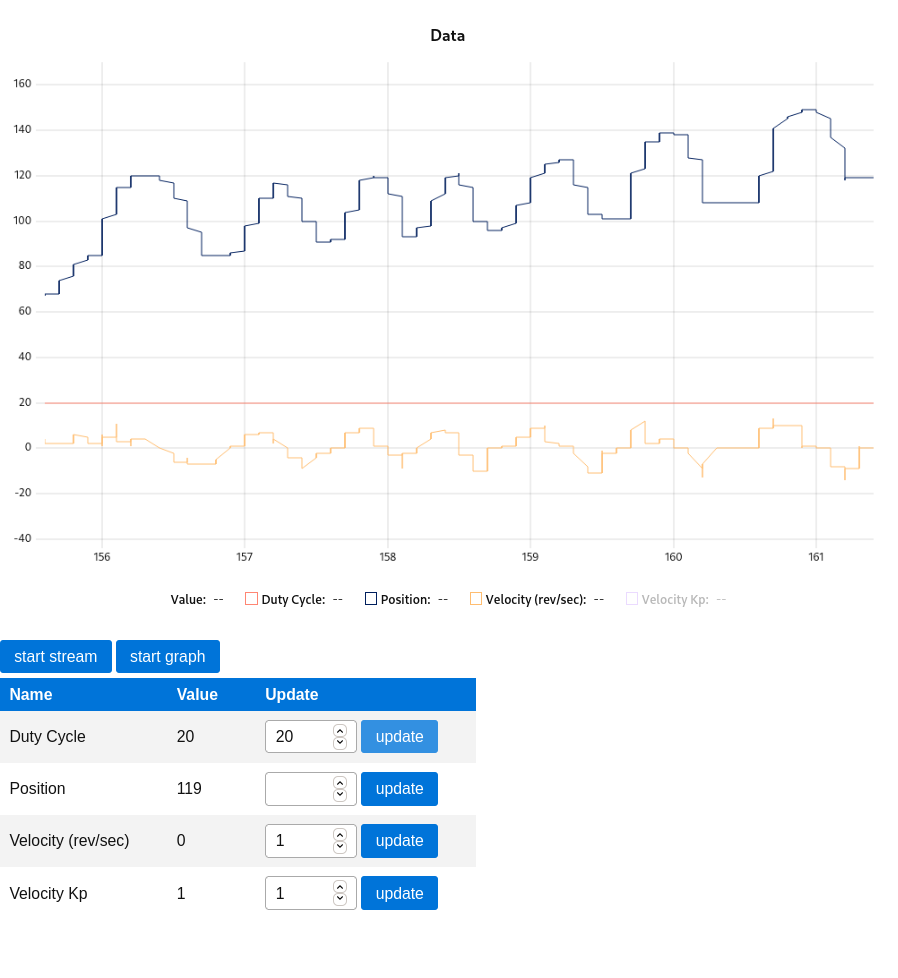
I was inspired by the work [CNLohr] did with the esp8266 using websockets and I wanted to create my own version so I could better understand how it works and to implement a few tweaks. I wanted to have a framework which allowed me to easily track values and see how they changed over time. The driving force behind this idea was to make the control loop tuning easier by watching a graph of the response and adjust gains in real time. But having that functionality makes other parts of development much easier as well.
Overview
The general principle behind how the system operates is to have an array of pointers to the memory addresses of the variables you want to watch and/or adjust as well as their type (float, int, etc.) and a name of some sort. Then, when a websocket connection is made, that data can be transmitted to the webpage, where a javascript program unpacks the data, displays it in a table, and graphs it. If we stick with 32 bit variable types (floats, int32_t, uint32_t) then all memory reads/writes are atomic and we don't have to worry about potential race conditions.
Microcontroller Side (C++)
For now, here is how the C++ side of things works. It is somewhat limited in capability, but is functional enough for now that I can move on to getting other parts of the system working:
The wsData class consists of 2 main functions. The 'add' functions, and the 'processPacket' which handles calling the other functions ('sendNames', 'sendData', and 'updateVars') as needed. The 'add' function is pretty self explanatory in that it allows you to add a variable to the system. The function takes the address of the variable, and a char array that is used as a title and description of the variable. Since it is a C++ function, we can use overloaded functions to determine the variable type so we don't need to specify directly (unlike the original C/IDF version of this I wrote).
The add function then populates a struct array with the pointer to the variable, a pointer to the name string, and a type field so that floats and ints can be differentiated.
When the esp32 receives binary websocket data, it is assumed that it is a command for the wsData class, and the data is passed to the 'processPacket' method. There are 3 types of packets, corresponding to the remaining functions, of the following forms:

S -- Setup
The Setup packet is designated by the 'S' opcode in the first byte. It is then followed by a 16 bit number which corresponds to the variables location in the wsData array (and consequently, the order in which it was added). 16 bits is probably a bit excessive, but 255 might be limiting in the future and it only costs an extra byte for 'future-proofing'. As a note, all numbers are stored and transmitted as little-endian since that is what the xtensa cores are and I would rather push complexity into the browser than on the microcontroller.
Following the number is a single byte which represents the variable type (currently only floats and int32_t are supported). Currently the type is represented by a character, either 'i' or 'f' for integer and float respectively.
After the variable type, the name is transmitted as a null terminated string. Immediately after the null character follows the 2 bytes for the next variable and the cycle continues until all of the variables names and types are transmitted, or the max ws packet size has been hit.

D -- Data
The Data packets start with the 'D' opcode and are used to request and transmit variable's values. The format is similar to the Setup packet where the packet starts with an opcode, followed by 2 bytes that indicate the variable number. Then instead of a string, the next four bytes are the raw representation of the float or int32 variable.
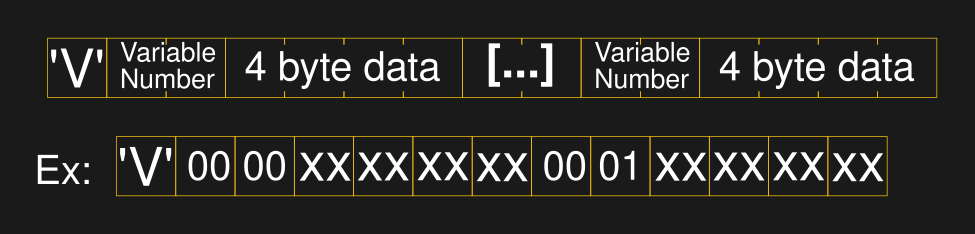
V -- Variables
The Variable packet is different then the others in that it is primarily used to send data from the browser to the esp32. This is used for setting values from the computer, such as gains, state machine stages, targets, etc. It follows the same form as the Data packet, Opcode, followed by variable number, and 4 bytes of data.
Browser Side (javascript)
To interpret the raw packets in the browser, the system uses the DataView object for converting the bytes into numbers. This also handles any issues with converting the values from little endian.
The system starts by sending a Setup packet so it is aware of the name and type of each variable. (If the system ever receives a variable number that it doesn't recognize, it will send a Setup packet again since it needs to know the type (and ideally the name) of a variable before it can process it.) Whenever a new variable is added, the system updates the data configuration table to add a new row with the variable's name, as well as add the data to the graph.
The system interprets each packet and stores the value of each variable in an array, along with pushing the most recent item into a history array for use with graphing.
Graphing is accomplished by the wonderful uplot library written by [leeoniya]. I choose this library for its small size, ease of use, and completeness. When I first attempted to make this interface, I manually plotted values using a html5 canvas, and while that worked. It was buggy, didn't auto scale, and missed a lot of important features. By using an existing library, I was able to get a more robust system then I could possibly have made on my own.
In a similar vein, I wanted to have a somewhat nice looking interface without having to manually create a stylesheet. I wanted something that was easy to use, looked nice, and was small so as to take up as little space on the esp32 as possible. The library I settled on was Picnic and it seems to be working well. So far, I have only used It's buttons and tables but they look nice. It also has support for tabs and popups which might be useful in the future.
Future Work
While the framework is in a decent enough state for me to move forward, it is not nearly as polished as I would like. Ideally I would turn this into a simple Arduino and JS library so that any project can use it. There are also plenty of issues with things that are hard coded, which should be configuration options, such as:
- Maximum number of variables in C++ code.
- How large the graph is and how many data points does it store.
- Clean up of both C++ and JS code.
- Packaging of everything into neat packages, and gzipping what I can.
For now though, these things will have to wait as I attempt to make progress on my original goal. If they start to cause problems (or if people express interest in having access to the library) I might work on the final clean up.
Conclusion
In the git repository, I made a tag to track when this log was written. If you are interested in seeing what the code looked like, click here: https://github.com/Ardustorm/vplotter/tree/log-01
In my next log, I will document the main issue that I ran into trying to control motors from an interrupt, and the ways I was able to get it (somewhat) working.
Discussions
Become a Hackaday.io Member
Create an account to leave a comment. Already have an account? Log In.