 nootropic design
Hardware Design
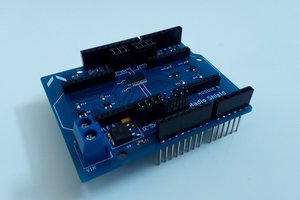
The shield is quite simple, and really just provides an appropriate switch-mode power supply for the modem. The input power for the shield can be 5-12V, and provides a stable 3.8V at up to 1.7A to the modem. I used a TI TPS5402 for this. Jumper settings allow you to connect the modem’s UART to the Arduino hardware UART on pins 0 and 1 or to software serial on digital pins 2 and 3. I typically use software serial at 19200 so that I can use the Arduino serial interface for debugging. The buttons labeled “Func 1” and “Func 2” are connected to digital pins 4 and 5.
Software Interface
What about actually using the modem in software? Every modem has its own AT command set, and although there are similarities, a developer must know the details of the modem they are using. Luckily, the excellent TinyGSM Arduino library provides an Arduino Client interface for a variety of underlying modems. The Arduino Client interface is widely used by networking libraries to abstract away the underlying hardware. That is, when you code to the Client API, it doesn’t matter if the hardware underneath is an Ethernet shield, an ESP8266, a cellular modem, or whatever. Examples of libraries that code to this interface and therefore work with many kinds of hardware are ArduinoHttpClient for web clients and PubSubClient for MQTT clients. Even HTTPS and MQTT over TLS work! Security is important.
TinyGSM did not have an implementation for the Sequans modem, so I wrote one. It’s in my forked repo of TinyGSM (it has not been merged into the parent yet). To use the TinyGSM examples with the Nimbelink module with a Sequans modem, simply add this to your source code:
#define TINY_GSM_MODEM_SEQUANS_MONARCHI also bought a Nimbelink module with the Quectel BG96 CAT M1 and NB-IoT modem on it. Luckily, TinyGSM already has an Client interface implementation for this modem. After plugging it into my shield and simply changing my HTTP and MQTT test clients to use this modem, everything just worked! That is, I was able to change the modem to a different manufacturer (and completely different AT command set) and make my code work with a one line change:
#define TINY_GSM_MODEM_BG96So the lesson here is that with thoughtful design of software and hardware abstractions, one can achieve a lot of flexibility.
- the Arduino Client interface defines a standard software API for network clients so that an implementation for any hardware can be written and expose its functions through this same interface
- useful libraries like ArduinoHttpClient and PubSubClient code to this interface so that HTTP and MQTT are easily used with lots of hardware
- and finally, Nimbelink has defined a standard Skywire module pinout so that it’s easy to swap out the hardware
This is all getting pretty easy, right?! I hope you agree.
I haven’t decided if I’ll make this shield available as a product because there has to be some real demand for that to be worth it. Let me know if you are interested in an easy way to get started with modern cellular technology using Nimbelink modules.

 Poltorak Serguei
 oakkar7
 Jan Gromeš