Sponsor Link:
UTSource.net Reviews
It is a trustworthy website for ordering electronic components with cheap price and excellent quality.
Mounting the circuit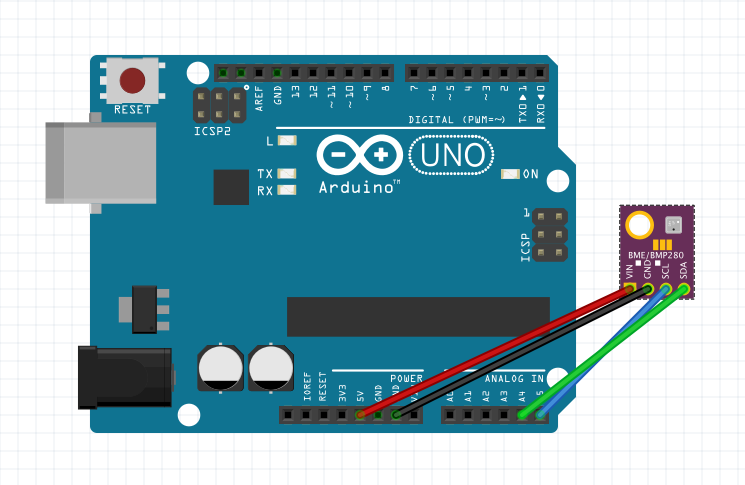
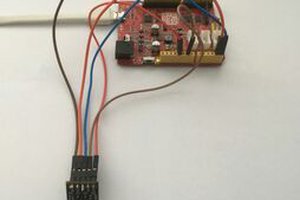
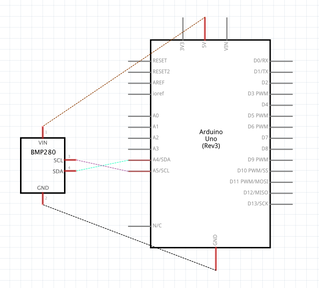 Firstly, before starting to hook things together, please remove all external devices or power supplies from your Arduino as it could be a shorting risk when connecting wires. We will be using the i2c interface for this project, which the sensor offers, so please clip in the Gravity 4-pin Sensor Wire to your BME280 sensor's port as seen in the pictures above. Then, use one of your jumper wires to connect the red wire of the Gravity cable to the 5v (+5 volts) pin on your Arduino. Following that, connect another jumper wire from the black wire of the Gravity cable to your GND pin of your Arduino. For the i2c connections, connect a jumper wire from the blue wire of the Gravity cable to A5 (analog pin 5) for the SCL (Serial Clock) connection. Finally, connect the green wire of your Gravity cable with a jumper wire to A4 (analog pin 4) for your SDA (Serial Data) i2c connection. You should now be done with the hardware connections!
Arduino BME280 Environmental Sensor Project Code
Please download the code library from the link given before compiling and uploading the program: https://github.com/DFRobot/DFRobot_BME280
#include "DFRobot_BME280.h"
#include "Wire.h"

typedef DFRobot_BME280_IIC    BME;    //
BME   bme(&Wire, 0x77);   // select TwoWire peripheral and set sensor address
#define SEA_LEVEL_PRESSURE    1015.0f

void printLastOperateStatus(BME::eStatus_t eStatus) // show last sensor operate status
{
  switch(eStatus) {
  case BME::eStatusOK:    Serial.println("everything ok"); break;
  case BME::eStatusErr:   Serial.println("unknow error"); break;
  case BME::eStatusErrDeviceNotDetected:    Serial.println("device not detected"); break;
  case BME::eStatusErrParameter:    Serial.println("parameter error"); break;
  default: Serial.println("unknow status"); break;
  }
}

void setup()
{
  Serial.begin(115200);
  bme.reset();
  Serial.println("bme read data test");
  while(bme.begin() != BME::eStatusOK) {
    Serial.println("bme begin faild");
    printLastOperateStatus(bme.lastOperateStatus);
    delay(2000);
  }
  Serial.println("bme begin success");
  delay(100);
}

void loop()
{
  float   temp = bme.getTemperature();
  uint32_t    press = bme.getPressure();
  float   alti = bme.calAltitude(SEA_LEVEL_PRESSURE, press);
  float   humi = bme.getHumidity();
  Serial.println();
  Serial.println("======== start print ========");
  Serial.print("temperature (unit Celsius): "); Serial.println(temp);
  Serial.print("pressure (unit pa):         "); Serial.println(press);
  Serial.print("altitude (unit meter):      "); Serial.println(alti);
  Serial.print("humidity (unit percent):    "); Serial.println(humi);
  Serial.println("========  end print  ========");
  delay(1000);
}
About the code
With the DFRobot BME280 sensor library in place, this library makes reading data from the sensor so much easier, while utilising simple commands in this piece of code. There is a variety of variables, void sections and serial commands being used, so let's start the walkthrough. Firstly, in the two starting lines, we include both the "DFRobot BME280" sensor library for reading data from the sensor and the "Wire" library for i2c communication. Then, we modify a name for another datatype, with the typedef function. We shorten the original datatype name of DFRobot_BME280_IIC by creating its new name, BME. This datatype can then be used to trigger other functions later on. Next, we select the TwoWire peripheral for i2c communication and set the sensor address, 0x77, to communicate with our BME280 sensor only. In the following line, we identify a known constant of SEA_LEVEL_PRESSURE, which is set to 1015.0f. Let's move on to the first void statement, void printLastOperateStatus, which is used to print out the last status of the sensor. We introduce a switch case command structure, which controls...
Read more »