Close
0%
0%

IoT Personal NodeMCU ESP12 WiFi Weather Station

NodeMCU (ESP12) WiFi module will send sensors data to wunderground.com, weathercloud.net and thingspeak.com

Similar projects worth following
NodeMCU (ESP12) WiFi module send sensors data to www.pwsweather.com www.wunderground.com, thingspeak.com and https://weathercloud.net/

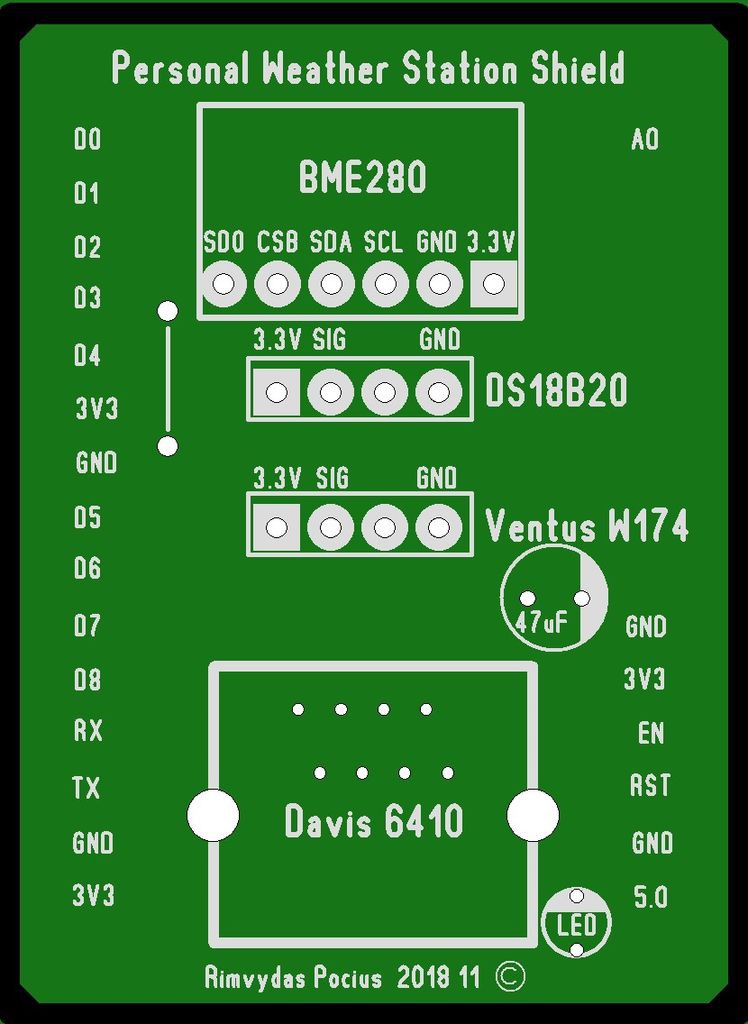
In this Instructable I'm going to show you how to build personal wireless weather station using NodeMCU (ESP12)

One year ago I was create weather station based on Arduino. But always there are ways how to improve things to be better. New version need less power consumption. Rain reset 24h more precise, because time update from NTP server. Add OTA (Over the Air) compability to update is the process of loading a new firmware to ESP8266 module using WiFi connection rather than a serial communication.

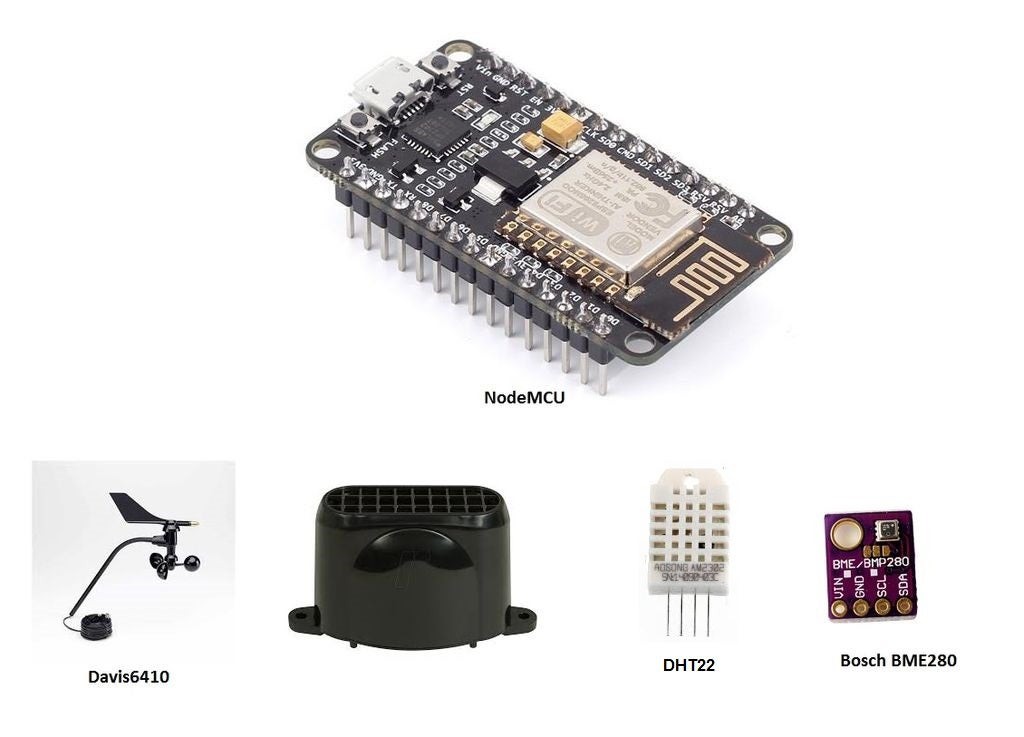
NodeMCU (ESP12) WiFi module will send sensors data to www.wunderground.com , https://weathercloud.net , https://thingspeak.com , https://www.pwsweather.com

A Weather station is a device that collects data related to the weather and environment using many different sensors. We can measure many things like:

  • Temperature
  • Humidity
  • Wind
  • Barometric Pressure
  • UV index
  • Rain

ino - 45.40 kB - 06/30/2021 at 20:11

Download

RAR Archive - 23.84 MB - 08/17/2019 at 17:23

Download

Gerber_NodeMCU_pws_shield.zip

Gerber files for pcb shield

x-zip-compressed - 17.01 kB - 06/21/2019 at 09:27

Download

  • 1 × NodeMCU ESP12
  • 1 × Hygrometer and Barometer (BME280)
  • 1 × Davis 6410 anemometer, wind direction
  • 1 × Rrain gauge
  • 1 × DHT22 temperature and humidity

  • 1
    1. Step 1: Types of Sensors Used for Weather Station

    The following is a list of measurement devices that are used in weather stations:

    1) NodeMCU (ESP12) main board

    2) Thermometer DHT22 thermometer measures temperature. You can measure both the temperature indoors and outdoors, record highs and lows, show trend arrows to indicate temperature rising or falling, and even predict short-term future temperature ranges.

    Hygrometer (DHT22)- A hygrometer measures relative humidity. Relative humidity is the quantity or percentage of water vapor (water in gas form) in the air. Humidity influences environmental factors and calculations like precipitation, fog, dew point and heat index.

    3) Barometer (BME280) – A barometer measures atmospheric pressure. A barometer can help to forecast upcoming weather based on the changes it measures in the atmospheric pressure.

    4) Davis 6410 anemometer measures how fast the wind is blowing, or wind speed. ESP8266 weather stations can display wind speed in MPH, KPH or knots, and record current, peak and average wind speed readings.

    Wind Vane – A wind vane, or weather vane, is an instrument that determines which direction the wind is blowing.

    5) Rain gauge measures rainfall or liquid precipitation

  • 2
    Step 2: Schematic and Wiring Diagram
  • 3
    Step 3: NodeMCU PCB Weather Station Shield

    Design printed circuit board (PCB), I was used ,,Sprint-Layout" software. Exported to Gerber files. PCB was made https://jlcpcb.com

    To create this NodeMCU ESP12 weather station shield you will need:

    1. NodeMcu Lua CH340G/CH340/ ESP8266 Wireless WIFI Internet Devolop Module Ebay
    2. Waterproof Digital Thermal Probe or Sensor DS18B20 Arduino Sensor Ebay
    3. JST-XH Kit 4Pin 2.54mm Terminal Housing PCB Header Wire Connectors Ebay
    4. Atmospheric Pressure Sensor Temperature Humidity Sensor Breakout BME280Ebay
    5. 2x 1K 0805 resistor
    6. 1x 120R 0805 resistor
    7. 2x 4.7K 0805 resistor
    8. 1x 10K 0805 resistor
    9. 1x RJ45 socket Ebay
    10. 1x 47uF electrolytic capacitor
    11. 1 x 40pin 2.54mm Female Single Row Breakaway Pin header Ebay

View all 10 instructions

Enjoy this project?

Share

Discussions

Gregory Sanders wrote 07/01/2021 at 10:56 point

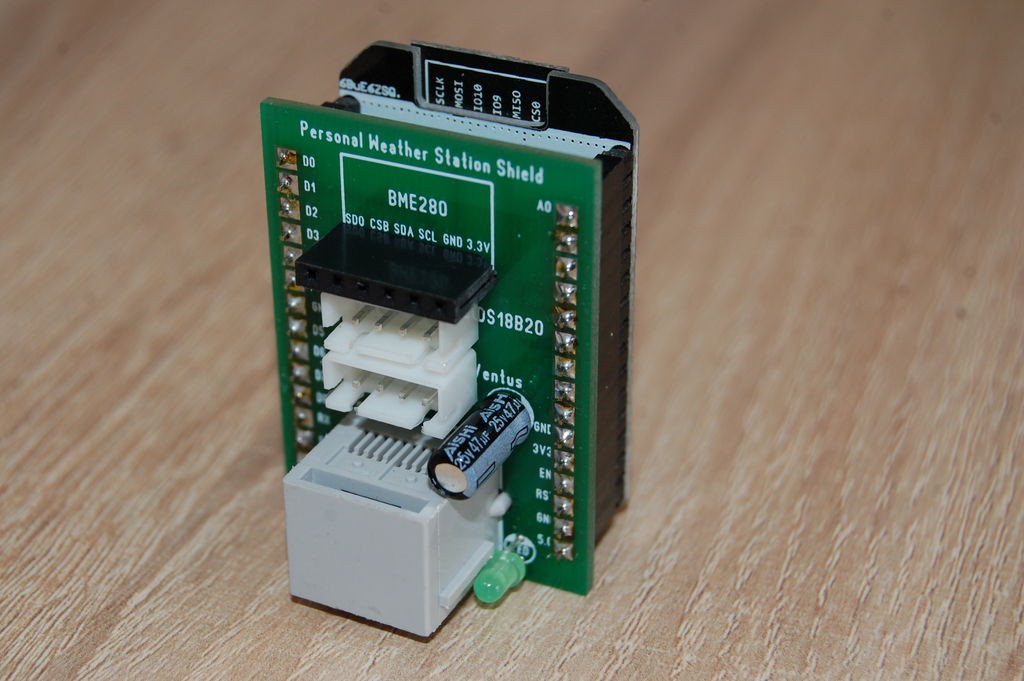
I had not thought about putting both a BME280 and a DHT22 in the same station.  Duh.  It makes such good sense because it gives a way to get some comparative readings for temp and humidity.  I'm putting adding a DHT22 to my WeatherPi project on the list!  Thanks!

  Are you sure? yes | no

aggie98bb wrote 05/02/2021 at 21:50 point

This looks like a fun project.  Do you think it would work with the Sparkfun Weather Meter Kit?  It is substantially less expensive than the Davis one.

One other question:  The component list mentions the DS18B20 for the Thermometer but the instructions talk about the DHT22 for temperature and humidity.  Which did you ultimately use because the PCB mentions the DS18B20 but I don't see how you could get humidity without the DHT22.  Thanks!

  Are you sure? yes | no

hardas999 wrote 05/03/2021 at 06:54 point

It's old project. So first I used DS18B20. But in winter it  measured incorrect temperature. So I replace it with  DHT22.

It would work with the Sparkfun Weather Meter Kit, but you need to  adapt code.

  Are you sure? yes | no

aggie98bb wrote 05/03/2021 at 09:07 point

Thanks!

  Are you sure? yes | no

Pierre C. wrote 09/03/2020 at 00:19 point

Nice project, great source of inspiration!

A couple of question, though:

Why didn't you use the BME280 for temperature measurement?

Did you put the electronic in some waterproof case or is the radiation shield enough to protect it?

  Are you sure? yes | no

hardas999 wrote 11/03/2020 at 14:17 point

BME280 - it is not good temperature sensor.  It always show higher  temperature value.

I just  spray  wood lacquer on electronic to   prevent from corrosion.  WiFi signal is weak. So if  I put electronic in to box, I just lost signal.


  Are you sure? yes | no

Tom Nardi wrote 06/26/2019 at 05:06 point

Love the radiation shield made from the flower pot bottoms, brilliant idea.

  Are you sure? yes | no

hardas999 wrote 07/09/2019 at 10:52 point

Thank you, Tom   but it is not new idea.

  Are you sure? yes | no

Similar Projects

Does this project spark your interest?

Become a member to follow this project and never miss any updates