Adam Taylor
Introduction
Many IoT developments these days, integrate and operate with Amazon's Alexa to provide voice interaction.
In this project we are going to look at how we can integrate Alexa with our Ultra96 design. This means we can develop applications which leverage the programmable logic and Arm cores of the Ultra96 and then integrate the solution with Alexa.
To integrate our application with Alexa we are going to use a number of Amazon Web Services (AWS) along with running Python applications on the Ultra96.
As such to implement this project you will need a AWS account.
Architecture
This project will use a number of AWS functions both at the edge and in the cloud. The architecture of the solution is outlined in the diagram below:

Architecture of the Solution
Once Alexa receives the invocation and intent word, we will configure the Alexa skill to send a JSON request to a AWS Lambda service. AWS Lambda will then access a AWS S3 bucket and read a file which has been uploaded by the Ultra96 with the current measured temperature.
AWS Lambda will then process the file and generate a JSON response which Alexa interprets and voices the temperature.
Of course while this example shows the communication path in one direction, we could use the same approach to control actions in the Ultra96.
Creating the Alexa Skill
The first thing we need to do is create a Alexa skill we do this by going to the Alexa developer console here:
https://developer.amazon.com/alexa
Once logged into the console we need to create a new skill - click on the Create Skill button.

Creating the Alexa Skill
Click on the created skill and we can step through the skill creation process, the first step is to create the invocation word. This is what we say to Alexa to start the interaction with our Skill - I used "Ultra Ninety Six" for this application.

Invocation word
The next step is to configure the intents, we can have multiple intents but for this example we will have one which is the intent for requesting the temperature.

Intents
Once we have set up the invocation and intents, the next step is to set up the end point.
This is where we set up up the interface with AWS Lambda here will, use the skill ID and the AWS Lambda settings.
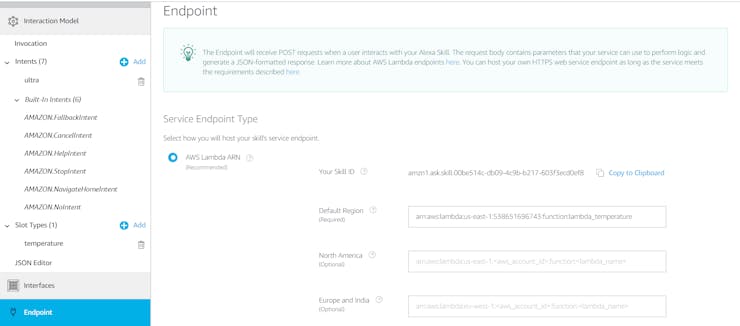
Integrating a end point with AWS Lambda
Setting up the S3 Bucket
Before we set up the AWS Lambda we need to be able to store files on the S3 Bucket. If we do not have a S3 bucket we need to configure one, sign into the AWS console and from storage select S3.

AWS Console
When you open the S3 instance you will see the following screen enabling you to create a bucket.

Creating a AWS S3 Bucket
For this example I called my bucket the MicroZed Chronicles:

Configuring the Bucket

Resultant Bucket
The final step is to generate the keys to enable us to access bucket. Click on your user name on the top right and select "My Security Credentials."
Under here you can create a Key ID and Secret Access Key.

Generating access keys
With the S3 Bucket and access keys created the next step is to create the AWS Lambda solution.
AWS Lambda
Within AWS Lambda, we need to create a function, click on the create function button.

AWS Lambda Welcome page.
Once the function is created we need to edit it - I called my function Lambda temperature.

AWS Lambda function
The first thing we need to do in the Lambda function is to add in the triggers. In this case these are Alexa and S3 Bucket.

Adding the triggers
The next step is to add in the Node.Js code for the Lambda temperature, I used the code below - Remember to replace the KEY and SECRET KEY with your credentials.
exports.handler =(event, context, callback) => { var prompt = ''; var myParams = { Bucket:'microzedchronicles', Key: 'data.txt' }; varAWS = require('aws-sdk');...
Read more »
 MongooseOS
 Tea B
Tea B
 zst123