Close
0%
0%

SmartSoak

Maximize hot tub enjoyment, minimize cost

Similar projects worth following

Hot tubs are very fun, a huge quality of life improvement, and also much more expensive than you might think at first blush. If you're like me, you searched "hot tub" on craigslist and thought, man, there are a lot of free hot tubs in this world! Or maybe the first place you searched was a hot tub store and thought "$5000 for the cheapest, yeah, nah." Even a free hot tub isn't cheap.

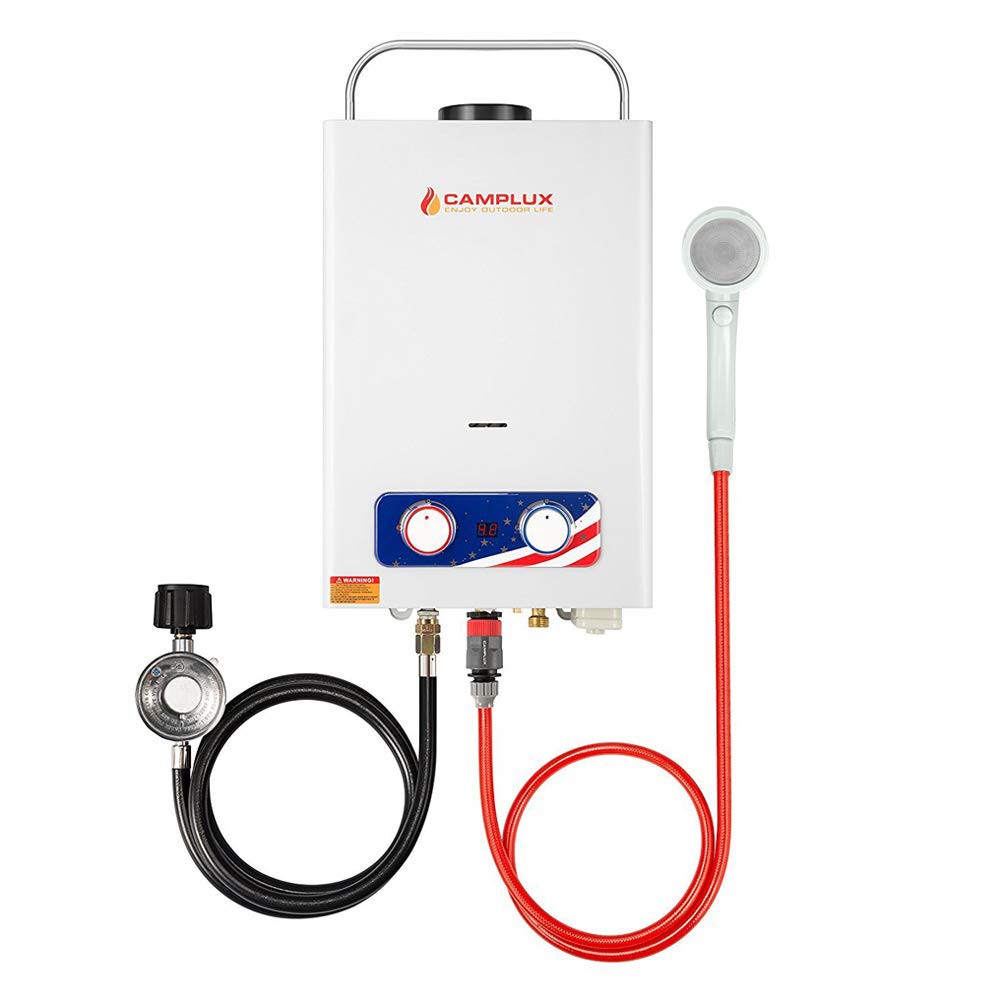
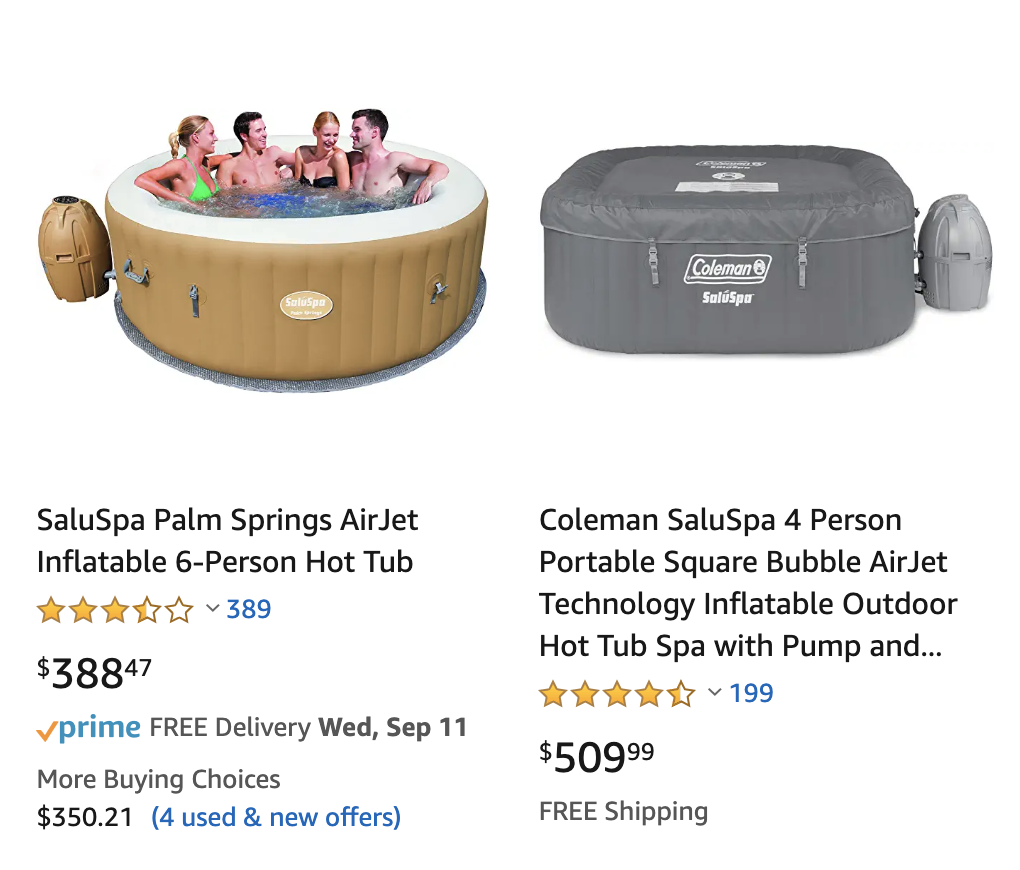
Luckily for the cheapskate, the world of plastics has just absolutely EVERYTHING to offer these days, including durable, enjoyable, affordable hot tubs!

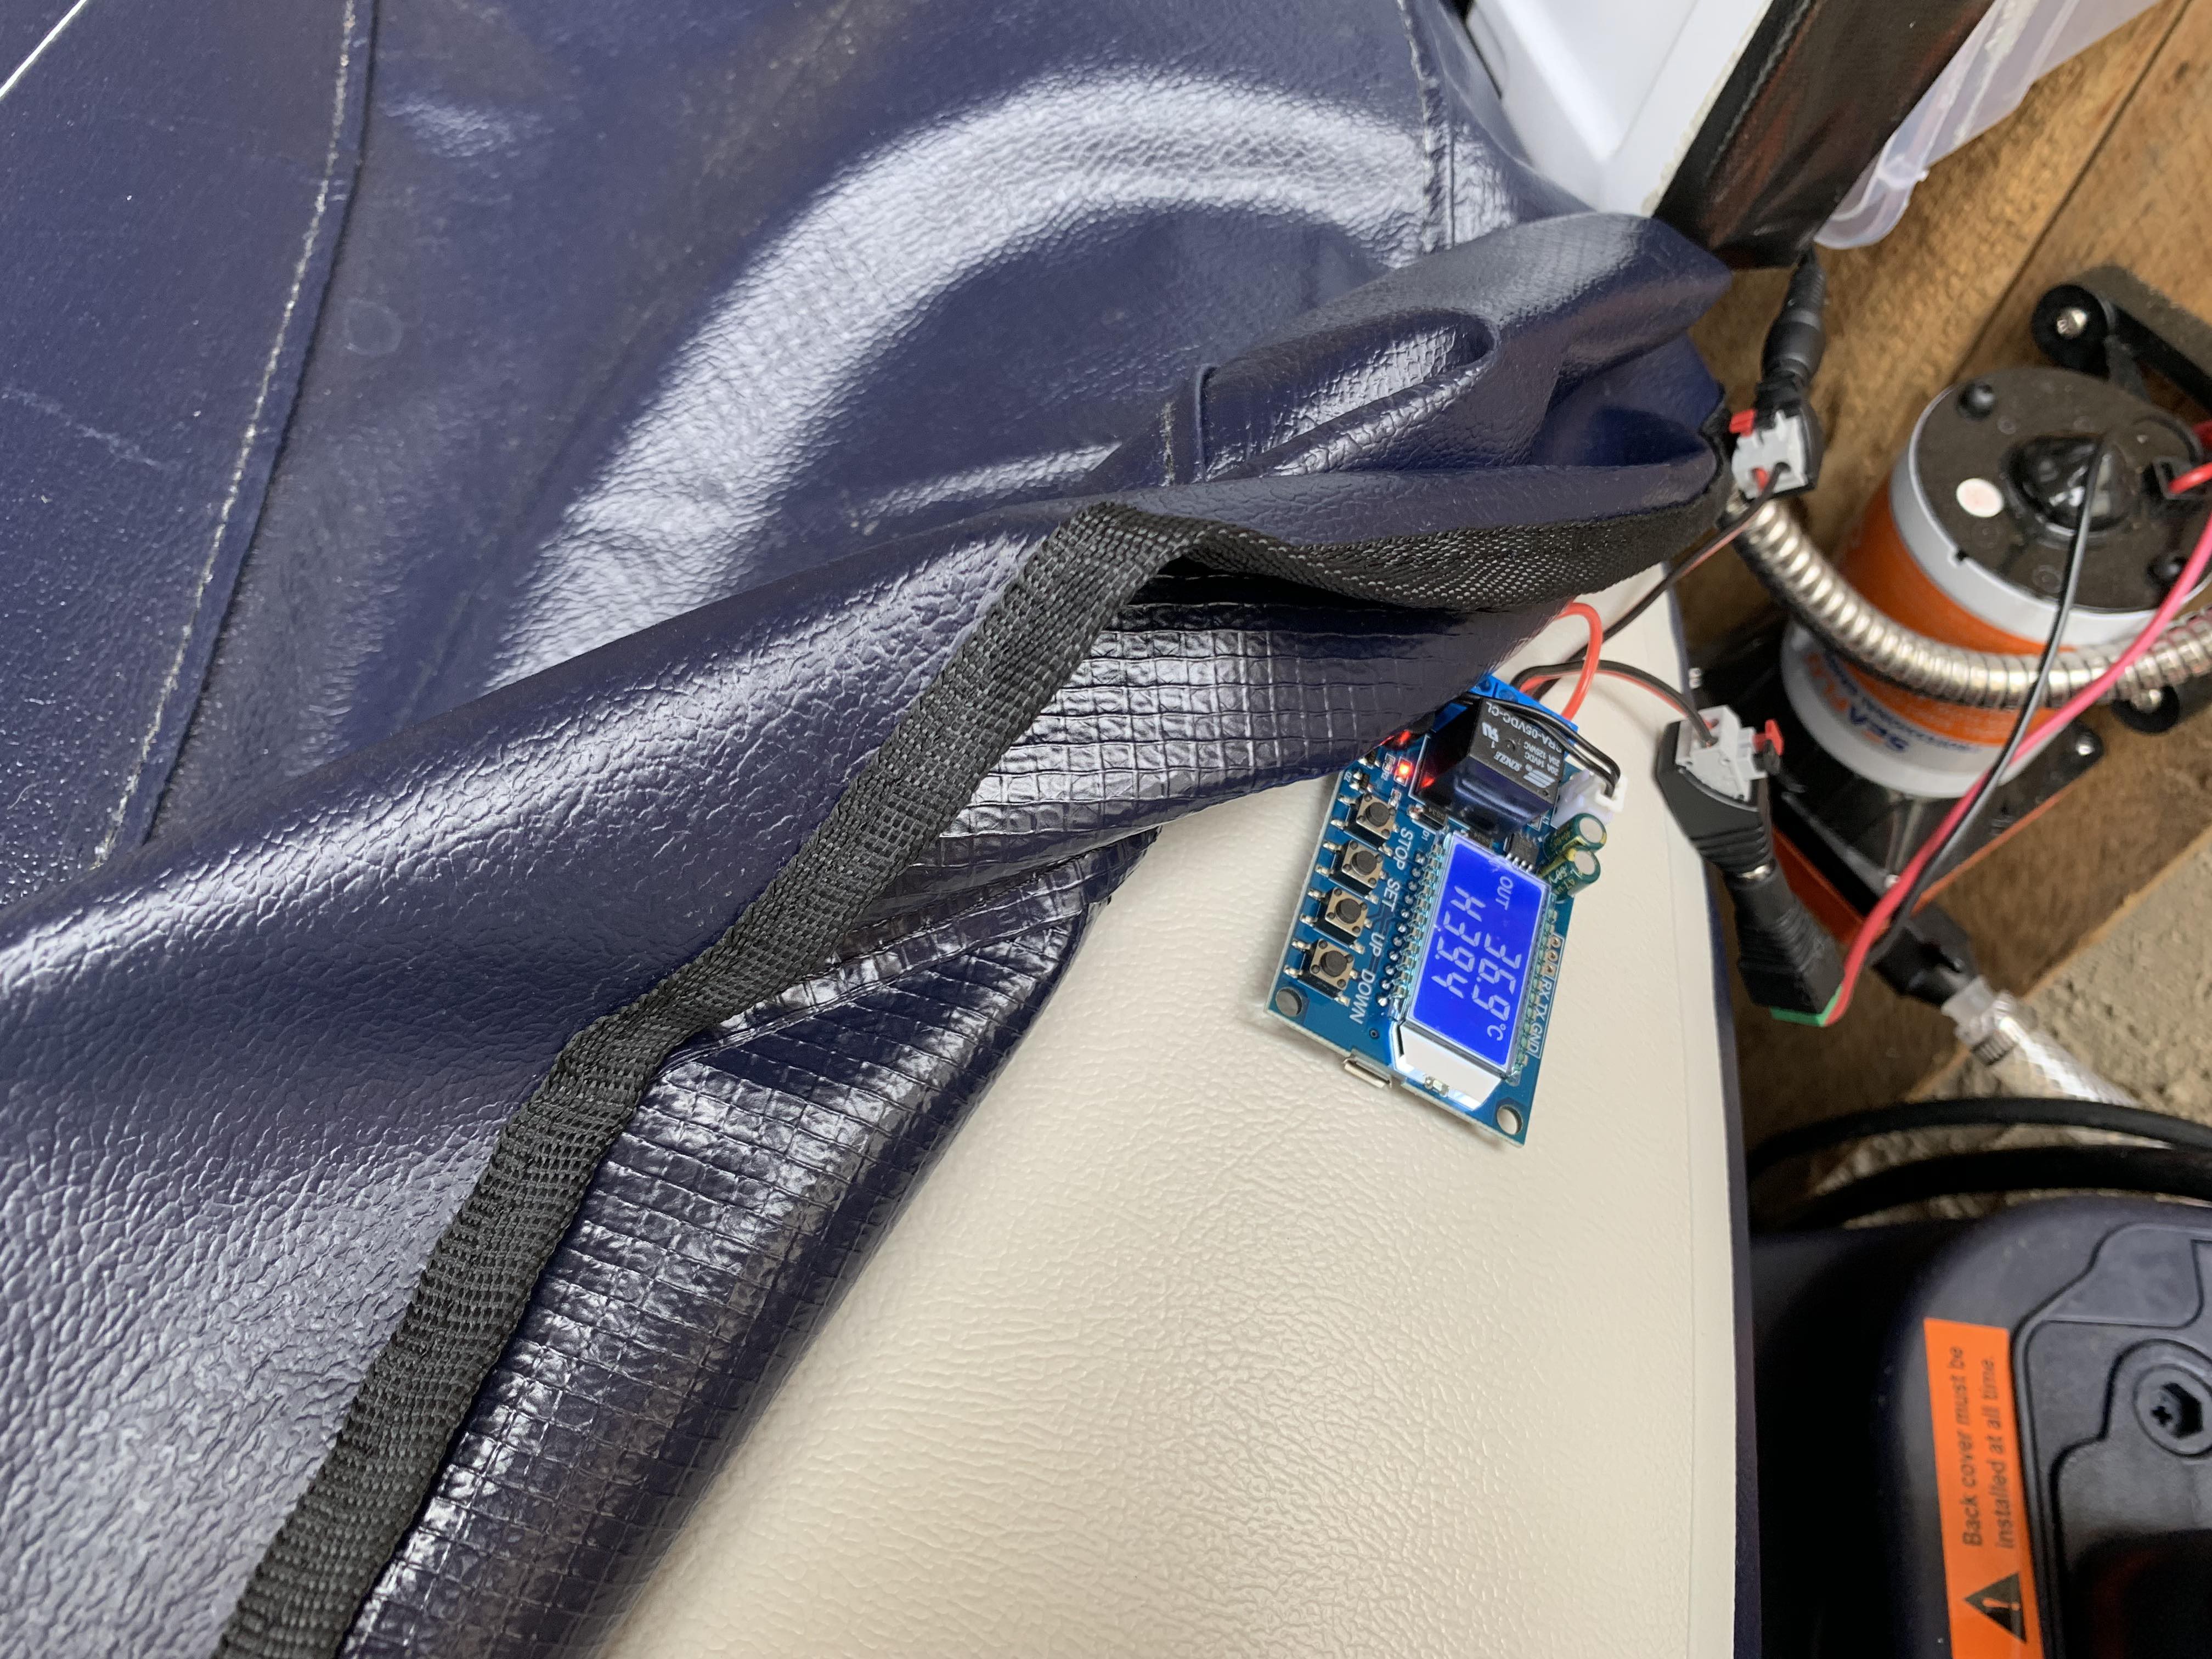
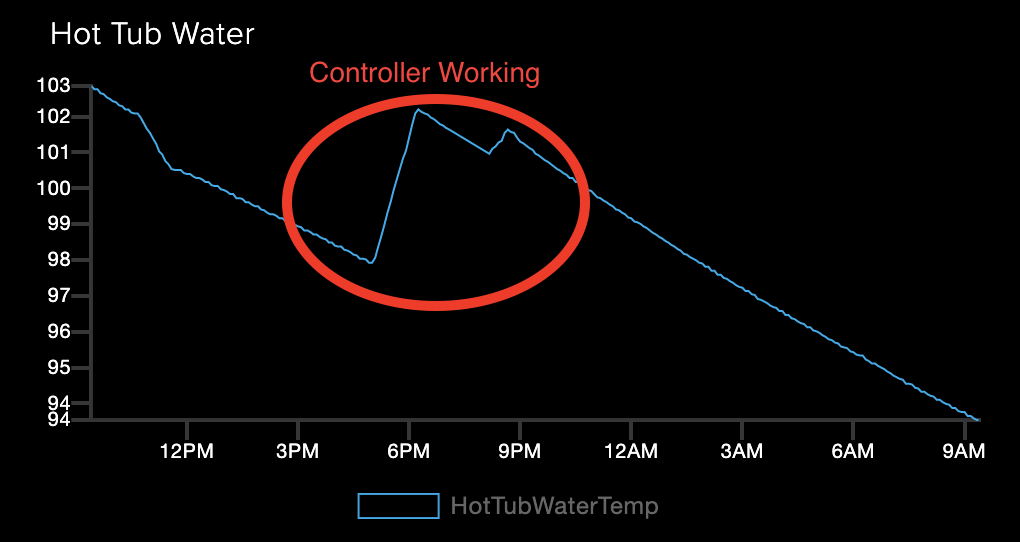
SmartSoak is an extended review of and indeed improvement upon just such a product, taking things two or three steps too far at each turn.

Check out the project logs for all the details. You probably want to read them start to finish, so scroll down to "Log 1" first.

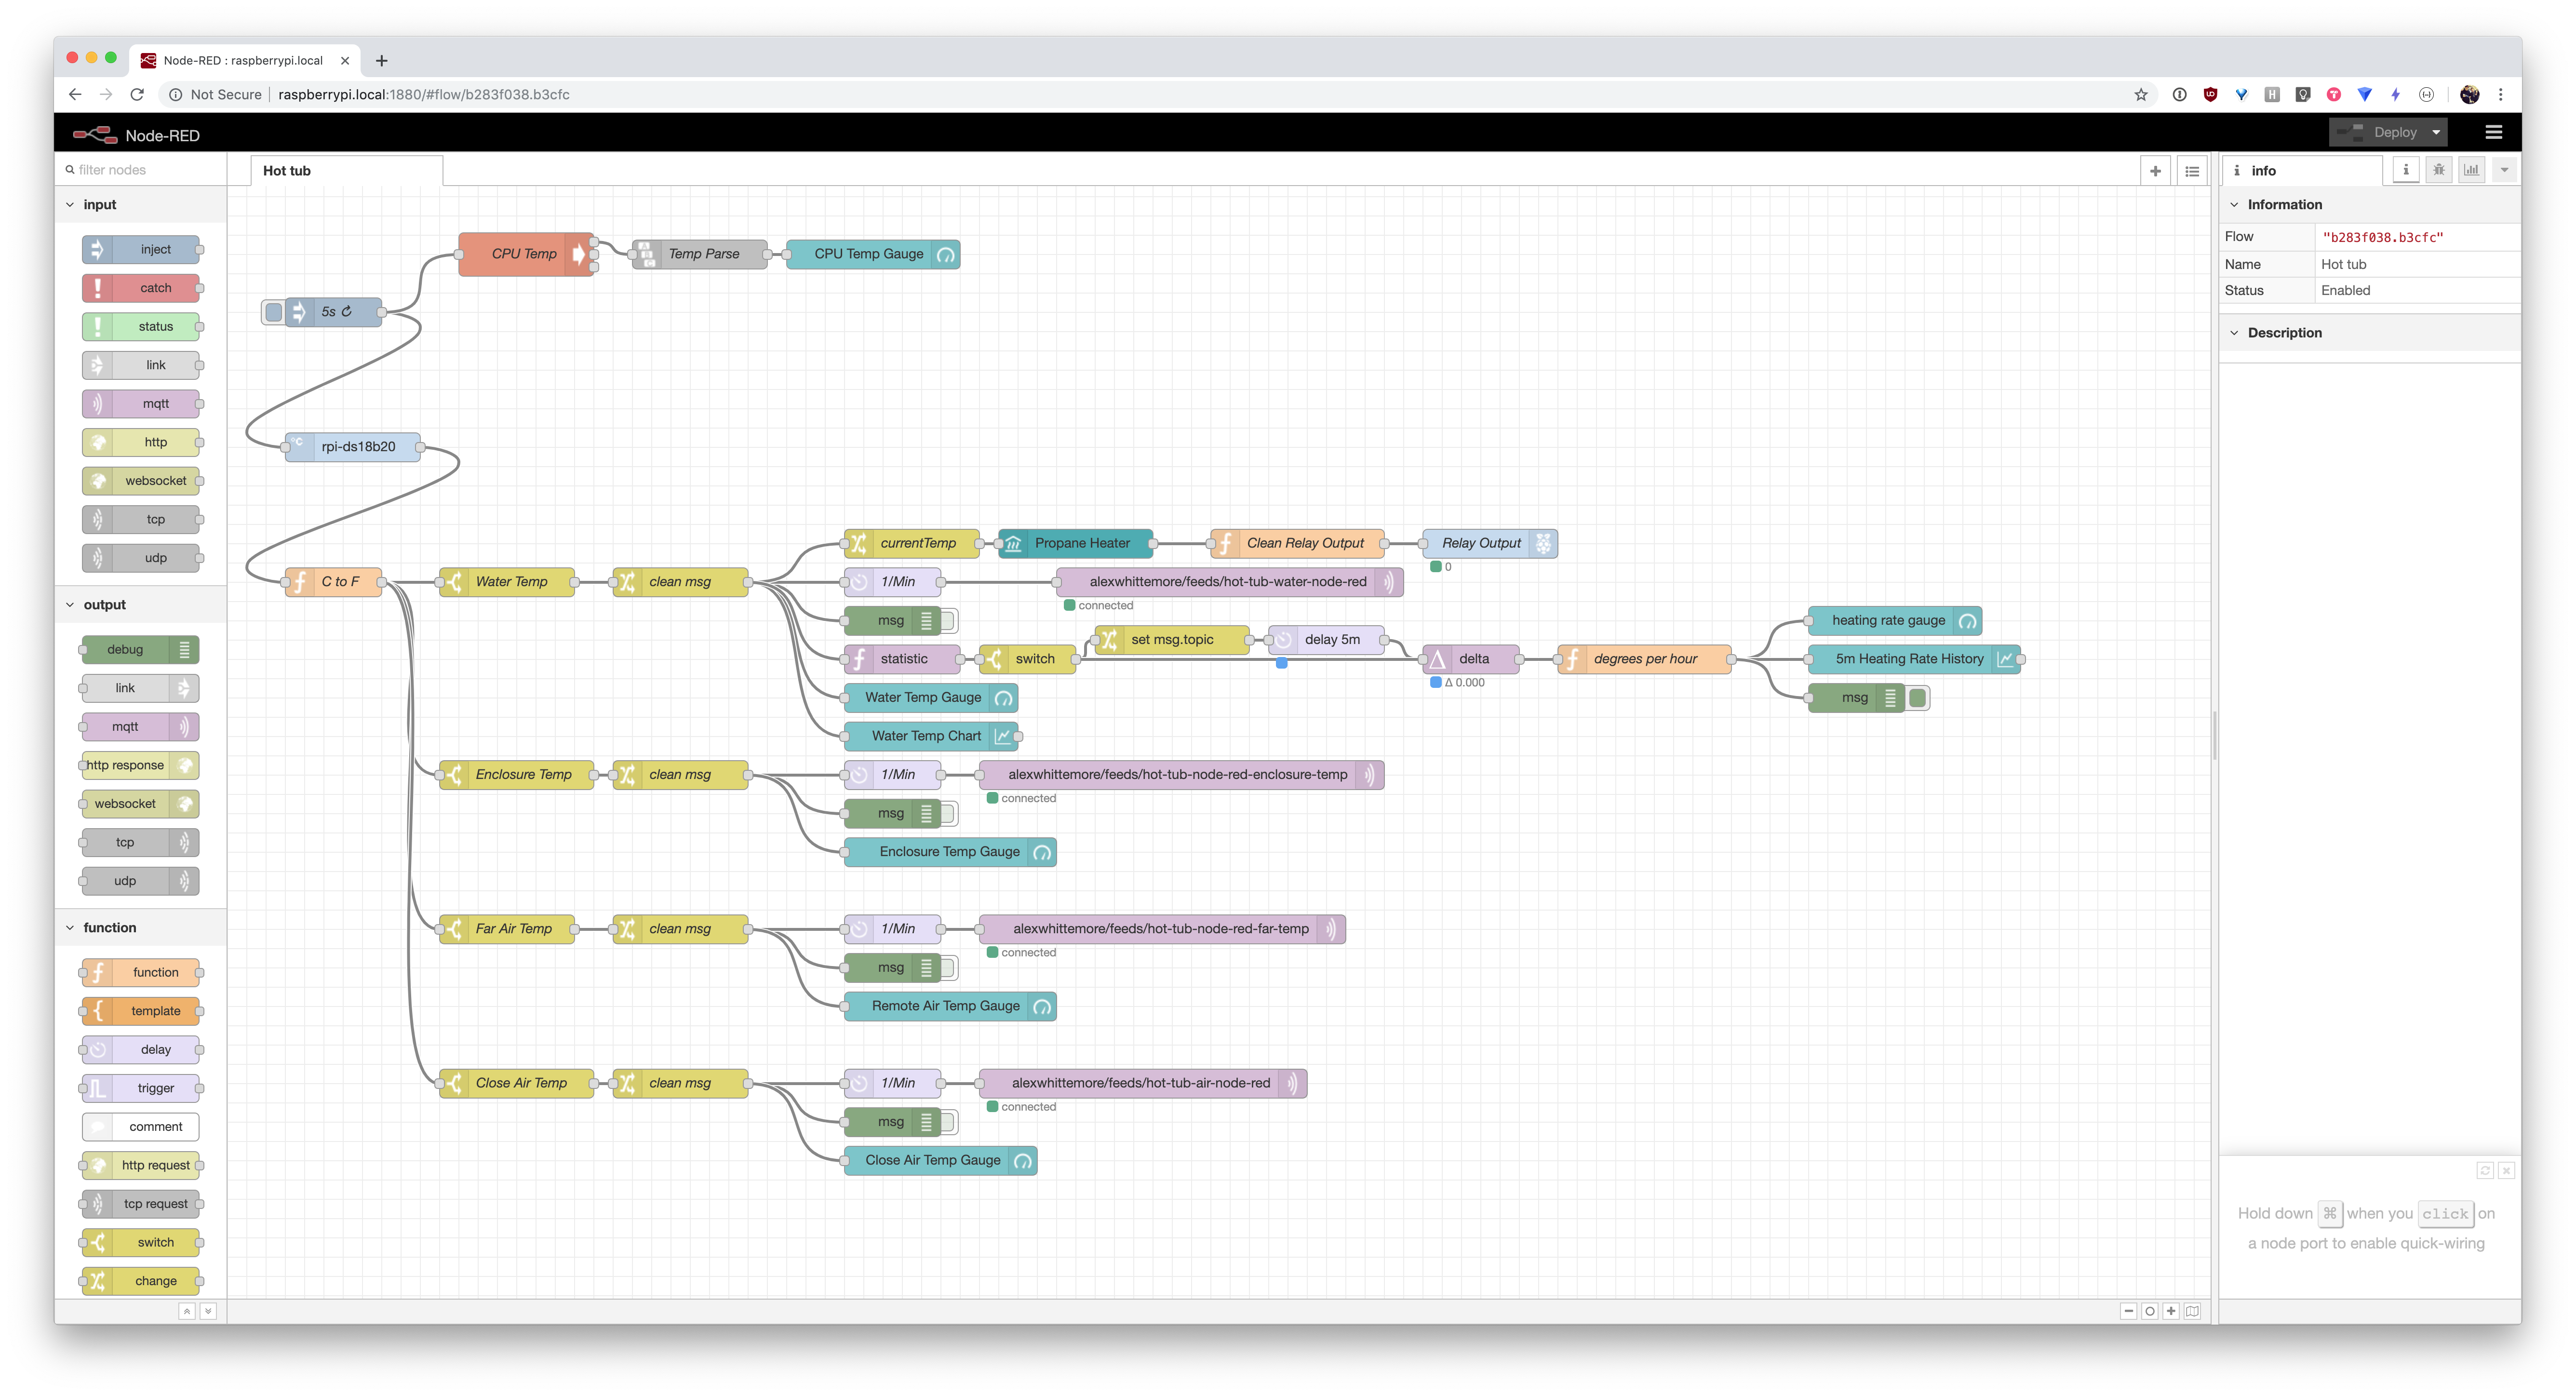
Github repo with node-red flow, though no documentation to reproduce: https://github.com/alexwhittemore/HotTubPi

  • 1 × Raspberry Pi running Node Red Main propane controller

  • Troubleshooting: DS18B20 Sensor Issues

    alexwhittemore07/08/2020 at 22:26 1 comment

    This project isn't FINISHED as such, but it's functional enough that it's reached a certain stasis where I don't have ENOUGH reason to do additional work. With one exception. The DS18B20 sensors I've been using for all the temperature measurements are, honestly, kinda bad.

    1. The resolution isn't awesome. 12 bit equates to .0625C, but the issue is they're still kinda noisy even down there. Or at least, they seem like it, even in water. I'm not super sure.
    2. The big one: they tend to fail. I'm just GUESSING I have counterfeit silicon, since I ordered them cheap from China. That might be part of the problem. But these guys have a tendency to just stop working correctly and fail CRC after maybe a few (6? 12?) months of usage.

    Here's the real killer: the failure mode is VERY tricky.

    The DS18B20 is a 1Wire sensor, and the readout time is relatively long in 12bit mode (~1s). I think these two factors conspire with the architecture of the linux kernel driver for 1Wire such that a CRC failure in 12 bit mode basically blocks whatever thread was trying to call the sensor for a full second. If you've got multiple sensors or a high read-rate, this can absolutely halt your application in its tracks.

    In my case, if even one sensor fails, Node-Red basically grinds to a halt and debugging becomes a huge challenge. The real clue was `tail -f /var/log/syslog` which showed the repeated sensor failures. Remove all the sensors and reboot, and Node-Red is suddenly zippy again. 

    Telltale sign of DS18B20 failure causing node-red performance issues

    The solution, unfortunately complex as it is, is to use something besides the DS18B20, ideally something with better longevity.

    I've had a handful of platinum RTD supplies on hand for a while to fix this issue. Luckily (pt. 1) one of those items is a MAX31865 RTD reader, and luckily (pt. 2) in the time since I last checked, "melvinrook" has created a MAX31865 RTD reader Node-RED node specifically targeting the raspberry pi

    Ultimately, my solution here needs to include multiple RTDs rather than just the one, AND I think I can do better than the MAX31865 for an application like reading a large body of water at a slow rate. But at least for now, the hot tub is working again.

    Hot tub fixed with a MAX31865

  • Log 9: Adding some Measurement

    alexwhittemore11/05/2019 at 17:00 0 comments

    This one's a slight diversion from the project logs so far. There's more to write about with software setup and changes I've made recently for robustness, but I got sidetracked trying to add a scale to measure propane. There's at least one nearly perfect off the shelf device for this - a load cell-based BLE propane tank scale from Flame King. It'd be nearly perfect if I could just hack together a battery eliminator for it, and let the Pi connect to it via Bluetooth for real time propane weight measurement.

    All the details of my attempt at that so far are over on my blog: https://www.alexwhittemore.com/reverse-engineering-cots-products-for-your-project/

  • Log 8: Control Software

    alexwhittemore09/15/2019 at 03:24 0 comments

    Finally, the meat and potatoes of hot tub control!

    Here's my Node-RED flow. Every 5s, all four DS18B20s get queried and those messages are separated into four separate flows based on which sensor it is. Three of them are just telemetry and gauge channels. These get cleaned up and decimated to 1/min (all messages but one per minute get discarded), then passed along via MQTT to Adafruit.IO, which I use as a high-availability monitor and data logger that doesn't have to be behind VPN. One of the sensors is the water temp channel used for heater control. This also gets passed to AdafruitIO once per minute, but also feeds a heater control block, and some complicated logic to calculate the heating rate of the hot tub. This logic needs quite a bit of work, but it at least gives a sense on the dashboard of how fast the tub is heating or cooling. Eventually, I intend to use the calculation to determine if the propane has run out, so I can stop needlessly pumping water and possibly signal the need for intervention. 

    The heater control block is from https://flows.nodered.org/node/node-red-contrib-heater-controller. One disadvantage of this block is that it implements a schedule that can't be disabled. At least one schedule entry MUST be present, so the controller can't simply maintain the last set point indefinitely. In practicality, I just set the necessary schedule items to 0°F, and the hot tub begins cooling down. Since it's only about 2-3 hours worst case scenario to get it hot again, this has been an ideal scheme anyway, for now.

    The DS18B20 library is a little tricky. There are a few to choose from, with various advantages and disadvantages. For instance, one I find more convenient to use, since it generates its own messages without input, but it doesn't handle multiple sensor busses. It worked fine when I had a couple sensors on one bus, but broke when I split each sensor out on its own. The one I'm using now is https://flows.nodered.org/node/node-red-contrib-ds18b20-sensor. If I recall, I had to do some trickery to get the multiple busses set up right. I'll try to figure that out and add some post-facto documentation.

    Interface

    One of the most convenient things about Node-RED is that it comes out of the box with a whole infrastructure for building a web-based dashboard UI. This UI can in turn be accessed from anywhere - a cell phone, the device itself if it has a screen, and so on.

    My plan was to use a cheap Android tablet, dedicated to the hot tub, rather than having to build some kind of custom physical UI. Unfortunately, all the usual cheapest suspects (Kindle Fire 7, etc) are actually too underpowered to tolerably load the web UI, since it's pretty javascript heavy. For now, I've just been using my phone. Eventually, I might build a touchscreen or button-based interface into the raspberry pi and cable box itself. 

    Here's what the UI looks like as-is:

    Where can I see the flow source?

    Node-RED flows are stored as a JSON file on disk, representing all the nodes and connections of a flow. There's a new(ish?) scheme called "Projects" that abstracts flows into complete, packaged and portable "projects" that exist automatically under Git version control. But I haven't enabled this yet for this particular project, as it requires some reconfiguration of Node-RED that could be damaging.

    Sometime this week or weekend I intend to

    1. Back-up the setup as-is by copying the flow off the disk, as well as by making a full copy of the SD card image for immediate roll-back
    2. Upgrade Node-RED to V0.20.8 (I'm on V0.20.7)
    3. Enable Projects
    4. Move this flow to a project

    This will set me up nicely for upgrading to V1.0 when it comes out in a matter of weeks, which probably won't go smoothly and will likely require rollback to 0.20.8 while component compatibility bugs get fixed.

  • Log 7: Controller Hardware Layout

    alexwhittemore09/15/2019 at 03:01 0 comments

    Before I get into the software that runs the tub, let's start with the hardware itself.

    First of all, everything is housed in a reasonably splash-proof weatherproof enclosure from Extreme Broadband. It turns out, these broadband cable enclosures are excellent. They're designed for flexibility so a cable installer can easily and quickly toss in whatever needs installing. They're meant to be used outside, so they've got reasonable water ingress measures like gaskets around cable entries and a double-lipped closure that should well keep out rain and hot tub splashing. And they're darn cheap. It was hard to find anything else at the $25 price point, even for simple boxes that would require manually drilling holes, installing cable glands, and all the rest of it. 

    As for stuff IN the box:

    Sonoff Pow smart switch This is primarily for monitoring electrical power consumption. In long term use, I probably won't care about the power usage minute to minute, but at least in the beginning, I want to be able to measure real power usage as a means of determining thermal leakage power of the hot tub when I start modifying it. It's also useful to know what components draw what unavoidable power besides just the heater. For instance, leaving the circulation pump on full time is probably unnecessary, and while it pales in comparison to the heater, 50W on 100% duty cycle is still like $10/mo in electricity. I'm sure I'll be revisiting that number in the future. Beyond power measurement, the master switch is a good failsafe for shutting down the whole works if something's going wrong. If telemetry shows the tub is at 110F, for instance, it's nice to have a backup plan when VPNing into the house to bring up the controller interface doesn't work and I just WANT. IT. OFF. NOW.

    Power strip Of course, everything needs power. The heater pump has a dedicated 12V 60W power supply, and the tub itself needs to be plugged in, all behind the Pow for the sake of monitoring. The Pi needs power too.

    Temperature sensor junction block This one is actually interesting in its own right. Pictured here, a bus connects 4 DS18B20 temperature sensors in parallel to one IO pin on the Pi. When I eventually implemented all 4 in software, this kind of fell apart. I ended up putting a new distribution block in there that has an IO per sensor. I'll try to detail this experience in a later update.

    Relay There's a single relay - an off the shelf board from one of the Chinese hobby electronics makers that just takes 5V, gnd, and a high impedance control signal, and has the relay driver circuit onboard. The relay switches the 12V power supply to the heater pump. I'd kind of like to switch AC power to the 12V supply instead, to eliminate parasitic draw of the power brick when the pump isn't in use. But that's a bit more dangerous, so I'll probably leave it for a future update once I have a chance to build a specific housing for the relay.

    Raspberry Pi The brains of the show. The Pi has a couple electrical connections - one to the temperature sensors, and one to the relay that controls the heater pump. Recall that the flow switch in the camp shower ignites the burner, so this one relay controls whether the heater circuit is active at all. To make electrical connection easier and more mechanically robust, I'm using this screw terminal Pi hat from Amazon. Because the internet is awesome, someone's already come across the need for an enclosure for this very combination, and I'm using the case by "sneaks" over at Cults3D. In order to make it fit easily, I cut out all the plastic that fits between rows of terminals. 

    All of these components neatly screw into the grid of bosses in the broadband box designed for just that. The relay and 1-wire distribution block don't have cases, so I just hot glued them in place.

    Most cables have been knotted internally for strain relief on the components.

  • Log 6: Adding Control

    alexwhittemore09/10/2019 at 06:42 0 comments

    Ok ok so with a toe dipped into the waters of IoT, I decided that a full-blown IoT/industrial control platform was totally necessary, so why not bring out the big guns and use a Raspberry Pi with Node Red?

    But first, a Chinese Amazon seller sent me this cheap temperature controller to play with, so I decided I would do that.

    It worked well until it exploded!

    Full story here: https://www.alexwhittemore.com/adventure-with-a-cheap-amazon-temperature-controller/

    So on to the REAL system.

    Obviously the system is going to need telemetry, so the main controller would have to have a wifi chipset. I thought about using the same ESP32 and building a controller around that, but I decided not to for a few reasons:

    1. Embedded software is tricky. If you get it wrong, it has a tendency to run out of memory and fail. Testing is a little difficult, since you can run into unhandled states that crash the system and don't output logs to figure out what happened. How many times have you written an Arduino sketch with improper handling of millis() that worked great for a few days then suddenly blew up?
    2. Embedded devices are slower to iterate. For the most part, I can't just log in remotely to look at state of operation and activity, and make changes in real-time as I please.
    3. Embedded devices leave everything up to YOU. Need an interface? Make and wire a board full of buttons, LEDs, and maybe an LCD. Then build the logic and/or graphics for that. Need new connectivity? Hope you have program memory space left!

    In contrast, there are much easier options. For one, a Raspberry Pi seems like a great choice - an embedded linux box with connectivity up the wazoo that will work with whatever sensors and whatever application layer frameworks and languages you like. Control scheme not working? SSH in and have a look at the logs. Make some quick changes in Python and restart the service. Easy.

    On top of that, I've seen Node-RED kicking around for a while now and I've always wanted a chance to kick the tires and see what it's all about. This seemed like a perfect opportunity. As it turns out, Node-RED is, in my opinion, nearly perfect for this kind of process control scenario. I can't say for sure that it IS, but it sure feels like it protects you from some of the logical and flow control gotchas of programming a controller in code. For instance, there are multiple tasks to keep track of - do you build a runloop architecture? Scheduler architecture? Use true multithreading? Run each thing in its own process and hope contention for the physical resources doesn't become a problem? Node-RED's visual and message flow-based design takes a lot of these decisions off the table from the get-go, and when you run into problems that are more difficult to solve with that kind of methodology, you CAN add in some custom code easily enough.

  • Log 5: IoT (THIS IS THE CONNECTED PART)

    alexwhittemore09/10/2019 at 06:39 0 comments

    So obviously, having a faster heater is better.

    I ran some calculations before deciding to spend the money on a propane heater to see if the cost would work out. I'll dig them up and add them here, since it's interesting, but spoiler alert, it's worth the money.

    The built-in electric heater will heat about 2°F/hr, if you're lucky. The propane heater on the conservative, more efficient low flame heats about 5°F/hr. If you're willing to take a 10% efficiency hit, the high setting does 15°F/hr, which means the tub is basically ready to go in 2 hours, even if you've left the heat off for a week. (More on how I measured/calculated these numbers next post. Sorry I'm a tease.)

    Unfortunately, with great power comes great responsibility.

    Even at 5°F/hr, you've got to check the hot tub temperature and turn it off really inside a 30m window of your target, or bad things start to happen.

    One night I turned the tub on to have it ready by post-dinner, but in the process of cooking, I realized I needed groceries. I shopped, one thing led to another, I came home, cooked dinner, and by the time I remembered the hot tub, it was already at a rare-steak-sous-vide 120°F. That's way beyond health hazard - scum had started to congeal on the surface and in the chlorine ball and in the intake filter on the pump. Still not sure what that was, but I know it was gross.

    In similar fashion, I left on vacation, giving the roomie the low down on how to fly the tub in my absence. Predictably, he made the same mistake, but two drinks in on a Saturday decided that 110°F didn't seem too unreasonable. After a couple minutes of uncomfortable soaking, he very suddenly ran out of the tub and into the bathroom to vomit.

    So yeah, it control better than human-actuated bang-bang.

    But before getting there, I actually put together a quick project simply to add telemetry, so I could gather those numbers I mentioned before and so I could SEE when I'd left it on to melt itself to slag.

    That and just to see the water temperature more accurately than the 1-degree increments the built-in display shows.

    Here's the code:

    https://github.com/alexwhittemore/ESP32_Temp_AIO

    The sensor actually sends data to an Adafruit.IO dashboard at https://io.adafruit.com/alexwhittemore/dashboards/hot-tub, though it hasn't been in use for quite a while now.

    This was remarkably easy to set up:

    • Create a new "Feed" for the water temp
    • Create a new "Feed" for the air temp
    • Set the feed names appropriately on lines 10 and 11 of the arduino sketch.

    All in all, I just followed Adafruit's tutorial linked on that repo's readme to a T, but replacing "humidity" with a second temperature channel.

    In the end, you get pretty graphs over time without any additional work, like this one you'll see in the next update:

    Adafruit.IO is pretty cool!

  • Log 4: Portable Heater

    alexwhittemore09/10/2019 at 06:11 0 comments

    So the low-hanging-fruit solution to poor heater performance, besides "keep it full temp all the time for $100/mo," is a camp shower. For about $120 on Amazon, you can buy a propane-fired continuous on-demand water heater meant to take cold-af garden hose water and spit out a shower. Sounds like JUST the ticket.

    Of course, at first I considered putting a coil of copper pipe in the webber grill next to the tub, but for about 38 reasons, I'm glad I bought this instead:

    https://www.amazon.com/gp/product/B073F1PVHN/ref=ppx_yo_dt_b_search_asin_title?ie=UTF8&psc=1

    These things are super simple, and pretty robust: there's a flame knob, a water flow knob, an outlet temperature indicator, and a battery box. The batteries are used to trigger a gas solenoid and ignitor when a flow sensor detects sufficient water flow. Literally - turn on the hose, the whole thing fires up. Turn off the hose, flame off. The temperature knob is pretty self evident - more red = more flame = more hot. The water flow knob is a little less so - for a given flame setting, lower flow = hotter output, and higher flow = stronger water pressure, but colder.

    Of course, there's still the problem of how to pump water INTO the heater. 

    A simple aquarium pump won't do, because they don't produce enough static pressure. A utility pump would, but I wanted to avoid sticking power lines in the hot tub with live, mortal humans, UL rating be damned. Of course, the prior art points us to the correct solution: a demand pump.

    These things are designed for RVs and sailboats. From a 12V source, they pump a modest flow of water (1-5L/min) at an outlet pressure similar to your tap (between 40 and 60 PSI depending on the pump and setting). They have a pressure switch on the output, so that if the high end of that pressure is reached, they auto shut off, and if the pressure drops, they turn on. Open the tap, get pumped flow. Close the tap? Pump stops.

    This is extra convenient in our case, because we can control the pump and therefore heater either electrically OR hydraulically, by simply turning off a valve somewhere in the pressurized section of our heater circuit. 

    I do have one bit to add that the prior art doesn't make super clear: in the realm of demand pumps, you get what you pay for, or more accurately, you lose what you don't pay for.

    Wanting to be cheap, this is the first pump I bought:

    https://www.amazon.com/gp/product/B072XLZX72/ref=ppx_yo_dt_b_search_asin_title?ie=UTF8&psc=1

    It's under $20, but it's HELLISHLY loud. Like, I wadded it up in a pile of towels and still couldn't in good conscience run it at hot-tub-oclock, much less set it up on automatic control. I even measured the sound with an iPhone app - 74.6 dB at 2m away without the towel. It was car-engine-with-hood-open loud. 

    So back it went, in exchange for this one at 3X the price ($60):

    https://www.amazon.com/gp/product/B01CQ7DD0S/ref=ppx_yo_dt_b_search_asin_title?ie=UTF8&psc=1

    This one clocked in at 52.6 dB at 2m, which my Amazon review notes tell me was slightly quieter than the circulation pump built into the hot tub. And even then, I think the dominant component of that 52.6 was actually the propane burner, not the pump itself.

    So, like, definitely spend the money on a quiet pump.

    Finally, you'll want to power it. 12V AC bricks are a dime a dozen, no big deal:

    https://www.amazon.com/gp/product/B003TUMDWG/ref=ppx_yo_dt_b_search_asin_title?ie=UTF8&psc=1

    So how's it all hooked up?

    I've made some modifications since, but this is how I first put this together:

    For one, all of the electronics are in that tupperware, with a healthy dose of tape around the side. It's not exactly an IP rating, but at least I feel more comfortable that, this way, a splash from the tub won't arc us all to kingdom come. You'll also notice the creative plumbing. The heater comes with male and female garden hose adapters, since that's the plumbing everyone typically has on hand for stuff like this. In this case, I'm abusing the female GHT (garden...

    Read more »

  • Log 3: Solutions

    alexwhittemore09/10/2019 at 05:35 0 comments

    So what can we DO about these two problems:

    • Takes a long time to get hot
    • Costs too much to keep hot

    Easy.

    • Hack-in a better heater
    • Hack-in a cheaper heater
    • Add a ton of insulation.

    To be clear, this isn't all original, clean-sheet work. The idea of using a propane camp shower on a portable hot tub has been done before:

    https://www.instructables.com/id/Portable-Water-Heater-for-a-Hot-Tub-or-Pool/

    https://www.instructables.com/id/Portable-Hot-Tub/

    This one even went so far as a solar heater

    https://www.instructables.com/id/Overview-2/

    Excellent idea, and one I'd like to try, but at this point in my case it seems more cost than it's worth. And I don't want to buy and keep an extension ladder, in a rental, just for this. I could borrow one, but only if I had a VERY tolerant extension-ladder owning friend who didn't mind not seeing it again for 3 months of on-off work.

    Anyway, while it's not all original work, I do believe I'm the first to have taken the idea to such extremes as IoT integration and closed loop control. More on that next.

  • Log 2: Energy Costs of a Portable Spa

    alexwhittemore09/10/2019 at 05:21 0 comments

    When you spend 1/10 the cost on a spa, you have to wonder, what are you giving up?

    • Jets (the portable units have bubbles - impressive, but not the same)
    • built-in seats
    • big, long-lasting filters
    • insulation
    • heater power

    The first 3 aren't a big deal. Yeah, you're sitting on the ground, but you're in a bath, who cares? If you do, you can get a seat on Amazon.

    Insulation and Heater power are the real killers, and the reason for this project.

    Portable spas have anemic heaters

    Here's the thing - real hot tubs plug into the same circuit your electric car does. They have basically infinity power. Same if your tub is gas-fired. You want to soak but the water is cold? Set the temp and wait 30m. Maybe an hour.

    Portable spas are designed to plug into a normal 120V outlet on a 15A circuit. That limits you to 1800W right there, which isn't a lot when you want to heat ~290 gallons of water. Add to that that individual appliances are meant to draw 20% less than that  (1440W) if they're "continuous" (on for >3 hours) and the hot tub doesn't have much to work with. And remember, the heater isn't even the only device in the box you plug in.

    By my measurements, my Intex spa draws around 50W for the circulation pump, 1400W when the bubbles and heater are on, around 700W bubbles-only (man, that's a powerful compressor), and around 1200W for just the heater (so 1250 heater+pump).

    TL;DR: The portable spa heater is only 1200W. It heats at about 1-2°F per hour. Long story short: you'll have to keep the water hot all the time if you want it to be ready for a soak any given day of the week.

    This leads to a second problem:

    Cost to maintain a set temperature is proportional to amount of thermal insulation, and the temperature delta to ambient.

    Unfortunately, the requirement for dense, heavy, thick insulation is directly at odds with the requirement for packing everything neatly into a single box a single mortal human can lift by themselves (albeit briefly).

    Real hot tubs are insulated TO THE NINES. Do you know why a good hot tub cover costs $500 easy? Because it's THICK, HEAVY, and unwieldy as hell. LOTS of foam and structure to support it. Similarly, if you take the side panel off, you'll find that nearly every gap between the tub and its housing is stuffed chock full of expanding PU foam.

    The reason is, the (energy) cost to run the hot tub is driven entirely by the average heat loss to ambient.

    You have two options for reducing heat loss:

    1. Use a ton of insulation (strike 1).
    2. Keep the water cold, so low delta-t, then heat it up quickly on-demand. (strike 2, with a heater less powerful than a hair dryer).

    Looks like we just found our hacking targets.

    Quickly, before we go on to the actual hacking, let's get a baseline. I know the heater takes 1200W, but it's not on ALL THE TIME. So how much power am I actually paying for? If I stick a temperature sensor in the water and log it with the built-in heater set to 104, I measure a heater duty cycle of about 42%. Give or take, keeping the hot tub full-heat takes about 500W. For now, take my word, and I'll show you numbers and graphs and stuff later. For reference, 500W is 12kWh/day, or about $3 at our local electricity prices, so about $90/mo. Or in different units, a lot of hacker project budget.

  • Log 1: Overview and Motivation

    alexwhittemore09/10/2019 at 04:51 0 comments

    Hot tubs are expensive. Even free craigslist jobs come with tremendous costs:

    • Moving the (very heavy) hot tub
    • Installing the (very heavy) hot tub somewhere you can put a bunch of heavy water in it
    • Repairing the hot tub
    • Getting a heater for the hot tub (free on craigslist rarely comes with a functional heater)
    • Getting a cover for the hot tub (covers are VERY valuable [more later] and therefore pretty expensive, and therefore often sell without the actual tub)
    • Running power to the hot tub (240V, high current)

    Even if you can get your buddy, your buddy's truck, and 4 other friends to help you heave the thing around, a big foam-packed plastic tub is still a long way off from a functional spa, even if it's watertight. 

    Ballpark, assuming you don't already have 240V in the perfect spot on a patio, a hot tub will run you $5-10k before you even turn it on. Maybe $4k if you get a "free" tub, and maybe only $2k if your buddy with the truck is also an electrician.

    Enter the inflatable spa.

    I can say with confidence - if you're looking at this and thinking, "hmm, that's a good idea!" - you're right. Go get one. On Prime Day you might even be able to get one of those 6 person models for $350. To be clear: yes, it fits 6 people, if you're all close friends. It fits 4 comfortably. 3 if you don't like each other. It is worth every penny.

    But then, $350 and $3500 are pretty far apart, and there are good reasons. So maybe read on first.

    The REAL cost of a $350 Hot Tub

    Ok, so the CAPITAL cost is much cheaper. But that's not the whole picture. Here's where the hot tub owner spends money:

    • Capital (purchase) $$$
    • Consumables (chemicals)
    • Personal effort
    • Accessories
    • Energy $$$

    Personal effort - well, you're a hacker, so you're probably not the type to pay someone to make the problem go away. Ignore this.

    Consumables - these are pretty cheap, especially for such a small volume of water. As a point of reference, I've spent about $60 or 80 on chemicals since the start of this, and I'm in no danger of running out of anything soon. It's more like, a $10 bottle of chlorine that'll last you a year, a $18 bag of Alkalinity Up that you'll never finish, etc.

    Accessories - get what you want, duh. We always kinda go nuts on projects, don't we? I recommend a hand-held pool skimmer, but otherwise, budget appropriately.

    Capital - This is the single biggest cost, and with the inflatable tub, we've knocked it WAY down.

    Energy - This is the second biggest cost, and knocking this down is basically the whole focus of this project.

View all 10 project logs

Enjoy this project?

Share

Discussions

nodemcu12ecanada wrote 08/22/2020 at 12:05 point

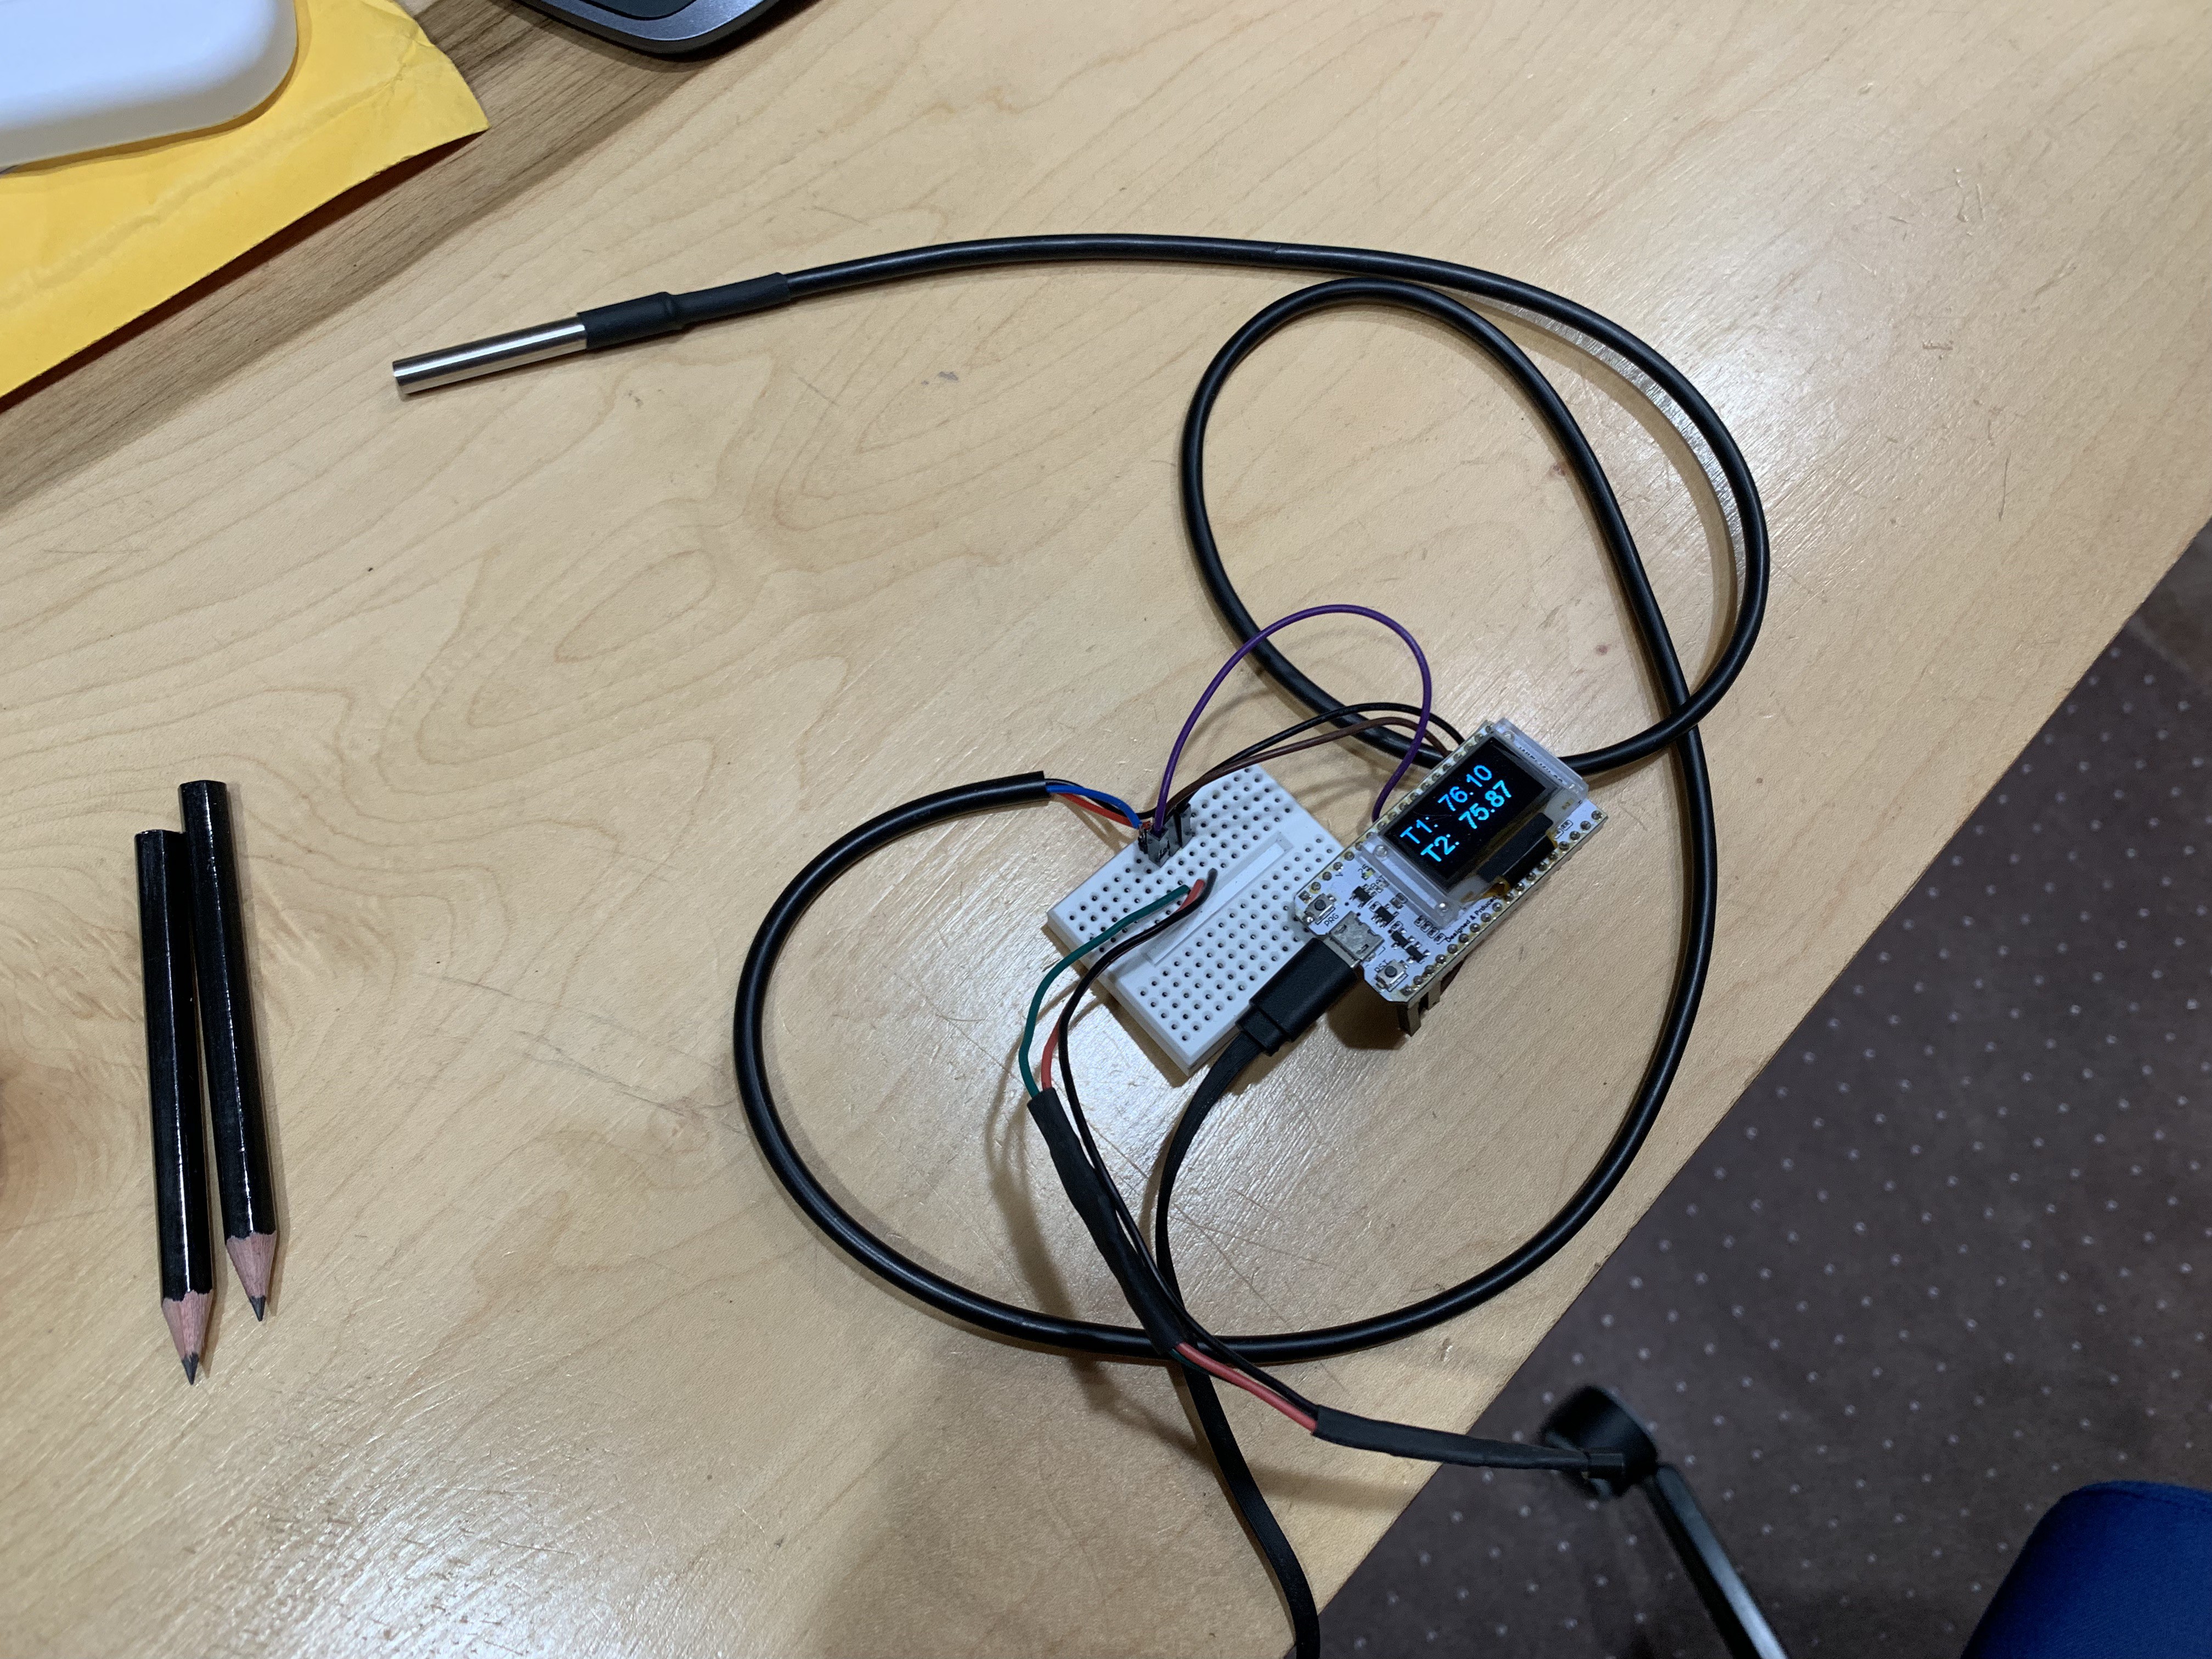
I use many DS18B20s with 6 NodeMCU devices for over 3 years with no issues including controlling the waterbed temp. 3 DS18B20 on one input in some cases. Programs include error checking. Web pages hosted on the device are used to monitor and control instead of an app. Data is sent to a cloud spreadsheet. Also monitor and control from anywhere using MQTT. Upload programs wirelessly.

 https://sites.google.com/site/nodemcu12e/

  Are you sure? yes | no

Mike Szczys wrote 07/16/2019 at 21:29 point

Oh dear... sounds interesting. You should publish some details on this one.

  Are you sure? yes | no

alexwhittemore wrote 07/17/2019 at 19:41 point

Still in the midst of DOING it. I do have probably a useful-enough level of work at this point just getting a propane controller implemented, which I suppose provides a nice roadmap for a simple but full-featured node-red based SCADA system. But this project is also basically made of feature creep.

Then again it's probably the most rewarding kind of project to waste time on :)

  Are you sure? yes | no

Similar Projects

Does this project spark your interest?

Become a member to follow this project and never miss any updates