 Md. Khairul Alam
A 4 digit seven segment display is included in the kit. Each segment in the display module is multiplexed, meaning it shares the same anode connection points. And each of the four digits in the module have their own common cathode connection point. This allows each digit to be turned on or off independently. Also, this multiplexing technique turns the massive amount of microcontroller pins necessary to control a display into just eleven or twelve (in place of thirty-two)!
The LED segments of the display require current-limiting resistors when powered from a 5 V logic pin. The value of the resistor is typically between 220 and 470 ohms. And, driver transistors are recommended to provide additional driving current to the LED segments, because each pin of a microcontroller can source or sink near 40 mA of current only. When all (seven) segments of the display turned on at once (the numeral 8), the current demand will exceed this 40 mA limit. The image shown below indicates the basic wiring diagram of the current limiting resistors and driver transistors.
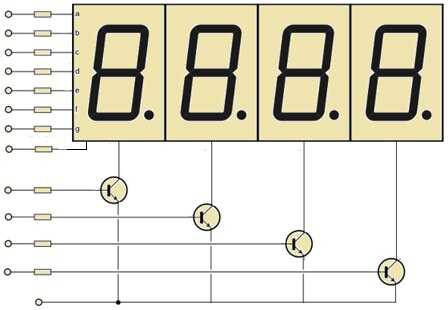
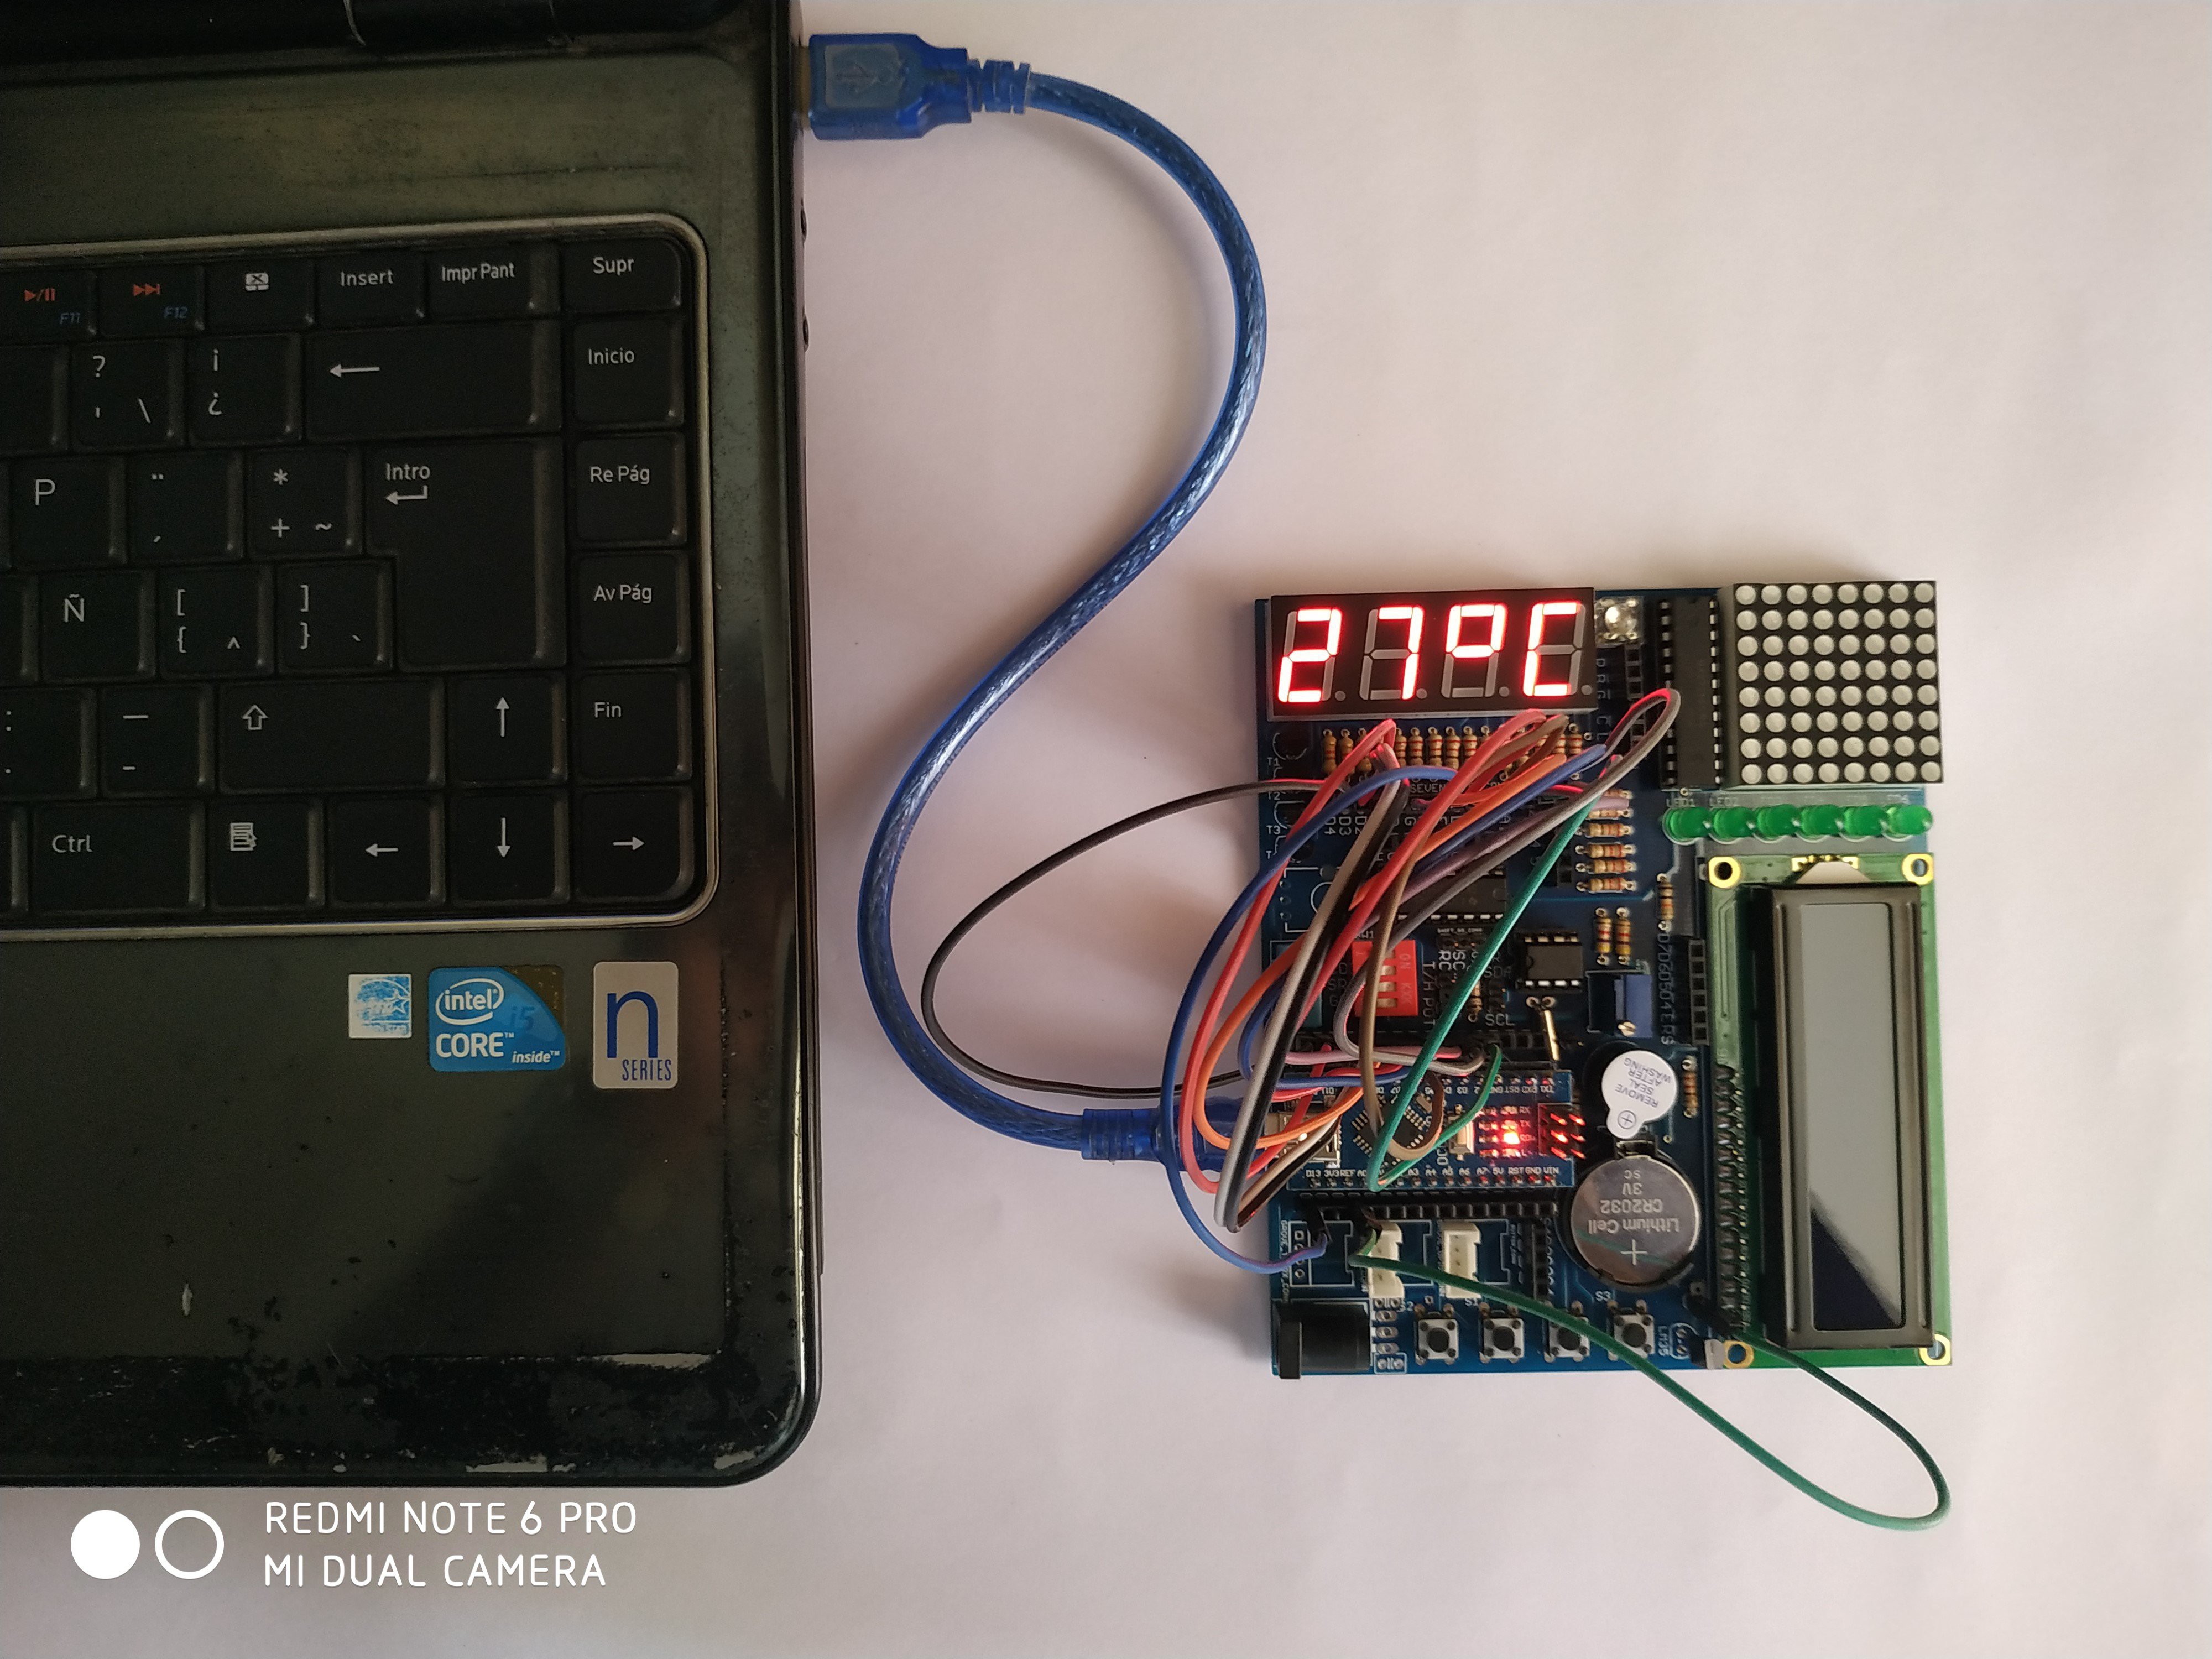
All the above connections are made in the board. You just need to connect 4 digit pins and 7 segment pins to the Arduino digital pin followed by the Arduino sketch. Carefully follow the hookup diagram to complete your hardware, and then upload the sketch to Arduino using the Arduino IDE as usual. The finished circuit can display the temperature using on-board LM35 temperature sensor. Arduino analog pin A0 should be connected to the signal out of the sensor.
//the pins of 4-digit 7-segment display attach to pin2-13 respectively
int a = 2;
int b = 3;
int c = 4;
int d = 5;
int e = 6;
int f = 7;
int g = 8;
int p = 13;
int d4 = 12;
int d3 = 11;
int d2 = 10;
int d1 = 9;

void setup()
{
  //set all the pins of the LED display as output
  pinMode(d1, OUTPUT);
  pinMode(d2, OUTPUT);
  pinMode(d3, OUTPUT);
  pinMode(d4, OUTPUT);
  pinMode(a, OUTPUT);
  pinMode(b, OUTPUT);
  pinMode(c, OUTPUT);
  pinMode(d, OUTPUT);
  pinMode(e, OUTPUT);
  pinMode(f, OUTPUT);
  pinMode(g, OUTPUT);
  pinMode(p, OUTPUT);

}
int del = 5;
int temp;
/***************************************/
void loop()
  temp = analogRead(A0)*500/1023;
{
  clearLEDs();//clear the 7-segment display screen
  pickDigit(0);//Light up 7-segment display d1
  pickNumber((temp/1000));// get the value of thousand
  delay(del);//delay 5ms

  clearLEDs();//clear the 7-segment display screen
  pickDigit(1);//Light up 7-segment display d2
  pickNumber((temp%1000/10));
  delay(del);//delay 5ms

  clearLEDs();//clear the 7-segment display screen
  pickDigit(2);//Light up 7-segment display d3
  //pickNumber(n%100/10);//get the value of ten
  deg();
  delay(del);//delay 5ms

  clearLEDs();//clear the 7-segment display screen
  pickDigit(3);//Light up 7-segment display d4
  //pickNumber(n%10);//Get the value of single digit
  ce();
  delay(del);//delay 5ms
}
/**************************************/
void pickDigit(int x) //light up a 7-segment display
{
  //The 7-segment LED display is a common-cathode one. So also use digitalWrite to  set d1 as high and the LED will go out
  digitalWrite(d1, LOW);
  digitalWrite(d2, LOW);
  digitalWrite(d3, LOW);
  digitalWrite(d4, LOW);

  switch(x)
  {
    case 0:
    digitalWrite(d1, HIGH);//Light d1 up
    break;
    case 1:
    digitalWrite(d2, HIGH); //Light d2 up
    break;
    case 2:
    digitalWrite(d3, HIGH); //Light d3 up
    break;
    default:
    digitalWrite(d4, HIGH); //Light d4 up
    break;
  }
}
//The function is to control the 7-segment LED display to display numbers. Here x is the number to be displayed. It is an integer from 0 to 9
void pickNumber(int x)
{
  switch(x)
  {
    default:
    zero();
    break;
    case 1:
    one();
    break;
    case 2:
    two();
    break;
    case 3:
    three();
    break;
    case 4:
    four();
    break;
    case 5:
    five();
    break;
    case 6:
    six();
    break;
    case 7:
    seven();
    break;
    case 8:
    eight();
    break;
    case 9:
    nine();
    break;
  }
}
void clearLEDs() //clear the 7-segment display screen
{
  digitalWrite(a, LOW);
  digitalWrite(b, LOW);
  digitalWrite(c, LOW);
  digitalWrite(d, LOW);
  digitalWrite(e, LOW);
  digitalWrite(f, LOW);
  digitalWrite(g, LOW);
  digitalWrite(p, LOW);
}

void zero() //the 7-segment led display 0
{
  digitalWrite(a, HIGH);
  digitalWrite(b, HIGH);
  digitalWrite(c, HIGH);
  digitalWrite(d, HIGH);
  digitalWrite(e, HIGH);
  digitalWrite(f, HIGH);
  digitalWrite(g, LOW);
}

void one() //the 7-segment led display 1
{
  digitalWrite(a, LOW);
  digitalWrite(b, HIGH);
  digitalWrite(c, HIGH);
  digitalWrite(d, LOW);
  digitalWrite(e, LOW);
  digitalWrite(f, LOW);
  digitalWrite(g, LOW);
}

void two() //the 7-segment led display 2
{
  digitalWrite(a, HIGH);
  digitalWrite(b, HIGH);
  digitalWrite(c, LOW);
  digitalWrite(d, HIGH);
  digitalWrite(e, HIGH);
  digitalWrite(f, LOW);
  digitalWrite(g, HIGH);
}
void three() //the 7-segment led display 3
{
  digitalWrite(a, HIGH);
  digitalWrite(b, HIGH);
  digitalWrite(c, HIGH);
  digitalWrite(d, HIGH);
  digitalWrite(e, LOW);
  digitalWrite(f, LOW);
  digitalWrite(g, HIGH);
}

void four() //the 7-segment led display 4
{
  digitalWrite(a, LOW);
  digitalWrite(b, HIGH);
  digitalWrite(c, HIGH);
  digitalWrite(d, LOW);
  digitalWrite(e, LOW);
  digitalWrite(f, HIGH);
  digitalWrite(g, HIGH);
}

void five() //the 7-segment led display 5
{
  digitalWrite(a, HIGH);
  digitalWrite(b, LOW);
  digitalWrite(c, HIGH);
  digitalWrite(d, HIGH);
  digitalWrite(e, LOW);
  digitalWrite(f, HIGH);
  digitalWrite(g, HIGH);
}

void six() //the 7-segment led display 6
{
  digitalWrite(a, HIGH);
  digitalWrite(b, LOW);
  digitalWrite(c, HIGH);
  digitalWrite(d, HIGH);
  digitalWrite(e, HIGH);
  digitalWrite(f, HIGH);
  digitalWrite(g, HIGH);
}

void seven() //the 7-segment led display 7
{
  digitalWrite(a, HIGH);
  digitalWrite(b, HIGH);
  digitalWrite(c, HIGH);
  digitalWrite(d, LOW);
  digitalWrite(e, LOW);
  digitalWrite(f, LOW);
  digitalWrite(g, LOW);
}

void eight() //the 7-segment led display 8
{
  digitalWrite(a, HIGH);
  digitalWrite(b, HIGH);
  digitalWrite(c, HIGH);
  digitalWrite(d, HIGH);
  digitalWrite(e, HIGH);
  digitalWrite(f, HIGH);
  digitalWrite(g, HIGH);
}

void nine() //the 7-segment led display 9
{
  digitalWrite(a, HIGH);
  digitalWrite(b, HIGH);
  digitalWrite(c, HIGH);
  digitalWrite(d, HIGH);
  digitalWrite(e, LOW);
  digitalWrite(f, HIGH);
  digitalWrite(g, HIGH);
}

void deg() //the 7-segment led display 9
{
  digitalWrite(a, HIGH);
  digitalWrite(b, HIGH);
  digitalWrite(c, LOW);
  digitalWrite(d, LOW);
  digitalWrite(e, LOW);
  digitalWrite(f, HIGH);
  digitalWrite(g, HIGH);
}

void ce() //the 7-segment led display 9
{
  digitalWrite(a, HIGH);
  digitalWrite(b, LOW);
  digitalWrite(c, LOW);
  digitalWrite(d, HIGH);
  digitalWrite(e, HIGH);
  digitalWrite(f, HIGH);
  digitalWrite(g, LOW);
}
/*******************************************/
You will get the following result if everything goes well.
Discussions
Become a Hackaday.io Member
Create an account to leave a comment. Already have an account? Log In.
Yes, you are right. But I tried to keep the code simple so that a beginner can easily understand the code.
Are you sure? yes | no
A good opportunity for you then to write tutorials on how to transform the code to be more effective.
Are you sure? yes | no
You might want use arrays to reduce the amount of switch statements and a function for every number.
Are you sure? yes | no
Yes, you are right. But I tried to keep the code simple so that a beginner can easily understand the code.
Are you sure? yes | no