Close
0%
0%

Concertina MIDI Controller

A Bluetooth LE MIDI controller in the shape of an English concertina

Similar projects worth following
The English concertina, invented in 1829 by Sir Charles Wheatstone, is a fully chromatic free-reed instrument. This is a 56-key MIDI controller with the same arrangement of keys and bellows that outputs MIDI over Bluetooth LE.

Many years ago, I took up playing the English concertina because I wanted to be able to play sea shanties. I quickly learned that the concertina is quite a versatile instrument with a much richer history than I had imagined. First, it was invented by a hacker, Sir Charles Wheatstone, way back in 1829. (Sir Charles did a lot of interesting stuff, including telegraphy, crypto, the stereoscope and developing the Wheatstone bridge.) Second, it was originally used for playing virtuoso solos and as a chamber music instrument with an orchestra before it was widely used for popular music in the late 1800s and then again during the folk music revival in the 1960s. But, whatever. I learned to play the concertina, not the piano.

Since I can already play one, when I decided I'd like something to control a synthesizer, the obvious form factor was the concertina. Trouble is, there are none very few around. If I wanted one, I'd have to design and build it.

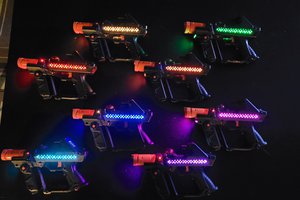
The result is what you see here. It has 56 buttons, 28 on each side. The buttons operate Cherry MX switches (the non-clicky kind) that I've modified by adding an internal diode to each one. They are organized as one big 4 x 14 matrix that I can scan with a microcontroller and a pair of shift registers. The microcontroller is an Adafruit Bluefeather 32u4 which comes with an on-board Bluetooth LE radio and, to make life super simple, a MIDI-over-Bluetooth-LE library. To set the MIDI "Expression" (volume), there's a differential pressure sensor that measures the pressure difference between inside and outside of the bellows.

The bulk of the physical structure is made from 3mm Baltic birch plywood. I designed the parts in Adobe Illustrator and laser cut them. The fancy wood on the outside is eighth-inch maple and maple plywood that has been engraved using the laser cutter. The buttons are made of Delrin rods, so they slip nicely when pushed. The bellows is made from pasteboard, thin type 10 Tyvek, and ripstop nylon. The three layers were laser-cut and then glued together with PVA glue.

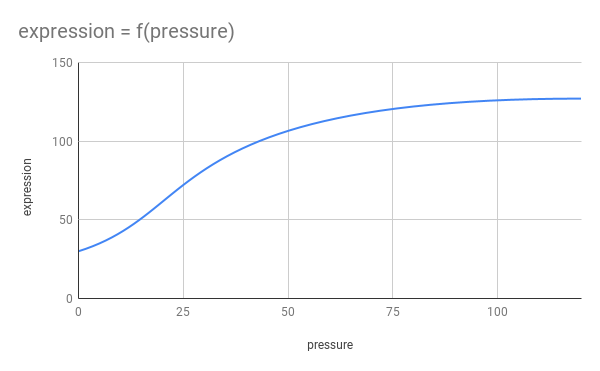
At this point the concertina works quite well (video on Vimeo) -- it's certainly playable, and the feel of the buttons is good. The original bellows was too springy, because the cardboard bumped into itself at the peaks and and was stretched at the valleys when completely compressed, but I redesigned the whole thing and it now works well. Initially, I wasn't keen on the red ripstop I used. I thought something a bit more toned down would look better, but the look has grown on me. The final adjustment I made was to the transfer function that maps bellows pressure to MIDI Expression. It surprised me how much subtle changes to it changed the feel of the instrument.

Adobe Portable Document Format - 3.50 MB - 06/21/2021 at 05:08

Preview
Download

Adobe Portable Document Format - 1.94 MB - 06/21/2021 at 05:08

Preview
Download

Concertina PCB L.pdf

Schematic for left PCB

Adobe Portable Document Format - 99.63 kB - 08/14/2019 at 19:41

Preview
Download

Concertina PCB R.pdf

Schematic for right PCB

Adobe Portable Document Format - 83.81 kB - 08/14/2019 at 19:41

Preview
Download

Concertina Kbd Mux.pdf

Schematic of keyboard MUX

Adobe Portable Document Format - 68.11 kB - 08/14/2019 at 16:49

Preview
Download

  • More Responsive Bellows

    Dave Ehnebuske03/25/2022 at 18:11 0 comments

    After using the concertina five or six hours a week for a couple of years, it finally sunk in that I needed to improve the way the bellows pressure controls the MIDI "expression pedal" (instrument volume). The motivation was twofold. First, I suspected that the controller was sending many more expression pedal MIDI messages than was actually necessary. When I really cranked on the bellows, it would sometimes induce a fleeting lag in the synth. Second, pushing (or pulling) the bellows produced less change in volume – particularly at the low pressure end – than I wanted.

    So, I reworked the transfer function that converts the bellows pressure to the MIDI expression pedal value. This was really simple to do because it's described by a cubic Bézier curve. All I needed to do was twiddle a few compile-time constants. To see what effect the twiddling would have I used a spreadsheet that plots the curve:

    And I reworked the code that issues the midi expression pedal messages to be more careful with how often it sends them. The result was a noticeable improvement on both fronts. It's considerably more responsive without being "jumpy" and I haven't seen the occasional lag I saw before.

    Of course, once I got to changing how the bellows worked, it got me to thinking about more "improvements" I could make. For now, though, I'll play it a while with the update to see how I like it. But I suspect I'll be back. A good project is never done.

    While opening this project up again, I discovered the only place the code existed was on my laptop. Oops. There's now a Github repo.

  • Just Using It!

    Dave Ehnebuske01/02/2020 at 20:50 0 comments

    Since making the new bellows and fiddling with the pressure-to-Expression transfer function, I switched my attention to making a dedicated BLE-driven synthesizer I can use with the concertina.

    That turned out to be pretty straightforward. I based it on a Raspberry Pi B+, a touch-screen display from Adafruit and a MAX9744 Class D Audio Amplifier, also from Adafruit, Taking inspiration from the Adafruit Pibow stacked acrylic enclosure, I designed and laser-cut a custom enclosure for the hardware. This worked and looks nice, but, because of the need to interconnect boards, is a bit fiddly to assemble.

    For software I used Raspbian together with a selection standard packages. For the synth, I chose the open source Fluidsynth project. On this set of giants' shoulders, I wrote a simple GUI client for Fluidsynth using C++ and QT5.

    Et voilà! A fully functional synth in a nice compact form factor with just the features I need to have exposed.

    Since getting the synth working, I've stopped fiddling with the innards of the concertina and the synth and just used them. I play the concertina almost every day and it's a joy to do so. Mostly, I make it sound like a flute, an oboe, a bandoneon, or the pan pipes. But a cello and a reed organ are nice, too. Maybe I should turn my attention to making an English concertina "sound font" so that it can sound like what it appears to be. Maybe someday. In the meantime, I think I'll just use it.

  • New Bellows, New Seals

    Dave Ehnebuske08/28/2019 at 04:43 0 comments

    I slightly redesigned the bellows to eliminate most of the pasteboard at the hinge points -- both mountains and valleys -- to decrease the overall springiness. I also reworked the way the bellows attaches to the two keyboard assemblies and added a beeswax-filled gasket to cut down on air leaks.

    The result is a big improvement. The whole concertina now rests comfortably in a more-or-less closed position. It's still a bit springier than a traditional bellows, but not horribly so. Although there are clearly some I missed, going after leaks really helped with two things: 1) how responsive the MIDI "expression" is to bellows pressure and 2) how long I can sustain a note (or chord). More work in that area would be good, for sure.

    I'm still fiddling with the parameters for the Bézier curve that maps pressure to MIDI expression. It's surprising how much it changes how the concertina feels when playing it.

    A really good set of improvements overall.

  • Cubic Bézier​ Curves

    Dave Ehnebuske08/19/2019 at 18:54 0 comments

    Before embarking on a redesign of the bellows to make it less springy, I decided to fiddle with the function that translates bellows pressure into MIDI expression. I'd been using a function of the form expression = a*ln(pressure) + b* pressure + c for no good reason other than that for suitable values of a and b it rises quickly and then flattens out which more or less is what I think a traditional concertina feels like it does. But after playing it for a while, I decided I didn't like how it jumped in volume at low bellows pressures. A traditional concertina requires a minimum pressure to do anything at all and then rises slowly for a bit and then quickly until finally flattening out again.

    In casting about for a a curve that looks like that, I sketched it out in Adobe Illustrator. Which got me to thinking, why not use the same kind of curve used in vector graphics programs and standards: cubic Bézier curves. A cubic Bézier curve is a continuous vector-valued function of t where t is a real number in the range 0 to 1. The function's values sweep out a curve between two points called "anchor points" as t goes from 0 to 1. The shape of the curve between the anchor points is controlled by two other points called "control points." Because of this, not all Bézier curves are functions where y = f(x) -- which is what I need -- but many are, and it's easy and natural to control the the shape of the curve if you've ever used a vector graphics program like Illustrator or Inkscape.


    So, I implemented a change that calculates a pressure-to-expression lookup table using a cubic Bézier curve. The table is calculated during initialization and used at runtime. The feel is much improved and it's easy to fine tune how it behaves. Plus designing and implementing this change gave me a really good reason to look into the nuts and bolts of Bézier curves, which I've used in Illustrator and SVGs for years but never really studied.

View all 4 project logs

Enjoy this project?

Share

Discussions

pclark wrote 03/19/2021 at 11:35 point

Hi Dave, great project. I've been considering something like this for some time. I think with the latest technologies 3D Printing and single board low cost computers for synthesis, it could become a reality. I like the idea of using Cherry MX switches. Do you have a drawing of the front panel of the concertina, if not maybe the pitch between switches horizontally and vertically. Many thanks.

  Are you sure? yes | no

neznajka wrote 07/08/2020 at 15:51 point

Can you share the drawings of the case itself?

  Are you sure? yes | no

Dave Ehnebuske wrote 07/20/2020 at 01:04 point

I'd be happy to if you really need them, but there are quire a few and I haven't organized them for publication. It would take some work to turn them something useful. It's not exactly obvious how the hundreds of parts all go together, for example. Let me know.

  Are you sure? yes | no

neznajka wrote 07/21/2020 at 20:54 point

I want to try to replicate your project. I would be glad if you have free time to prepare the files. In the photo, the design does not look very confusing.

  Are you sure? yes | no

Nate wrote 06/21/2021 at 03:39 point

I am unable to reply to neznajka's reply here, but I too am interested in these files. They don't need to be organized. Figuring them out will be half the fun. I mostly want to know three things. 

1. The layout of the button holes - size, spacing, distance from edges.

2. How much airflow you allowed for most authentic bellows pressure feeling.

3. The process you used to construct your bellows. I would like to learn from your mistakes on your first bellows so I don't repeat them.

  Are you sure? yes | no

Dave Ehnebuske wrote 06/21/2021 at 05:53 point

@Nate I uploaded a couple of PDF files of a few of the parts. In both files the drawings are actual size. Because they're derived from the files I used to cut the parts, the wooden parts are kerf-compensated. That means the outside lines are moved out by 0.12mm and the holes are moved in by 0.12mm.

One file shows the two fingerboards including the layout of the buttons, decorations, etc.

The other shows the parts for 1/3 of the bellows. To make the whole thing, the assembly shown in the drawing is made three times. The bellows consists of three layers. The inside layer is made from white posterboard. The middle layer is made of thin type 10 Tyvek (the smooth, paper-like kind). The outside layer is made of ripstop nylon. It's for decoration and to cover the seams joining the three assemblies together. The layers are glued together with PVA glue (e.g., Elmer's Glue All).

The trickiest part of making the bellows is getting the layout of the inner layer right. It's easy to have too much material in the bellow folds that point toward the outside of the bellows. This makes the bellows want to spring into the expanded position. As you can see from the drawings, there's just enough left to barely hold the layer together for assembly.

To get the authentic bellows pressure feeling I just sealed the whole thing up as best I could, making it more and more airtight. The main thing was make beeswax-impregnated blotter-paper gaskets for the ends of the bellows where it attaches to the keyboard assemblies. I stopped sealing things up when the action felt about right and haven't had any trouble with it since, even though I've had it apart several times.

Hope this helps.

  Are you sure? yes | no

Nate wrote 06/21/2021 at 19:28 point

Thank you. Your input was very helpful.

  Are you sure? yes | no

Brian Slesinsky wrote 06/03/2020 at 17:55 point

It looks like FluidSynth plays soundfont files, so I'm wondering where you found good soundfonts for this?

  Are you sure? yes | no

Dave Ehnebuske wrote 06/03/2020 at 23:00 point

The one I used is Fluid (R3) General MIDI SoundFont. There's a list of alternatives (and other stuff about soundfonts) on the SoundFont page of the Fluidsynth wiki. I've been meaning to look into some of them but haven't done so yet.

  Are you sure? yes | no

Bruce Thomson wrote 06/02/2020 at 22:41 point

David, this is fabulous!!
I and a colleague Vietnamese have been designing an electronic concertina, the Concertina Nova, these past years, and have a group 'Concertina Technology' in Facebook following it (the 'Nova is nearly due, maybe a prototype this month). If you or others would like to join us, here's the link...
https://www.facebook.com/groups/1771580879534725/?ref=group_header

  Are you sure? yes | no

Dave Ehnebuske wrote 06/03/2020 at 05:38 point

Thanks for the nice words; I'm really glad you like it. I use it most every day. Since finishing it I've have built a Bluetooth LE enabled synth to go with it. I should really write that up sometime.

Thanks for the link to the FB group. There are more folks interested in this sort of thing than I ever guessed there'd be, and, based on what's posted on the group, quite a few are doing interesting things. I don't think I'll be joining, though. FB just isn't for me. I find its business model and ethics more than a little off-putting.

  Are you sure? yes | no

Brian Slesinsky wrote 02/14/2020 at 23:36 point

I'm curious what pressure sensor you used? Any source code to look at for the pressure curve?

I'm working on an accordion synthesizer (https://github.com/skybrian/accordionsynth) and I'm figuring out if I want a real bellows or some kind of substitute to control expression. Currently I'm using a hinge and I'm starting to think it needs to resist movement.

  Are you sure? yes | no

Dave Ehnebuske wrote 06/03/2020 at 05:23 point

Sorry I missed getting back to you on this question, Brian. The sensor I used is called "Aideepen Breakout Board MPXV7002DP Transducer APM2.5 APM2.52 Differential Pressure Sensor" and is available on Amazon, among other places. One port is attached to the inside of the bellows, the other is just open to the ambient pressure.

  Are you sure? yes | no

Aeva Palecek wrote 08/19/2019 at 17:29 point

what is the software you're using for sound synthesis in the video?

  Are you sure? yes | no

Dave Ehnebuske wrote 08/20/2019 at 16:13 point

For testing purposes I'm using the Android app Fluidsynth running on my phone. My plan is to build a Pi-based dedicated box, probably also using Fluidsynth, which, in addition to being a good synth, has a nice API so I can control it with a custom script.

  Are you sure? yes | no

Adam Quantrill wrote 08/19/2019 at 15:36 point

Not wishing to be too pedantic, but isn't this a Melodion? 

Looks good, though! 

  Are you sure? yes | no

Dave Ehnebuske wrote 08/20/2019 at 16:10 point

No, it's an English concertina pattern. A melodeon (see: https://en.wikipedia.org/wiki/Diatonic_button_accordion) is yet another of the huge family of free-reed squeezeboxes. It's diatonic and its two keyboards are arranged quite differently, both from each other and from a concertina.

  Are you sure? yes | no

Joseph Kesselman wrote 08/16/2019 at 02:23 point

I've had a sketch for a midi Anglo hanging fire for years, mostly because I set myself the goal of measuring press/draw directly for an "infinitely efficient bellows". Full props to you for actually building something, and making it quite pretty while you were at it. (I love the mock scrimshaw.)

  Are you sure? yes | no

Dave Ehnebuske wrote 08/16/2019 at 03:38 point

Glad you liked it. As usual with a complicated build, overcoming the myriad design issues -- including making it pretty -- was a great deal of fun.

As for measuring the press/draw, as I rework the bellows I'm going to focus on increasing the range of possible pressures and bellows efficiency by making sure there are as few leaks as possible. Since it doesn't need moving air to play and the differential pressure sensor doesn't pass air between its ports, I hope the system ends up pretty close to "infinitely efficient"  -- that it amounts to squeezing or stretching an all-but-fixed volume of air. We'll see.

  Are you sure? yes | no

Dave Ehnebuske wrote 08/15/2019 at 23:01 point

Just added a short, low-res video on Vimeo.

  Are you sure? yes | no

Dan Maloney wrote 08/15/2019 at 20:28 point

This looks fantastic! I'd love to write this up for the blog. Any chance you have a video of you playing it? That would be a great addition.

  Are you sure? yes | no

Dave Ehnebuske wrote 08/16/2019 at 15:24 point

Just added a short, low-res video on Vimeo.

  Are you sure? yes | no

Dan Maloney wrote 08/17/2019 at 21:16 point

Nicely done, just wrote this up and it should post soon. Thanks!

  Are you sure? yes | no

Similar Projects

Does this project spark your interest?

Become a member to follow this project and never miss any updates