 Matthew James Bellafaire
This project has moved pretty fast overall, not sure how long I expected this project to take. Either way, I have been waiting on some OLED I2C displays to actually test this library properly and they finally arrived (I plugging into the arduino and using the serial monitor interferes with the results). I also tested the library using a boost converter circuit powered from the same battery that's being monitored so basically this is just an all around project update with some actual test footage. So lets talk about the code first, which doesn't change between either of the tests shown in this log:
#include <BatteryMonitor.h>
#include <Wire.h>
#include <Adafruit_GFX.h>
#include <Adafruit_SSD1306.h>

#define SCREEN_WIDTH 128 // OLED display width, in pixels
#define SCREEN_HEIGHT 32 // OLED display height, in pixels

Adafruit_SSD1306 display(SCREEN_WIDTH, SCREEN_HEIGHT, &Wire, OLED_RESET);

#define batVoltagePin A0 //connect directly to positive terminal of the battery
#define batCurrentPin A1 //connect to the other side of a shunt resistor going from the positive battery terminal to the rest of your circuit

BatteryMonitor bat = BatteryMonitor(batVoltagePin, batCurrentPin);

void loop() {
  display.clearDisplay();
  display.setCursor(0, 0);
  display.println("Battery Monitor Test");
  display.print("Vbat = ");
  display.println(bat.getCurrentBatteryVoltage());
display.print("Ibat = ");
  display.println(bat.getBatteryCurrent());
display.print("Vop = ");
  display.println(bat.getCurrentOperatingVoltage());
  display.display();
  delay(100);
}
I cut out the setup(), but it is important to note that the resistance for these tests was set to 1.42 ohms.... because that's the best I could cobble together from my salvaged parts box. So a better test will come when some proper .05 and .1 ohm resistors arrive from digikey. All this sketch really does is use the library functions getCurrentBatteryVoltage(), getBatteryCurrent(), and getCurrentOperatingVoltage() then print the return values to the display.
note the sketch prints battery input as Vbat, Battery Current as Ibat, and the operating voltage of the Arduino as Vop.
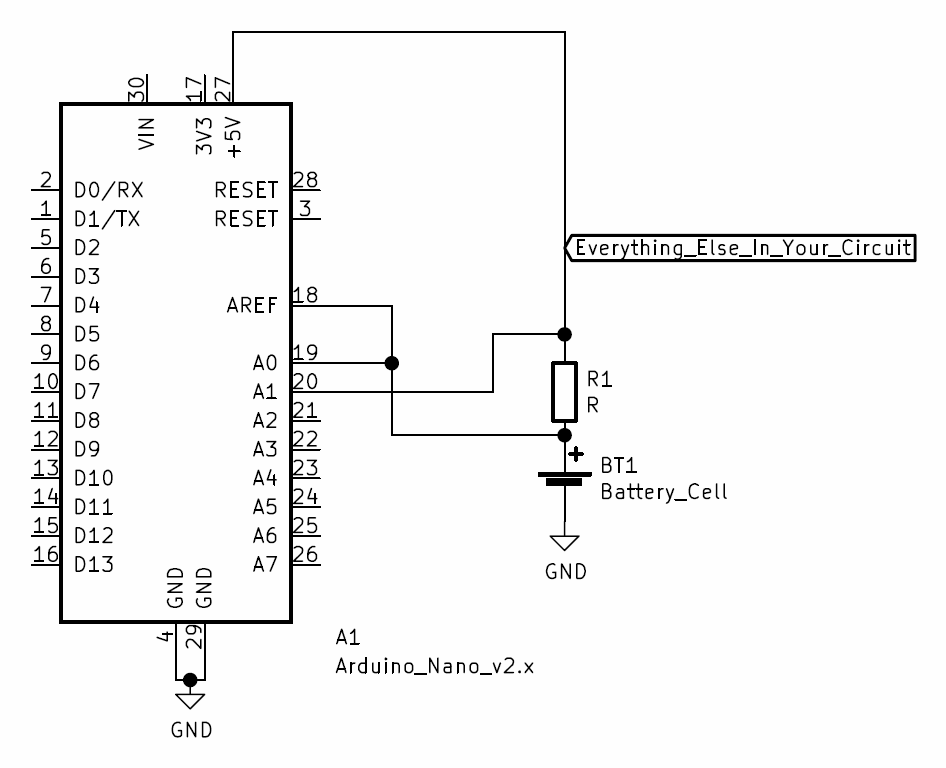
onto the simple battery monitor which was the original goal of this project it works! using the same schematic as is shown in the project image:
and the results of the test are shown in this video:
The voltage of the battery and the operating voltage appear to be reading pretty accurately but the current is somewhat off. I suspect this is due to the sense resistor I'm using, however, I currently don't own a multimeter that can measure resistances that low with any real accuracy. I measured 1.42 ohms by just doing the math after putting it across the power supply set to 1V and reading the current (its a 5w resistor it could take it).
Now onto the good stuff, the library can now officially monitor a battery while being powered by a boost converter. For this the schematic gets a little bit more messy but really its not that bad. I used some generic boost converter module that was laying around so there's really just a stand in for the boost converter in the schematic below:
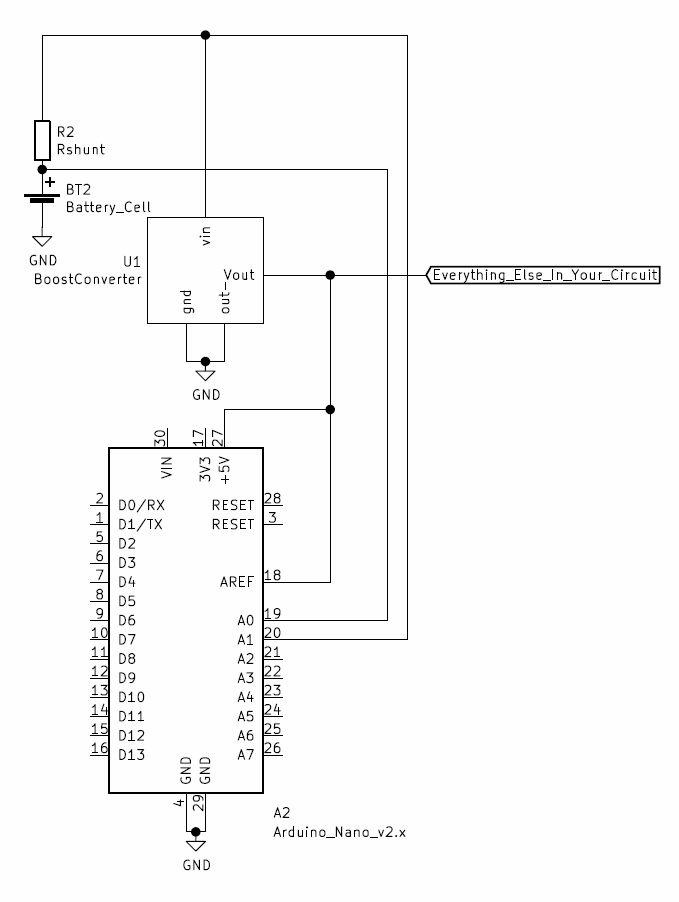
Its worth noting that the AREF pin of the Arduino should always be connected to the highest voltage in your circuit provided that it's not outside the operating range of the board itself. Either way here's a nice little video of the library operating with the same program as above:
I was pretty sure that a boost converter could be used like this with the library but until now it hadn't been tried, either way all the codes there to allow someone to easily monitor battery voltage for whatever project they're doing. Even if you don't want to use your Arduino as a BMS it might be helpful in some cases to have a good estimate of the battery power remaining. Either way there's probably still more to add to this project so see you in the next log!
Discussions
Become a Hackaday.io Member
Create an account to leave a comment. Already have an account? Log In.