 FiftyOne
Tacx Neo – The inside story.
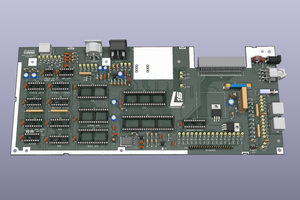
Its with some frustration I am creating this thread for reasons which will become apparently later. The Tacx Neo (1) is likely the best trainer units on the market still today; providing silent operation, fantastic integration with both Bluetooth & ANT protocols, a class leading maximum power resistance, road feel, along with a stable and trustworthy read of actual power figures while requiring zero calibration. It functions with 1 moving part and two small fans which means there are no secondary pulleys, belts, tensioners, adjustments or otherwise to deal with. Even trainers almost 4 years on can only claim a few of these things. I intend to dig in a little here to uncover what makes this unit so capable, along with highlighting some of the short comings in its design. I will then move to part 2 of this teardown where things will get more interesting from a cyclists perspective.
A little about me to begin with. Former mechanical designer with 14 years’ experience in electrical and mechanical pieces. Mining, material handling, bodywork, electronic packaging, radio comms, and the vehicle design. I also think I’m a good cyclist. I don’t claim to know anything or much at all and at any stage in this write up am happy for someone with more experience to tell me I’m wrong about anything I am claiming.
The obligatory warnings-
I DO NOT recommend opening, repairing, modifying, tampering or otherwise attempting to fix or service these units nor units like this. You should consult with the manufacturer as to the best course of action which is likely to be in consultation with your nearest approved TACX dealer or distributer. The risks you face by messing with this are large electrical shocks, possible electrocution, broken bikes, broken you, fire, an unrepairable unit, death or worse than that telling your wife you ‘fixed’ the $2000 trainer so well it needs to be sent away for professional repair. In short it is unwise to disregard the user manual (the manufacturers opinion) and attempt anything below. DO NOT open the unit.
However, I am a special kind of stupid and as will become apparent in coming posts there is a reason I am undertaking this.
You’ll require the dedicated flywheel puller to get the wheel out prior to disassembly. YOU MUST use a puller, particularly when you are reinstalling the wheel. The magnets on the Neo are incredibly strong and will snap down on your fingers or get jammed on the shaft potentially damaging the magnets, the shaft, the bearings or other components on its way in. Again, don’t recommend you do this however you will need a flywheel tool. A quick note about the flywheel and the puller; Initially Tacx did not offer the puller to the public, truly making the unit unserviceable. With reports of the infamous grinding noise coming up online, a decision was made to make the tool available to the public and a change to online documentation was made to educate users of the correct way to maintain the unit. The issue is caused in large part from the highly magnetic flywheel and its proximity to the bikes drivetrain. The reality is fully sealing the flywheel with a gasket or similar would be difficult but due consideration wasn’t really given to the full view of how this product will be used. Drivetrains deteriorate, debris can rattle out of calliper brakes, a trainer is picked up to be transported in the back of cars, they are used in sheds or outdoors. Eventually something metallic will make its way towards the magnetic surfaces. The good news is that rectifying any issues is generally easy.
The first thing that becomes apparent when disassembling the Neo is the large number of star bit screws otherwise known as Torx screws securing everything. These are not security...
Read more »
 SukkoPera
 2bluesc
 Bob Baddeley
 Mastro Gippo
Great project!
I've just taken my Neo apart because it was dead when I connected the power source. None of the externally visible LEDs were lit, but when I see the circuit board there is a red led blinking near the main IC. Also, the rear fan spins for a few seconds when powered on, but then stops. Any idea how I can continue fault finding?
Best regards,