 Vedran
tl;dr
Hardware
This being my first audio project and battery powered project, I was a bit in the blue about how to start. I started with knowing it will be battery powered, so it has to be power efficient. I had a single cell Li-Ion battery at hand so I started with that.
Power consideration
With battery in hand, I went on to pick the brains of the project. I needed something that supports WiFi and BT, ideally microcontroller to minimize power consumption and layers of software. ESP32 was a familiar platform and a quick internet search confirmed that such projects are indeed possible in software. Being a microcontroller, ESP32 consumes minimal power while fulfilling all of my requirements. Perfect!
An internal battery charger was the next on the list. It's not very portable if you need to take the thing apart whenever you want to charge the battery - and you can't play music while doing so. After a bit of search, I settled on a charger module based on TC4056 in form of a small board with a micro USB port conveniently mounted on. Looking pretty good, what next?
Power converters. ESP32 requires 3.3V to operate, and most probably will other components that I choose to add in. Given the battery-powered design, my first choice were SMPS (switch mode power supplies). However, I remember hearing some of my friends ranting about SMPS being awful and not easy to use in audio projects due to the noise they introduce and affect audio quality. Granted, this is not a high-quality audio system but I wasn't sure what to expect. I decided to roll with it anyway.I found some buck-boost converters capable of switching between the two modes depending on the supply input voltage. This will ensure stable 3.3V for electronics over time when the battery slowly discharges. These converters also feature an EN (enable) pin, so I can select a low-current power switch that does not need to be rated to the current used by the device.
Lastly, I also tossed in another converter, same as the 3.3V one, just configured to 5V in case the amplifier needs a bit more juice.
Audio hardware
I found a project on github outlining what I wanna do with ESP32 and saw that it recommends I2S for audio output of the microcontroller. ESP32 has built-in two-channel DAC but its quality is not recommended for audio applications as the resolution caps at 8bits (in comparison, the DAC later mentioned here is 24bit).
DAC
With the knowledge of protocol, I found UDA1334 which is used in some audio hats for raspberry pi. Later on, I also discovered another hackaday.io project (Professional Audio On An ESP32) which put my mind at ease regarding the choice of a DAC. The unit sold by adafruit comes with a headphone jack soldered on, convenient for both having it exposed in a final setup and debugging the connections later on :D It provides stereo audio decoding, even though this project uses only one channel, 24bit resolution and can be powered off the 3.3V power supply.
Speaker
Original speaker I started this project was something I had laying around from my grandma's radio ('70s) and was turned to be the root cause of very poor audio quality. It kept me busy for few weeks, making me change few audio amplifiers and just giving me a lot of headache before I admitted myself it must be it and go get a new speaker. But lesson learned :) Visatone FRS7 ended up in the final build.
Amplifier
Originally, I was naive enough to make an attempt at building a transistor amplifier myself. Discovering that what I'm looking for is a class AB amplifier, I found few designs with the components I had at hand:
https://www.onetransistor.eu/2018/01/audio-amplifier-common-transistors.html
http://electronics-diy.com/4x4.php
https://electronics.stackexchange.com/questions/67369/simple-amplifier-cuircuit
The speaker played music, but quality was awful. After few weekends of going back and forth, I admitted my defeat and chose instead to get a dedicated audio amplifier. LM386 seems to be very common so I order few ICs and a kit. Once again, the sound was mediocre at best. For whatever reason, I gave it a go with one more amplifier, HXJ8002 board, with no significant improvements. At that point I gave up the old speaker.
Finally...
...I settled on the components and wired everything together. Below is the block diagram of the setup
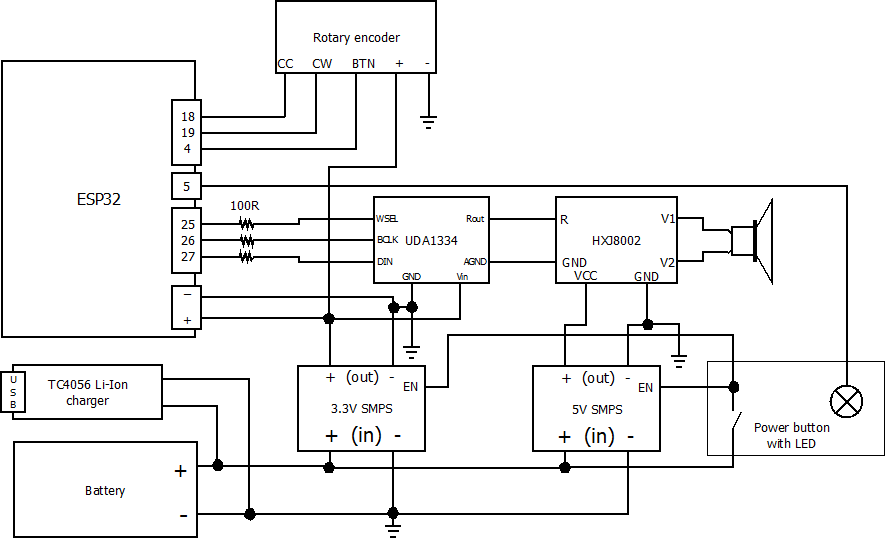
Apart from issues with the speaker, I also noticed some I2S issues, luckily I had that headphone jack to check this part of communication. Searching online, it seems that I2S sometimes needs series resistors in the path, ergo the 3 100ohm resistors
Software
After a bit of searching, I stumbled upon karawin's Ka-Radio32 project which implements a very feature-rich internet radio on ESP32. Supports various modes of outputting sound from ESP32, LCD, multiple knobs, IR receiver and even a web page hosted on the controller itself from where you can add new stations, change AP, control music etc. Everything apart from Bluetooth functionality - for which they supply some files in the repo but no documentation. Finally, I found another repository which looks like an early version of Ka-Radio32 with basic internet radio, but supports Bluetooth.
End result, merge the two into something that supports both and allows you to seamlessly switch between the modes. Forking the more developed Ka-Radio32 internet radio, I simply merged the bluetooth part in. Problem, however, is that after compiling the project resulting binary is too big to be uploaded and run from to standard ESP32 with 4MB flash and 512k RAM. Binary is around 2MB and has to be uploaded in two copies - probably one per core, I don't understand it well enough. I did some attempts of stripping the code of LCD and some other components which I don't use which made the binary uploadable to 4MB flash, but it would then throw runtime errors, probably RAM related. All these issues went away after switching to a unit with more memory (16MB flash, 8MB PSRAM).
Result
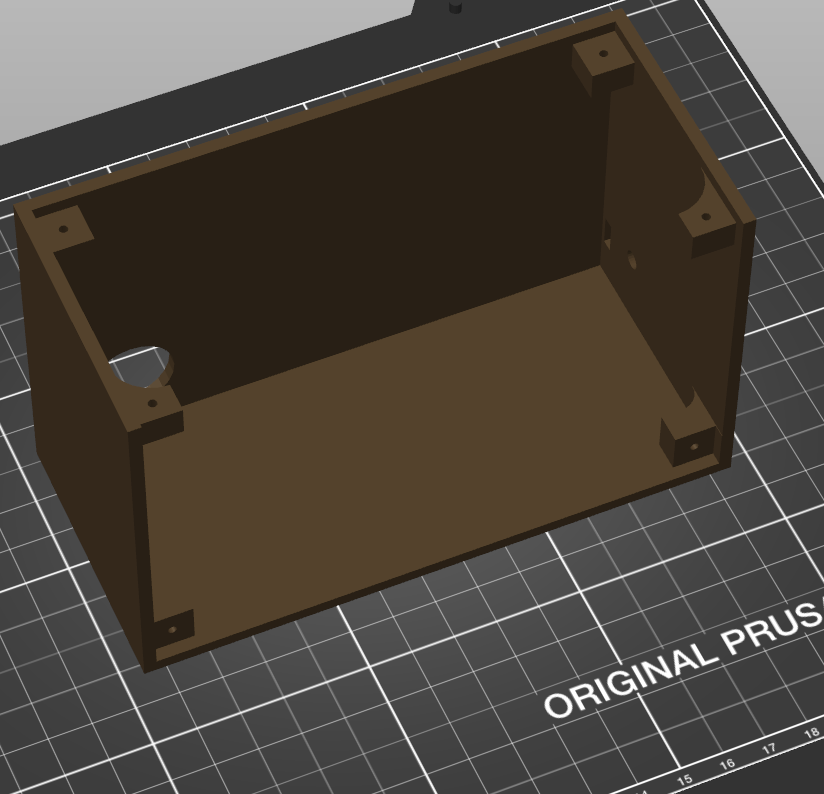
Confirming everything working on a breadboard, the design was wired and placed in a 3D printed case.
One piece of the case was a "shell", which contained most of the electronics and a cutout on the back for air, together with charging and headphone port on on of the sides. Six small square supports provided mounting point for an L-shaped cover holding the speaker, power button and a knob. All fitting into a box 140x85x65mm.
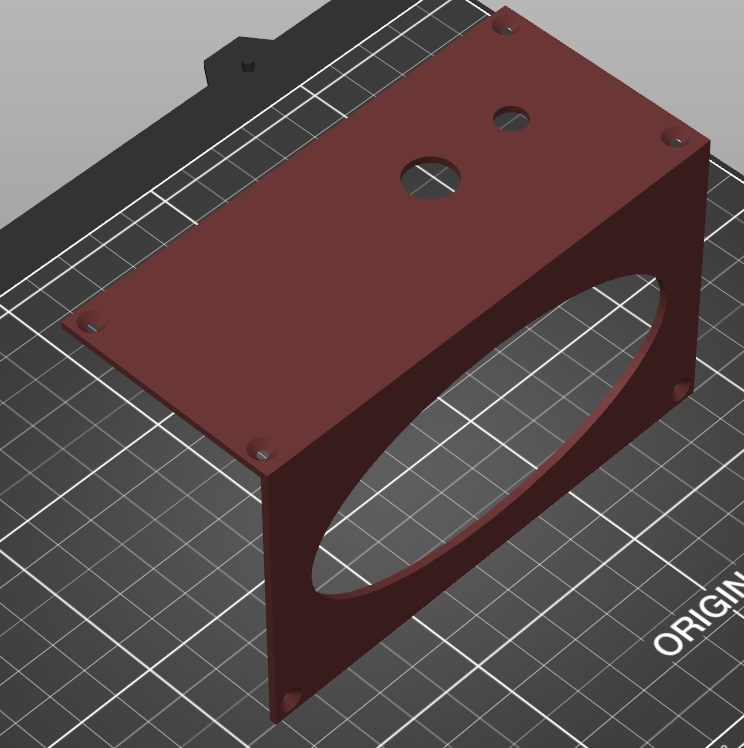
Original speaker was a lot wider than the one I ended up using so the hole is unnecessarily wide. But since it's hidden by the overlaying fabric layer, it's not that big of a deal.
User interface
UI is very minimalistic. After pressing the power button, the following is available in radio mode:
- Play/stop radio station by pressing the encoder button
- Adjust volume by turning the rotary encoder
- Move between the stations by pressing the encoder for about a second, then rotating it while pressed. Rotating counter-clockwise goes to the next station on the list, while counter-clockwise goes to the previous station
- Double click the encoder quickly in order to change to bluetooth speaker mode
And in bluetooth speaker mode:
- Adjust volume by turning the rotary encoder
- Double click the encoder quickly in order to change to radio mode