 Brian Gilbert
Exact components are still in the works, but the types of components have been "finalized". (Sortof... suggestions are welcome!)
Main Components:
-Lattice ECP5 FPGA
-HDMI capable (up to 1080p60)
-Standard (full-size) HDMI
-DDR3 memory
-QSPI flash for FPGA configuration
-MicroSD port for data storage
-JTAG port for programming/debugging
The goal is to route this on a 4-layer board with 6/6mil spacing. Some of the GPIO on the FPGA may go unused, but it's not the end of the world. 2-layer is not (likely) an option due to the impedance-controlled HDMI traces, as well as the mess of 50-ish traces between the FPGA and the DDR3 memory.
It is definitely worth noting that due to the flexible nature of the ECP5 FPGA, this board could be used for many other purposes. The goal is to ship with an out-of-the-box configuration for creating graphics for games, but this can be updated/modified with a JTAG programmer/debugger for now. With a few tweaks, it could easily become a GUI front-end, sending an interrupt request to the host when a user interacts with the device. Or, the FPGA can be configured to perform accelerated mathematical functions for another device, allowing the primary processor to be more efficient. Maybe if I get the board right the first time, the FPGA could even be configured in-situ by an attached Feather, with OTA updating possible if Wi-Fi is available on the attached Feather (think Huzzah Feathers).
Someday this will graduate from a FeatherWing to a standalone system, similar to this FPGA dev board, yet different. It won't have any of the buttons or other modules on it, as the linked board is for educational purposes and so must include lots of stuff this system doesn't need. The vision for the future iteration of this concept will include an ESP32-WROOM module as a dedicated processor and WiFi/BLE module, USB ports for connecting wired controllers (if desired) or mouse/keyboard for config, and possibly battery management for a Li-Ion battery.
 Martin Cejp
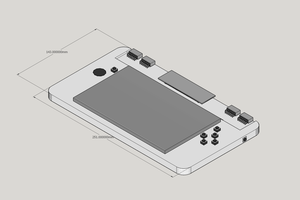
 Dave
Dave
 Tobias Rathje
 BladeRunner