 RedoX
RedoXIt is cheap, simple, hackable, ...
Some of the nice features:
- Instead of requiring a host software (like cec-client) it acts as a standard keyboard.
- Provides Hyperion-compatible interface for Ambilight setups
It's not a dedicated development board, but it provides some nice development/debug features:
- a LED
- a DFU bootloader (can be enabled/disabled with a solder jumper)
- ICSP header is broken out in case you break with the DFU feature or want to flash the AVR often...
- Test pads for all interesting signals
- CEC
- CEC input
- CEC output
- HPD
- I2C SCL/SDA
- 5v
- 3.3v
- GND
- ICSP header is broken out in case you break with the DFU feature or
want to - SPI Port is broken out ( mostly for the WS2811 LED strip ) - SPI Port is broken out ( mostly for the WS2811 LED strip )
- Input 5v can be selected from USB (default) or HDMI. In case you want to develop an autonomous device.
- TWI/I2C is wired to the HDMI bus. The goal is to be able to read the Physical address of the HTPC (currently hard-coded in firmware). Tested and working.
- Hotplug Detection (HPD) is wired to the HDMI bus. Tested and might be a dead-end for detect TV state...
Firmware status is a bit less advanced:
- Working
- CEC spy-mode
- CEC read/write
- RawHID USB debug
- Keyboard emulation
- Physical address
- Partially working
- Ambilight. Limited to only a few (< 100) LEDs
- ToDo
- Currently hardcoded
- Device name
- Keys mapping between CEC and Keyboard (ie: Currently only for my TV and Kodi)
- Missing features
- TV control (turn off, turn on, switch source)
- Currently hardcoded


 EtchedPixels
 dannyvandenheuvel
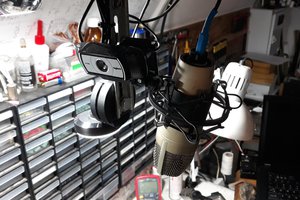
 Keri Szafir
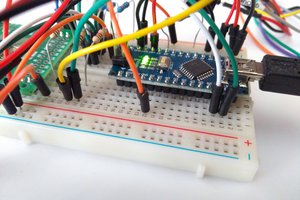
I was looking to convert your project over to function with an Xbox One (It mostly works!). Would I just need to modify the handlers.c file for the correct keypad commands? Also does this support the use of "&" to have multiple key commands at the same time? One of the commands is Windows key and M for the menu which I'm guessing I could use "KEY_CTRL&KEY_ESC&KEY_M"? I also modified common.h to change the name of the board to Xbox One. Am I missing anything? I haven't set up to program the board quite yet, but I'm a little unfamiliar with the process. Do I just need to boot the Firmware using the process you outlined (DFU jumper solder etc.)? If that's the case, what is the sw folder for? Do I install both?
Something I noticed is that if I'm on a different input, the keyboard shortcuts still override the TV controls which isn't ideal (maybe just the select button?) and it is difficult to change inputs on the TV. Maybe a future feature could be "muting" the keyboard and allow for normal functionality of the remote if a menu is present or if it isn't on the proper input, or could there be something else at hand. I've programmed in the past, but forgive me, it has been a while so I'm a little slow going through the code, but I have some training in computer science.