 Michael Möller
The project started with the flea-market find of the Ampere-meter. These school-physic-class meters had an exchangable scale and appropiate conversion circuits (ie a resistor) so it could work as a Volt, Ampere or Watt meter.
So basically it is an analog galvanic meter, and supplying the 0-12mA current determines the needle deflection.
Easy enogh with an Arduino, and the 400Hz varyingwidthsquarewave the analog output gives is totally smoothed out by the heavy mechanical inertia.
The circuit is trival: straight from an Arduino "analog" output. through a resistor to the coil.
To tell time the usual DS1307 clock chip is used, with supplied libraries, and the code takes current time-of-day, converts it into 0-255 fraction, and sends that to the output. (255 steps resolution gives roughly 5½ minut or a 0.004 increment on the scale)
A few additional details: Things are not quite linear, so there is a conversion table (10 values, interpolation between) in the software.
The clock needs to be set. There is only ONE button, a long push on it starts a setup sequence where a number of short button presses advances the needle to the digit on the scale, and a long pause advances to the next digit
Power is suppllied on the original terminals through a ~6 volt wallwart. (There is a protection diode) . The integrated battery on the clockchip-board means it keeps time even if unplugged, and the display is correct when plugged in again.
The clock stands in my livinig room. I can not tell the exact time, but the decimal fraction of the day. I get up around 0.3 (there is no alarm), go to work around 0.35, dinner is served around 0.7324 (just kidding, you can at most see two significant digits) and bedtime is 0.95 at the latest. At midnight the needle starts at 0.0, again.
One can carefully read the value (the picture shows 0.85(+) , multiply by 24 (=20.52) take the fraction and multiply by 60(31) so the time shown is 20:31.
Alternativly one gives the only button a short push, and the needle will briefly pause on three digits giving the exact 12 hour clock value (showing the 0-11 hour as a single "digit", 11 is offscale)


 leadacid44
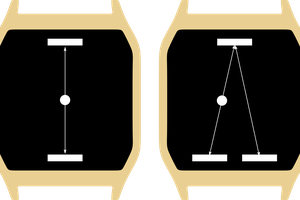
 M. Bindhammer
 mircemk
The voltmeter clocks have potential but this one really shows the current time, hahaha. 😉