Close
0%
0%

Disaster Radio - LoRa Mesh

A disaster-resilient communications network powered by the sun

Similar projects worth following
This project is not currently active, https://reticulum.network/ or https://meshtastic.org/ may be interesting alternatives to consider.

A disaster area network (DAN) is a wireless mesh network that utilizes the LoRa modulation scheme for point-to-point or point-to-multipoint connections between nodes.

It offers a very low cost, communications network which can be entirely solar-powered.

The firmware is working on cheap off the shelf ESP32 dev boards. Users connect to a local Wifi hotspot to access the chat interface in a browser. There is also an optional Bluetooth Android app which offers local maps as well.

Devices on a LoRa mesh network are assumed to only have a single omni-directional radio transceiver (though we are adding support for two). This means that every routing decision comes down to a single question that every node asks upon receiving a packet, Should I retransmit the datagram or not?

Firmware details

The Disaster Radio firmware is made up of a single "server" and a number of "clients", as well as "middleware" that sits between the clients and server. These are a"server" and "client" in the logical, software sense, not a literal, networking sense.

Here are the modules currently implemented with descriptions of their purpose:
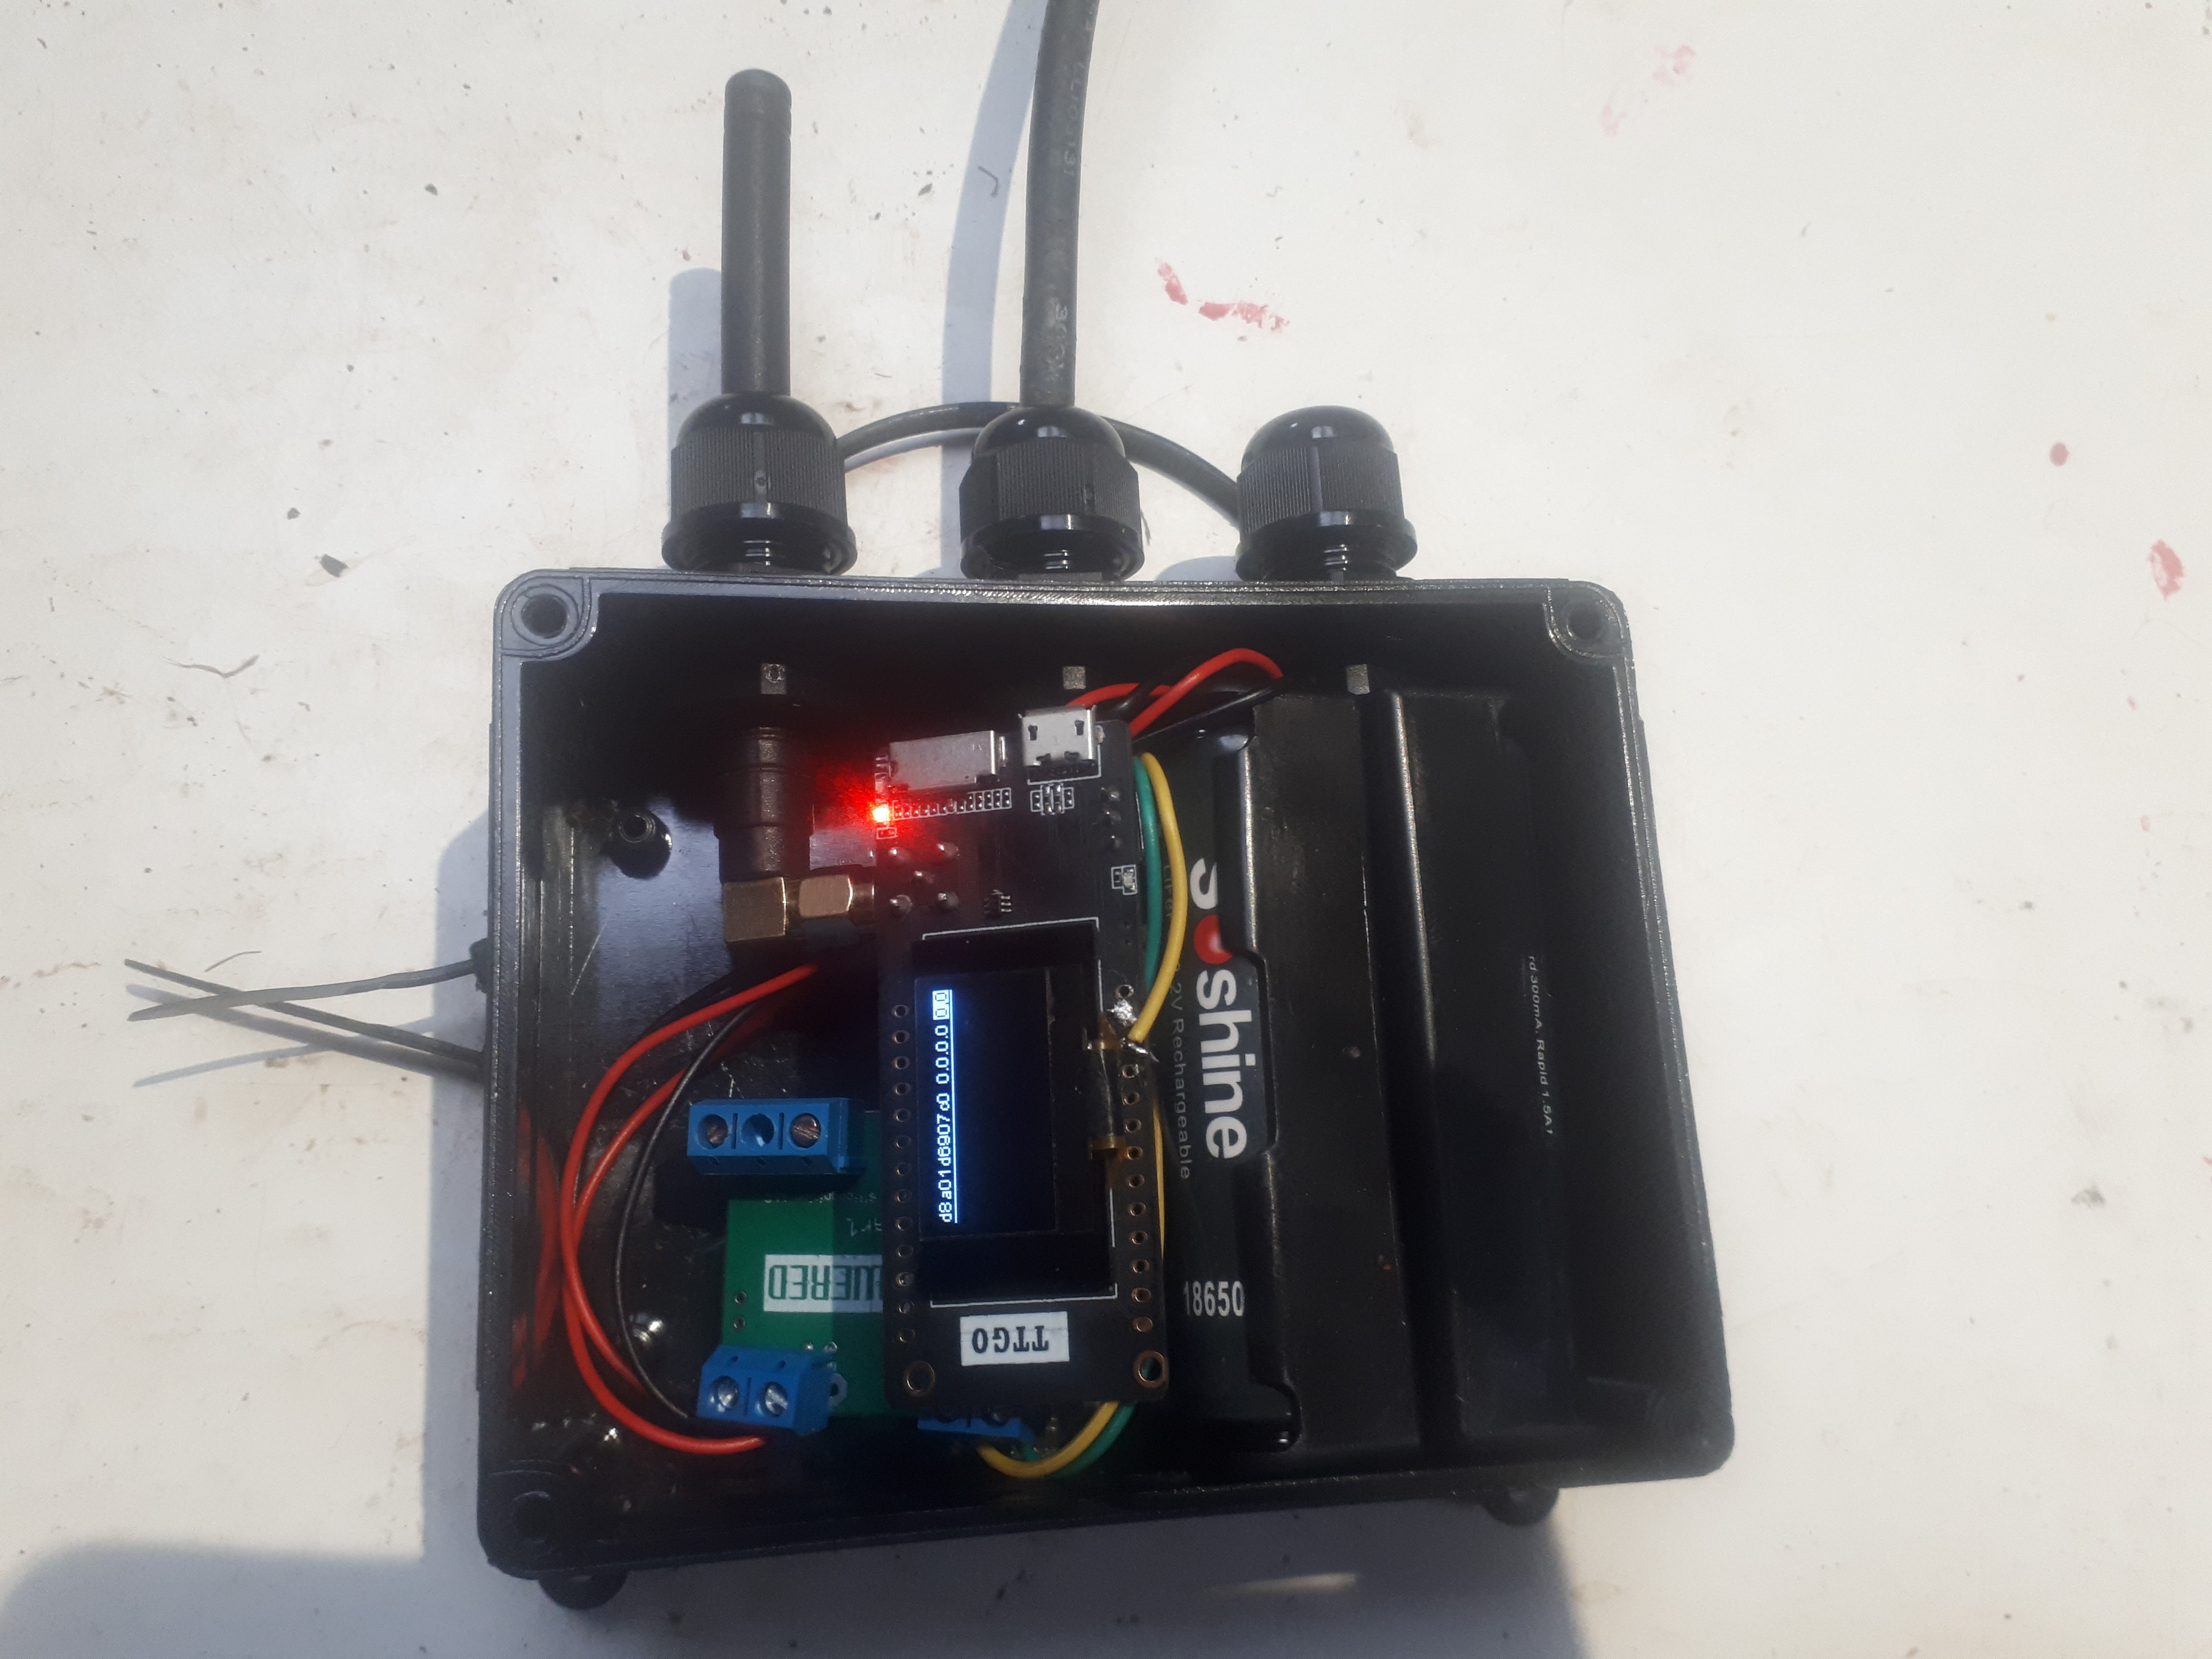
  • DisasterServer:
    • DisasterRadio: the main "server" that takes messages from clients and sends them to other clients
  • DisasterClient:
    • LoRaClient: interfaces with LoRaLayer2
    • WebSocketClient: WebSocket connections from the web app
    • StreamClient: for Arduino Stream, currently used for serial console
    • TCPClient: for a telnet-like server
    • HistoryRecord: records messages to SD card (or bounded queue in memory)
    • OLEDClient: displays messages on the screen (mostly for debugging purposes, but eventually I'd like to use this for a mobile Disaster Radio terminal of some kind)
    • GPSClient: proof-of-concept, interfaces with a serial GPS module to beacon your current location periodically
  • DisasterMiddleware:
    • WelcomeMessage: (very simple, in main.cpp) shows a welcome message to clients when they connect
    • HistoryReplay: shows history to clients when they connect
    • Console: implements a simple console with chat (similar to the web app) plus some /commands (I went with a more IRC-like syntax but you could easily implement a getopt version)
  • DisasterHistory:
    • HistorySD records history to SD card
    • HistoryMemory records history to a bounded queue in memory (default limit 10 messages)
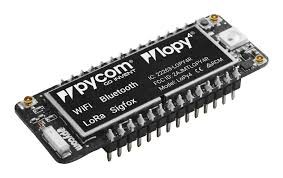
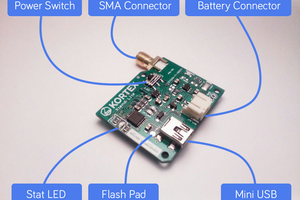
Bluetooth or Wifi

You should choose whether you wish to use Bluetooth or WiFi to access the device. The boards come in Wifi mode if you intend to use Bluetooth/ Android app. You should reflash the device, commenting out Wifi and uncommenting Bluetooth.

latestboard.png

Most up to date dual-radio board design from https://github.com/sudomesh/disaster-radio/blob/master/hardware/board_esp32/bom/ibom.html Full hardware details: https://github.com/sudomesh/disaster-radio/tree/master/hardware/board_esp32

Portable Network Graphics (PNG) - 140.94 kB - 02/28/2020 at 12:32

Preview
Download

View all 2 project logs

  • 1
    Building a solar node
    • Take the enclosure and remove the cover with a screwdriver
    • Pass the big cable through the central cable gland as you face the enclosure with the cover removed and the cable glands at the top.
    • Pass the short antenna through the right hand cable gland (this is unused, it's just to block the hole)
    • Pass the long antenna through the left cable gland.
    • Connect both the + (red) cables from the battery holders to the bat + terminal on the Solar1 charge controller
    • Connect both the - (black) cables from the battery holders to the batt - terminal of the Solar1 charge controller.
    • Insert the batteries into the holders
    • Place the battery holders to the left of the enclosure. Secure with adhesive silicone.
    • Connect the wires  from the plug that came with the TTGO board to the + and - load output of the solar charge controller.
    • Use a lump of silicone to attach the solar charge controller to the right-hand side of the enclosure.
    • Connect the +/- wires from the large cable you passed through the cable gland to the +/- terminals on the solar charge controller.
    • Connect the plug to the TTGO dev board.
    • Screw the TTGO dev board to the long antenna. Spin so it does not foul the lid.
    • Check that the screen on the dev board is showing some information
    • Tighten the cable glands
    • Attach the 10w or 20w solar panel to the cable you have passed through the cable gland.
    • Put the solar panel in the sun.
    • Connect to the Wifi network that has been created and visit 192.168.4.1 in a browser, or launch the Android app and connect to Bluetooth if you have re-flashed the device.

    Portable node

    It should be possible to make a portable node from this box and this power bank but this is untested.

View all instructions

Enjoy this project?

Share

Discussions

aaaaaa wrote 04/15/2023 at 17:37 point

why not using reticulum?

  Are you sure? yes | no

Samuk wrote 05/20/2023 at 23:08 point

It was very alpha back when we were working on this

  Are you sure? yes | no

teraz wrote 09/18/2021 at 18:17 point

this device will be compatibility with pineDio pine64 ?

  Are you sure? yes | no

josemartinn290 wrote 08/29/2021 at 08:34 point

Arising Low Power Wide Area Networks (LPWAN) address a genuine leap forward for observing applications, since they give the likelihood to produce and communicate information more than many kilometers while burning-through scarcely any energy. To additional expansion the self-rule of such remote frameworks, the current paper proposes a unique strategy to accurately measurement the critical components of an energy self-sufficient hub, specifically, http://sportsshow.net/ the supercapacitor and the battery that chiefly give the structure factor of the hub. Among the LPWAN competitors, LoRa is picked for genuine field explores different avenues regarding a custom remote stage that demonstrates its energy nonpartisanship over a limited skyline. Diverse LoRa designs are investigated, prompting sufficient dimensioning. For instance, it is shown that, for a similar nature of administration, the size of the sun powered board expected to keep a LoRa hub self-governing in the South of France is not exactly 50% of the size needed in North of France.

  Are you sure? yes | no

KryptoKidz wrote 01/20/2021 at 14:20 point

very promising stuff. is there any DIY documentation i can follow to build one with my own hardware to test it out? thanks!

  Are you sure? yes | no

Patrick wrote 06/17/2020 at 20:25 point

I love the concept of this, I'd been contemplating a similar project just for use between a few of my friends for a while now. Is there any list of people who've gotten this running? I'd love to build myself a module, but, assuming I can't get my friends on board with the project, it's rather useless (especially for emergency use) if I'm the only one using it within the signal's range. Thanks!

  Are you sure? yes | no

Matt Hampton wrote 03/30/2020 at 00:23 point

Hi, love the idea, and full kudos to you all! Suggestion: 

Are you able to add another couple of downloads? Suggest preloaded First Aid, Hazards and maybe Survival Manual! Been through three devastating earthquakes, above apps essential to survival. Most will not have prior to disaster!

And as we all know, comms is always the first to go!

  Are you sure? yes | no

Samuk wrote 04/07/2020 at 12:30 point

Yes this is possible, see here for more: https://github.com/sudomesh/disaster-radio/issues/59

  Are you sure? yes | no

Kearney wrote 08/27/2021 at 06:10 point

Great advice. Best wishes.

  Are you sure? yes | no

Sorin wrote 03/09/2020 at 14:16 point

Hello

I like your project. I'm also interested in a LORA pager mesh network. I'd like to find a plan that is in the stage that can be manufactured and sold at a reasonable price on the internet. Is your project at this stage?

Also, I saw that you are using TTGO boards for prototyping. I find some other boards that are very interesting. Maybe you want to look at them and can be useful for you. You can find it at following web address https://lowpowerlab.com/guide/moteino/lora-support/

Thank you very much

Thank you very much for your attention

Yoshua Czeizler
czsorin@yahoo.com

  Are you sure? yes | no

Samuk wrote 04/07/2020 at 12:32 point

Yes you can buy the boards here: https://www.aliexpress.com/item/4000396836096.html

I believe the http://www.snaponair.com/ project intends to use the disaster radio firmware / protocol too

  Are you sure? yes | no

Neo wrote 03/02/2020 at 11:03 point

Very cool project, I have two Lolin boards, going to give it a shot. I've been thinking this would be a cool idea for ages.

One thing I thought about that could be useful is: having an optional GPS receiver on-board and sending location data across the network (displaying it on a map screen in the UI), could be useful in keeping track of people in a search party or sending an SOS if you're in trouble etc.

  Are you sure? yes | no

Samuk wrote 03/02/2020 at 17:47 point

If you access via the Android app then there is a map based on the phone GPS. There's also experimental support for the TTGO Tbeam that has an onboard GPS: https://github.com/sudomesh/disaster-radio/wiki/Devices--&-Hardware

  Are you sure? yes | no

Samuk wrote 02/25/2020 at 19:19 point

At present there are two data types in use (C)hat and (M)ap.

In principle anything that will fit within the 236byte message size will work.

You would just set byte 15 to your new message to (S)ensor or whatever: https://github.com/sudomesh/disaster-radio/wiki/Protocol#packet-structure

  Are you sure? yes | no

Mike Hammonds wrote 02/25/2020 at 15:46 point

What type of data can be transmitted over this project? 

  Are you sure? yes | no

Samuk wrote 02/24/2020 at 18:55 point

Hmm it depends. With no line of sight (some trees a house or two) I've got around 2 miles.

With proper line of sight maybe up to 10 miles? Untested at this point.

  Are you sure? yes | no

morgan wrote 02/24/2020 at 19:19 point

I'm getting around 10km with not so perfect line of site.

  Are you sure? yes | no

Dan Maloney wrote 02/24/2020 at 18:05 point

I can see this being useful in a lot of different situations. What's the maximum distance between nodes? With LoRa I'd think it would be pretty far.

  Are you sure? yes | no

Similar Projects

Does this project spark your interest?

Become a member to follow this project and never miss any updates