 Jacques Gagnon
I worked in WiFi for around 10 year, five first as a tester then as a Linux driver developer. So I got a base on RF but didn't know much about Bluetooth until I started this project. What I learned from those years is that you got to get wireless trace to fully understand issues. I learned more about WiFi doing trace than reading books. Book & spec tell you what the devices are supposed to do. Trace show you the reality!
So my approach to learning Bluetooth was to get some traces first and then analyze them with the help of the Bluetooth core spec. I did try to look online but finding stuff about Classic Bluetooth (BR/EDR) is hard since pretty much everything you will find is about BLE.
This is written from the point of view of writing a host Bluetooth Classic stack on a embedded system. What you will find online is mostly about making devices.
Bluetooth tracing
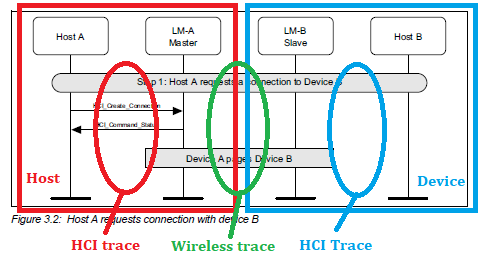
With Bluetooth you got basically two ways of tracing. Over the air using some costly hardware or a ubertooth or tracing the HCI communication interface between the Bluetooth stack and the Bluetooth controller.
 The controller is a mix of software and hardware handling the very low level of a Bluetooth transmission. The Bluetooth stack implement the higher level of the Bluetooth spec. As an example for ESP32 the software part of the controller is located at https://github.com/espressif/esp32-bt-lib it's a closed source library. You really don't want to face bugs in there because you are then at the mercy of the vendor support. The esp-idf provide BlueDroid as the software stack.
For BlueRetro I decided to write my own "minimal" stack talking to the BT controller directly via the ESP32's VHCI interface. My reasoning for doing so was that I knew nothing about Bluetooth and duplicating what I was seeing in the HCI traces directly to the controller looked easier and faster than learning a particular stack API. I felt I would get a more generic knowledge this way. Also early game console controllers don't follow Bluetooth spec/good practice 100% and I felt that a generic stack could limit the project and I didn't want to start hacking into a giant Bluetooth stack code base. I just want reports from a HID device and it should be simple enough I thought back then.
You can get most of the job done with only the HCI traces but in my case I do see a couple bugs already that would require a wireless trace to help figure out the issue.
HCI trace on Linux
It's very simple to do HCI trace on Linux and so it was my goto method to look at each HID devices I wanted to add support for in BlueRetro.
sudo hcidump -w hci_trace.log
Then simply connect the Bluetooth device you want to get a trace for, once done simply kill the trace. This create a BT snoop trace you can open with Wireshark.
HCI trace in Windows 10
There is no direct way to get HCI trace in Windows but if your Bluetooth radio is connected through an USB connection you can sniff the HCI packet by using Wireshark in conjunction with USBPcap.
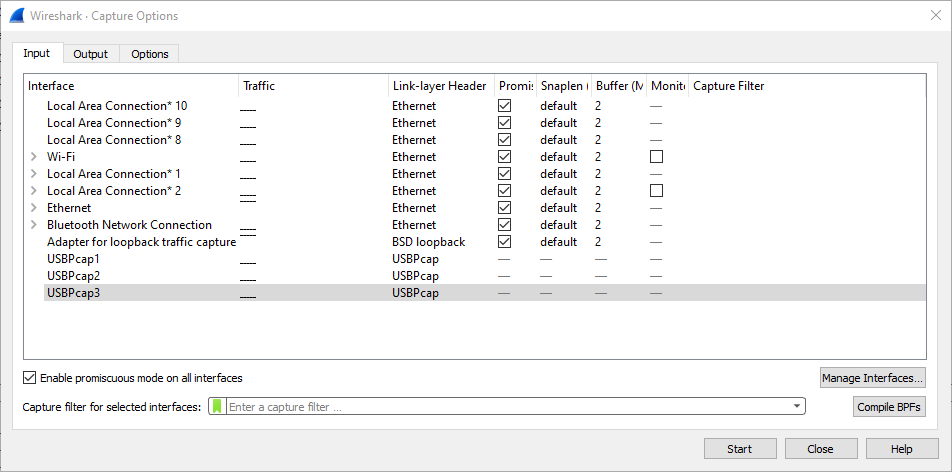
Try each USBPcap interface until you find some Bluetooth traffic.
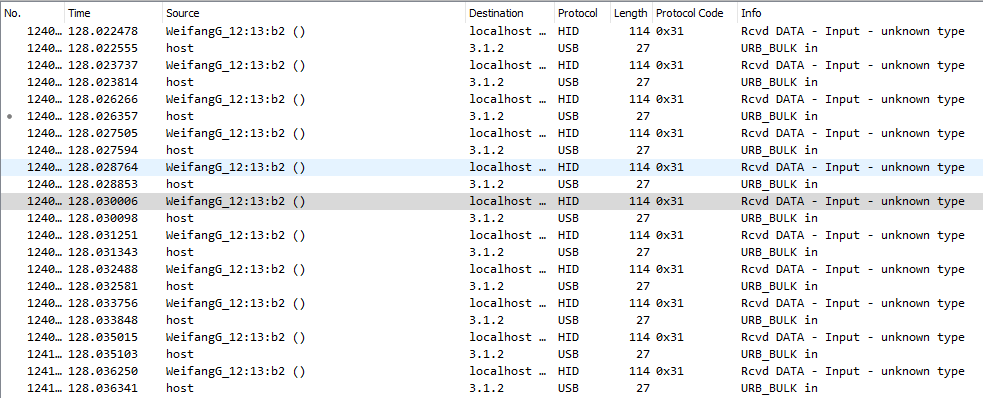
The Bluetooth HCI packet will be mix with the USB low level packet. Simply use the "bluetooth" filter to make that trace easier to read.

See sample trace here:
https://github.com/darthcloud/bt_traces/blob/master/win10_steam_ps5_ds_rumble.pcapng
HCI trace on Android
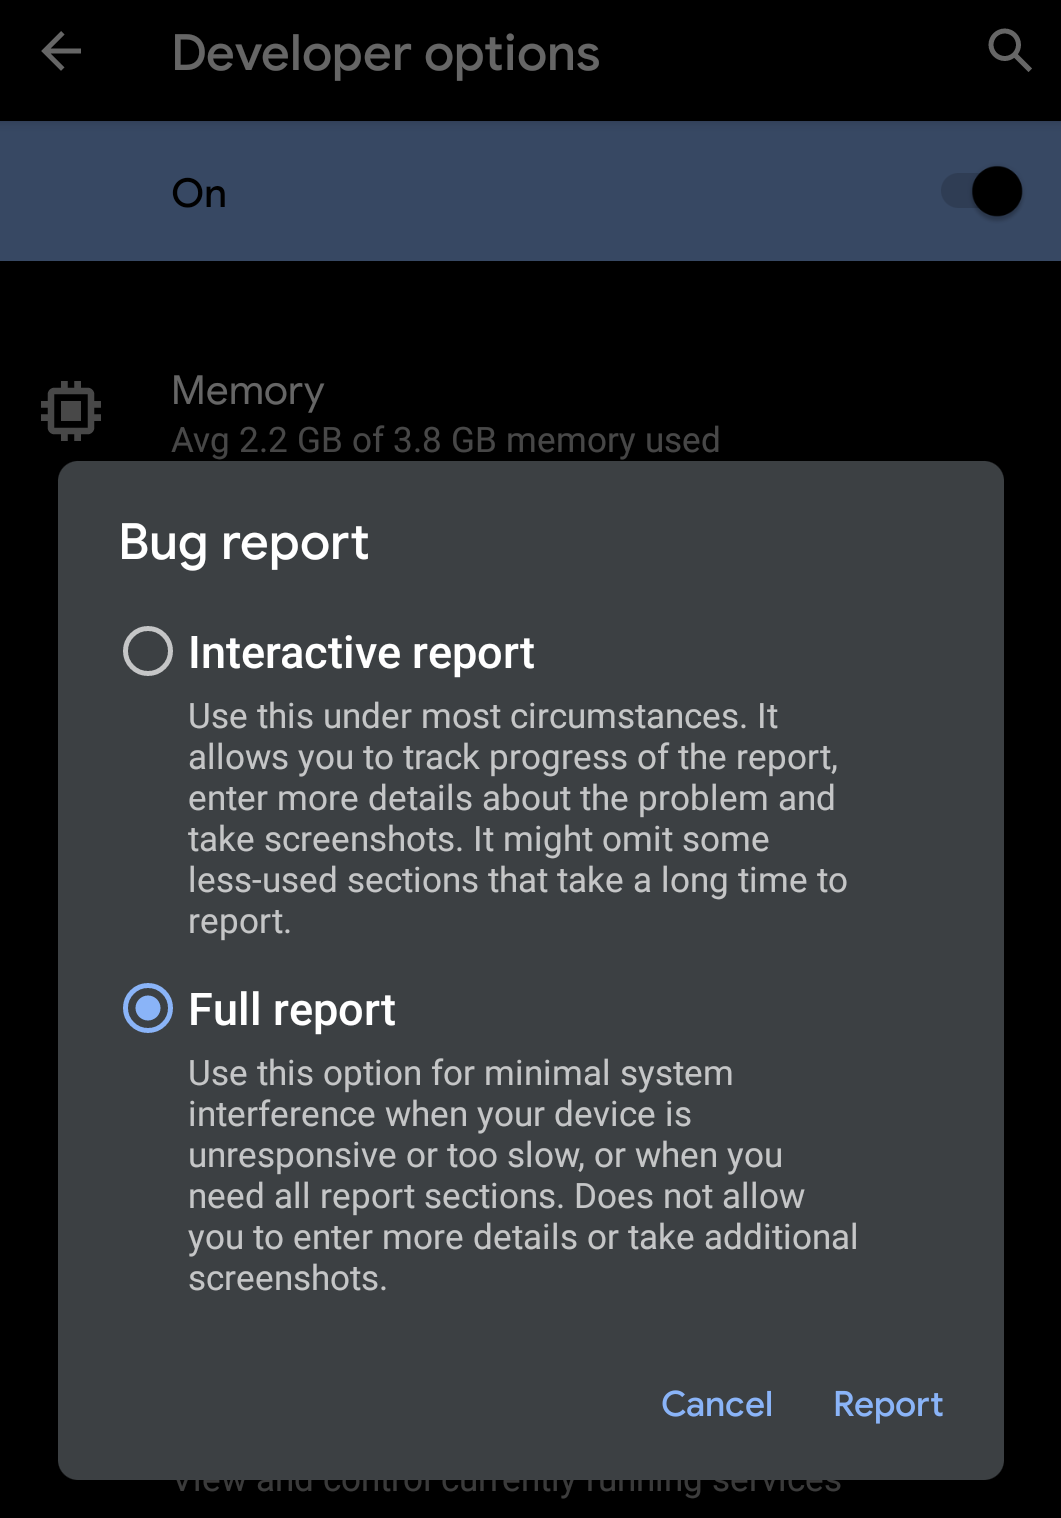
You can do the same on Android by enabling Bluetooth trace in the developer options menu.
Enable Bluetooth HCI snoop log.
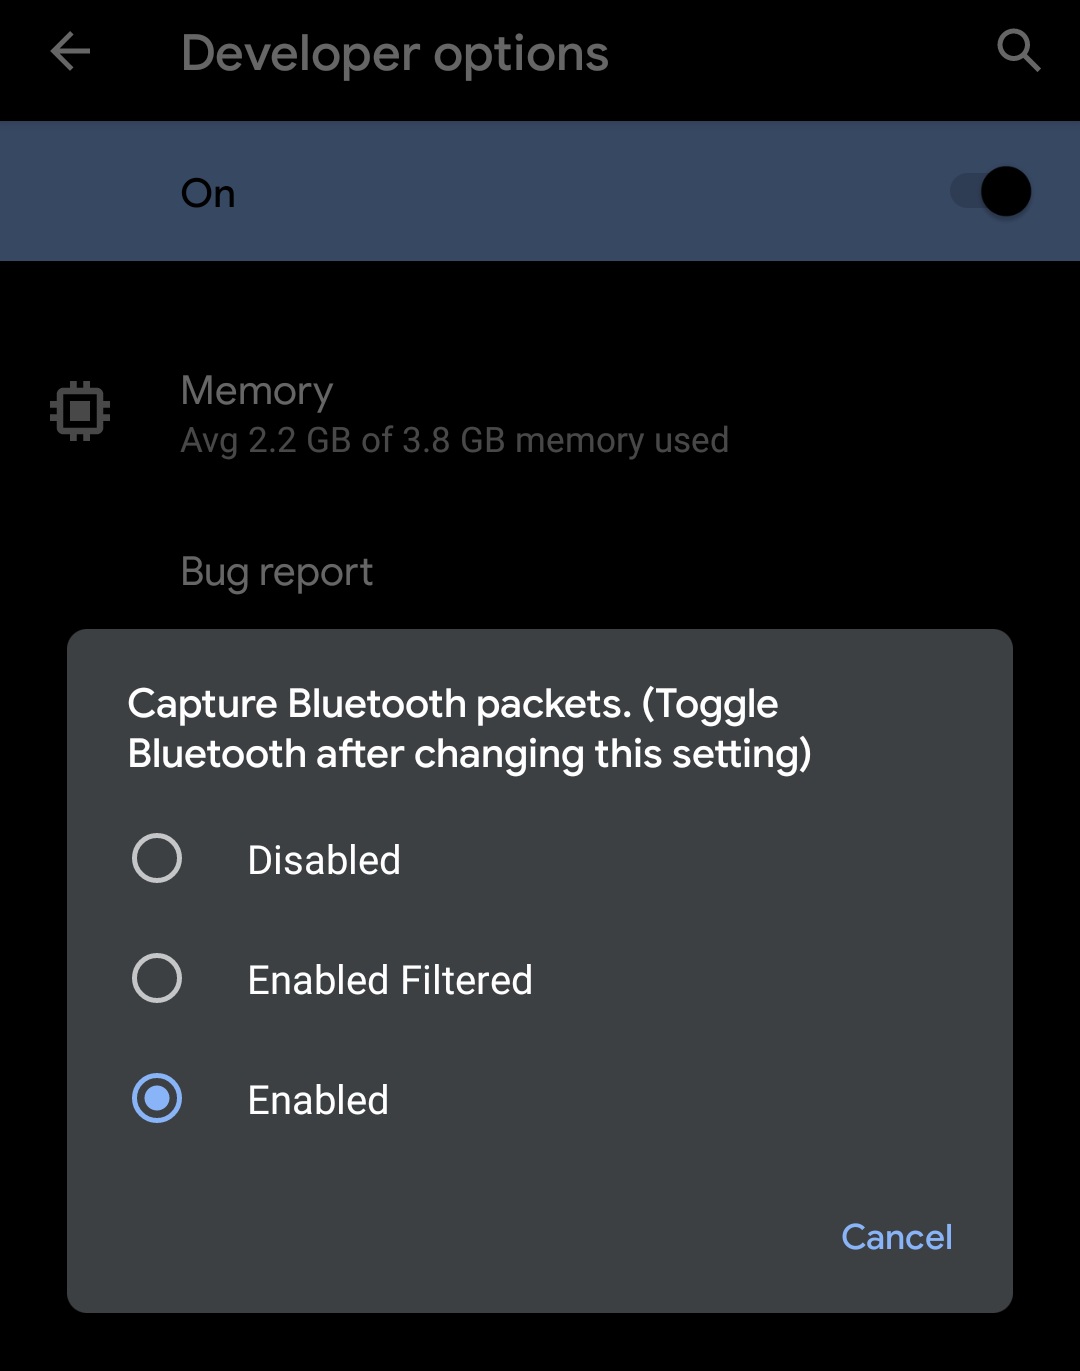
Then toggle Bluetooth off & on, connect the Bluetooth device and once done generate the report. This can take several minutes.
The HCI trace will be in zip generated under:
FS/data/misc/bluetooth/logs/btsnoop_hci.log
HCI trace in your own code
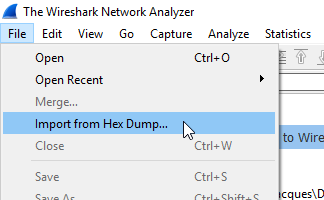
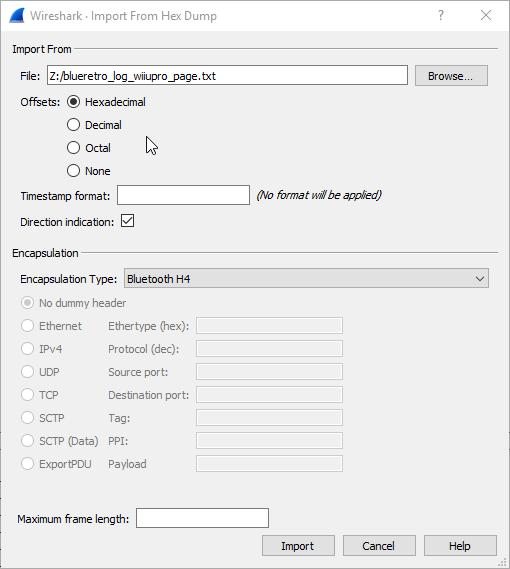
Wireshark got that awesome and little-known feature that allows you to import hex dump and get then analyzed and saved back to pcap format. You simply need to add a hook in your code at the packet RX & TX function and format it as per the text2pcap format.
static void bt_h4_trace(uint8_t *data, uint16_t len, uint8_t dir) {
    uint8_t col;
    uint16_t byte, line;
    uint16_t line_max = len/16;

    if (len % 16)
        line_max++;

    if (dir)
        printf("I ");
    else
        printf("O ");

    for (byte = 0, line = 0; line < line_max; line++) {
        printf("%06X", byte);
        for (col = 0; col < 16 && byte < len; col++, byte++) {
            printf(" %02X", data[byte]);
        }
        printf("\n");
    }
}
You got to prepend all the other logs with # otherwise the parser will fail. See an example of a BlueRetro log.
HCI trace on UART
When debugging a HID device, it is good to have the HCI trace from its own point of view. Most of the time the microcontroller and Bluetooth chip are separate and they are linked via UART using the H4 protocol to pass the HCI packets. This example show a PS3 controller clone that somehow never receive my L2CAP config.
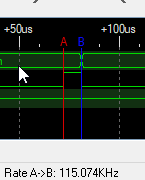
If you got a scope or logic analyzer with enough memory simply use that to get the trace. Otherwise what I do personally is to use an UART cable to sniff the data on my PC. The first step is to still look with the logic analyzer for a stop bit in the middle of a transmission and measure the rate. That PS3 clone controller use 115200 as an example.
Then in Linux config the port for that speed and direct the raw data stream to a binary file:
picocom -b 115200 /dev/ttyUSB1
(stty raw; cat > clone_ps3.bin) < /dev/ttyUSB1
I made a simple python script to convert it in a format Wireshark importer would like.
You can trace TX and RX line separately with this method. But doing so you lose the order between the cmd and response. What I do is that I mix together both lines using a AND gate from a 74HC08 (UART Idle high) this way you get both in one trace!

The drawback is that UART is full duplex and you will get collision sometimes especially in the L2CAP handshake. Usually with the RX, TX and combine traces you can figure things out.
Trace analysis
Let's take a look at some traces you can find in this repo: https://github.com/darthcloud/bt_traces .
Early host config
At that stage what you want to do is reset the controller to a known state, get some info about it and configure a few basic things.
On Linux you get trace this part by resetting the controller while an HCI trace is running:
sudo hciconfig hci0 reset
We can see what I do on BlueRetro in the init_blueretro.pcapng trace. You can get reference for most of those commands and events in the Bluetooth core spec 5.2 in Vol. 4: Part E: 7.3 & 7.7 sections.
Some of the notable setting I do for BlueRetro is setting up filters for inquiry and connection events to only allow HID devices (Packets #49 & #51). I also setup periodic inquiry mode (Packet #81) every ~10 sec for a duration of ~4 sec. It's important to leave time slots for page scan. Once a device is connected, BlueRetro will stop inquiries automatically after one minute to reserve all air time for game play. If all devices disconnect periodic inquiry will be restarted.
Device connection
You can achieve connection between device in two ways: inquiry or page.
Let's look at Switch Pro controller trace ubuntu1804_sw_sync_inquiry.log. Inquiry takes place when you pair a device for the first time. You place the device in inquiry scan mode by usually pressing a sync button or holding power button for a short amount of time. The device is now looking for inquiry. The host then sent an inquiry (P#480) for which the device will answer and generate an Inquiry Result event (P#534) on our controller. At that point the host will send a Create Connection cmd (P#570) and the device should accept (P#574).
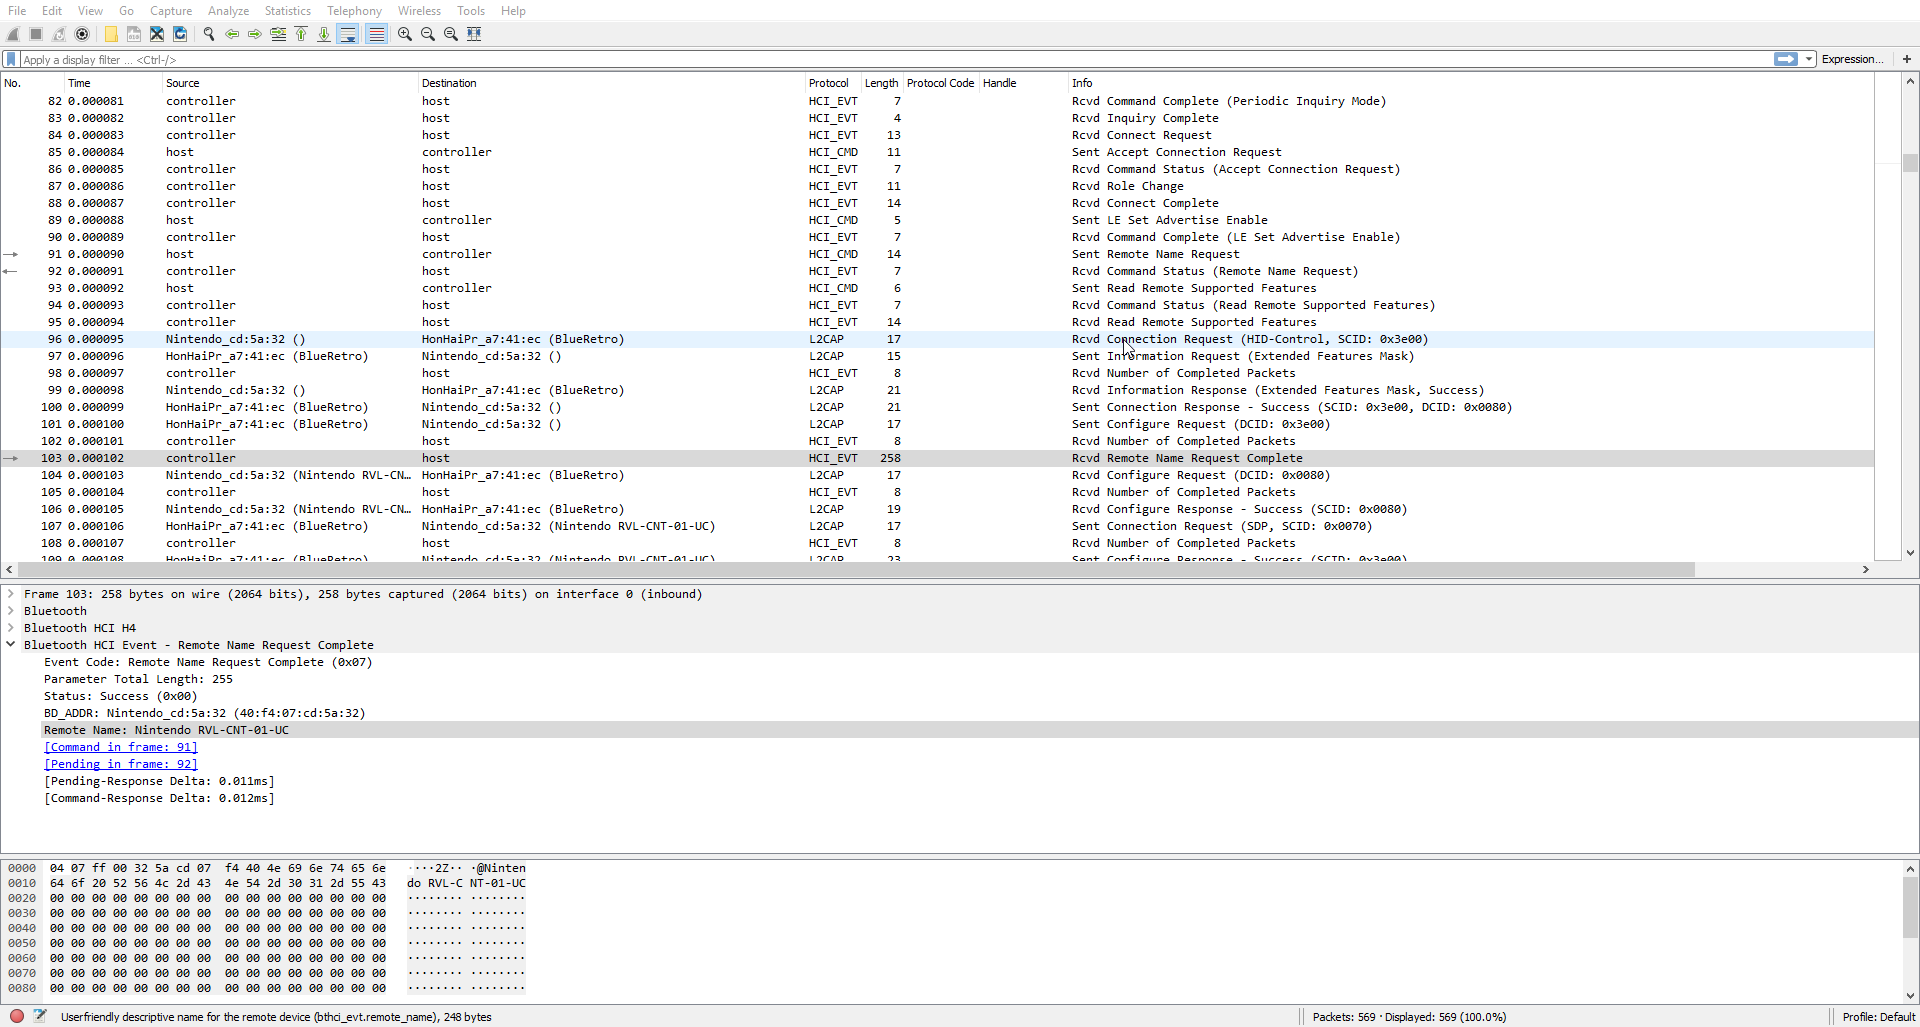
Now for page let's look at trace ubuntu1804_sw_btn_page.log. Page takes place when a device was paired with an host previously. The host should be configured to be in page scan. The device will page it's last known host upon pressing any buttons or the power button. The page from the device will generate a Connect Request event (P#38). After we accept (P#39) the device will hand the role of master to the host (P#41).
Either way we are now connected to the device.
Back at the inquiry trace, the host will signal the authentication phase to the device (P#587). For HID device authentication is done using PIN code or via secure simple pairing (SSP). Most new devices now support SSP and it's the case for the Switch controller. In this phase the device takes the initiative and will request for a Link Key (P#589). Since this is our first pairing the host got no link key yet and will send a negative reply (P#590). The device will next request for our IO capability (P#592) and for user confirmation (P#609). Upon host confirmation (P#609) the SSP process is completed (P#611) and the device will send us a link key (P#618) to use on our next connection. This completes the authentication (P#619) phase and the device are now paired together. The Switch controller require to enable Encryption on the connection pass this point (P#620).
In the page trace link key request (P#55) is receive right away and the host response with the link key (P#56) obtained from the inquiry pairing.
Service discovery
To learn more about the device it is possible to connect to Service discovery protocol which contains a lot of information. Typically what interests us the most for a HID device is the HID descriptor which describes the format of the report sent by the device. The amount of information is quite large and so it's typical for the reply to be in multiple fragments. As an example, in the Switch inquiry trace at packet #715 we see all the fragments reassembled. Digging into the HID attributes, we can find the HID descriptor.

If we decode this hex stream at http://eleccelerator.com/usbdescreqparser/ we get:
0x05, 0x01,        // Usage Page (Generic Desktop Ctrls)
0x09, 0x05,        // Usage (Game Pad)
0xA1, 0x01,        // Collection (Application)
0x06, 0x01, 0xFF,  //   Usage Page (Vendor Defined 0xFF01)
0x85, 0x21,        //   Report ID (33)
0x09, 0x21,        //   Usage (0x21)
0x75, 0x08,        //   Report Size (8)
0x95, 0x30,        //   Report Count (48)
0x81, 0x02,        //   Input (Data,Var,Abs,No Wrap,Linear,Preferred State,No Null Position)
0x85, 0x30,        //   Report ID (48)
0x09, 0x30,        //   Usage (0x30)
0x75, 0x08,        //   Report Size (8)
0x95, 0x30,        //   Report Count (48)
0x81, 0x02,        //   Input (Data,Var,Abs,No Wrap,Linear,Preferred State,No Null Position)
0x85, 0x31,        //   Report ID (49)
0x09, 0x31,        //   Usage (0x31)
0x75, 0x08,        //   Report Size (8)
0x96, 0x69, 0x01,  //   Report Count (361)
0x81, 0x02,        //   Input (Data,Var,Abs,No Wrap,Linear,Preferred State,No Null Position)
0x85, 0x32,        //   Report ID (50)
0x09, 0x32,        //   Usage (0x32)
0x75, 0x08,        //   Report Size (8)
0x96, 0x69, 0x01,  //   Report Count (361)
0x81, 0x02,        //   Input (Data,Var,Abs,No Wrap,Linear,Preferred State,No Null Position)
0x85, 0x33,        //   Report ID (51)
0x09, 0x33,        //   Usage (0x33)
0x75, 0x08,        //   Report Size (8)
0x96, 0x69, 0x01,  //   Report Count (361)
0x81, 0x02,        //   Input (Data,Var,Abs,No Wrap,Linear,Preferred State,No Null Position)
0x85, 0x3F,        //   Report ID (63)
0x05, 0x09,        //   Usage Page (Button)
0x19, 0x01,        //   Usage Minimum (0x01)
0x29, 0x10,        //   Usage Maximum (0x10)
0x15, 0x00,        //   Logical Minimum (0)
0x25, 0x01,        //   Logical Maximum (1)
0x75, 0x01,        //   Report Size (1)
0x95, 0x10,        //   Report Count (16)
0x81, 0x02,        //   Input (Data,Var,Abs,No Wrap,Linear,Preferred State,No Null Position)
0x05, 0x01,        //   Usage Page (Generic Desktop Ctrls)
0x09, 0x39,        //   Usage (Hat switch)
0x15, 0x00,        //   Logical Minimum (0)
0x25, 0x07,        //   Logical Maximum (7)
0x75, 0x04,        //   Report Size (4)
0x95, 0x01,        //   Report Count (1)
0x81, 0x42,        //   Input (Data,Var,Abs,No Wrap,Linear,Preferred State,Null State)
0x05, 0x09,        //   Usage Page (Button)
0x75, 0x04,        //   Report Size (4)
0x95, 0x01,        //   Report Count (1)
0x81, 0x01,        //   Input (Const,Array,Abs,No Wrap,Linear,Preferred State,No Null Position)
0x05, 0x01,        //   Usage Page (Generic Desktop Ctrls)
0x09, 0x30,        //   Usage (X)
0x09, 0x31,        //   Usage (Y)
0x09, 0x33,        //   Usage (Rx)
0x09, 0x34,        //   Usage (Ry)
0x16, 0x00, 0x00,  //   Logical Minimum (0)
0x27, 0xFF, 0xFF, 0x00, 0x00,  //   Logical Maximum (65534)
0x75, 0x10,        //   Report Size (16)
0x95, 0x04,        //   Report Count (4)
0x81, 0x02,        //   Input (Data,Var,Abs,No Wrap,Linear,Preferred State,No Null Position)
0x06, 0x01, 0xFF,  //   Usage Page (Vendor Defined 0xFF01)
0x85, 0x01,        //   Report ID (1)
0x09, 0x01,        //   Usage (0x01)
0x75, 0x08,        //   Report Size (8)
0x95, 0x30,        //   Report Count (48)
0x91, 0x02,        //   Output (Data,Var,Abs,No Wrap,Linear,Preferred State,No Null Position,Non-volatile)
0x85, 0x10,        //   Report ID (16)
0x09, 0x10,        //   Usage (0x10)
0x75, 0x08,        //   Report Size (8)
0x95, 0x30,        //   Report Count (48)
0x91, 0x02,        //   Output (Data,Var,Abs,No Wrap,Linear,Preferred State,No Null Position,Non-volatile)
0x85, 0x11,        //   Report ID (17)
0x09, 0x11,        //   Usage (0x11)
0x75, 0x08,        //   Report Size (8)
0x95, 0x30,        //   Report Count (48)
0x91, 0x02,        //   Output (Data,Var,Abs,No Wrap,Linear,Preferred State,No Null Position,Non-volatile)
0x85, 0x12,        //   Report ID (18)
0x09, 0x12,        //   Usage (0x12)
0x75, 0x08,        //   Report Size (8)
0x95, 0x30,        //   Report Count (48)
0x91, 0x02,        //   Output (Data,Var,Abs,No Wrap,Linear,Preferred State,No Null Position,Non-volatile)
0xC0,              // End Collection

// 170 bytes
Our buttons report is number 63 (0x3F).
HID L2CAP connection
Still looking at the Switch inquiry trace the next step is to connect at the HID control and interrupt channel. Control is not really used but it is still required to connect it first (P#775-789). Then we can connect at HID interrupt channel on which we will receive the HID report (P#790-799). At this point we are done! The device will start sending at regular intervals report for buttons & axes status (P#801).
For the Page trace the connection process is the other way around and is always initiate by the device (P#247-271).
Conclusion
There is much more than that to the Bluetooth specification but I hope this will give you a kick-start in your learning process. We'll talk about BLE next time.
Discussions
Become a Hackaday.io Member
Create an account to leave a comment. Already have an account? Log In.