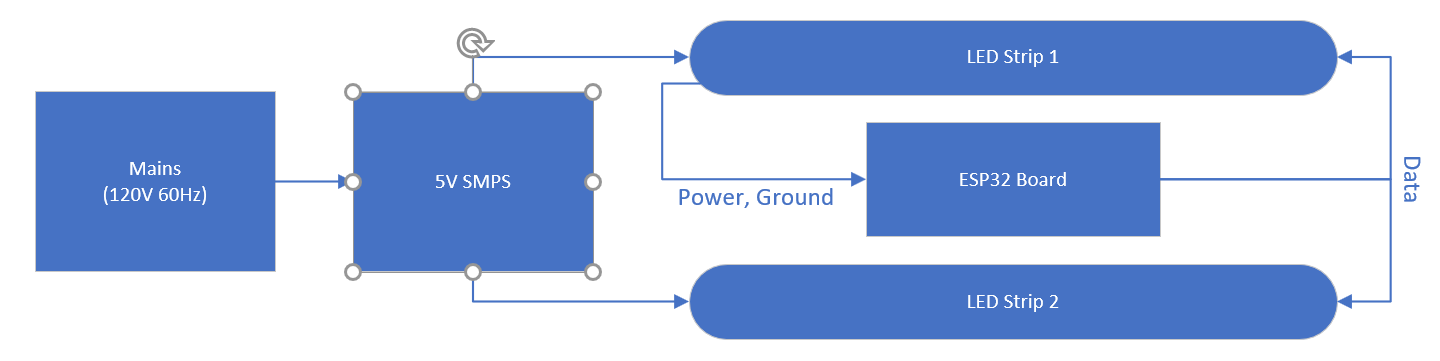
Close
0%
0%

LED Light Clock

Two 1-meter strings of APA104 LEDs, one ESP32

Similar projects worth following
I wanted something to spruce up dreary 45-degree-latitude winter mornings, and this project is my answer. An ESP32 board drives two 1-meter APA104 strips based on NTP time and configuration set through an mDNS-advertised HTTP interface.

At the time appointed through the HTTP interface, two meters of fully programmable LEDs will cheerfully augment the growing dawn light with a color of your choice. It even sports a virtual snooze button!

This little bar of joy is even useful in the evening, when it will take a temperature and brightness of your choosing, convert it into an LED color, lighten up the room, and slowly, peacefully fade to black. It can even stay on for a selectable number of minutes before fading over a selectable number of minutes.

This must-have build is pretty easy if you have the materials and tools. The software might be considered non-trivial by Arduino standards, but hey, it's already done! Not only that, but it's commented copiously to help you dip your toes into the world of embedded development should you so desire.

If you're feeling particularly adventurous, there are several patterns available that reach beyond the plainness of solid colors. Rainbows, fades, Unix epoch time, and even a binary-coded-decimal display are included free of charge*!

This project made possible by Alibaba, SparkFun, AdaFruit, Amazon, Vetco Electronics, Ace Hardware, the local Microsoft Garage chapter, my brother-in-law, and our dear, old friend SARS-COV-2 whom we still wish to banish into the mists of time as soon as reasonably possible.

* Note that staring too long into the bright, LED-lit expanse of time may cause irreparable harm to one's perspective on the shortness of life, including but not limited to multigenerational planning and horror at the meaninglessness of social media (cat videos excluded, of course).

View all 8 components

  • Picture Time!

    Jon Kunkee12/02/2020 at 06:50 0 comments

    I had my phone handy and was putting it back where it goes, so I stopped to get a better selection of photos. You'll find them after the break!

    Read more »

  • OTA Updates and Core Dumps Working

    Jon Kunkee11/29/2020 at 07:41 0 comments

    As of commit 8b0f3dee, both OTA updates and core dumps are working!

    Core dumps were surprisingly straightforward. I just had to turn them on in menuconfig and add an HTTP route through which I could dump the core dump partition of the flash device. After that there's pretty good documentation and discussion online of the local tools for processing the dump once it's downloaded;

    OTA updates were another story. Lines like this one are there due to about a half hour of adding logging, turning up existing logging too far, reading through the SDK's HTTP initialization code, and finally realizing this was a simple developer-facing parameter. My favorite was when switching the firmware upload receive buffer from the stack to the heap caused a ~10x slowdown. It turned out I was using sizeof() instead of the macro I had defined with the size in it, so the heap version was using only the first four bytes of a two-kilobyte buffer.

    I checked in several of the commands I find handy in a .ps1 file. (Visual Studio Code and the ESP IDF plugin make PowerShell the most convenient, so that's what I'm using.)

  • Version Two Idea List

    Jon Kunkee11/26/2020 at 07:31 0 comments

    Adam Savage's Every Tool's a Hammer and my Geiger counter project have mostly sold me on lists as brainstorming and work-tracking tools. The next version of this project will differ pretty much only in software; here's a list of bite-sized features I want to add:

    • Save core dumps to flash
    • Retrieve core dumps via HTTP
    • OTA updates
    • Thermals tracking
    • In-RAM debug logging
    • Retrieve logging via HTTP
    • Filesystem for HTML/CSS/JS content
    • Faster local-loop UI workflow
    • Mobile-friendly UI
    • Prettier UI
    • Current state indicator on UI
    • HTTP responsiveness watchdog
    • Settings in NVRAM of some kind
    • Differentiate first boot after flash vs. power cycle and reboot using NVRAM to enable safe settings storage, OTA, and core dump operations
    • Diagnose and fix random loss of network contactibility

  • Version Two

    Jon Kunkee11/09/2020 at 07:48 0 comments

    Over time I have noticed a few pain points: the HTML interface is only marginally usable with not-so-useful-to-me defaults, the network connection sometimes freezes and leads to a system reboot, and I have to take the device apart to re-flash it. I really do want this to be a fire-and-forget device for weeks on end, and it needs some work to get there.

    As part of this I expect to learn how to save ESP32 core dumps to flash and retrieve them over the network, how to do OTA updates, how to read debug logging over the network, and how to use CSS to make the UI easier to use on mobile.

    The UI would be easier to test if I were to use the filesystem to store and serve the files instead of having to transmute them into C strings before building. I could even have multiple files at that point!

  • Software Architecture

    Jon Kunkee07/20/2020 at 07:16 0 comments

    Most makers working with the ESP32 can easily accomplish their goals by using the ESP-IDF integration with the Arduino IDE. With my background in hardware and low-level software, I wanted to learn a bit more about the ESP32 and went with the ESP IDF (coupled with Visual Studio Code. (The blog post linked from the Project page discusses some of the work I had to do to get it working in the somewhat exotic environment I work in on a daily basis.)

    This meant I was exposed to FreeRTOS resource management and multitasking, and I had some fun.

    The IDF sample project starts with a 'main' function that runs in its own FreeRTOS task (thread). As peripherals are initialized and started, relevant tasks, events, and ISRs are set up. The programmer is then left to build on top of this.

    Overall, the code is split into:

    • Color Space APIs
    • LED patterns and colors
    • Configuration management
    • HTTP handlers
    • Alarm+Sleep state machine

    I ended up with two event loops of my own: a vestigial one in the 'main' task that keeps the WiFi up and an alarm loop that tracks time and listens for configuration events.

    initialization outputs
    The initialization done in main() has a number of subsystems it sets up.

    Here's a look at how these parts talk to each other, whether by function calls or events, during normal operation:
    call/event flow under normal operation
    Call/event flow under normal operation. Note that the alarm event loop is the star of the show with a wide variety of supporting characters. One important exception to this is that LED commands can come directly through HTTP.


    The ESP-IDF services all expose either a direct call interface--where a function is called to perform a given task--or a callback-based asynchronous interface. For my own services (the LEDs and the configuration engine), I crafted rough approximations of the same. The HTTP handler calls into the config engine which then calls a static callback to inform interested subsystems that they should re-read their configuration. The LED service has a single exposed function for running LED patterns, which internally uses a mutex to ensure only one command is processed at a time. The underlying code makes extensive use of my color space APIs to convert various conceptual concepts, like 'green' and '3100K', into linear RGB which then gets gamma-corrected by the LED driver itself.

    The color APIs all rely on only function arguments and locals, making them state-free and so lock-free.

    The alarm event loop is not direct-call or callback-based. Instead, it uses events and event wait timeouts to receive things like HTTP events (snooze, stop) and time changes.

    Time is tracked by the onboard RTC and periodically updated via NTP. As an alarm clock on mains power, no attempt was made at power management.

    Nothing makes code easier to maintain than good comments (except maybe good docs in addition to good comments :). Knowing I would probably take quite some time away from this project and seeing that I was learning a lot as I went, I put as much documentation as I could in the code.

    https://github.com/jkunkee/lc-esp32

  • Electronics Architecture

    Jon Kunkee07/20/2020 at 06:51 0 comments

    Wiring up the project got a little weird because of some aesthetic choices I made.

    The LED strips came with two plain wires for ground and +5V and a 3-wire cable for ground, +5V, and data. Instead of wiring the power in a classic star topology (ESP32 and LED strips all connected to the barrel jack), I connected the two plain wires to the barrel jack and connected the ESP32 to power through one of the LED strips. It came out something like this:


  • Build

    Jon Kunkee07/20/2020 at 06:41 0 comments

    Over the next several weeks, I spent my spare time setting up the build environment, brainstorming desired features, and writing code. There were a number of little problems, described primarily in the Git commit history, code, and in a blog post linked from the Project page. Probably the most interesting issue was that LEDs past about number 30 would sometimes get random colors. It took a lot of forum crawling, some trial-and-error, and a little oscilloscope work to establish that one ESP32 CPU core isn't powerful enough to handle both WiFi and IR transceiver (RMT) interrupts on the same CPU if the RMT load is high enough--like when doing tight-loop animations or writing to long strands. The fix was to move the RMT ISR to the second CPU.

    A second interesting problem was programming colors. The ESP32 is capable of using floating-point representations for colors at all phases (barring its terrible floating point performance), but eventually they needed to be converted to the 24-bit RGB values the LEDs would accept. I ended up with a set of layered abstractions and conversion functions moving from the most abstract color systems, like CIE x,y values and color temperatures, down past HSV to linear RGB through to gamma-corrected RGB PWM values to be sent straight to the hardware. This felt like the part where I learned the most.

    The remainder of the physical build was actually straightforward: drill some holes in plastic and aluminum, bolt things together, and run some wires. It sounds simple, but I ended up only getting three of the four board-mounting holes to line up well enough to use. (I also learned that a common battery-powered drill with wood bits is, with some effort, quite capable of working 1/16" aluminum.

  • Origins

    Jon Kunkee07/20/2020 at 06:23 0 comments

    A long time ago (2018), I had a hare-brained idea to make getting up in the morning easier: add light to the room on a timer. This led to a part-buying binge with quite a bit of back-and-forth on which 5V power supply to use and which LED strips would minimize the work I had to do, with a mix of SparkFun and AdaFruit parts sneaking off with my wallet. A local hardware store, Ace Hardware, provided a meter of angle aluminum.

    This sat on my shelf for two years, right next to the ESP32 modules a family member got me for Christmas.

    Well, technically I immediately used the adhesive backing on the LED strips to paste them to the angle aluminum, and that subassembly sat on my shelf forever. As is often the case with my projects, enclosure design stymied me--until I discovered Hammond Manufacturing project boxes at Vetco Electronics Store.

    Around the start of the COVID-19 response in my country, I got the bug to make something and, with all the parts sitting around, this project was the clear winner.

View all 8 project logs

Enjoy this project?

Share

Discussions

Similar Projects

Does this project spark your interest?

Become a member to follow this project and never miss any updates