Close
0%
0%

Smartphone Rocket Launcher

Launch model rockets with a smartphone and Raspberry Pi.

Similar projects worth following

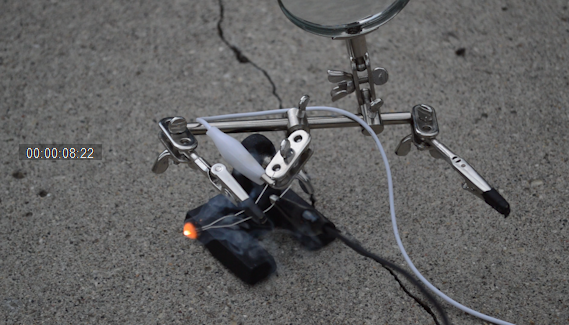
In the iPhone ad "Powerful"  actors launched a group of model rockets with an iPhone. You can view the ad here. I thought this was insanely cool, but in typical Apple fashion, I couldn't find out how they did it. I decided to take matters into my own hands and my own system from scratch using a Raspberry Pi, Web IO Pi Framework, Relay Board and a modern smartphone. Here is the video about this project:

  • 1 × Raspberry Pi Model B
  • 1 × Web IO Pi Framework
  • 1 × Relay Board
  • 1 × Model Rocket and Engine
  • 1 × 9V Battery

View all 7 components

  • Video Done

    Lewis Callaway07/14/2014 at 02:27 0 comments

    I still haven't documented the steps yet, but I have finally made the video for this project. Check it out here:

  • Launching Rocket

    Lewis Callaway07/13/2014 at 15:37 0 comments

    I just launched the rocket. I had to go a couple of times to send it off. The first time I learned that you need to use an alkaline battery for it to ignite. The second time I learned that model rocket igniters are VERY finicky. The last time I was overrjoyed when it worked. I will post instructions very soon.

  • Done Testing

    Lewis Callaway07/06/2014 at 02:00 0 comments

    I finished programming the Pi and connecting and testing the hardware today. I tested just a model rocket igniter to see if it would start on fire.  After trying a faulty igniter, the second one ignited perfectly! Now all that is left to do is launch a rocket! 

View all 3 project logs

  • 1
    Step 1

    Install WebIOPi onto the Raspberry Pi https://code.google.com/p/webiopi/wiki/INSTALL?tm=6

  • 2
    Step 2

    Next create a custom HTML page and a python file to help it. This will allow us to use one large button instead of many small ones. You can view the code in this project here: https://github.com/electrodog10/Model-Rocket-Launc...

    You can see how to change the default WebIOPi page here:

    https://code.google.com/p/webiopi/wiki/Tutorial_Ba...

    Also connect the Pi to the Wifi hotspot you will use when flying the rocket. Check out a tutorial for that here: https://learn.adafruit.com/adafruits-raspberry-pi-lesson-3-network-setup/setting-up-wifi-with-occidentalis

  • 3
    Step 3

    Connect the power, signal, and ground wires between the Raspberry Pi and relay board. Connect the relay board output to act as a switch on the +9V coming off of the 9 volt battery. Once that is done, connect the 9V battery to the rocket igniter.

View all 4 instructions

Enjoy this project?

Share

Discussions

Similar Projects

Does this project spark your interest?

Become a member to follow this project and never miss any updates