Close
0%
0%

WiFi Motion Sensor (3D print) - DIY

We show how to build IOT WiFi Motion Sensor powered on a battery with email notification over IFTTT.

Public Chat
Similar projects worth following
In this project we build a battery powered Wi-Fi Motion Sensor with Email notifications. Every time the sensor detects movements it sends notifications to your email. This instruction comprises with the following steps:

1. Explaining project using Fritzing schematics
2. Assembly
3. Setting-up IFTTT and email service
4. Configuring IoT module
5. Connecting IoT module to the internet

We also attach 3D printing files. So once you use exactly the same components shown in this project, you can have a ready made 3D casing.

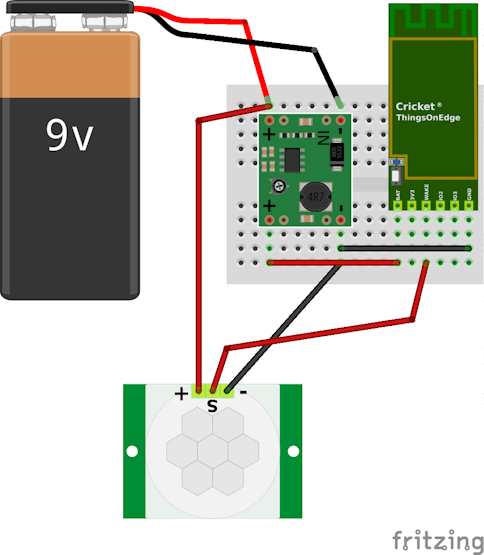
In this project we use the PIR sensor module (HC-SR501), which is easily accessible from Amazon and other online shops. The module detects motions and sets the OUT pin HI for selected duration (explained in more details further in the blog). This wakes up the IOT module and sends the email notification over IFTTT.

The PIR module operating voltage is 4.5-20V and we have chosen a 9V battery to power-up this sensor. However we also want to use the IOT Cricket Wi-Fi module which operates between 1V and 3.5V. We cannot connect this battery directly to the IOT module. We need to add a step down regulator DC-DC to lower down the voltage otherwise we damage the board.
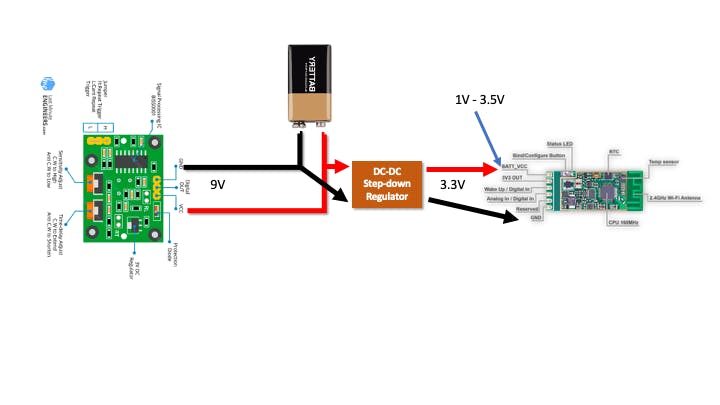
Power circuit

Power circuit

We choose the step-down MP1584EN module of which output voltage can be adjusted between 0.9V and 20V. We have to make sure the output voltage is set correctly to avoid damage. The module has a potentiometer to regulate output voltage. This should be adjusted to provide 3.3V using a multimeter.

The motion sensor also has 2x potentiometers to regulate sensitivity and duration of the output signal. The cricket module wakes-up by providing a high signal on WAKE_UP pin, then it sends the notification to the cloud/IFTTT and powers itself down to wait for another wake_up signal. The entire process takes approx. 5 seconds. The duration for the motion sensor can be adjusted between 3s and 1 minute. We need to set this to minimum to avoid multiple notifications on a single movement detection.

The potentiometer should be turned to maxim anticlockwise. This sets the output signal to last approx 3 seconds.

  • 1 × HC-SR501 Human Body Sensor
  • 1 × MP1584EN DC-DC Buck Converter
  • 1 × IOT Cricket Wi-Fi module Things On Edge (https://thingsonedge.com)
  • 1 × 9V Battery

  • 1
    Assembly

    Follow the schematics below to connect all components together, it can be done using breadboard but eventually this will be turned into a standalone product with 3D printed enclosure.

    Schematics

    After assembly the circuits should work as expected, any movements detected should wake-up the Cricket board, this is indicated by LED blinking.

  • 2
    Setting-up IFTTT and email service

    Follow the steps:

    • Go to: https://ifttt.com/
    • Login or register
    • Click Create from User / Account menu (top right corner)
    • Click + to create new source event
    • Select Webhooks service
    • Click Continue
    • Click Receive a web request (on the left hand side)
    • Create event name e.g. pir_sensor
    • The source event should be set-up now, click + after Then event
    • Search email service
    • Change subject and body of the email accordingly
    • Click Finish

    Nearly done, we need to get a HTTP address to which we can post events from the IoT module.

    Search for Webhooks service and click on the document in the right up corner.

    Next copy web links under "Make a POST or GET web request to:" you will need it later.

  • 3
    Configure Wi-Fi Cricket module

    Cricket is entirely configured OTA (Over The Air) through TOE Developer Portal (https://dev.thingsonedge.com). Once the Cricket module is paired to a Wi-Fi network it retrieves a configuration from the Developer Portal automatically. Now let's configure it first.

    For our Wi-Fi Motion Sensor device we want to configure Cricket to send HTTP Post Requests to the IFTTT / Webhooks when it wakes up on IO1: WAKE_UP pin. The IOT Cricket module wakes up when IO1 receives a high signal from the PIR sensor module.

    Now open TOE Developer Portal from any browser either from PC or mobile. You must register/login to Developer Portal to activate and configure the device in your account. Otherwise the device won't work.

    Login / Register to TOE Developer Portal

    After successful login / registration you need to click "Add newdevice to activate your device in the system. You need to use the unique serial number printed on a label stick on the back of Cricket.

    Unique serial number at the back of the module

    Unique serial number at the back of the module

    WARNING: You must keep the serial number for yourself only. Do not share it with anyone else.

    Now we can configure the device.

    Set the following configuration:

    • RTC: OFF
    • IO2: OFF
    • IO3: OFF
    • Battery monitor: OFF
    • Force updates on - IO1 Wake Up: On
    • Force updates on - RTC Wake Up: OFF
    • Post Events: see below

    Copy / paste the link we copied from Webhooks in io1_wakeup and leave data empty.

    Just two more steps:

    • replace https to http
    • replace event to pir_sensor

    The link should look like below:

    http://maker.ifttt.com/trigger/pir_sensor/with/key/hfNIx8SKn_xxxxxxxxxxxxxxxxxxxxxx_YW3xx5yFw5MGD

    Set configuration and hit the Save button.

    Set configuration and hit the Save button.

    Great! We are almost there! We just need to connect our device to the internet over Wi-Fi network. See the next step.

View all 6 instructions

Enjoy this project?

Share

Discussions

Similar Projects

Does this project spark your interest?

Become a member to follow this project and never miss any updates