Close
0%
0%

Arduino Solenoid Door Lock using RFID

RFID is an inexpensive and accessible technology. It can be used in many applications such as access control.

Similar projects worth following
This project describes the Arduino solenoid door lock using RFID and how it can be used in various applications.

About Project

Solenoid Lock

A solenoid lock operates on the principle of the electronic-mechanical locking mechanism. This lock has an idler with a slanted cut as well as a mounting bracket.

When the power is utilized, DC generates a magnetic field that drives the slug inside and maintains the door in the unlocked position. The slug will maintain its position until the power is excluded. When the power is disconnected the slug transits outside and locks the door.

Implementation and Testing

Once we are ready with all implementation, we can start testing the Solenoid Door Lock project.

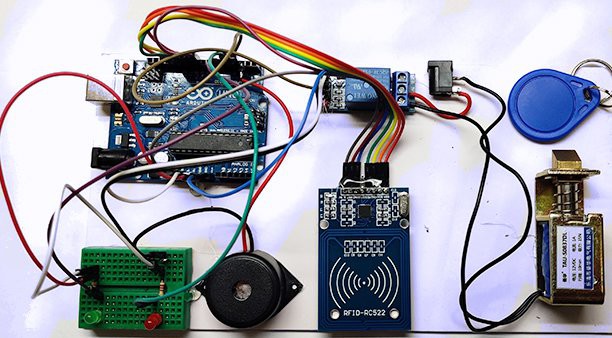
Here in the below diagram, we have soldered all the components on the board so that it can be installed on the door simply.

So for testing mount the board on the door frame as well as a magnet on the door so that it can recognize the door movement.

Now you can scan your RFID card to open the door lock. The solenoid lock will rest open until the Hall Effect sensor output is high.

  • 1 × Arduino Uno
  • 1 × RFID-RC522 Module
  • 1 × 12v Solenoid Lock
  • 1 × Relay Module (Generic)
  • 1 × Hall Effect Sensor

View all 7 components

  • 1
    Run a Program
    #include #include
    int hall_sensor = 3;
    int state,lockread;
    int Buzzer = 4;
    const int LockPin = 2;
    #define SS_PIN 10
    #define RST_PIN 9
    MFRC522 mfrc522(SS_PIN, RST_PIN); // Create MFRC522 instance.
    void setup()
    {
    Serial.begin(9600); // Initiate a serial communication
    pinMode(LockPin, OUTPUT);
    pinMode(Buzzer, OUTPUT);
    pinMode(hall_sensor, INPUT);
    SPI.begin(); // Initiate SPI bus
    mfrc522.PCD_Init(); // Initiate MFRC522
    //Serial.println("Approximate your card to the reader...");
    // Serial.println();
    digitalWrite(LockPin, LOW);
    }
    void readsensor()
    {
    lockread = digitalRead(LockPin);
    state = digitalRead(hall_sensor);
    //Serial.print(lockread);
    //Serial.print(state);
    // delay(2000);
    }
    void loop()
    {
    readsensor();
    sensor();
    // Look for new cards
    if ( ! mfrc522.PICC_IsNewCardPresent())
    {
    return;
    }
    // Select one of the cards
    if ( ! mfrc522.PICC_ReadCardSerial())
    {
    return;
    }
    //Show UID on serial monitor
    String content= "";
    byte letter;
    for (byte i = 0; i < mfrc522.uid.size; i++)
    {
    content.concat(String(mfrc522.uid.uidByte[i] < 0x10 ? " 0" : " "));
    content.concat(String(mfrc522.uid.uidByte[i], HEX));
    }
    //Serial.println();
    //Serial.print("Message : ");
    content.toUpperCase();
    if (content.substring(1) == "60 4E 07 1E" ) //change here the UID of the card/cards that you want to give access
    {
    digitalWrite(LockPin, HIGH);
    Serial.print("Door Unlocked");
    digitalWrite(Buzzer, HIGH);
    delay(2000);
    digitalWrite(Buzzer, LOW);
    sensor();
    }
    else
    {
    Serial.println("You are not Authorised");
    digitalWrite(Buzzer, HIGH);
    delay(2000);
    digitalWrite(Buzzer, LOW);
    }
    }
    void sensor()
    {
    readsensor();
    if (lockread == HIGH){
    readsensor();
    if(state==LOW){
    digitalWrite(LockPin, LOW);
    Serial.print("Door Closed");
    digitalWrite(Buzzer, HIGH);
    delay(2000);
    digitalWrite(Buzzer, LOW);
    }
    }
    }

View all instructions

Enjoy this project?

Share

Discussions

Similar Projects

Does this project spark your interest?

Become a member to follow this project and never miss any updates