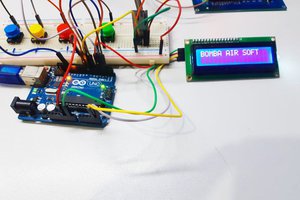
We often want to perform remote actuation of several actuators such as lamps, motors, and other actuators.
However, there are cases where the use of wired systems to drive these actuators becomes impracticable due to the distance between the actuator and the drive system or the difficulty in carrying out the installation of the cabling necessary to carry out the desired operation.
In these cases the remote control is an alternative to be used, there are several radio transceivers that can be used, such as the HC 12, NRF24L01, Lora module, among others.
In this article, we will learn how to build a NEXTPCB Electronic Board to make an automation system and control several devices remotely.
The NEXTPCB Printed Circuit Board will have the HC 12 radio transceiver/module and the Arduino Nano that will be the receiver and an HC 12 with the Arduino Uno that will be the transmitter to perform the activation of LEDs at a distance.
If you have interesting in construct this project, you can download the files and obtain your NEXTPCB GIFT in this link: NEXTPCB GIFT.
Therefore, through this article you will learn:
- Perform the circuit assembly on the protoboard
- Understand how the HC 12 module works
- Perform the communication of the Arduino Nano / Arduino Nano with the HC 12 module
- Remote device activation
- Understand how serial communication works with a radio transceiver
- Create a NEXTPCB Printed Circuit Board for this project
Now, we will start the complete presentation of the development of the Remote Device Control project using the HC 12 module.
Construction of the NEXTPCB Remote Control Automation System with Arduino and HC12 Module
As previously mentioned, the project consists of creating a system to remotely activate devices remotely and create a NEXTPCB Printed Circuit Board to control the devices.
https://www.nextpcb.com/?code=limanextpcb
The HC 12 module is a radio transceiver and its operating frequency is From 433.4 MHz to 473 MHz.
It is possible to connect two types of antennas in this module, a helical antenna that comes with the module or another antenna to be connected to the UFL connector.
The range of this module can reach up to 1 km depending on the settings and the antenna used.
These modules usually come with some factory settings, so that we can communicate 2 HC 12 modules. For example, we can communicate 2 Arduinos.
In order to carry out this process, we must adjust some parameters such as communication speed, communication channel, operating mode using AT commands.
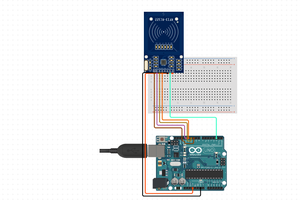
To configure the module, the set pin must be connected to the GND as shown in figure 1. This process allows the module to enter configuration mode.
It is recommended to supply the HC 12 module with an external 5V source, as it has some USB-SERIAL converters that do not provide enough current to supply the module.
To improve the design, we will create a NEXTPCB Printed Circuit Board to ensure adequate power for the HC12.
The GND of the USB-SERIAL converter must be connected to the GND of the power supply.

Figure 1 - Schematic circuit with the serial converter connections to the HC 12 module.
Now, let's configure the HC 12 module.
Table 1 shows the main commands used to configure the module using AT commands.
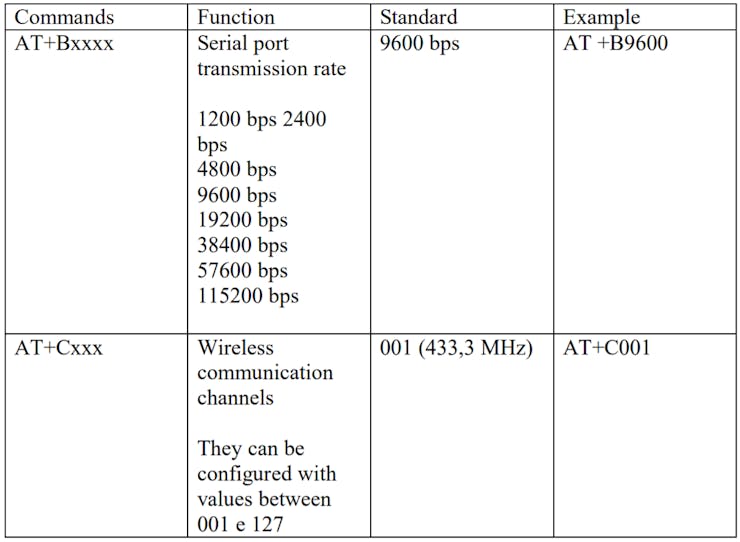

Table 1 - AT Commands to configure the HC12 Module.
The FU1 and FU2 modes have a lower power consumption than the FU3 mode, so the FU1 and FU2 modes are modes to be used in applications that use batteries.
The FU1 mode operates with electrical working current without transmitting 3.6 mA data.
The FU2 mode, on the other hand, operates with a working current of 80uA without transmitting data and supports only the speeds 1200 bps, 2400 bps, 4800 bps.
The operating modes are not compatible with each other, so the two modules must be configured in the same operating mode, whether FU1, FU2, FU3.
Before we start configuring the module, we must download the Termite software available...
Read more »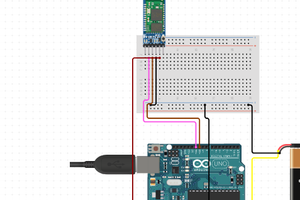
 hIOTron