 matthewkleinmann
As typical with my projects, cost is a big deal. This needs to be created out of stuff you can get on the cheap or even free. The antennas are 7 element yagi's with about 10db of gain. They are about 7" long and the boom is made out of 3/4" PVC and the elements are made out of solid 14ga copper wire. oneAll of the above was salvaged from a house I got to gut before it was torn down. The wire was from some 14/2 Romex that I stripped with a razor knife. For the average person the ladder line may be a bit harder to get on the cheap. I think a good ham friend gave me the bit I have, if not I rescued it from one of the trash bins at a local hamfest. Depending on length you need to span, and remember, shorter is definitely better, you may be able to roll your own ladder line out of PVC and wire.
Almost any yagi calculator will work. You can get fancy and shoot for the center of the 2.4Ghz wireless band, or just say 2.4Ghz or even give it the exact frequency of the channel you want. You will find they are all pretty close to each other as far as the elements go. The only place you MUST go off the page is with the driven element. This HAS to be a folded dipole to correctly match the ladder line. There are other ways of antenna matching but IMHO a folded dipole driving ladder line is simple and has a minimum of places for loss to creep in. The only consideration to keep in mind is the ladder line should be kept several wavelengths away from things. This is true of the yagi's as well.
Construction was pretty simple. I knew the antenna was going to be under 6" long, and my idea was to have a 90 degree PVC elbow at one end of the other that would go into another piece of PVC and act as a mount. To make the antenna proper I cut off an 8" or so length of PVC and cleaned up the cut edge. I used an old trick from my rocket building days to draw a line down the side of the length of the PVC. This involved holding the PVC against a piece of molding in the house, such as around a door, and using the straight part to draw a line with a black sharpie. Next, I calculated the elements for the Yagi. The site I used gives the spacing all starting from one end. I set my digital micrometer to 20mm, a semi arbitrary number but enough to allow an elbow to fit on that end without getting in the way of the first element. Note that when you put a piece of PVC in a fitting, it goes in the fitting roughly the diameter of the pipe. So a 3/4" ellbow will "swallow" about 3/4" of pipe. I locked the digital mics and put one blade against the reference end and used the other blade to make a scratch in the sharpie line. Do this will all the elements, but don't forget to add that initial 20mm to each distance. The spacing should look "yagi like" when you are done. I built a wooden V block years ago for a windchime project and I still have that so I dusted that off and I looked up, a number 52 bit is just a wee bit smaller than the diameter of the 14Ga wire. If you do not have a center bit, choke up as much as you can with the little bit in the chuck so there is just enough sticking out to make it through both sides of the PVC. Center the V block on the drill press table and clamp it down. I have old eyes, I get out my magnifying headgear and take my time lining up the hole and than drill it. There are only 7 holes so the drilling goes fast. Next you need to cut out the elements. This is a bit trickier and if you are a perfectionist your best bet is to make them a wee bit too big and sand each end down to the exact size. The way the copper deforms when you cut it with cutters it is more luck than skill getting l length dead on right. Use a pair of pliers to force the wire through the holes. I found it wa best to push about...
Read more »
 Morning.Star
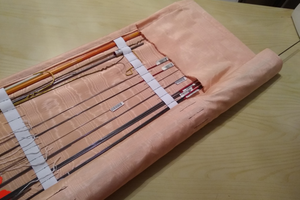
 Quinn
Quinn

 WJCarpenter