Michael Gardi
-
User Interface Progress
10/16/2020 at 19:45 • 0 commentsI haven't posted in a while because I have been learning the ins and outs of Python. Having never used it in my professional career (I was mostly a Java guy) I have to say I'm really liking the language.
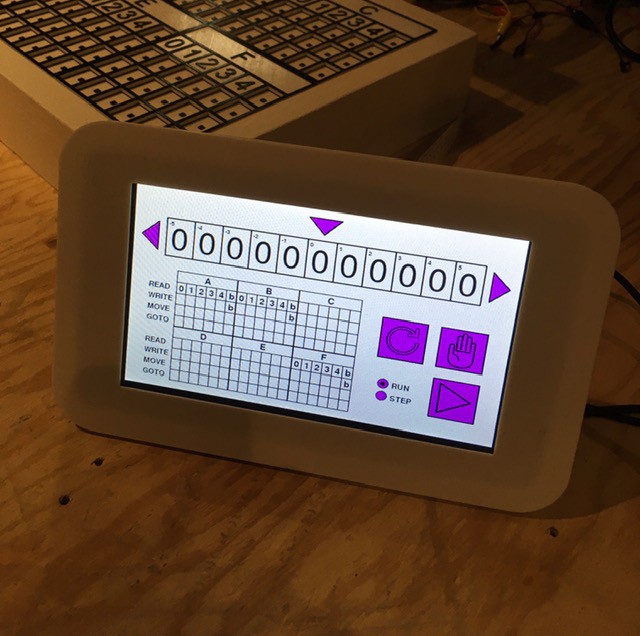
So I hit a couple of milestones today. First of all I finished my first cut at the user interface for TMD-2.
![]()
Now when I say finished, what I really mean is that the layout is done (for now), the tape can be scrolled and the cells changed manually, the other buttons react to mouse clicks or touches but are not currently "live". Certainly I still have quite a bit of work to do before the whole system is end-to-end complete, but so far so good.
I'm doing all of the UI development on my Windows laptop under Eclipse (because I'm familiar with it) and PyDev. At the recommendation of a fellow makerspace buddy I'm using the PyGame framework. I'm really liking this environment as well. The double buffering makes for very smooth screen transitions.
So this leads me to my second milestone. I probably should have tried this a lot sooner, but today I copied the python script and images from my laptop to the target environment, a Raspberry Pi with the official 7" LCD touch display, and as can be seen in the image above it worked! First try! I have used other pieces of software that claim to be "cross platform", but you end up having to make small (sometimes large) tweaks to get your program working in each new environment. Not this time. I'm very impressed.
My next step is to get the finite state machine running and fully working with the UI, then I'll tackle integrating the camera piece that I already have working as a separate project.
-
TMD-2 Hardware
09/28/2020 at 03:20 • 0 commentsMy Raspberry Pi 4, camera, and 7" display arrived so I though I would get the hardware part of the build sorted. I designed and printed a stand for the Pi 4 and display.
![]()
![]()
I like the way that the the two components integrate, and don't believe in hiding anything, so it's open concept much like my Working Digital Computer design.
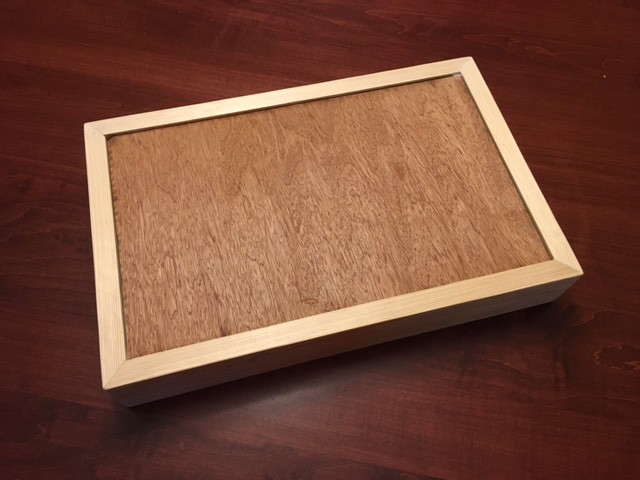
Next I built a base to hold the State "cards" and a legend with labels for each row.
![]()
![]()
A little white paint plus the addition of the printed State Transition Table pieces looks like this.
![]()
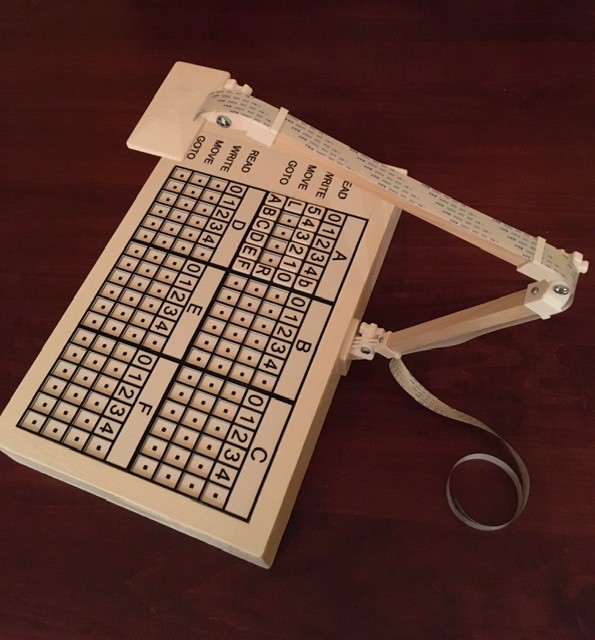
I found an articulated arm design by Chris Rogers (hackoholic) on Thingiverse. His motion capture rig is very similar to the base that I built so it's a good fit. The Raspberry Pi camera snaps snugly into the camera mount and the ribbon cable slides easily through the guides. Great design!
![]()
![]()
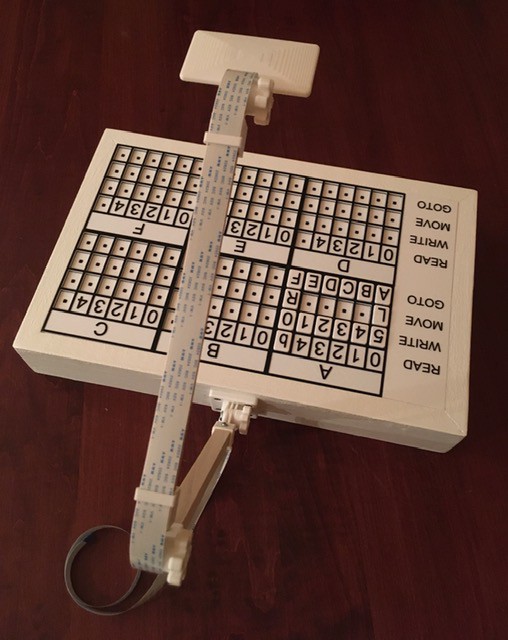
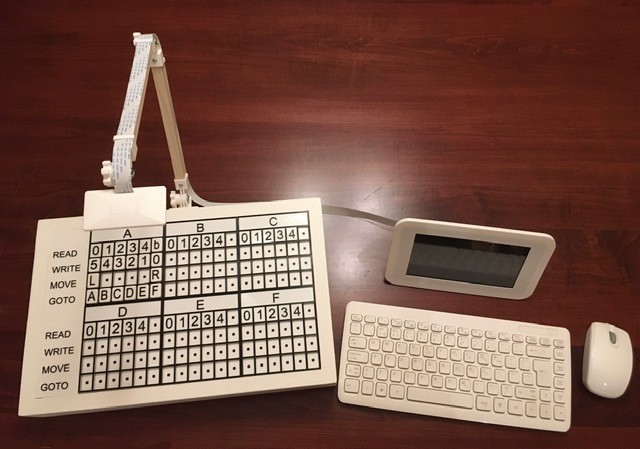
Finally I put the State Transition Table base camera together with the Pi and display. For development purposes only I have added a wireless keyboard and mouse.
![]()
So that's basically the TMD-2 hardware done. It's mostly a software project from here on in.
-
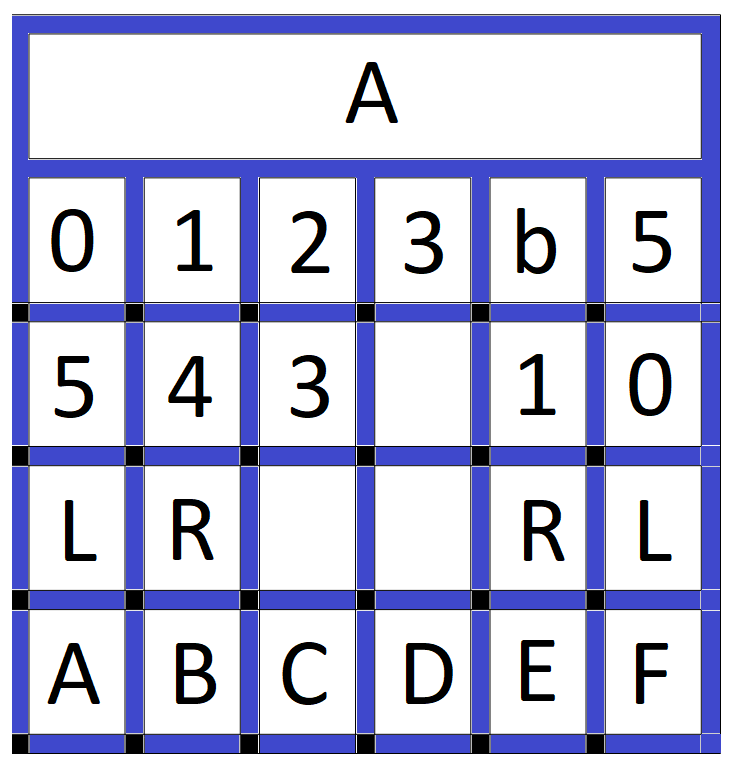
Testing the OCR With Some Real Tiles
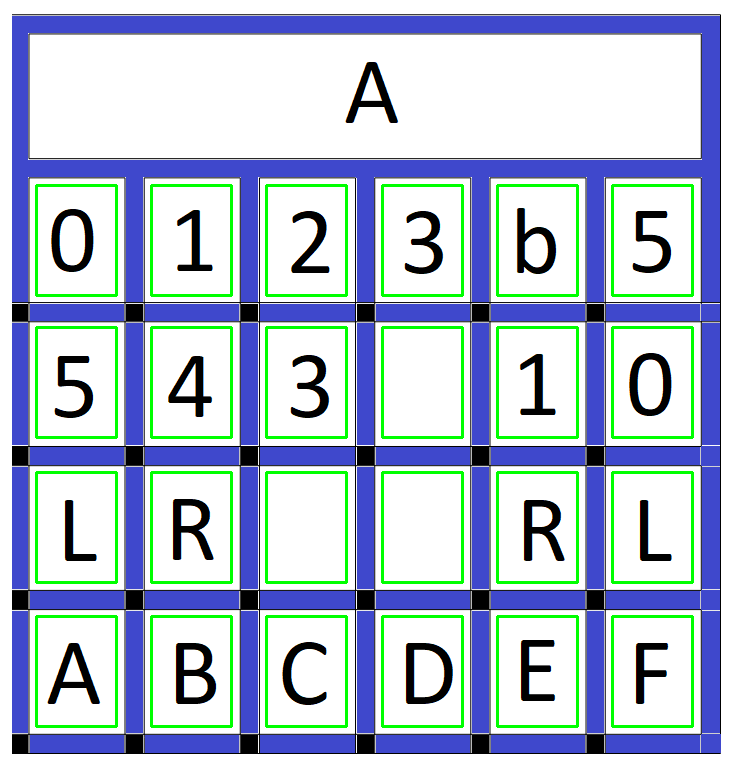
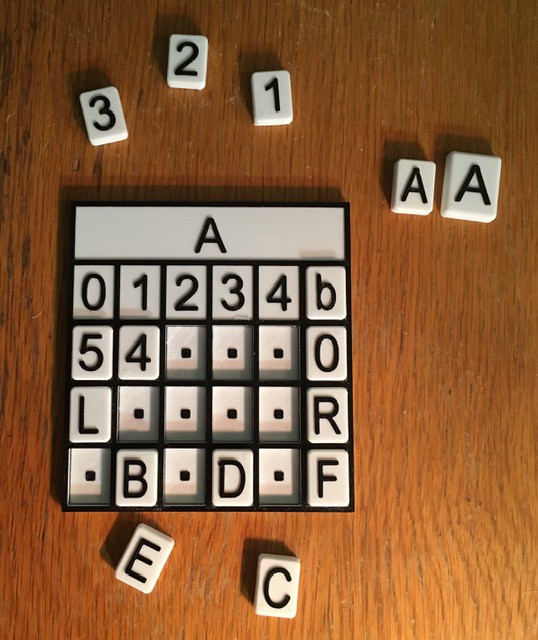
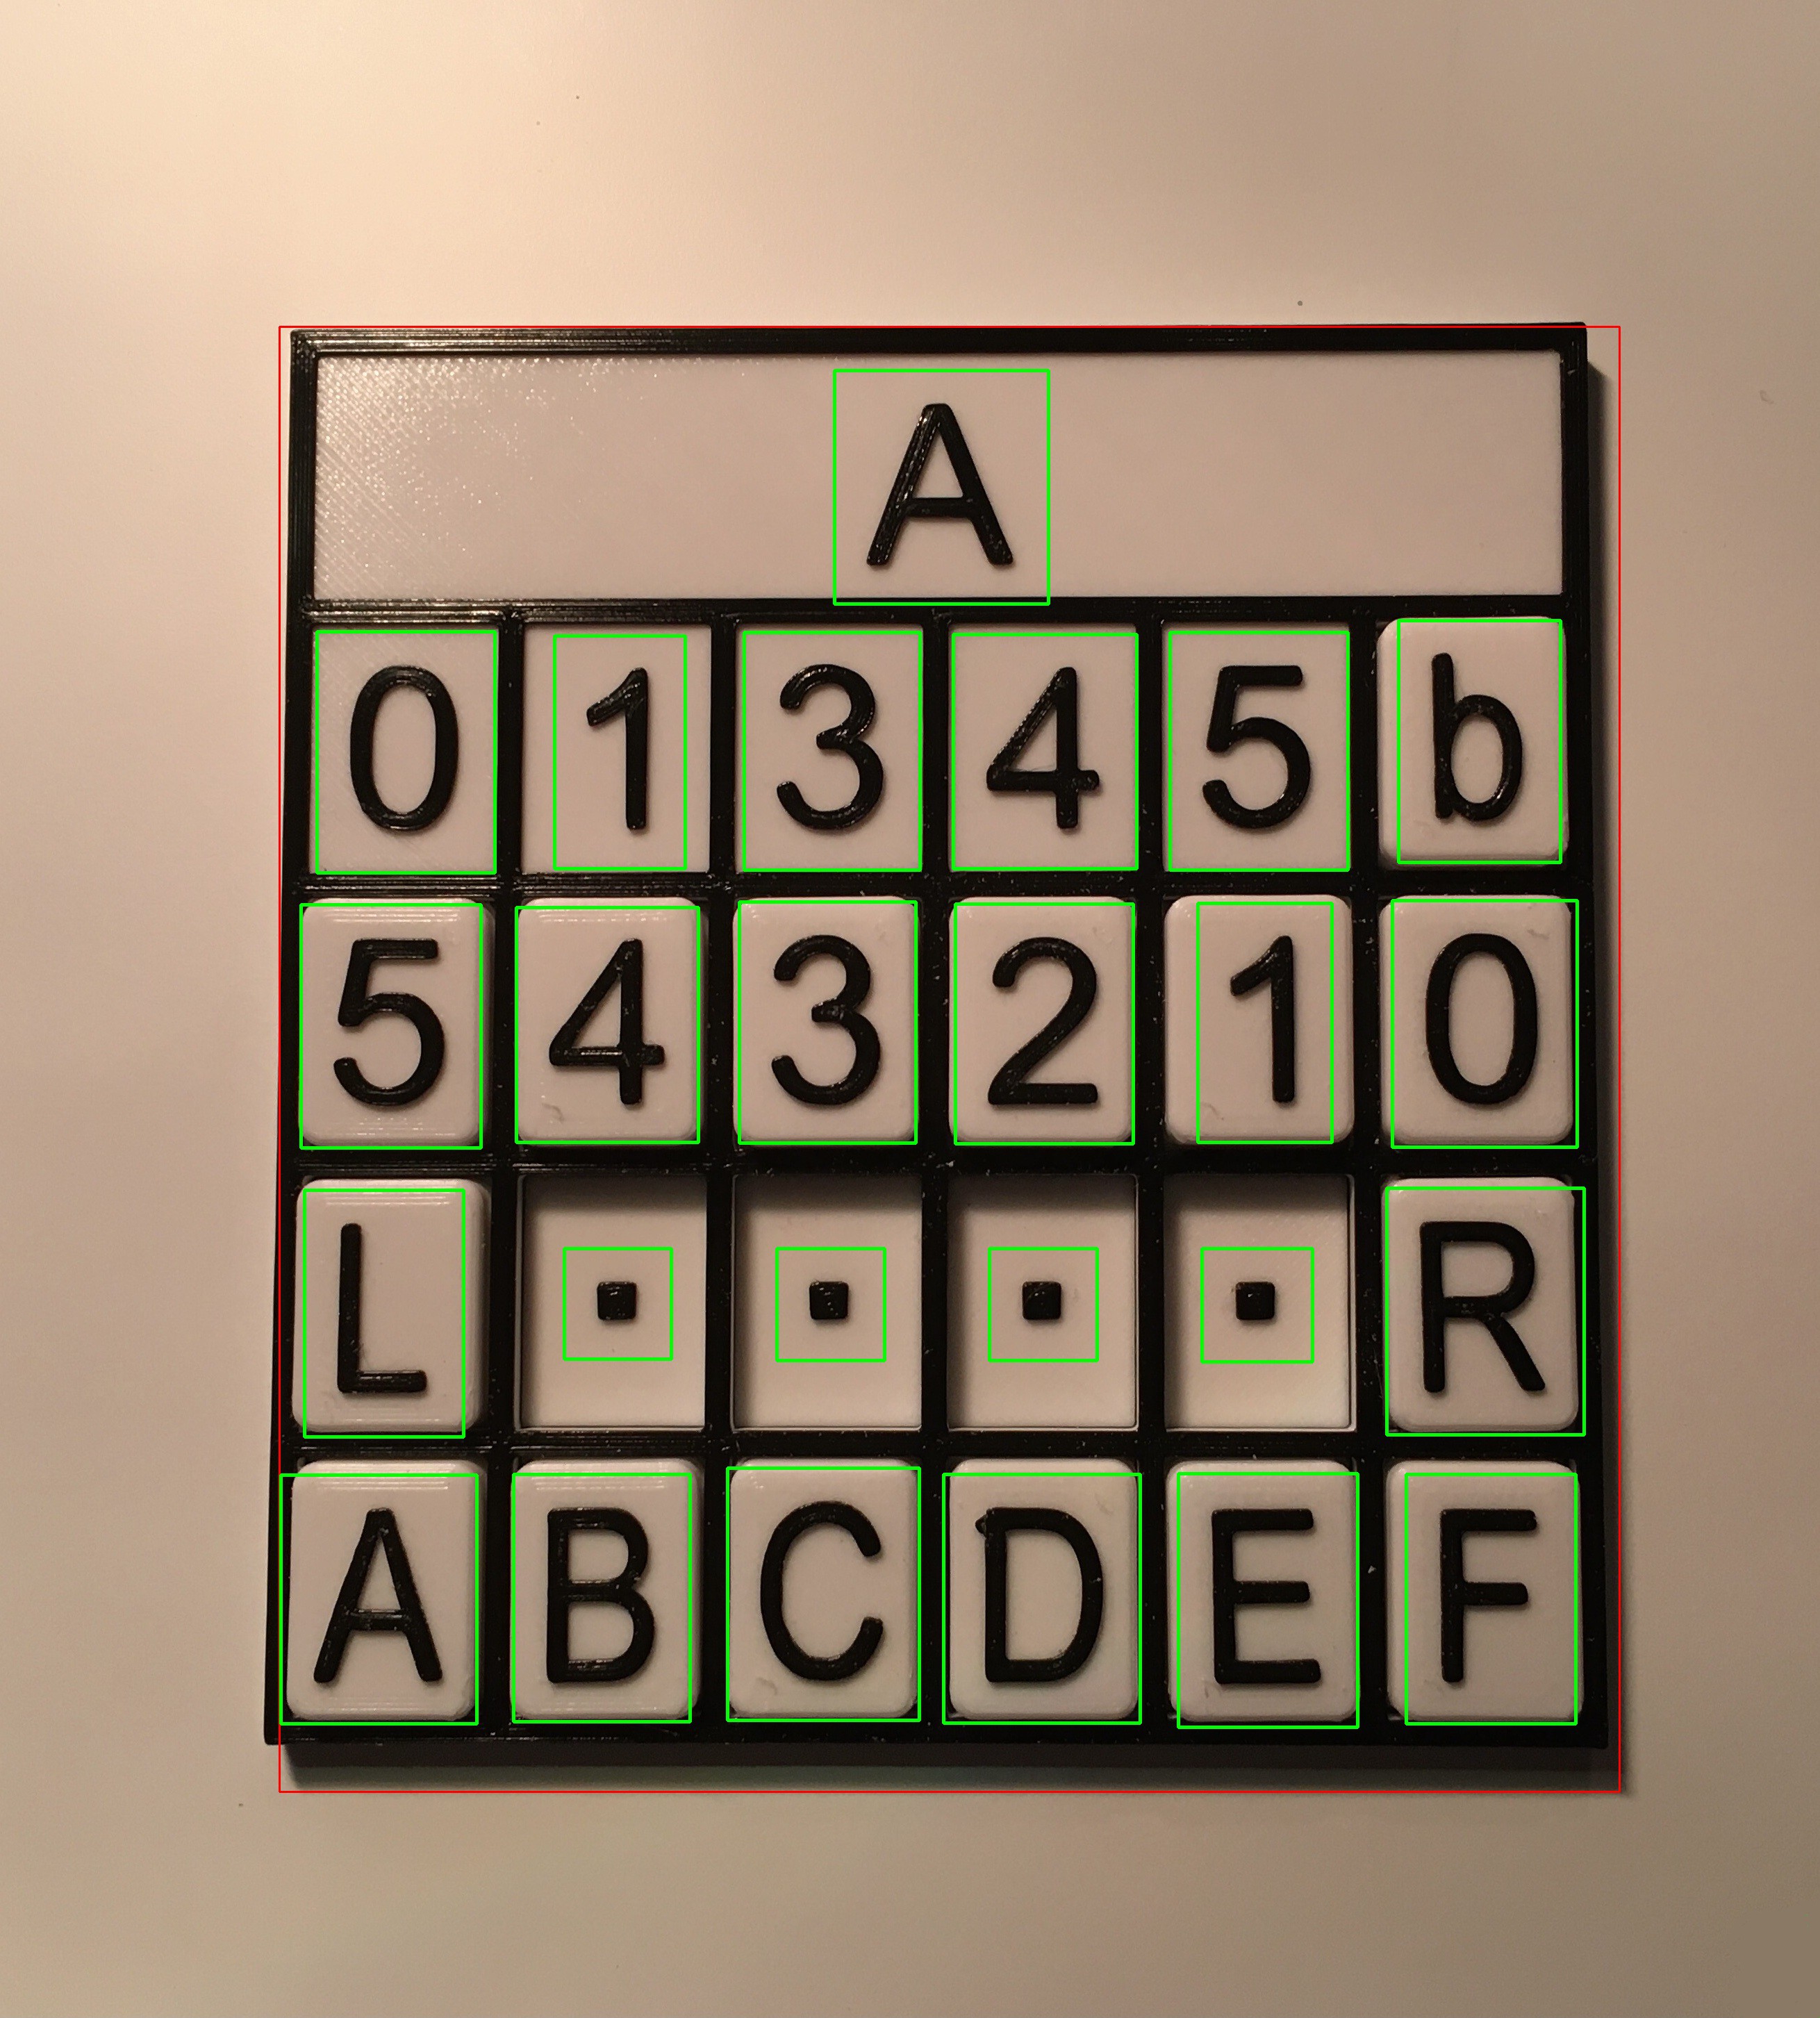
09/23/2020 at 17:26 • 0 commentsFor my last bit of OCR testing I wanted to use a photo of some real printed tiles on a printed base. So I created a single state "card" with rectangular indentations for tiles.
![]()
Since I will be combining six of these I wanted to scale things down as much as possible and still be useable. You can see the A tiles above for comparison, the larger being from TMD-1. The smaller tiles still feel pretty good and are easy to pick and place. Notice that the empty spots above have a square dot as a "place holder".
The Pi camera was not in yet so I just used my phone to take this shot.
![]()
The process is almost as before. One change is that I now identify where the black borders are around and between the "cells" and use a "flood fill" algorithm with white to eliminate them. Here is the resulting binary image:
![]()
Use dilation to eliminate the noise:
![]()
Edge detect the objects:
![]()
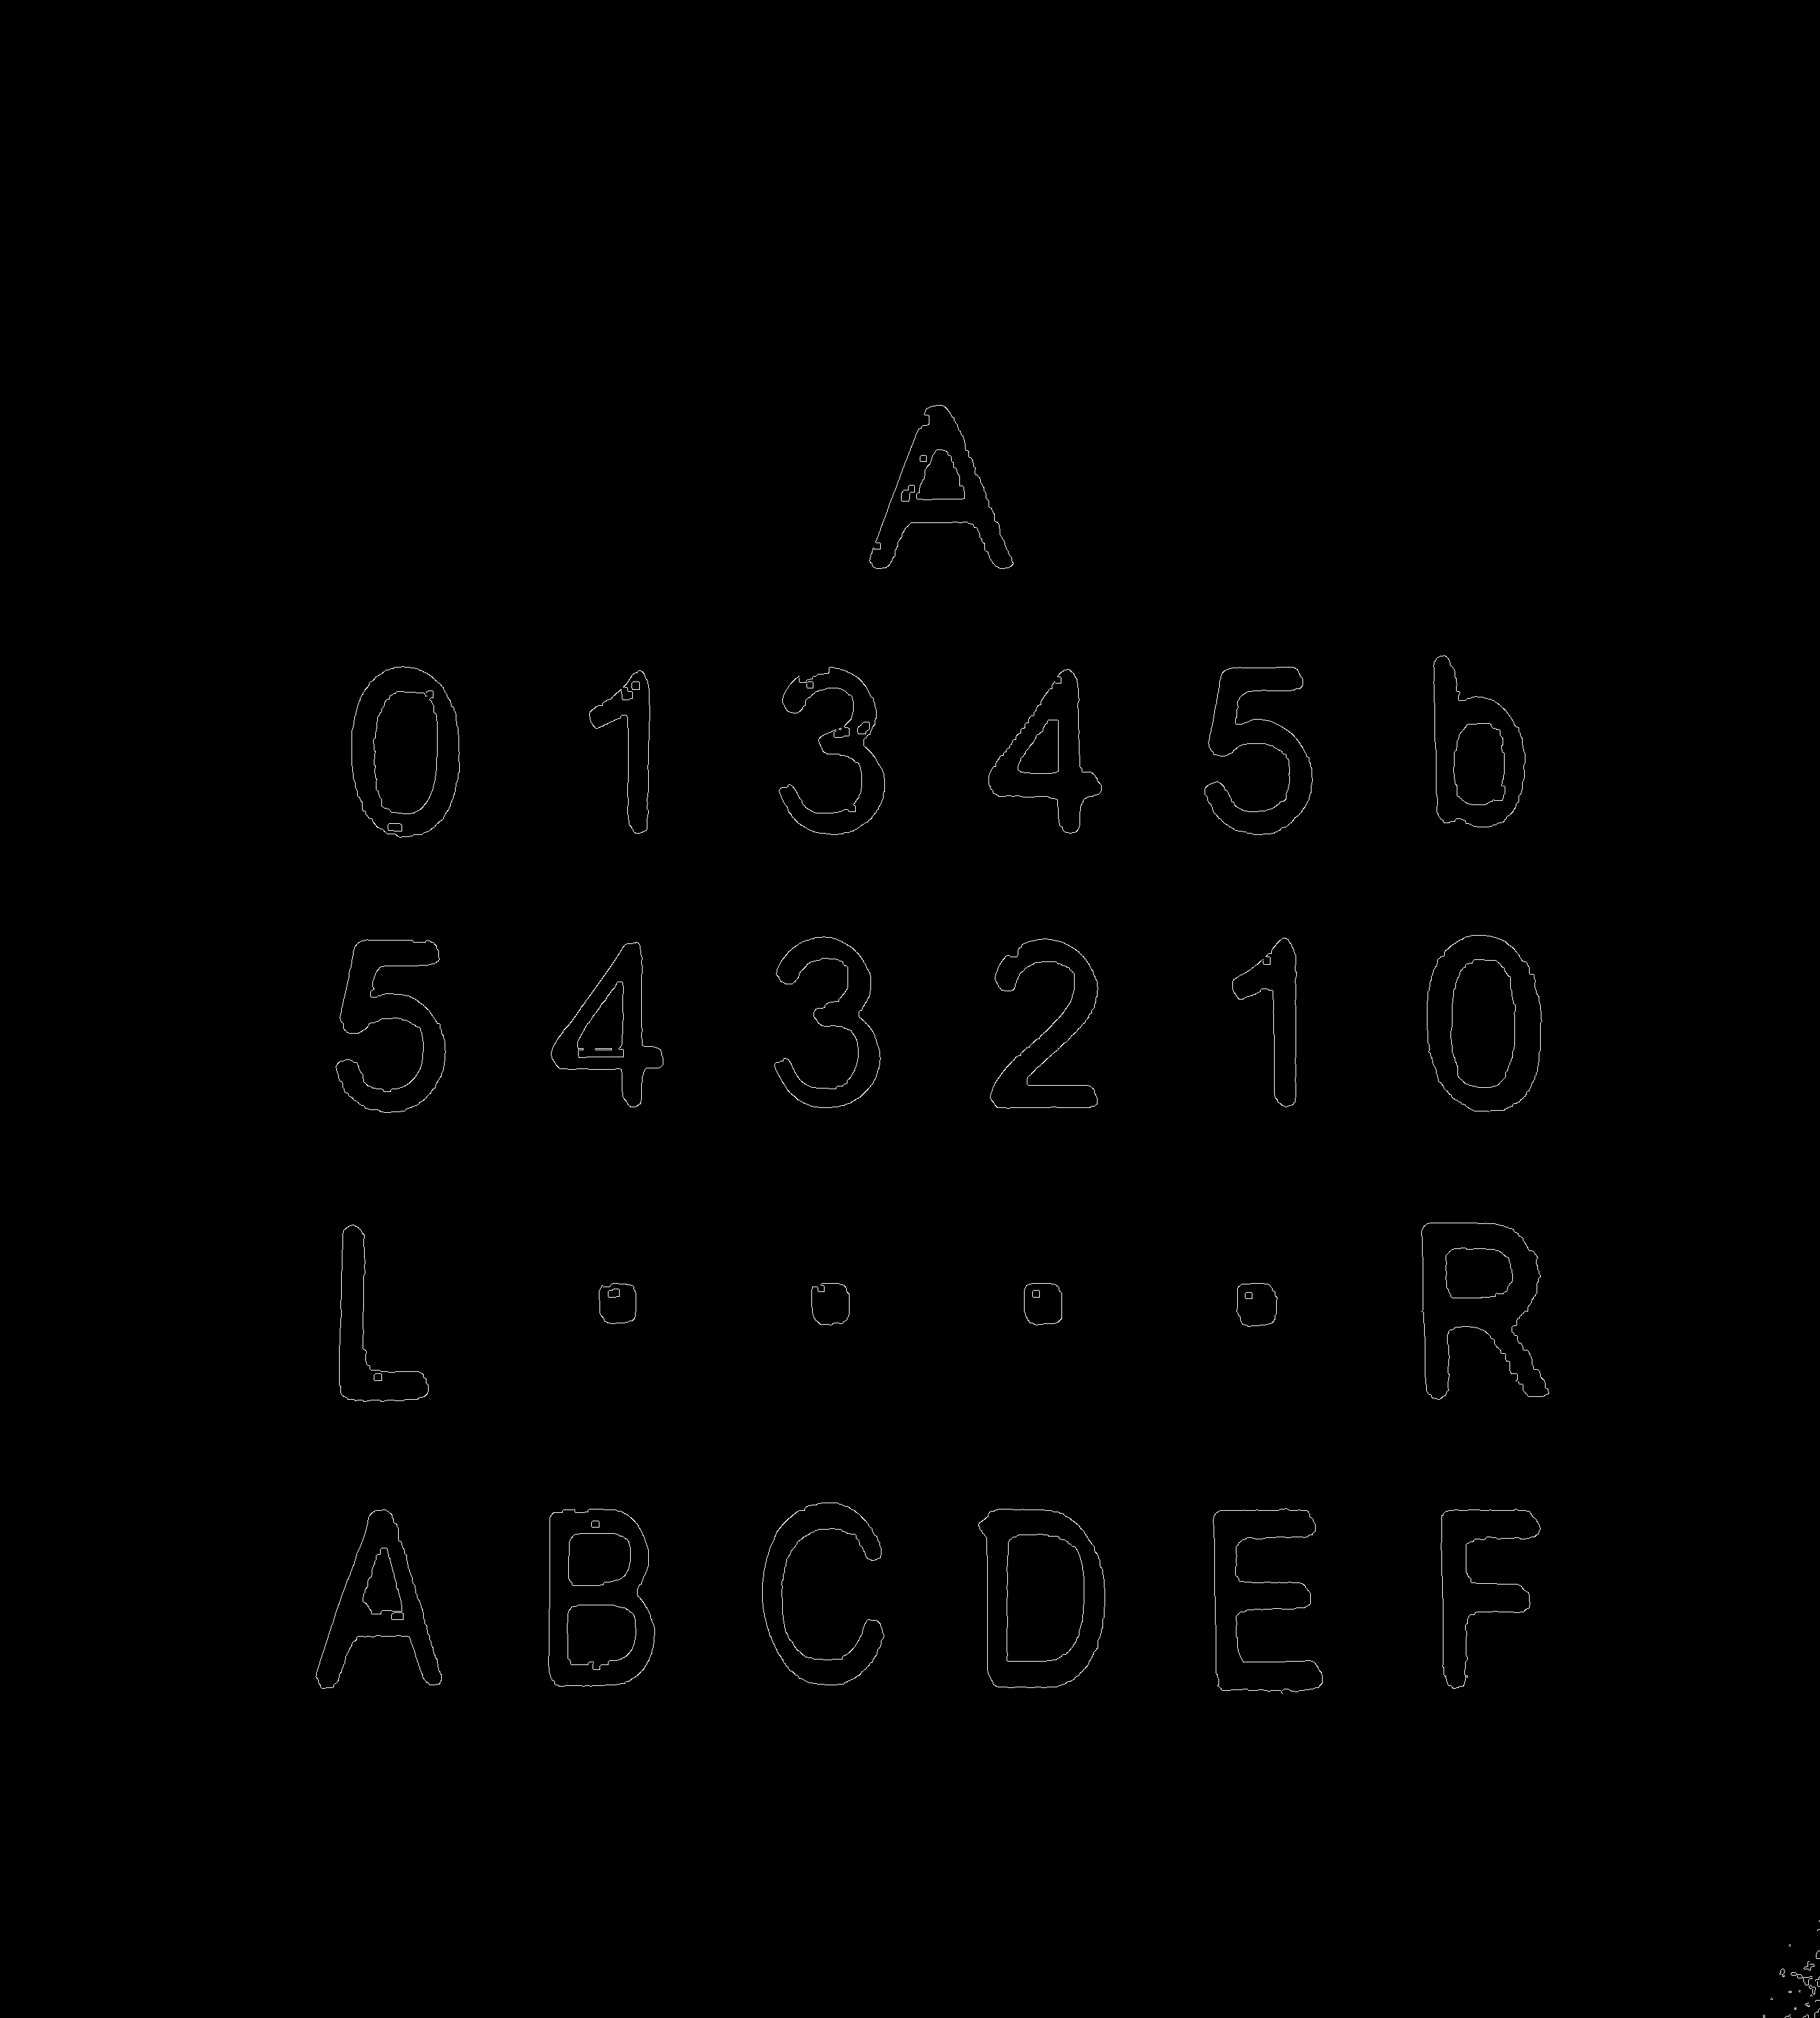
Then use contours to identify where the objects are:
![]()
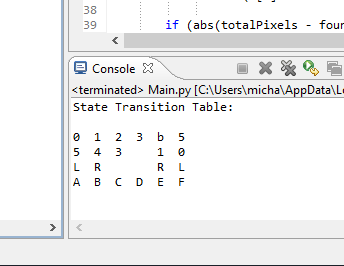
And the happy result after using Tesseract on each of the table cells:
![]() Since the size seems good I will print five more of these "cards" for states B, C, D, E, and F. I'll also make a legend down the side with each row's actions: Read, Write, Move, and Goto and combine them all on a base of some sort. I'll also have to figure out a way to mount the Pi camera above this base.
Since the size seems good I will print five more of these "cards" for states B, C, D, E, and F. I'll also make a legend down the side with each row's actions: Read, Write, Move, and Goto and combine them all on a base of some sort. I'll also have to figure out a way to mount the Pi camera above this base. -
Project Status Changed
09/23/2020 at 14:29 • 0 commentsI have done enough research to convince myself that I will be able to OCR the State Transition Table and reliably determine what tiles have been placed there. As a result I have decided to go ahead and build a 6-state / 6-symbol Turing machine. I have change the status from Research to an Ongoing project to reflect this.
-
More OCR Research
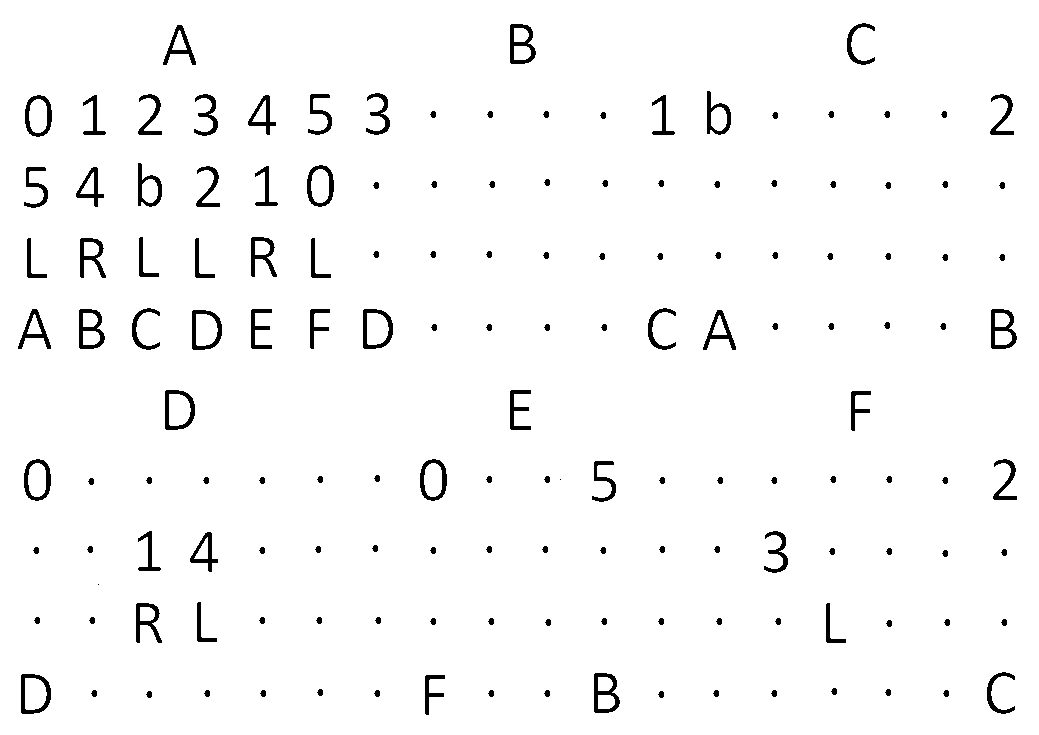
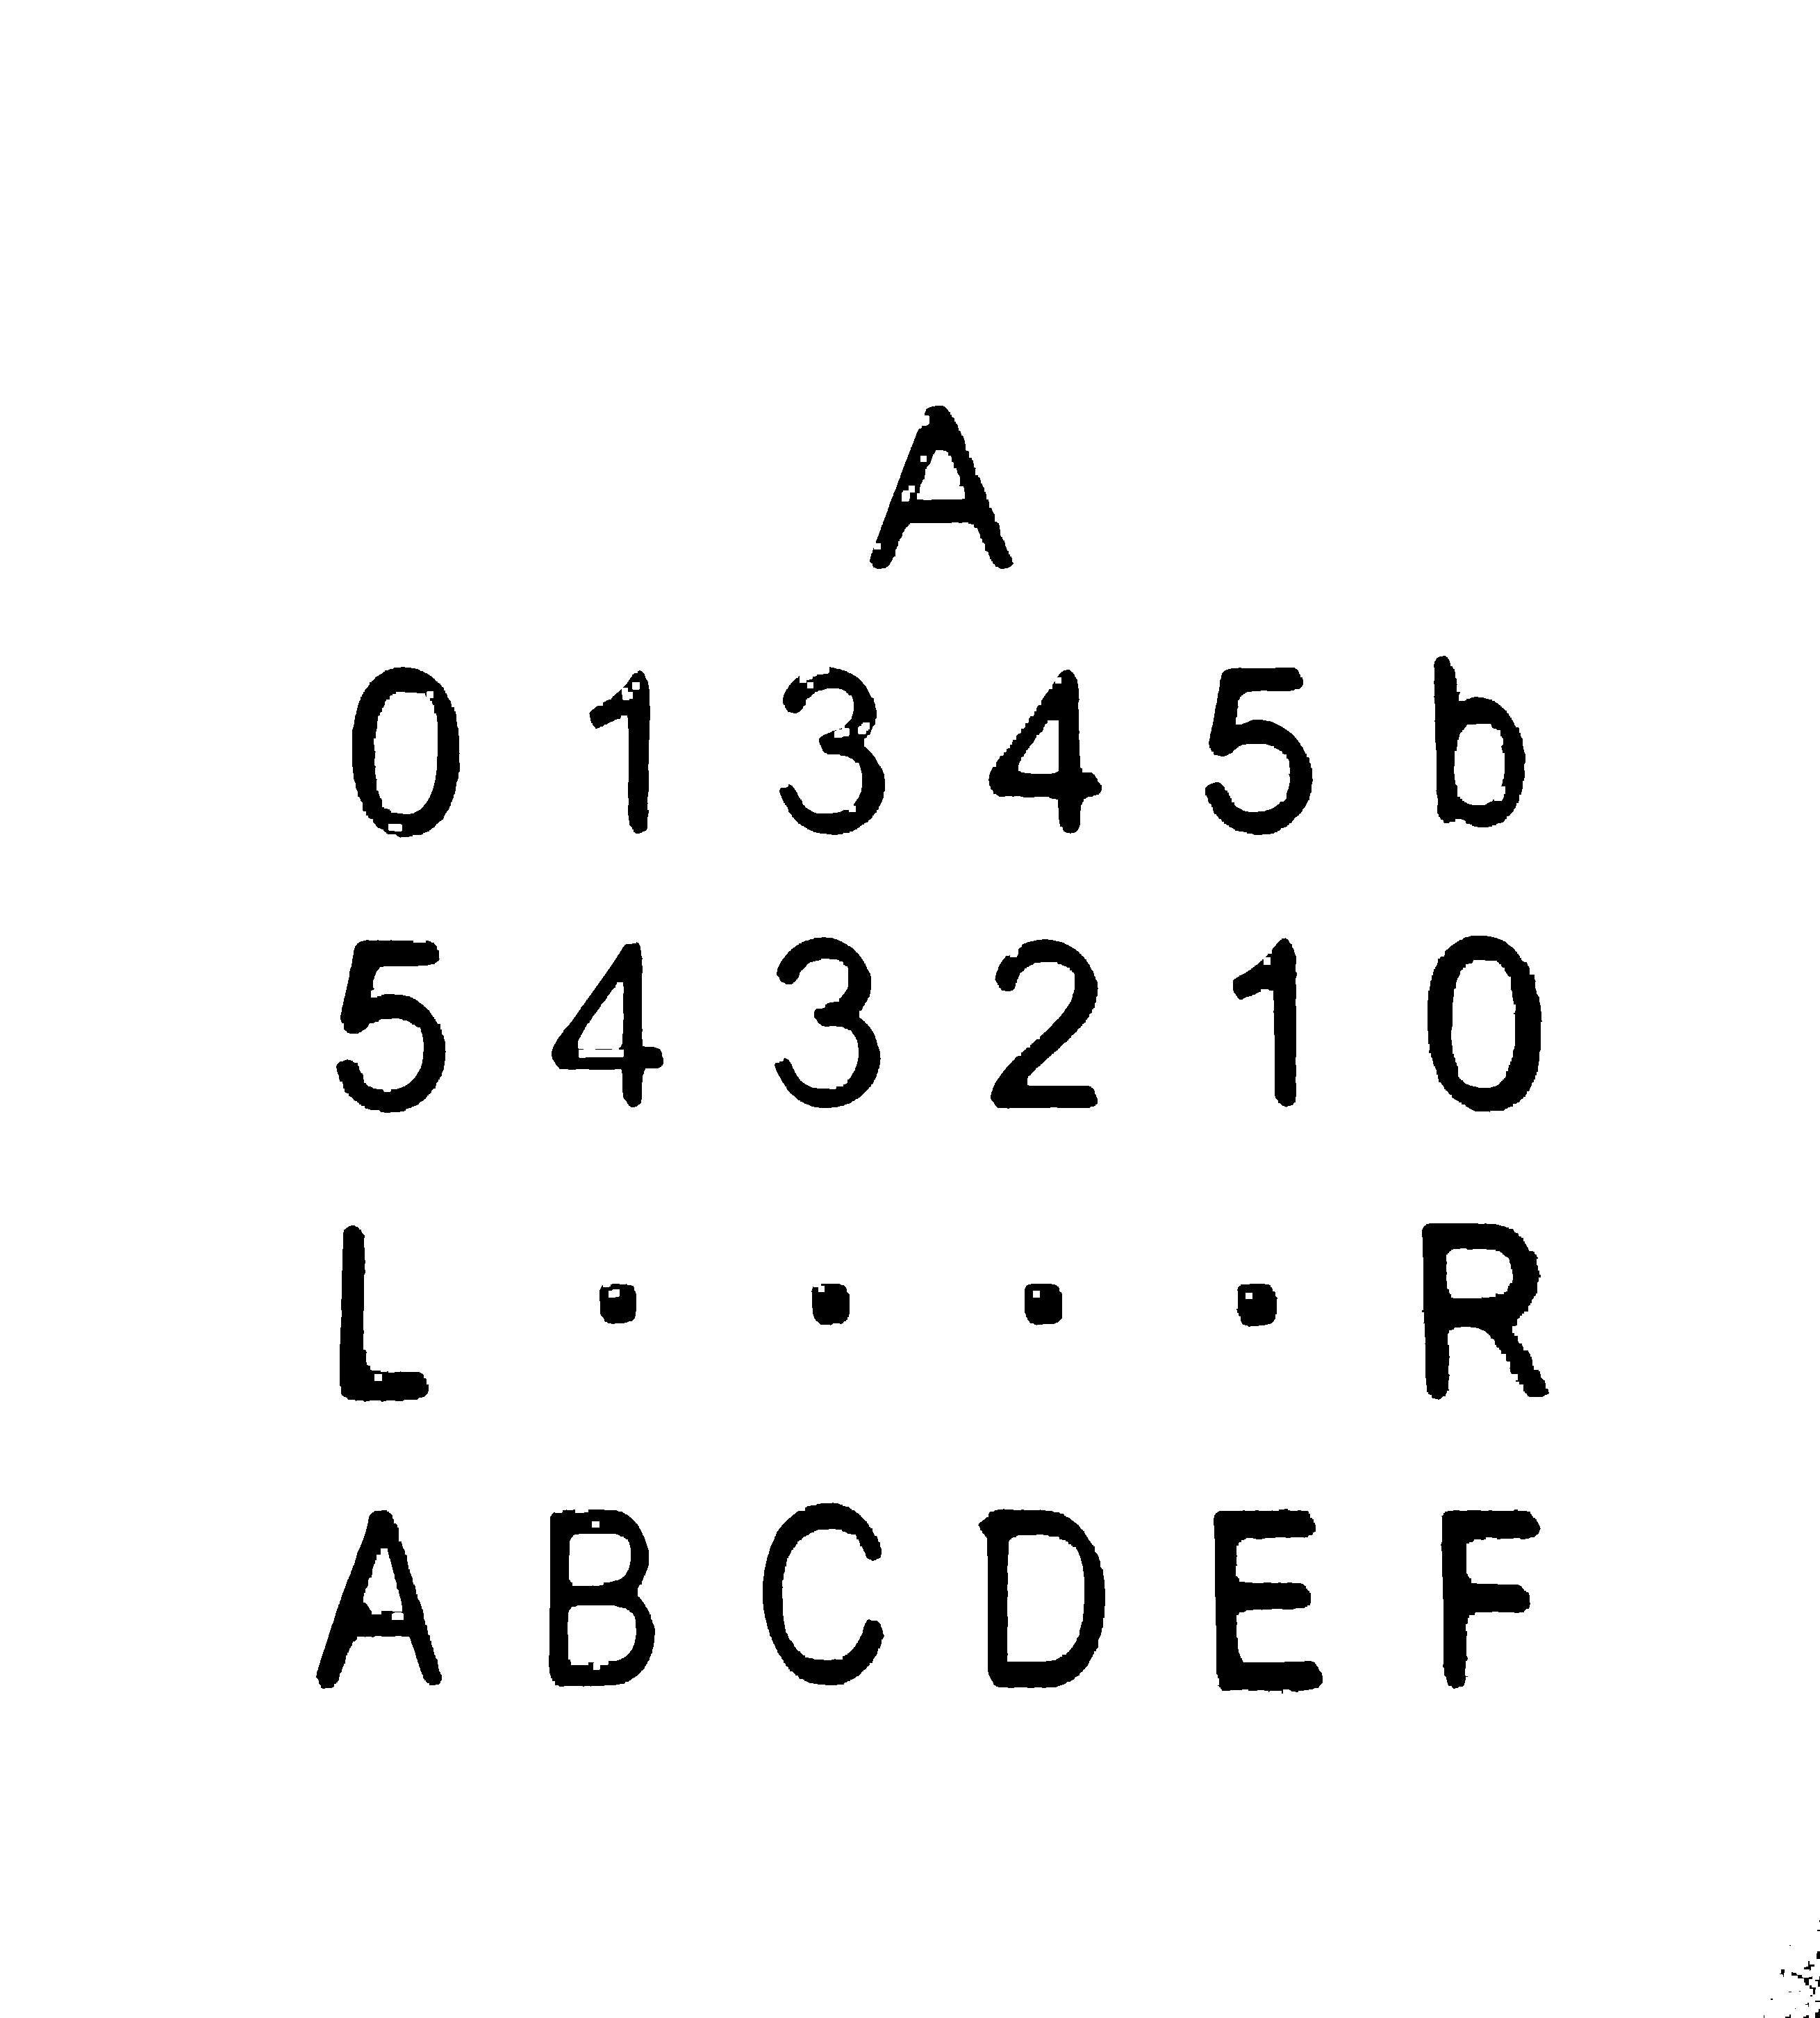
09/13/2020 at 20:30 • 0 commentsI created a new image that that I feel is more representative of what my 6-state / 6 symbol State Transition Table will look like:
![]()
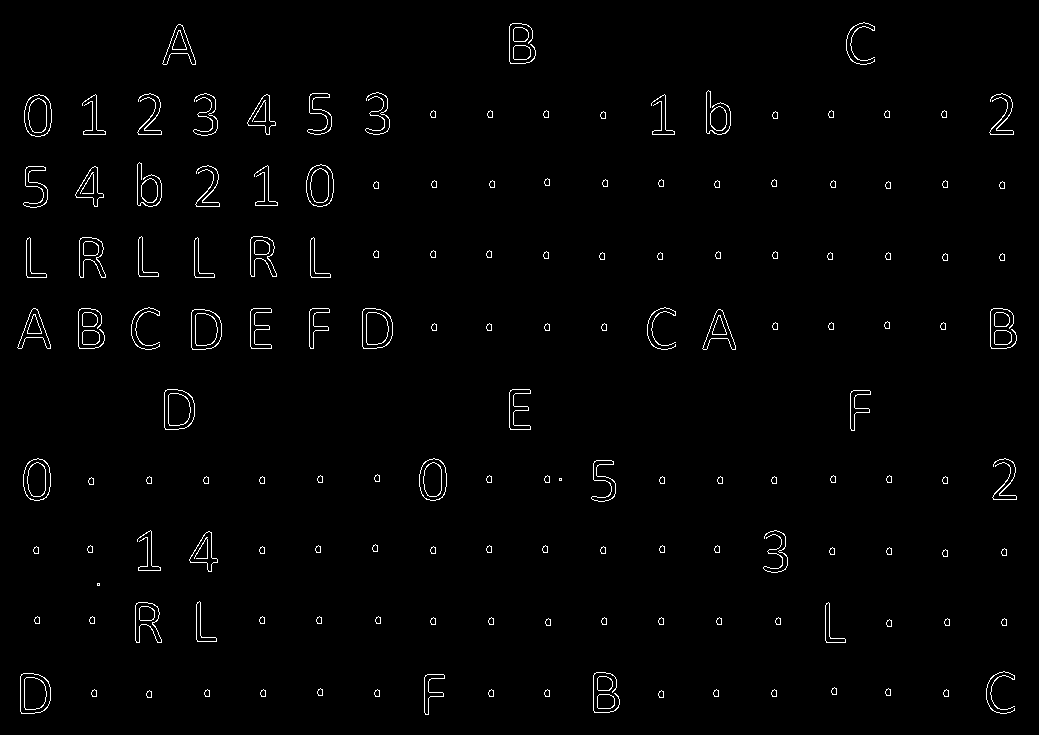
I revisited my idea of having a registration mark for each "Tile" when I realized that I could better identify the tile bounding boxes with contours alone. So here is what the binary image for the above looks like:
![]()
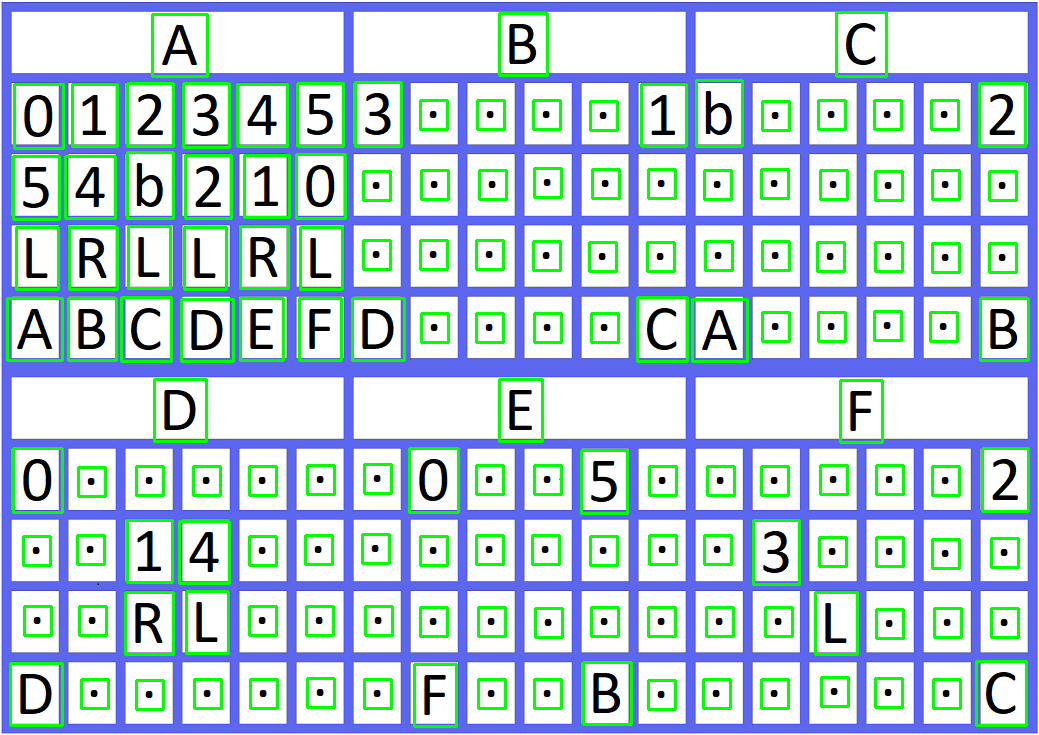
Now in order for this to work I needed to add a "dot" as a placeholder for the empty cells. I'm thinking these will be part of the "mat" that the tiles when placed will cover. The edge image:
![]()
So now when I use findContours I end up with the following bounding boxes around the tiles:
![]()
When I pass these sub images to Tesseract, based on the binary image above, I get the following result:
![]()
So the first image above will be printed to scale (when I can get to the color printer at kwartzlab), imaged with the Raspberry Pi camera, and I'll try this process with the photo. I expect that I will have to do considerably more working cleaning up the photo. We'll see.
-
Kicking Some OCR Ass
09/11/2020 at 23:40 • 0 commentsI spent some time working in my Liclipse environment with Tesseract, opencv, and numpy under Python. I'll spare you the false starts and head scratching and describe what I came up with so far.
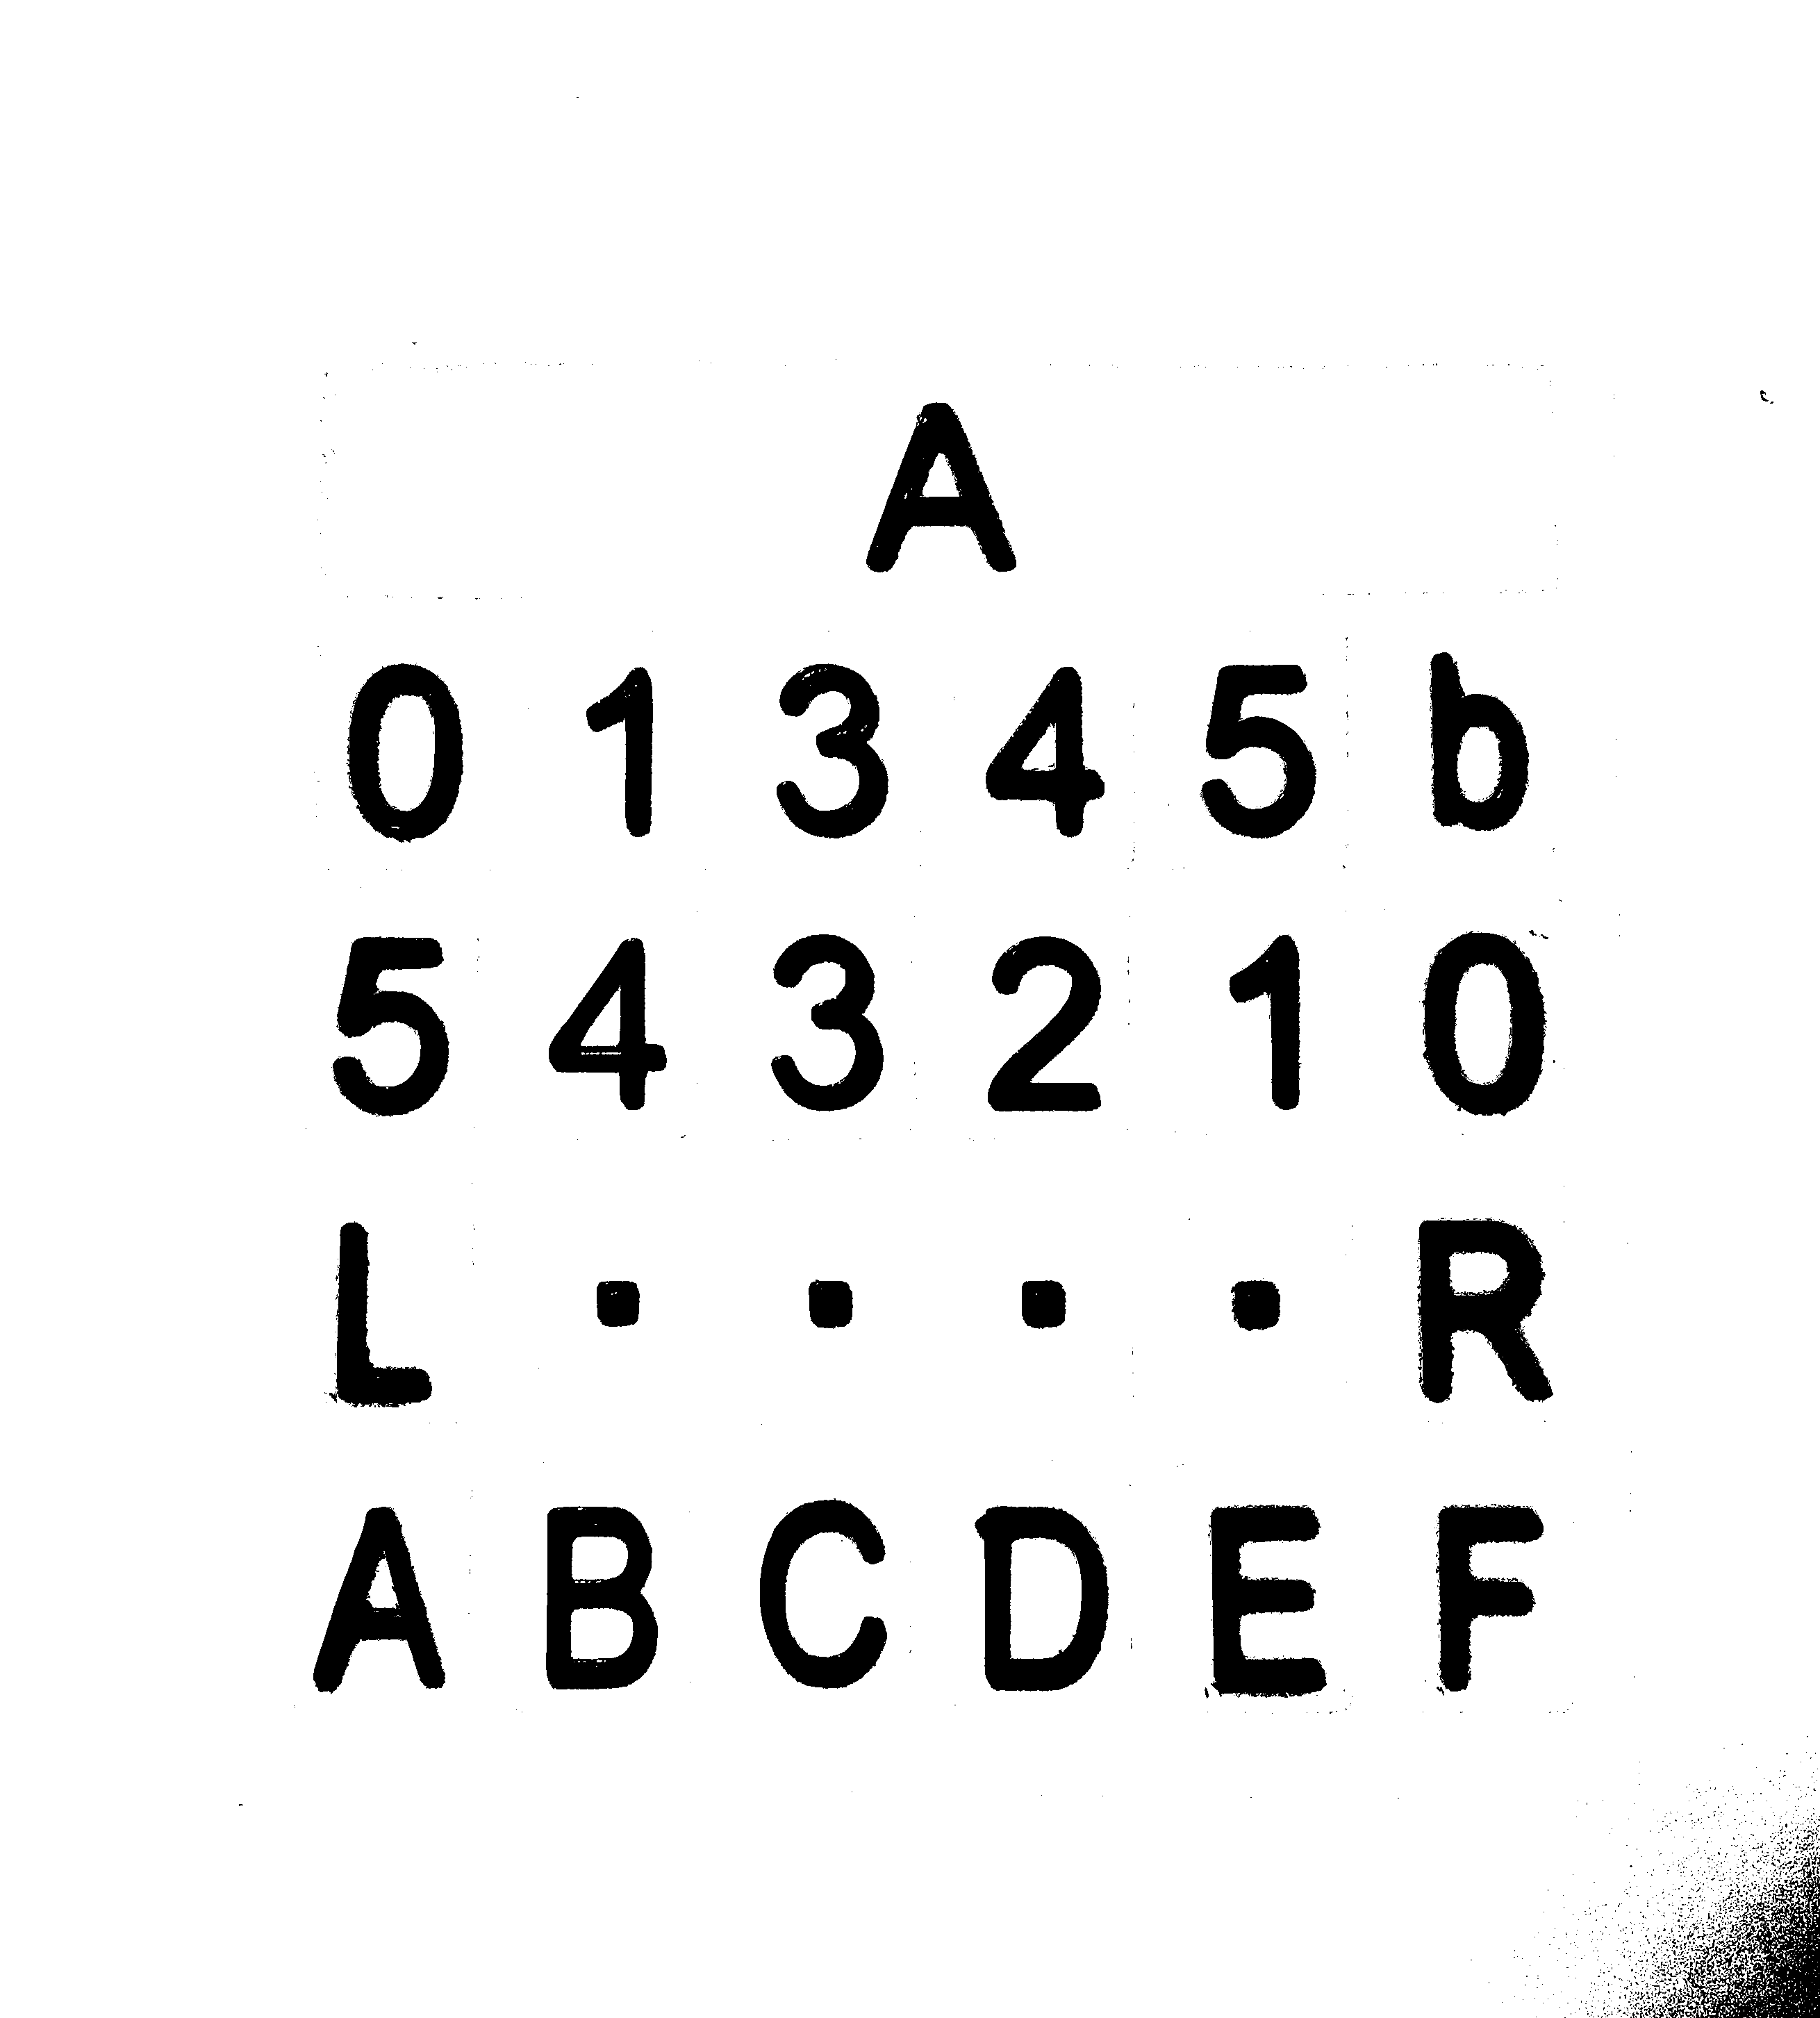
I started by creating a test image to work with. This is a slightly tweaked version of the original that had black squares along the right hand edge in addition to the others. You can see where they were. The black squares are "registration" marks that will help me identify where to find the "Tiles". There will be a black square at the lower left hand corner of each tile.
![]()
I converted this image to binary, using a fairly aggressive threshold to eliminate all but the white and black pixels. At this point I just care about the registration marks.
![]()
Some noise in the form of the thin black lines was introduced because of the way the the test image was created. At any rate I used a dilate function to eliminate any noise.
![]()
Then I applied edge detection to the dilated image.
![]()
Using a findContours function on these edge lines produces a list of all the "objects" in the image including all the registration marks. I can then check this list to identify just the registration marks. I use the size of each object's bounding box to tentatively identify a registration mark, then verify the selection by ensuring that the pixels in the bounding box are all black. I check my selections of verified registration marks by drawing a box around the tiles that they anchor. These tile bounding boxes are saved to another list.
![]()
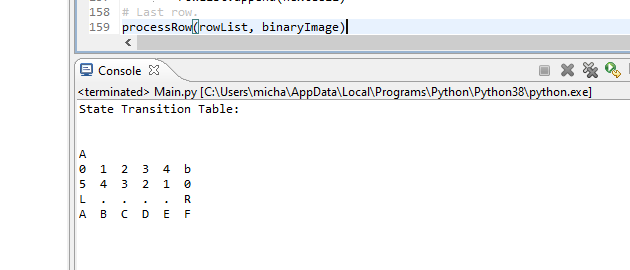
It's Tesseract time. I sort the verified tile bounding box list first by the y position, then the x position. This gives me the tiles in the proper row and column order. Then I pass the sub-image for each tile in sorted order (from the binary image above) to Tesseract. I tell Tesseract that the image passed is a single character plus pass a list of what the valid characters should be (012345bLRABCDEF). Here is the result:
![]()
So I was pretty successful. Quite happy. Here is the test code:
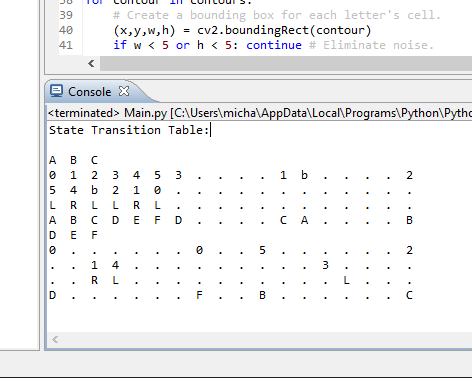
import pytesseract
import cv2
import numpy as np

# Get the original image to work on.
image = cv2.imread(r'C:\\Prusa\\TMD-2\\Single State Transition Table Test.png')

# Convert to binary.
ret, binary_image = cv2.threshold(image,10,255,cv2.THRESH_BINARY)
cv2.imwrite(r'C:\\Prusa\\TMD-2\\Binary Image.png',binary_image)

# Dilate to get rid of any noise.
kernel = np.ones((5,5), np.uint8)
img_dilated = cv2.dilate(binary_image, kernel, iterations=1)
cv2.imwrite(r'C:\\Prusa\\TMD-2\\Dilated Image.png', img_dilated)

# Do edge detection on the remaining what left.
edged = cv2.Canny(img_dilated, 30, 200)
cv2.imwrite(r'C:\\Prusa\\TMD-2\\Edged Image.png', edged)

# Find the contours of the edged image objects.
contours, hierarchy = cv2.findContours(edged, cv2.RETR_EXTERNAL, cv2.CHAIN_APPROX_SIMPLE)

# Now we can find all the small squares and use them to determine the
# values in the cells of the state transition table.
custom_config = r'-c tessedit_char_whitelist=012345bLRABCDEF --oem 0 --psm 10'
cellList = []
for contour in contours:
    (x,y,w,h) = cv2.boundingRect(contour)
    if (w >= 13 and w <= 17 and h >= 13 and h <= 17):
        # Right size but is it all 'black'?
        totalPixels = w * h
        foundPixels = 0
        for i in range(h):
            for j in range(w):
                k = binary_image[y+i,x+j]
                if (k[0] < 10 and k[1] < 10 and k[2] < 10): foundPixels +=1

        if (abs(totalPixels - foundPixels) < 10):
            # All or mostly black. Probably a registration point. Show it on original image.
            cv2.rectangle(image, (x+w+10,y-10), (x+w+90,y-120), (0,255,0), 2)

            # Create a list of all the cells where tiles can be found.
            cellList.append((x+w+10, y-120, x+w+90, y-10))

# Show where I think all of the cells in the state transition table are.
cv2.imwrite(r'C:\\Prusa\\TMD-2\\Cells Image.png', image)

# Sort the cellList by row then column and extract the tile values.
lasty = 0;
print('State Transition Table:')
for cell in sorted(cellList , key=(lambda k: [k[1], k[0]])):
    if (abs(cell[1]-lasty) > 100): lasty=cell[1]; print() # row changed
    cell = binary_image[cell[1]:cell[3], cell[0]:cell[2]]
    cell_value = (pytesseract.image_to_string(cell, config=custom_config)).strip()
    print('{:2s}'.format(cell_value),end =" ")

# Wait for key press before destroying windows.
cv2.waitKey(0);
cv2.destroyAllWindows()
My next step will be to produce a "to scale" paper representation of a full 6-state / 6-symbol State Transition Table. I'll take a photo of it and see if I can accurately read the tiles.
-
What Technologies?
09/11/2020 at 21:28 • 0 commentsHaving decided to at least try using OCR, and Tesseract specifically, I need to decide what I'm going to run my new machine on. Throw in the requirement that, if all goes well, I will have to take a picture of the State Transition Table of my larger machine to apply the OCR to, and I'm coming up Raspberry Pi. It doesn't hurt that Pis are well understood and supported by the maker community. A quick search for "tesseract and raspberry pi" turns up a lot of relevant howtos on making this work.
Thinking ahead, my new 6-state / 6-symbol Turing machine will need a way to present the Tape. Since the cells can now contain six (maybe seven ;-) different symbols, a mechanical solution is pretty much out of the question (sorry Flip-Bit). So that leaves 7-segment displays or an LCD of some sort. I'm opting for the Official Raspberry Pi 7" Touchscreen LCD. It's been well reviewed, has for sure hassle-free integration with the Pi, and the touchscreen will give me a lot of flexibility when creating a UI.
So my target runtime environment will be a Raspberry Pi, Official 7" Touchscreen LCD, and a Raspberry Pi Camera module. I'm looking forward to really working with the Pi. It's not like I don't have a bunch of them already running OctoPi, OSMC, OpenMediaVault, and MAME. It's just that those are all distributions that are easily installed and setup. Parts are ordered.
Getting back to running Tesseract on the Pi, all of the howtos suggest using the following software stack:
- Python
- opencv
- tesseract-ocr
- libtesseract-dev
- pytesseract
That sounds good to me. I have never done Python development before so that will be fun.
Since all of the above software is cross platform I have decided to at least start development on my Windows machine. I have installed my old friend Eclipse (the Liclipse distribution) with all of the aforementioned software. Ready to kick some OCR ass.
-
Keeping the Tile Interface?
09/11/2020 at 16:44 • 0 commentsIMHO the best part of TMD-1 is the tile interface. Programming the machine by filling out the State Transition Table with "special" tiles feels natural, something about the tactile nature of the process I guess. It's also a lot of fun. I've had a few people run through the Quick Start Guide on my TMD-1 and they all agree: easy and fun. So if at all possible I would like to keep using tiles.
Keeping the tile interface with the larger machine does have some serious issues however, the biggest of which is that the technology that I used to "read" the tiles does not scale well. It took 33 Hall Effect Sensors to interpret the 24 tiles on the State Transition Table for TMD-1. A 4-state / 4-symbol machine would require 88 sensors, and my 6-state / 6-symbol machine would need 252 sensors. At about $2 apiece it adds up pretty quick, not to mention the wiring nightmare. Clearly this will not work. I need a better way.
To keep the State Transition Table layout down to a reasonable size with a 6-state / 6-symbol machine, the tiles themselves will have to be significantly smaller that those on TMD-1, as much as one quarter the size perhaps. I think that this would rule out something like NFC or RFID. The tags would just be too close together and even if they were not, you would have to implement a mechanism to move a reader across each tile. Still need a better way I think.
Newspaperman5: suggested: "My only viable solution would be to place 2 electrodes on each block with a resistor in it, and then reading the resistance, but that makes block-production pretty complicated compared to just placing a magnet or 2 in them, and I’m not sure how reliable it would be". Interesting idea, but I must say that I agree with his comments about block-production and reliability. Also for larger machine you would still have to somehow route 252 inputs into analog pins on the controlling CPU.
About the only thing that I can think of that might work is Optical Character Recognition (OCR). Mount a camera above the State Transition Table matrix, take a picture, and process the resulting image. In a past life I had the opportunity to work with Tesseract. An OCR engine originally developed by Hewlett-Packard as proprietary software in the 1980s, Tesseract was released as open source in 2005 and development has been sponsored by Google since 2006. Having used the software, I am fully aware of its limitations. While it works quite well at deciphering and extracting the text from say the page of a book, a letter, or other similar documents, one often gets poor results when trying to read from a structured layout like say a "State Transition Table". Still I am pretty confident that I can get it to work.
-
Why Another Turing Machine Project?
09/11/2020 at 02:09 • 0 commentsThis started with a comment made by Newspaperman5: "Sweet! I would love a smaller and/or more capable version of [TMD-1] as a desk toy!", and it made me realize that I did too! I loved messing around with TMD-1. The tile interface is fun to use. There is enough there for educational purposes but I found that I am wanting more.
In this next iteration I will try to bring forward the simple to use, easy to understand, principles from TMD-1, but the emphasis will definitely be on increasing the overall functionality.
I'm thinking a 6-state / 6-symbol machine would be a good target. With it for instance, you could explore the 5-state / 2-symbol "busy beaver" problem for which there is still no definitive solution. Pretty cool.
So that's the why, and a little bit of the what, so now I just have to figure out the how.
TMD-2: Turing Machine Demonstrator Mark 2
Build a Turing machine based on TMD-1 but with support for more states and symbols.


 Since the size seems good I will print five more of these "cards" for states B, C, D, E, and F. I'll also make a legend down the side with each row's actions: Read, Write, Move, and Goto and combine them all on a base of some sort. I'll also have to figure out a way to mount the Pi camera above this base.