Close
0%
0%

Nemo 2

Volumio based Network Streamer

Public Chat
Similar projects worth following
Network streamer running Volumio based on a Raspberry Pi + DAC. Contains special hardware for minimalist system status display.

Intro

Inspired by an existing project to play music on a Raspberry Pi using DLNA , I created Nemo, a simple network audio streamer. While it works just right, it uses a 5$ USB "channel booster", which leaves a lot to desire in the sound department (although it sounds better than the Pi onboard sound).

It's both time to up the audiophile ante a bit, and a good excuse to kick off a new project.

Welcome to NEMO 2.

Requirements

The idea was to build a device with the following key requirements:

  • Sub $100. Beyond this price point, I might as well buy a (basic) streamer, and where's the fun in that?
  • As audophiliac as one can get within this budget.
  • Wired ethernet connection.
  • DLNA compatible.
  • Minimalist design that also must be a nice fit with rest of stereo.
    • HiFi form factor (430mm width).
    • Connectors and buttons on the back.
    • Status feedback using a single LED.

These requirements led to the following design.

Hardware

  • Raspberry Pi 2 Model B.
  • HiFiBerry Dac+ Pro.
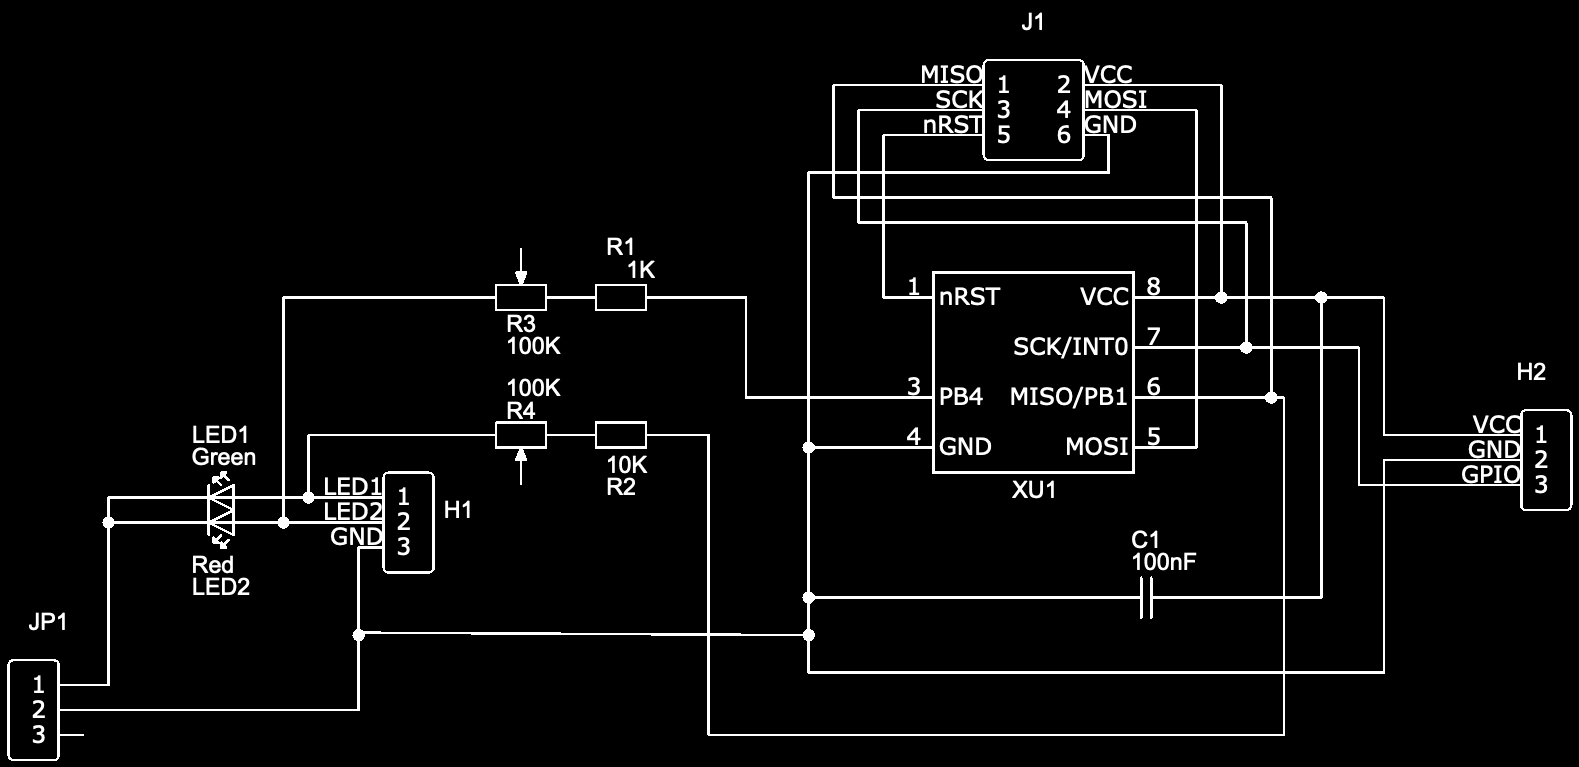
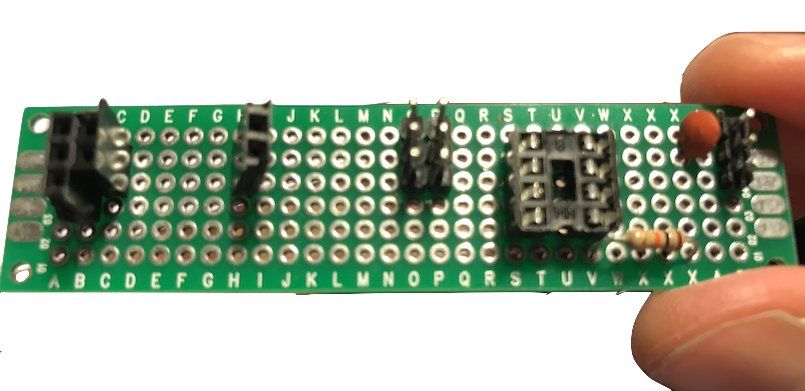
  • ATTiny85 to drive status LED.
  • Meanwell SNT RS switched power supply.
  • Old CD player case.

Software

  • Volumio.
  • Custom firmware for ATTiny85.
  • Some scripts added to Volumio install.

Block Diagram

The block diagram shows the system (the big dotted rectangle) and the parts with which it interacts. The core concept is a DLNA setup running in the local network. A Raspberry Pi fitted with a DAC running Volumio serves as the renderer, the VolumioApp as the control point and my trusty Synology NAS as the media server.

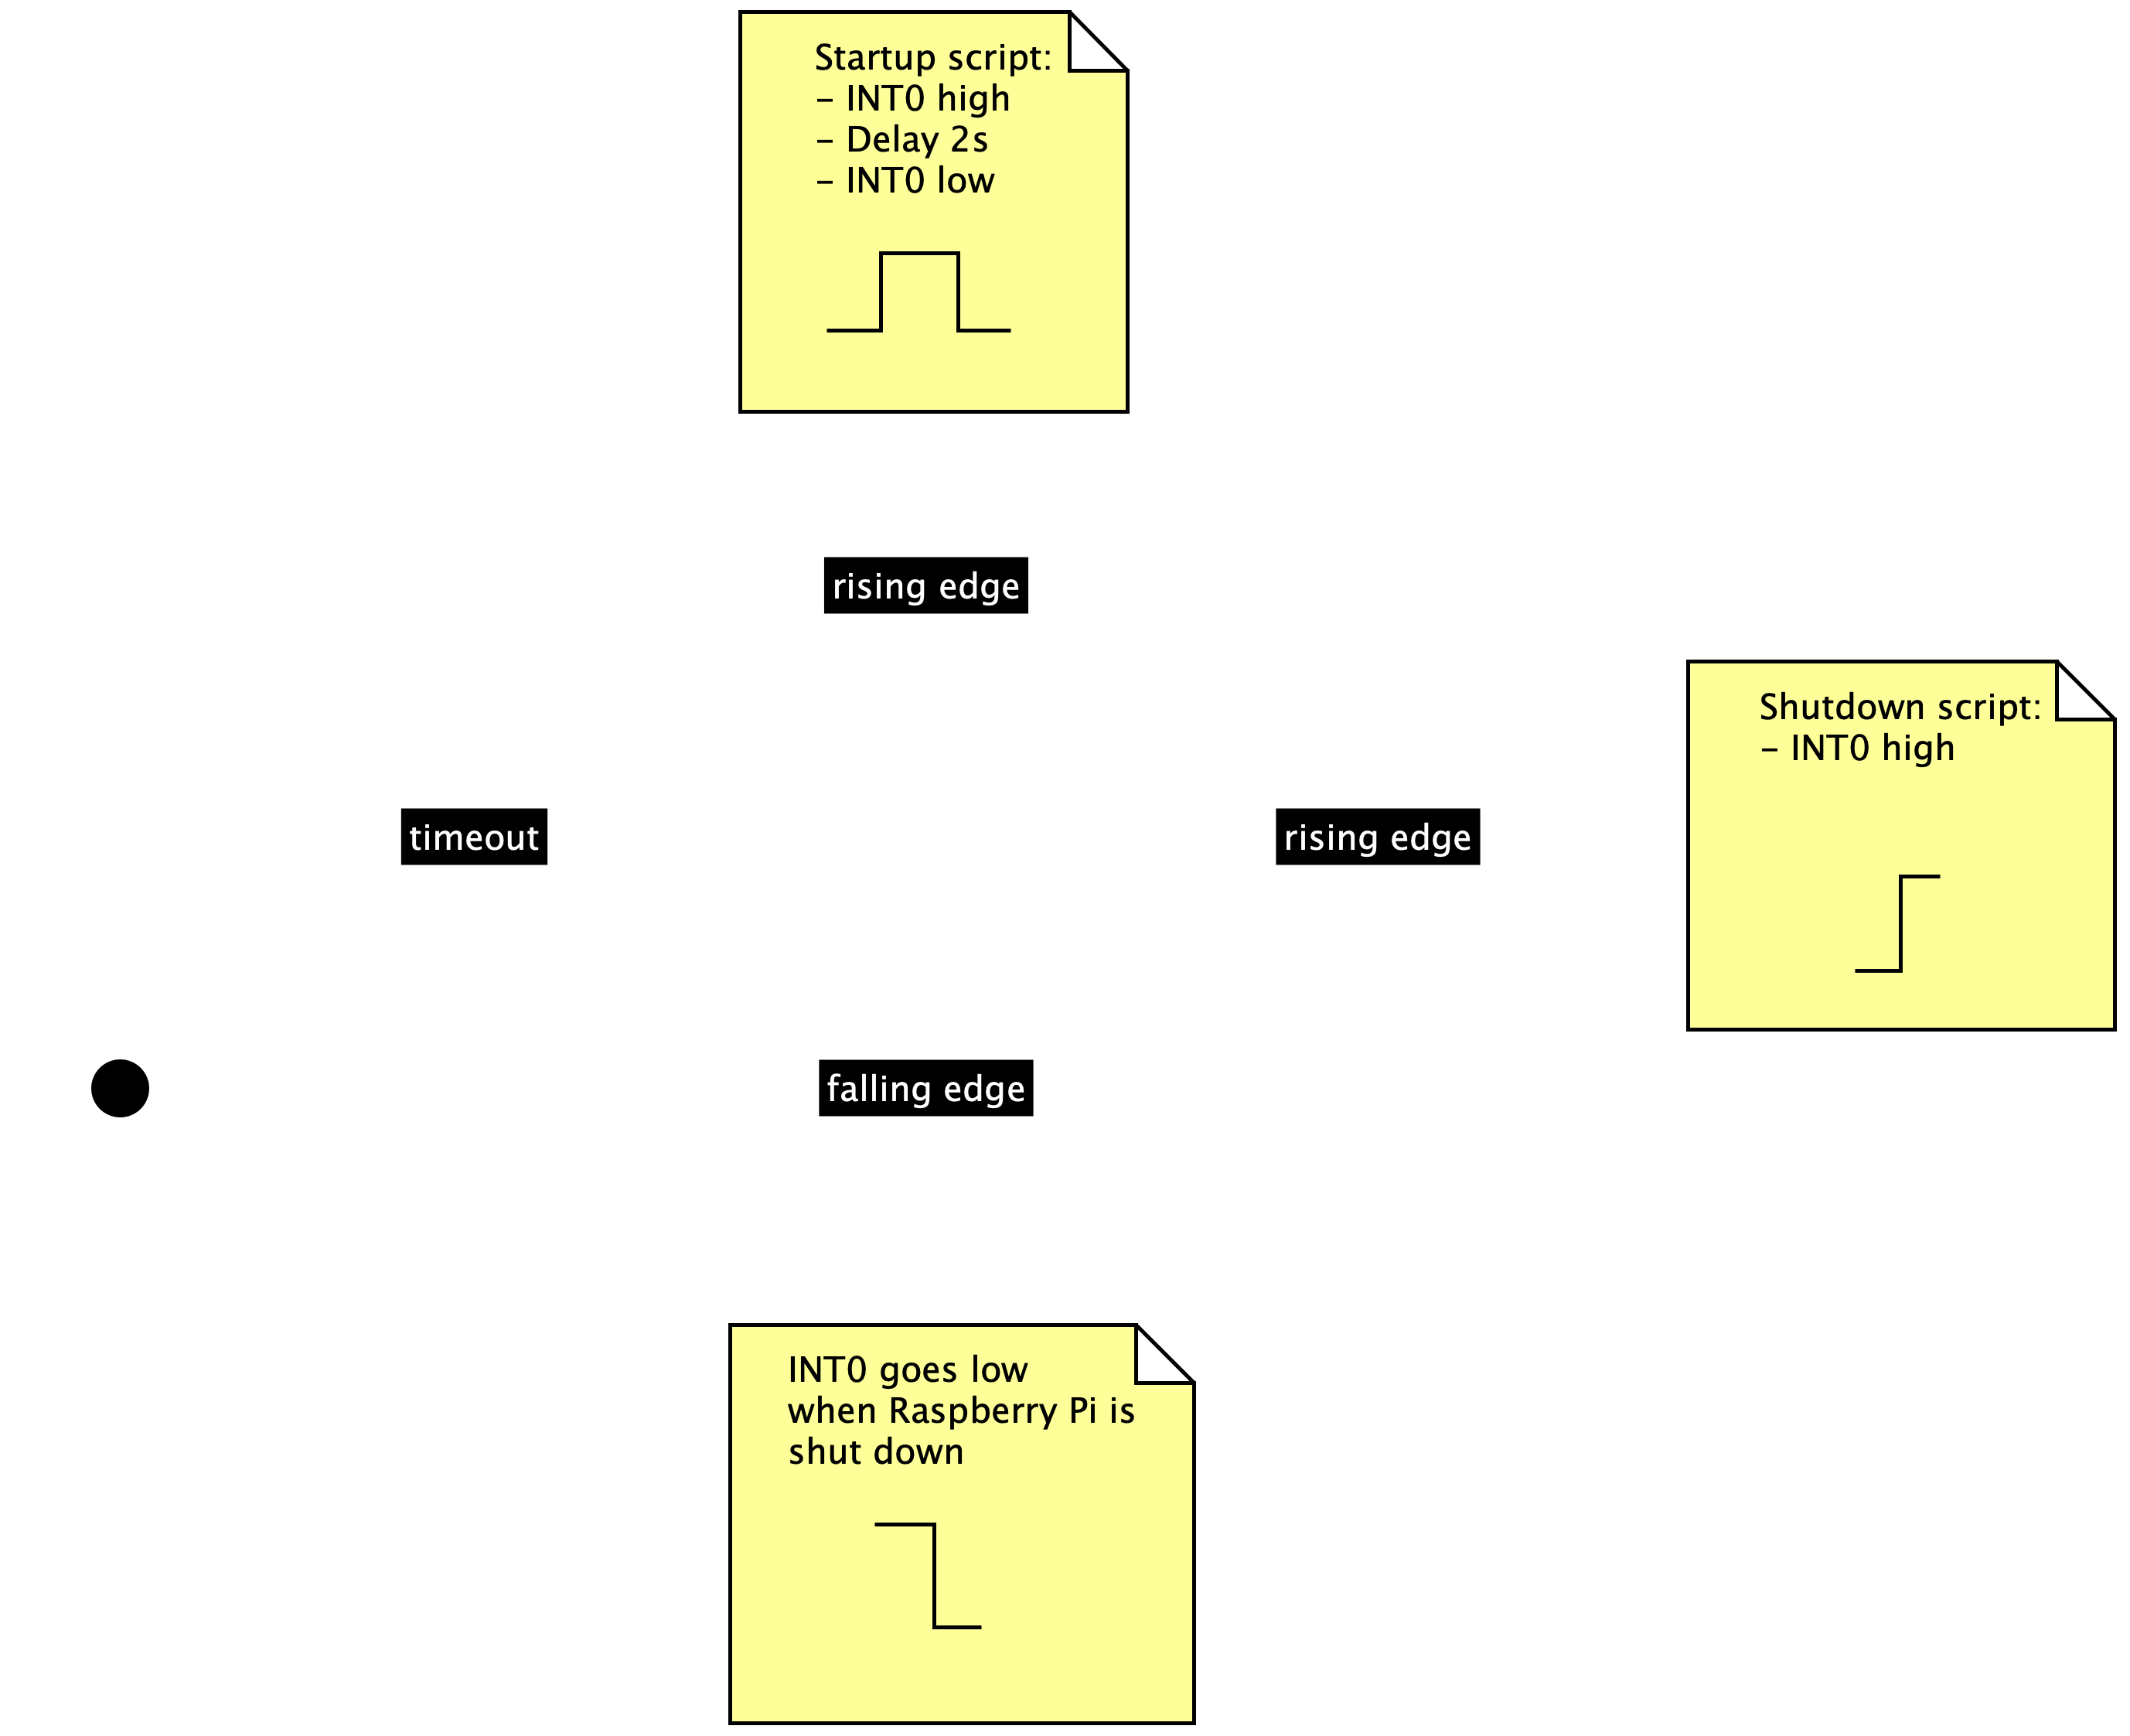
The purpose of the LED Control Module is to provide feedback regarding the activity state of the player. It consists of an ATTiny85 and an RGB LED.


In the build steps I will explain how I built the streamer. Apart from the LED Control Module, most of it is quite straightforward. Therefore, most steps will be dedicated to mentioned module.

View all 8 components

  • 1
    LED Control Module

    Behaviour

    The LED Control Module (LCM) drives an RGB LED using different colors and blinking patterns indicating the system state.

    • Green blinking: Starting. This state is displayed until Volumio is completely operational.
    • Green steady: Started. Normal operation.
    • Red blinking: Stopping.
    • Red slow blinking: Stopped. Indicates that the system can be powered off. Turning off the Pi during normal operation is not recommended, and it cannot be powered off completely using software.


    The state diagram (done with yEd) shows the different state transitions.

    Implementation

    The LCM is implemented using an ATTiny85 microcontroller listening to level transitions on the a GPIO pin on the Pi, and driving an RGB LED according to the above state diagram.

    The GPIO pin on the Pi is controlled by regular startup and shutdown scripts that have to be installed after installing Volumio. The pinout is described in the Prototype step.

    Hardware

    The circuit (drawn using EasyEDA) consists of the following main components.

    • A six-way AVR ISP header (J1).
    • Input header, including the GPIO connection from the Pi (H2).
    • Output header, for connecting the LEDs (H1).
      • The LEDs will only work when pins 1 and 2 of JP1 are shorted. Otherwise pins 1 and 2 of H1 can be used for an alternative connection. Used for debugging.
    • The resistors R1 and R2 are used to reduce the basic brightness of the LEDS.
      • Potmeters R3 and R4 can be used to further tune the brightness.

    The hardware components (not yet mounted in the picture) are mounted using through hole soldering on a simple PCB.

    Software

    The LCM firmware can be found on GitLab. The code is fully documented. From a high level perspective, it implements the state machine depicted above and uses (low frequency) PWM to blink the LEDs according to the current state.

    The software was developed on a Mac using the GNU AVR toolchain. Conveniently, the toolchain comes installed with the Arduino IDE

    The Arduino was used as a programmer, with the ATTiny being the target, connected through the P1 header on the PCB.

  • 2
    Install Volumio and scripts

    NOTE: some familiarity with Volumio is assumed. If you are not familiar, their Quick Start User Guide may be helpful.

    Install Volumio

    Download Volumio, and install it on a micro SD Card. A minimum of a 4GB is required, 8 GB is recommended. 

    Check the Raspberry Pi Foundation's website for some useful guides on how to write an image file onto an SD card using your favourite OS.

    Install Scripts

    Boot into Volumio, and make sure you can access it over SSH.

    Follow the instructions from the GitLab project. The GPIO pin can be changed in the startup script.

  • 3
    Prototype

    Now it's time to put together a prototype, to see if the hardware and software.

    The diagram (created using Fritzing) shows the system as it becomes one step closer to the real hardware.

    And now with the real hardware (spot the differences...):

    On the Pi, GPIO 17 was chosen as the LCM GPIO-in (eventually connected to INT0 on the ATTiny) because this pin goes to low when Pi is shut down. It can be changed to another pin as long as it behaves as GPIO 17 and does not conflict with the pins specified by HiFiBerry.

View all 5 instructions

Enjoy this project?

Share

Discussions

FORART fe wrote 04/01/2021 at 07:10 point

Hi there, very interesting project !

It would be also great to use a surround/multichannel amplifier to realize a multiamp like this:

https://www.instructables.com/Raspberry-Pi-Music-Server-With-Built-in-Crossover-/

Last but not least, check out our collection of open projects:

http://www.forart.it/progetti/ODFAS/index.php?file=kop6.php

Hope that inspires !

  Are you sure? yes | no

Similar Projects

Does this project spark your interest?

Become a member to follow this project and never miss any updates