The project was developed from the structure presented below. This structure is responsible for guarding and protecting the gas leak detector circuit.

The case has an LCD display, 3 buttons, and an MQ2 sensor.
The LCD will be used to present the information of the gas level monitoring and to present a menu for adjustment of settings by the user.
This adjustment can be made using the 3 buttons.
Next, we present the structure of the internal circuit. The internal space allows you to place an Arduino Nano on a small Breadboard.

After installing the Arduino, connect the elements of the project and start programming the project. Below, we present the connection structure of the circuit elements.

After that, download the files for laser cutting on 2.5 mm thick calls.

Download this file in the Attachment section.In addition to offering you the files, we will also offer the Arduino JLCPCB Compatible Board project.
Para realizar a fixação das peças da case, utilize parafusos
A Big bonus of JLCPCB.COM
The JLCPCB wantsto offer 10 units of this Arduino JLCPCBcompatible PCB for your projectsfor$2 in your first order with the link:Earn my PCBs Arduino Compatible.

Introduction
One of the main causes of fires in homes is the leakage of cooking gas that when it comes in contact with sparks caused by the lighting of lamps through the switches.
Faced with this problem, we will develop a system for the detection of cooking gas present in the environment.
To perform the detection of this gas we will use the MQ2 sensor, this sensor has a resistance that varies according to the gas detection, it is possible to adjust its sensitivity through a trimpot present on the plate.
This detection system will consist of an Arduino Nano, MQ - 2 sensor, red led, buzzer, and I2C 16 x 2 LCD display.
Therefore, through this article you will learn:
- Perform the assembly of the circuit on the protoboard;
- Understand the operation of the MQ2 sensor;
- Perform the communication of the Arduino JLCPCB with the MQ2 sensor;
- Display of measured values on the LCD Display.
- Earn your detector leakage gas case project;
- Earn your Arduino JLCPCB Printed Circuit Board.
Now, we will start the complete presentation of the development of the Gas detection system project with the MQ - 2 sensors.
Developing the Project Gas detection system with the MQ -2 sensor
As previously mentioned, the project consists of creating a kitchen gas detection system with the MQ - 2 sensor. Next, we will explain the details of the operation of this sensor.
The MQ2 Sensor
The MQ - 2 sensor is a sensor capable of detecting flammable gases such as LPG, Propane, Butane, Methane, among other flammable gases.
This sensor has two outputs: a digital one that when the gas is detected it goes to 0 V and an analog output that varies its value according to the presence of the gas in the environment.

In figure 2 we have the schematic circuit with the necessary connections for assembling the project.

Figure 2 - Schematic circuit with the connections of the MQ - 2 sensor and the LCD display to the Arduino nano.
After assembling the electronic circuit according to figure 2, we will program the Arduino UNO JLCPCB to read the sensor and display the values on the LCD display, activating the LED and the buzzer.
Next, we'll explain the source code.
The source code of the project
In order to carry out this project, two libraries will be needed, Wire for I2C communication and LiquidCrystal_I2C, which is the necessary library for communication with the LCD display.
// Bibliotecas
/ Inclusão da biblioteca I2C
#include <Wire.h>
Objeto lcd
LiquidCrystal_I2C lcd (0x27,2,1,0,4,5,6,7,3,POSITIVE);
Mapping naming each pin on the board with the name of each actuator or sensor that it will perform the...
Read more »
 jakelauck
 Tony Kambourakis
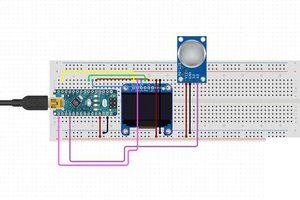
 hIOTron