Close
0%
0%

Remote RasPi GPIO control

Remote control for Raspberry Pi GPIO peripherals

Public Chat
Similar projects worth following
Suppose you sell a product using the RasPi GPIO connector. How does your customer control the attached hardware?

For a RasPi relay board, how does the user control the relays when the Pi is located in the attic? End-users might not have a spare display and keyboard, and a display and keyboard may not be convenient at that location.

The GPIOServer presents a web page interface to the RasPi GPIO lines, allowing the end user to read inputs and set outputs using any browser. The GPIO config is specified by a file (that you supply) limiting the user to valid actions.

The project also supplies executables to control the GPIO system directly without a browser. The programs can be used at the command line or embedded into scripts as needed. It can be compiled to run on linux, windows, or IOS systems.

How it works

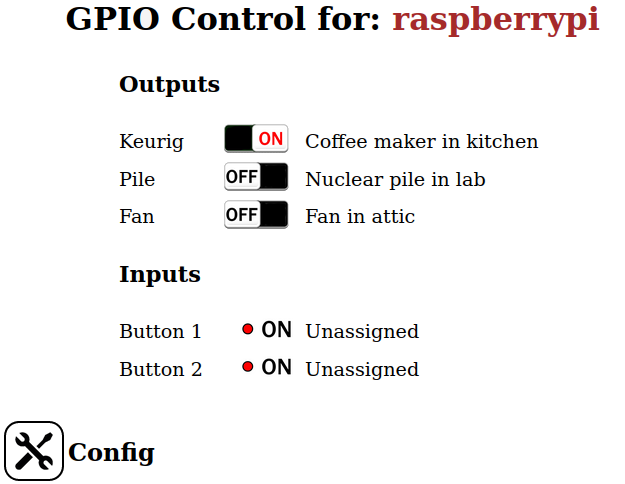
GPIOServer runs on the Raspberry Pi and reads a configuration file (that you supply) describing the GPIOs used by the attached hardware: the mode (input/output), logic (normal/inverted), hardware name ("Relay 2"), and so on. The server initializes these GPIOs and accepts JSON commands to read and/or set the values.

The project contains an executable (GPIOControl) to communicate with the server from an external host. The user can use this program to remotely read and control GPIO settings without a browser. The program can be run at the command line, and may be embedded into scripts as needed.

The system also spawns a web server with HTML pages showing the GPIOs. The web interface allows the user read inputs and set outputs using any web browser.

Integrating with your product application

The system is intended to be used with your hardware product.

After installing the project (using "git clone"), edit the configuration file "GPIO.conf" to specify which GPIOs are presented to the user, their mode specifics, and hardware names. Comment out any GPIOs that you don't want users to access.

Add your product branding to the web pages as needed: background color, fonts and styles, trademarks, and corporate logos.

This product is open source and free to use without attribution. Contact me through this site if you need a more definitive legal document. (See "private messages" at top of page.)

Bugs and errors

Please let me know about bugs and other issues so I can update the project.

Installing


Installation instructions are in the file "INSTALL.md" supplied with the project.

View all 2 project logs

  • 1
    Installation

    Installing

    This is an application-level program, not a system command or system feature. It is an add-on to your product software, and as such there is no global "apt-get install". You will need a copy of the source to modify for your needs.

    Step 1: Install AppDaemon

    Install the "AppDaemon" project, per that project's instructions. Continue with the next step once the AppDaemon example application is working.

    AppDaemon on GitHub

    AppDaemon on Hackaday.io

    Step 2: Copy the GPIOServer project to /home/pi.

    > cd
    > git clone https://github.com/ToolChainGang/GPIOServer.git
    

    Step 3: Upgrade your system

    The project subdir "install" contains scripts to upgrade your system and install extra packages which are not installed as part of the AppDaemon project.

    For proper installation, each script should be run multiple times, fixing errors as needed until the output contains nothing but a list of "already most recent version" messages.

    (as root)
    
    > cd /home/pi/GPIOServer/install
    > ./05-UpgradeInstall.sh
    
    Go get lunch, then rerun the script
    
    > ./05-UpgradeInstall.sh
    
    Verify that the output contains nothing but a list of "newest version" messages.
    
    > ./06-UpgradePerl.sh
    
    Go get dinner, then rerun the script
    
    > ./06-UpgradePerl.sh
    
    Verify that the output contains nothing but a list of "newest version" messages.
    

    Step 4: Configure your GPIO hardware

    Edit the file "/home/pi/GPIOServer/etc/GPIO.conf" to describe your specific GPIO hardware. The commentary at the top of that file explains the format, and there are example configurations to help you get started.

    The GPIOs shown by the GPIOServer should NOT include the ones used by the AppDaemon!

    For example, suppose your rc.local contains the following:

    nohup /root/AppDaemon/bin/AppDaemon -v --config-gpio=4 --led-gpio=19  \                                       --web-dir /home/pi/GPIOServer/public_html
    

    In this example, the GPIOServer will be unable to access GPIOs 4 and 19, since the AppDaemon owns them.

    Step 5: Test your GPIO hardware

    The install directory contains a testing app that uses the same GPIO numbering logic as the GPIOServer. Execute that app with your GPIO settings and verify that inputs can be read, outputs can be controlled, and so on.

    For example, the following command will flash (blink on-and-off) GPIO19, and read (and print) the values of GPIO4:

    > GPIOTest --flash-gpio=19 --read-gpio=4
    

    You can also use the "gpio" system command to test your hardware. Verify that your input hardware works, your output hardware works, and so on. Some useful gpio commands are:

    gpio -h             # Show usage
    
    gpio readall        # Read and display all GPIO modes and values
    
    gpio read 12        # Read GPIO 12 and display the value
    
    gpio blink 15       # Blink GPIO 15 on and off, as an LED
    

    Step 6: Configure AppDaemon to run GPIOServer

    Change the /etc/rc.local file so that the AppDaemon invokes the GPIOServer instead of the sample application.

    For example, put this at the end your /etc/rc.local file:

    #################################################################
    #
    # Start the GPIOServer
    #
    set +e
    
    ConfigGPIO=7;       # Config switch WPi07, Connector pin  7, BCM 04
    LEDGPIO=24;         # Config LED    WPi24, Connector pin 35, BCM 19
    
    Verbose="-v"        # AppDaemon gets very talky
    #Verbose=           # AppDaemon shuts up
    
    nohup /root/AppDaemon/bin/AppDaemon $Verbose --config-gpio=$ConfigGPIO --led-gpio=$LEDGPIO  \                                             --web-dir /home/pi/GPIOServer/public_html      \                                             --user=pi /home/pi/GPIOServer/bin/GPIOServer &
    
    set -e
    

    A sample rc.local file that does this is included with the project, so for a quick test you can do the following:

    (as root)
    
    > cd /home/pi/GPIOServer/install
    > cp /etc/rc.local /etc/rc.local.bak
    > cp rc.local.SAMPLE /etc/rc.local
    > reboot
    

    Step 5: Verify that everything is running

    Open a browser and connect to the IP address of your raspberry pi, and verify the GPIOs are displayed correctly, that they control your hardware in the correct manner, and so on.

    For example, if your RasPi has IP address 192.168.1.31, enter "http://192.168.1.31/" into the address bar to see the GPIOServer pages.

    Use the command program "GPIOControl" to connect to the IP address of your raspberry pi and verify that it can control the GPIOs in your system. For example, if your RasPi has IP address 192.168.1.31, from a different RasPi enter something like the following:

    > GPIOControl.pl --host=192.168.1.31 ToggleGPIO 12
    

    Assuming GPIO 12 is configured as an output to your system, the toggle command should switch the output state: "Off" becomes "On", and "On" becomes "Off".

    If you have trouble, check out /home/pi/GPIOServer/install/DEBUGGING.txt for useful information.

    Once everything is running the /home/pi/GPIOServer/install directory is no longer needed - you can delete it.

View all instructions

Enjoy this project?

Share

Discussions

Similar Projects

Does this project spark your interest?

Become a member to follow this project and never miss any updates