 Udi Cohen
I took an iterative approach with this project - started with something basic, tested it and slowly added new features until I got me a slick shade controller that I can let my kids use!
Here’s an overview of the steps I’ll cover:
- Finding a suitable motor and figuring out how to attach it to the shade.
- Building the circuit and testing it in my balcony.
- Taking automation to the next level by using NFC (Near-Field Communication).
- Improving the appearance of the shade controller.
- Supporting voice commands using Google Assistant.
Note - I wrote a more detailed post about this project in my blog, check it out if you're interested:
http://blog.udinic.com/2021/01/13/automating-balcony-shade-with-nfc/
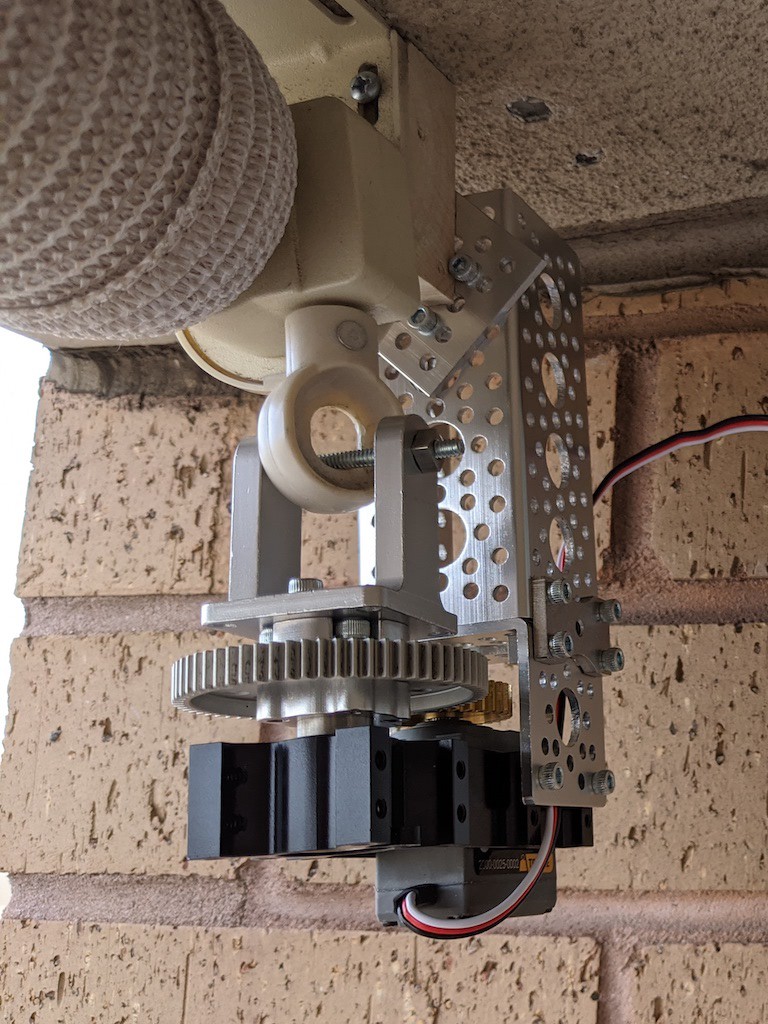
The Motor
To start, I needed to find a strong motor that can actually move this shade, which weights 8 pounds and is 8 feet long. There are ways to measure the force needed to move the shade (like using a luggage scale), but I ended up consulting my mechanical engineer brother, who helped me pick a motor that should be strong enough for the job. I found a Servo motor that’s strong by itself, but it also comes inside a gearbox that increases its torque (and I could use all the torque I can get!). The gearbox has 2 gears in a 2:1 ratio, which produces half the speed of the original servo motor, but with twice the torque. To close or open the shade we need to rotate the crank 60 times, so with the 31 RPM the motor can do - it’ll take about 2 minutes. That’s reasonable enough.
Since I don't have a 3D printer, I improvised a way to connect the motor to my shade. I used structural components form that I found in ServoCity, a well-organized website that sells parts for projects like this.
Building the Shade Controller Circuit
I started with something basic, just 2 buttons that can move the shade in both directions.
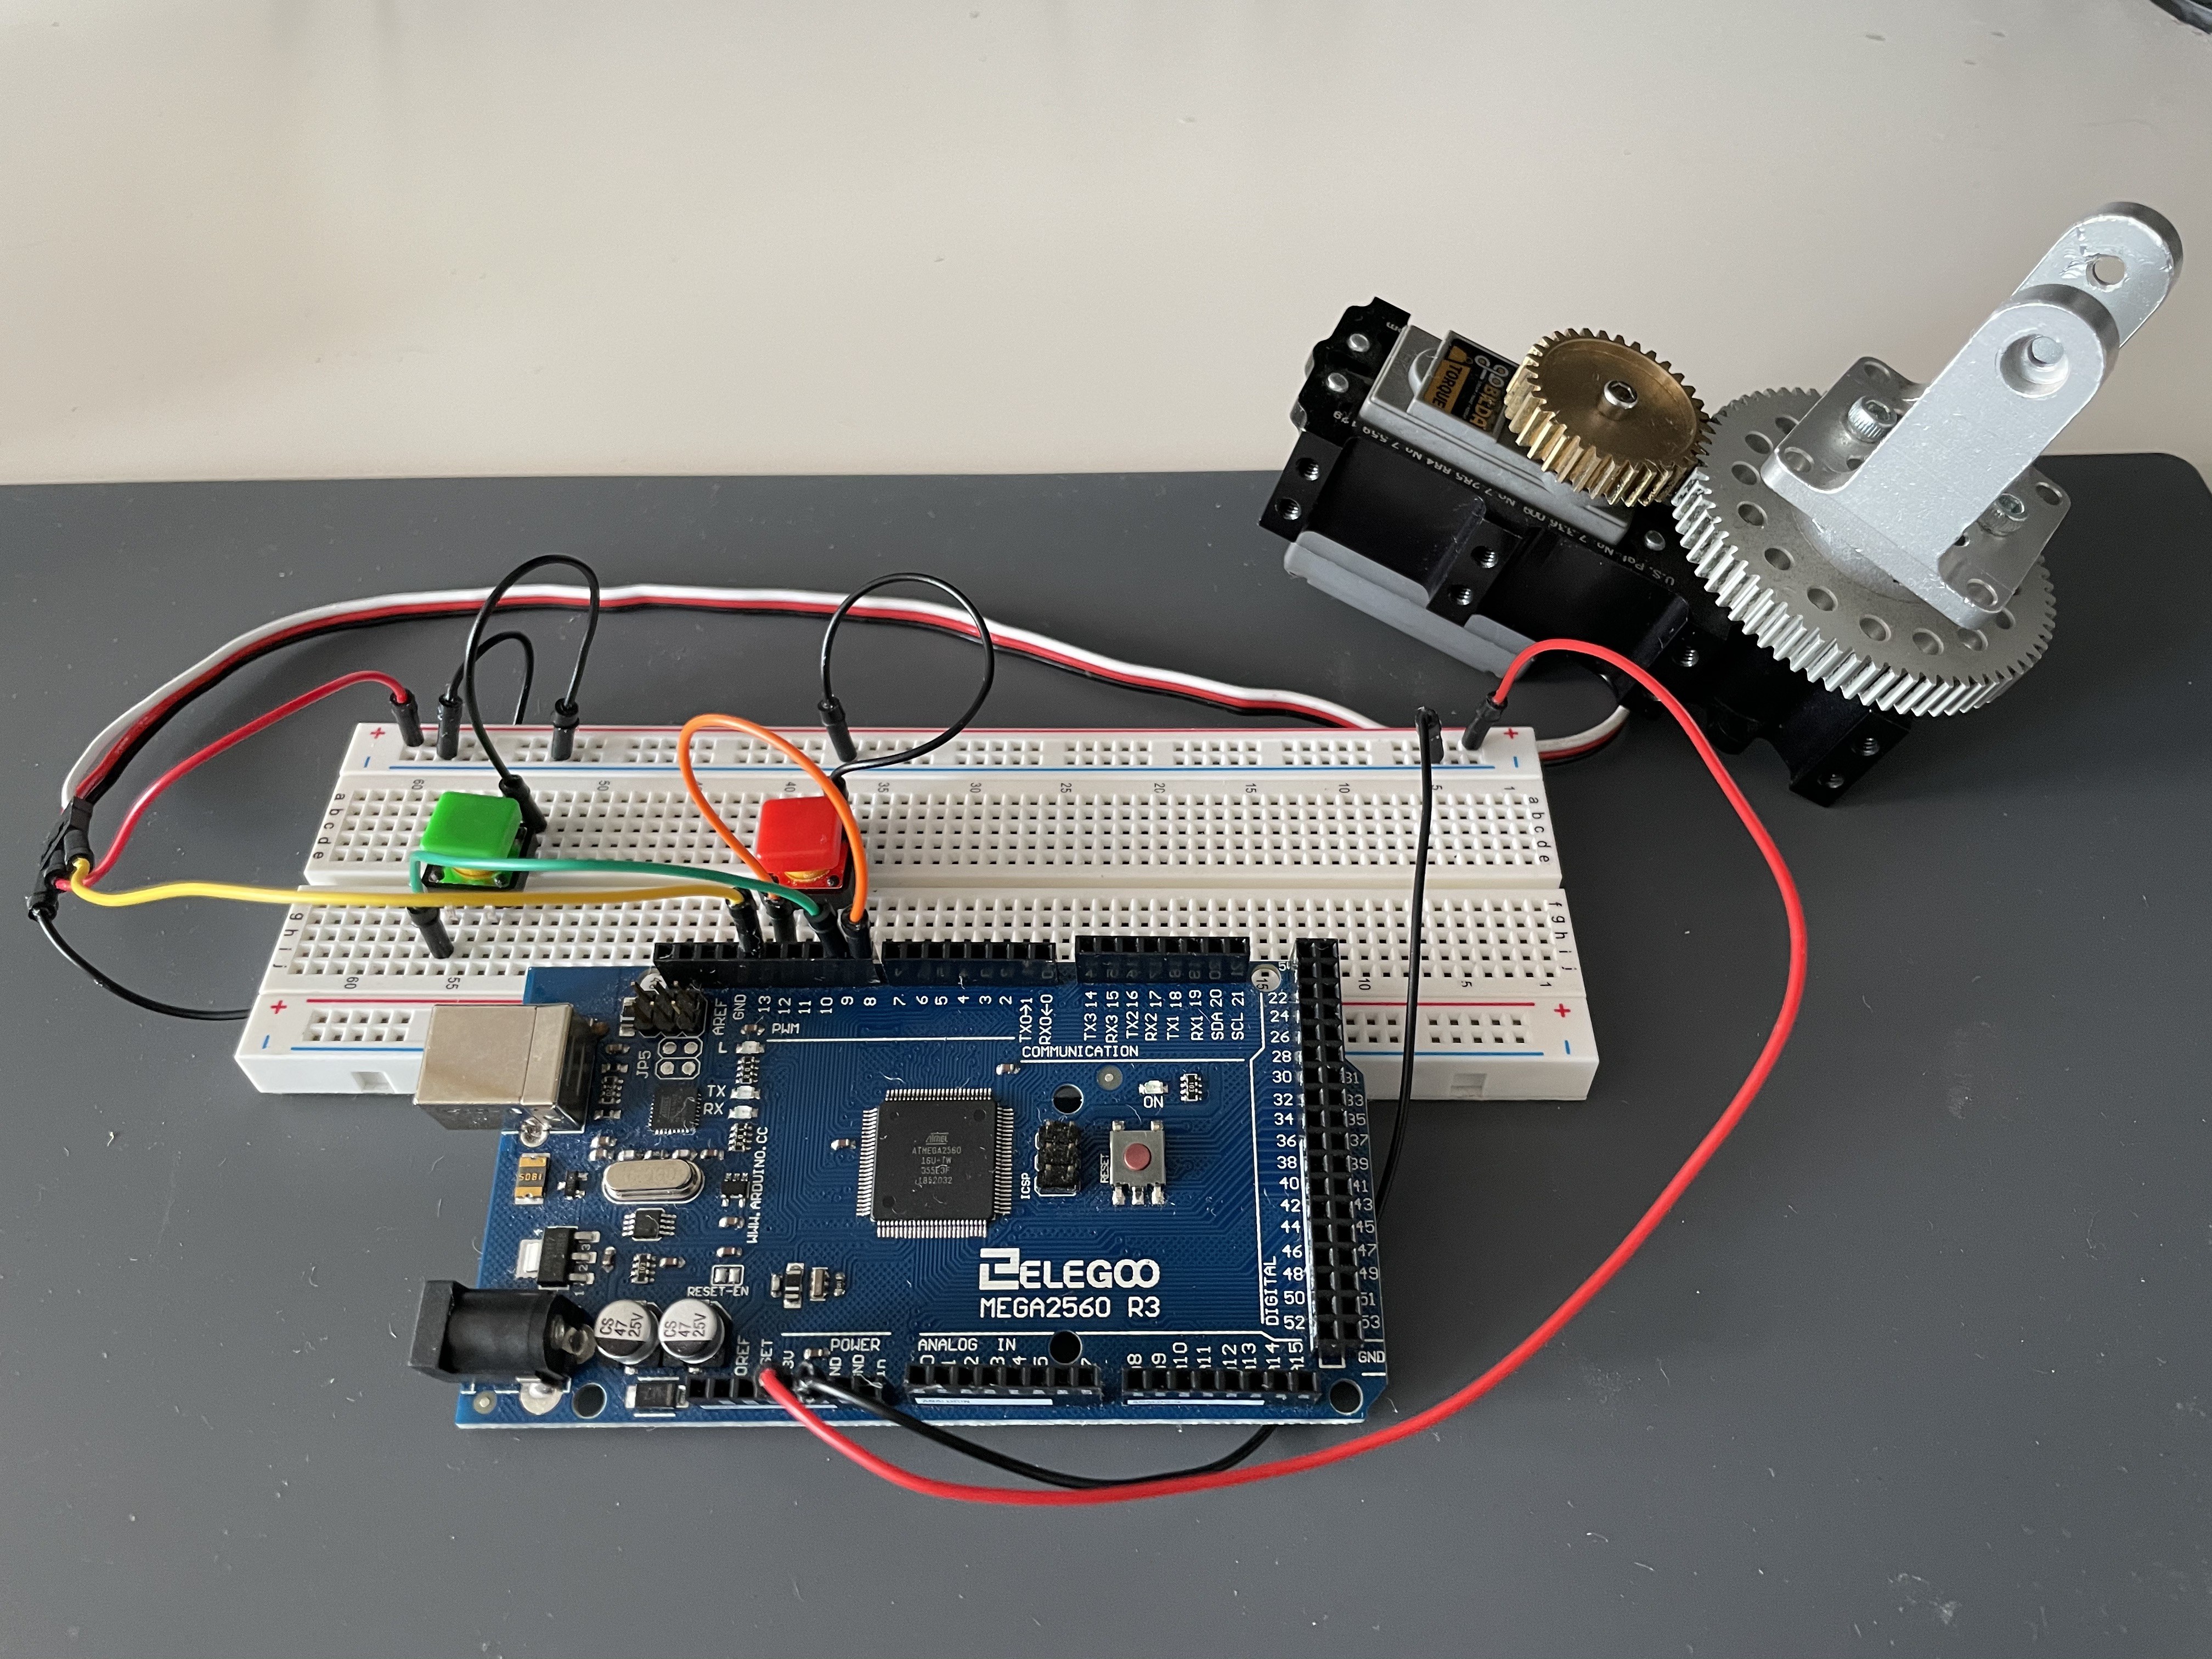
After I got this to work, I switched the Arduino board with an ESP32. It's smaller, more powerful and support WiFi (which I'll need a little later).
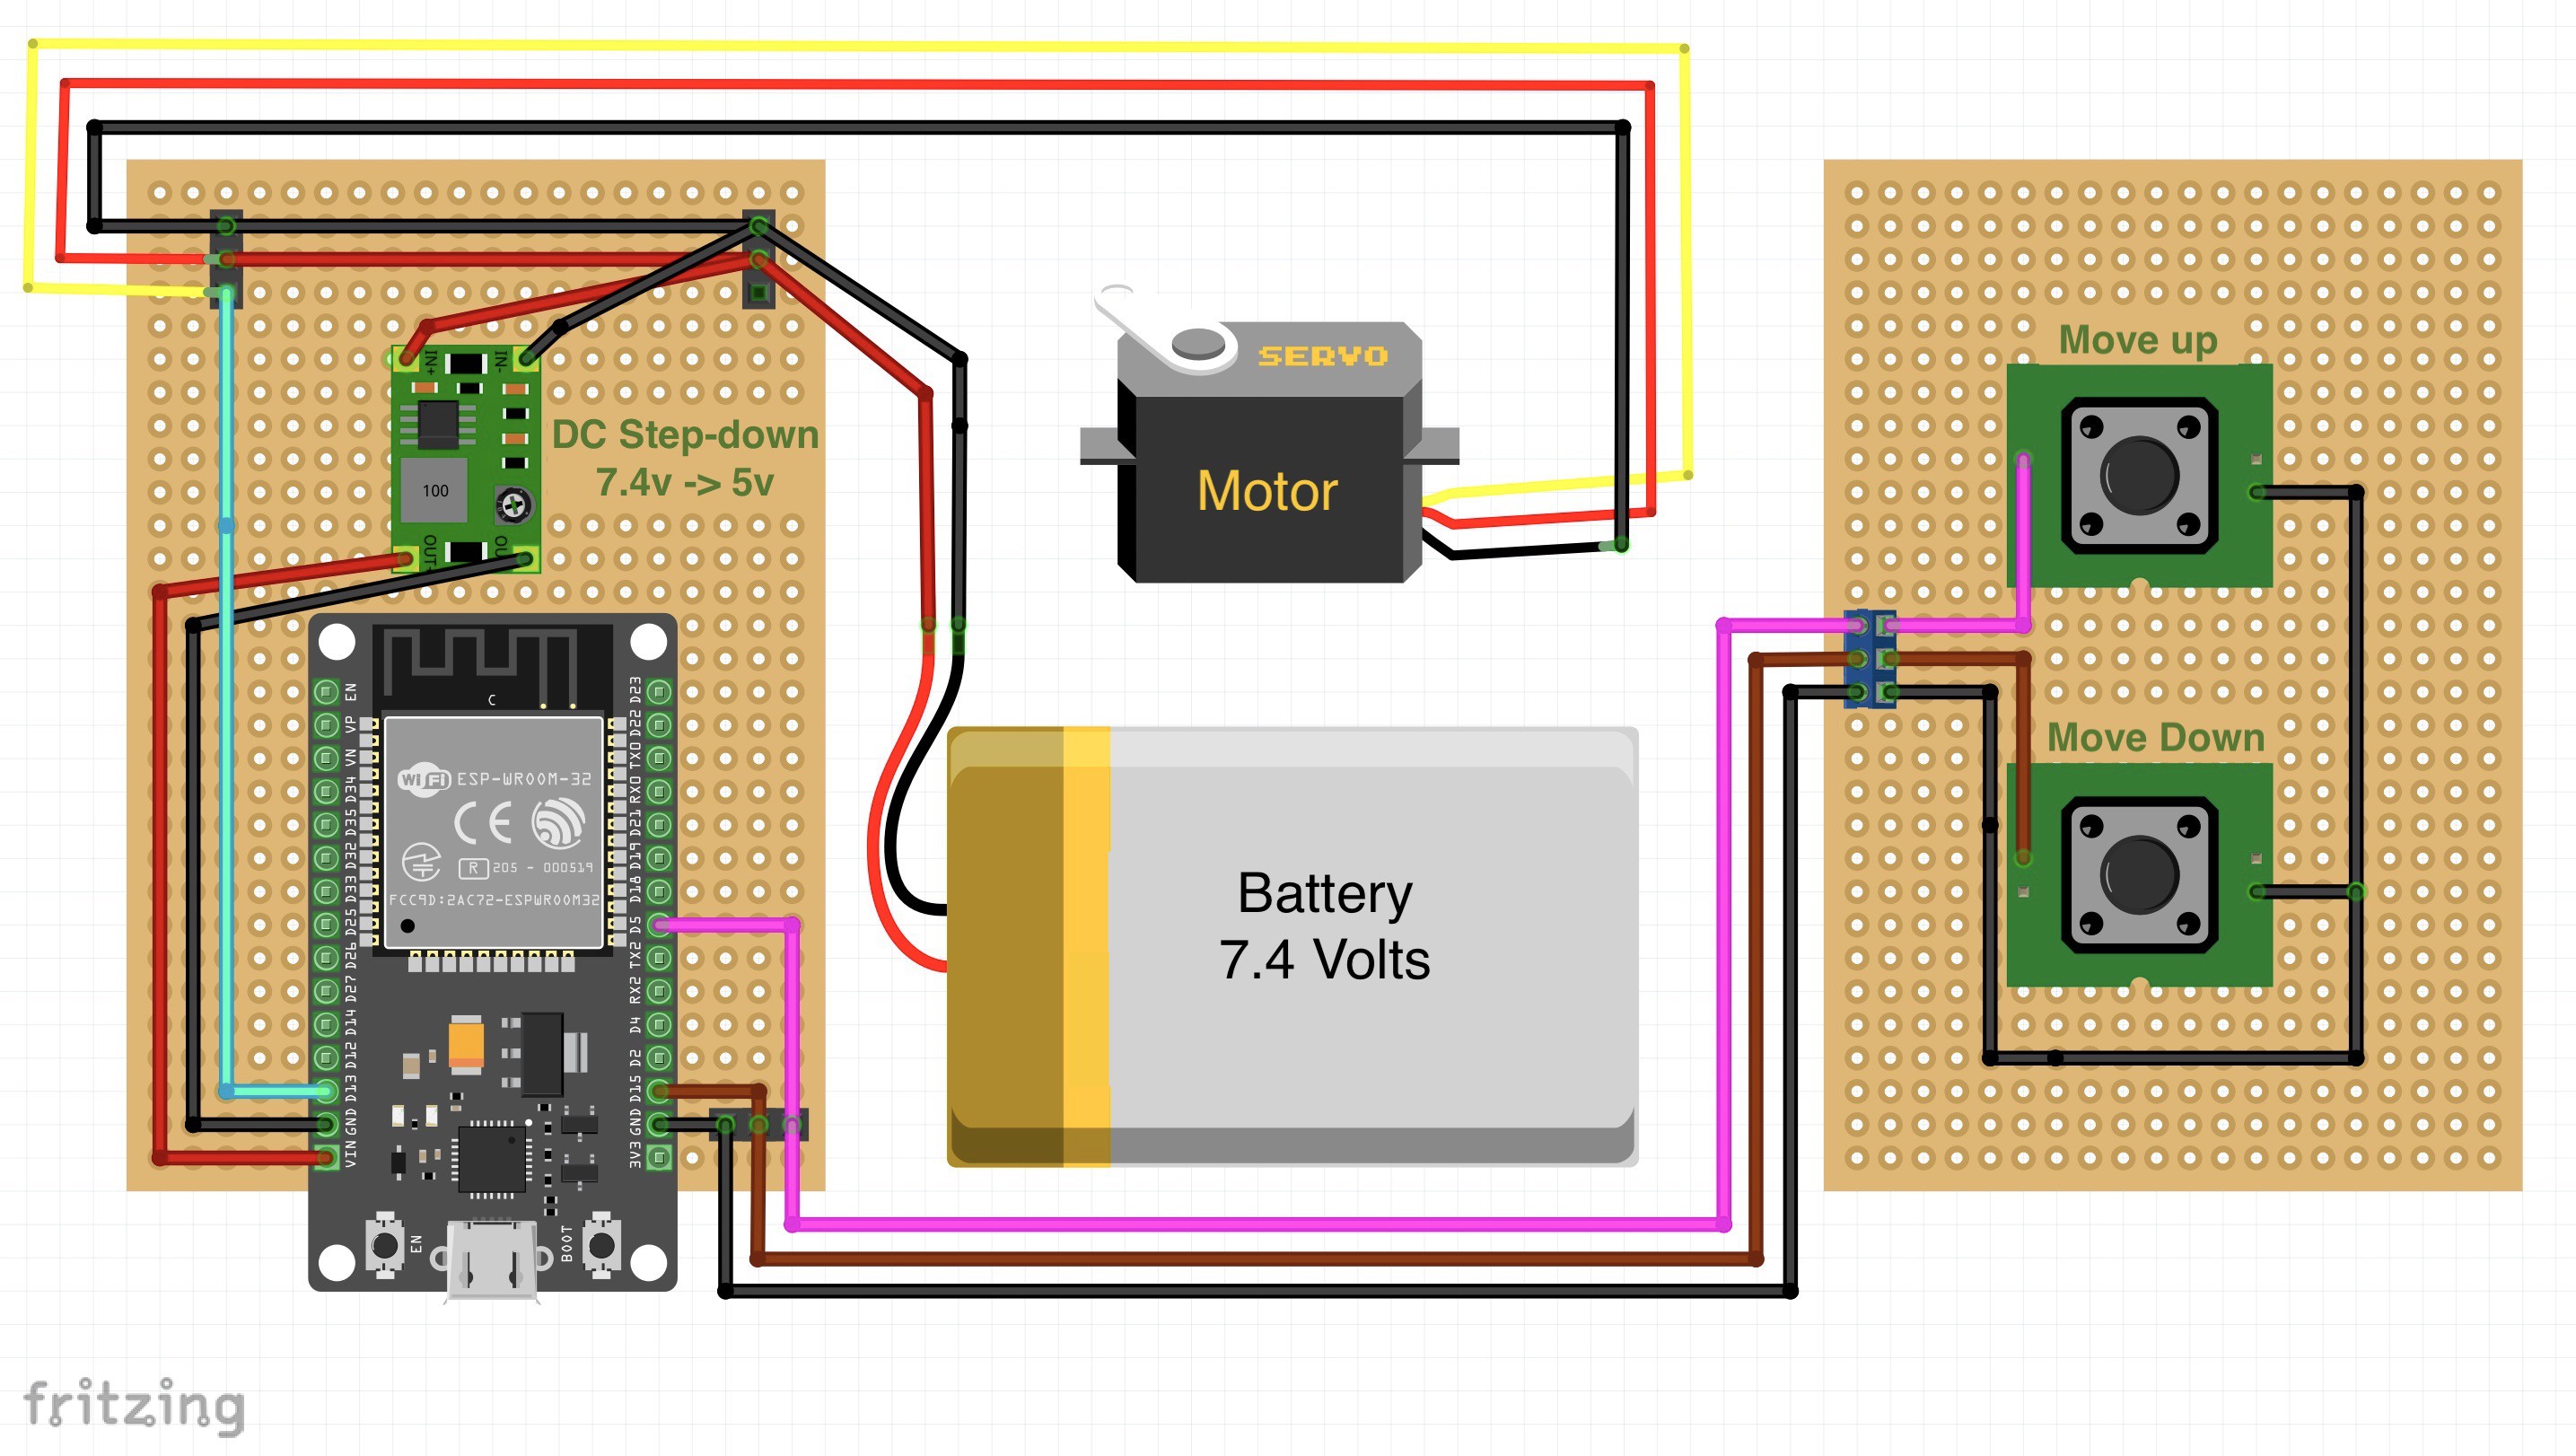
The First Prototype
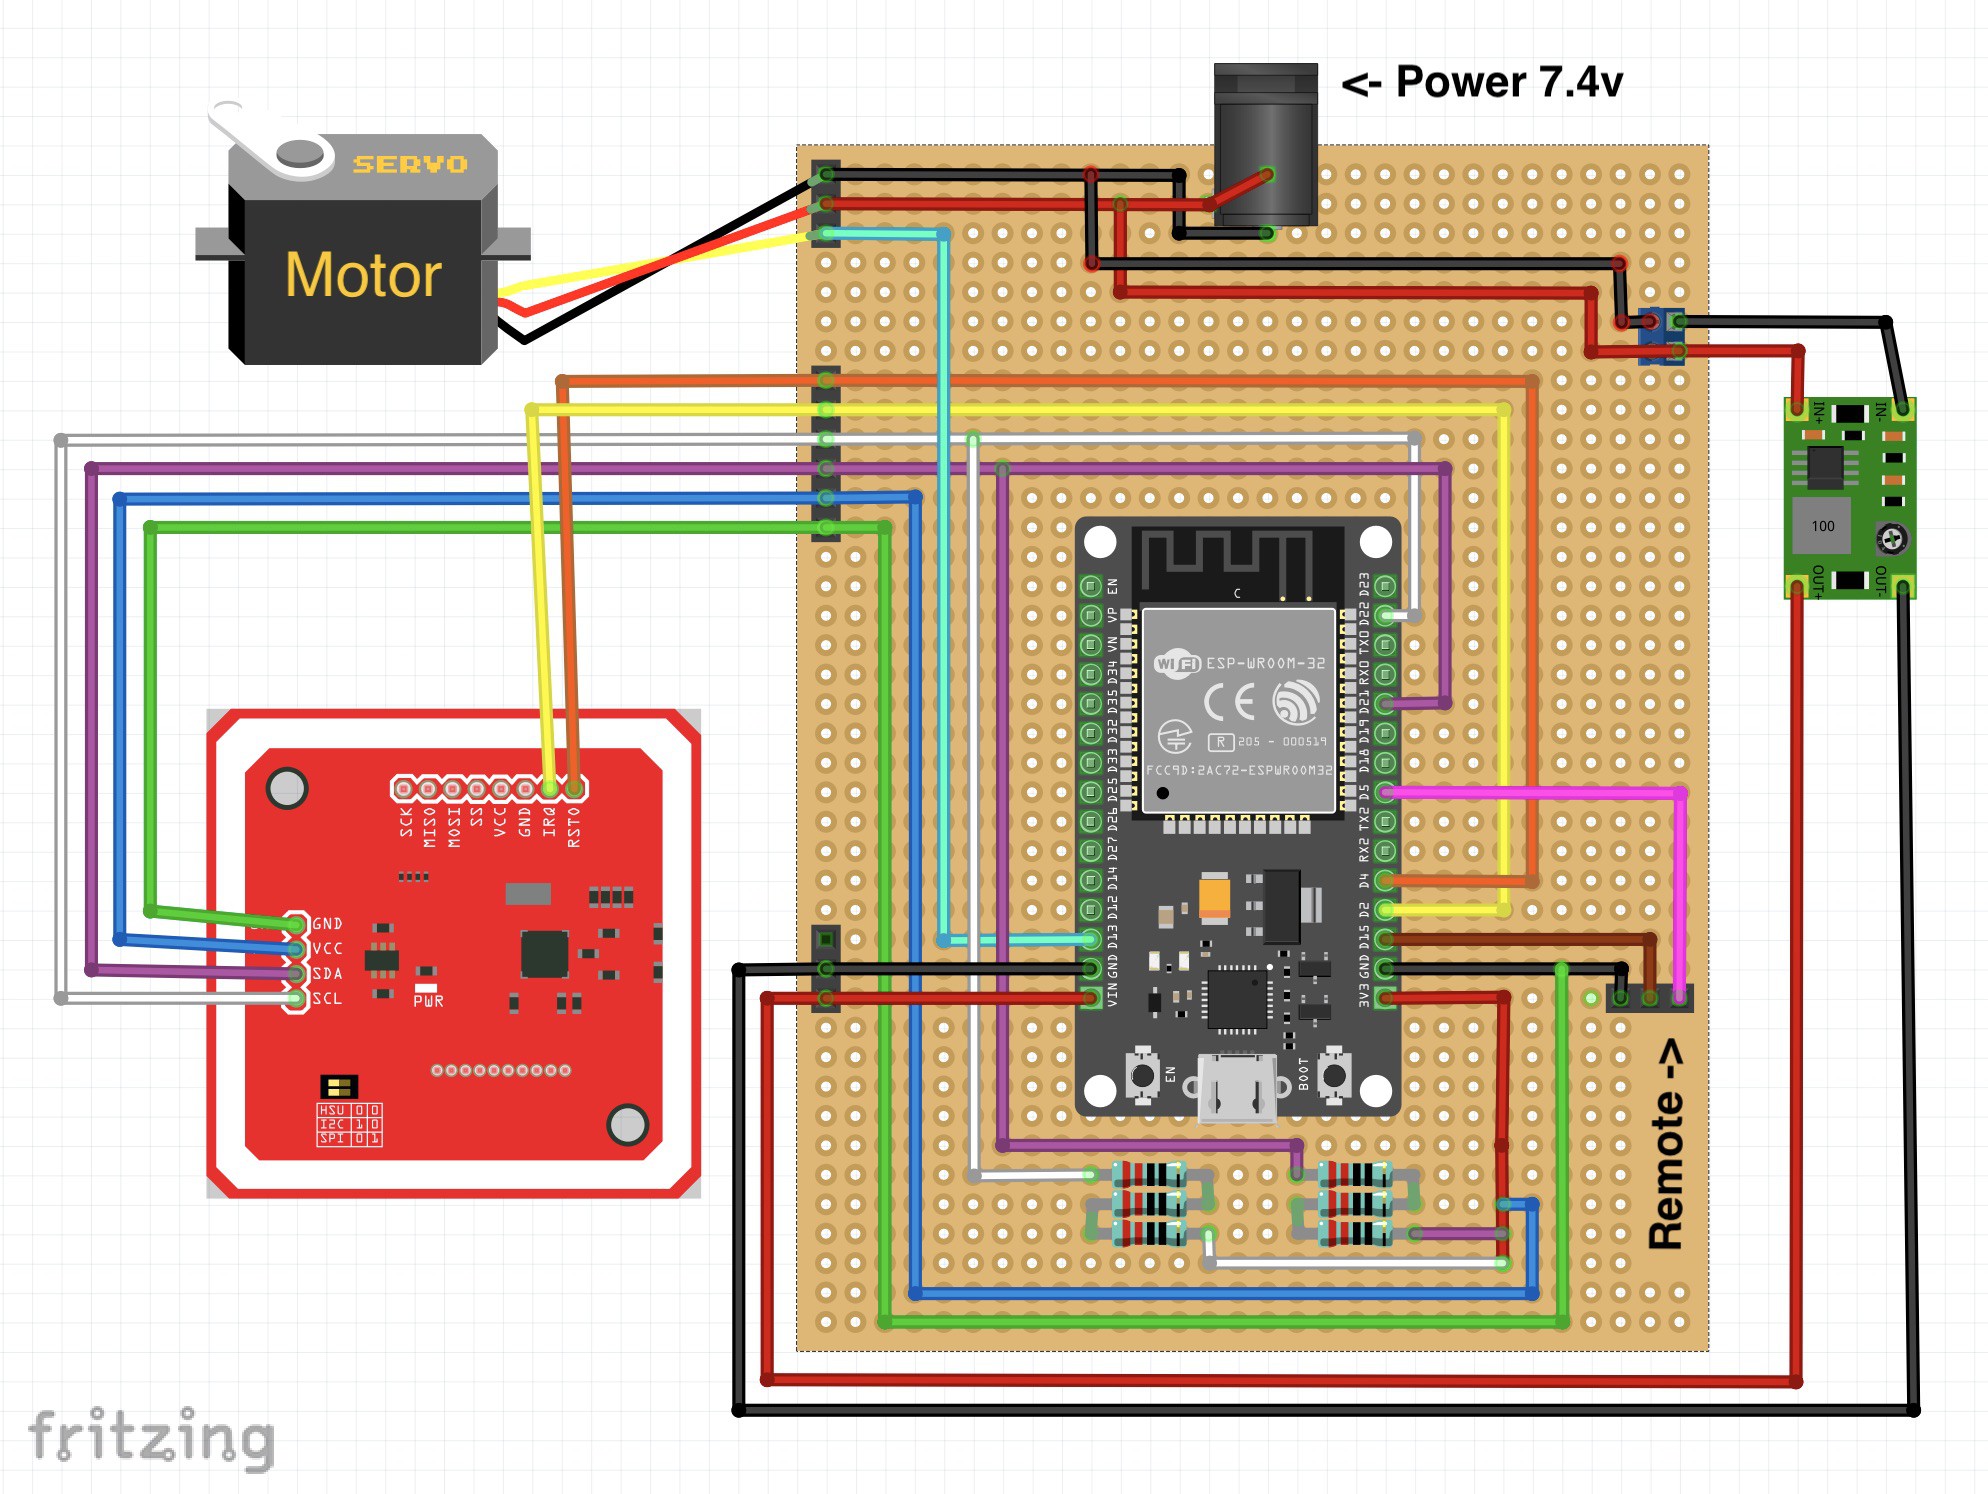
I moved my circuit from a breadboard to a perfboard and created a circuit I can start using in my balcony. Here's a diagram of the connections I made:
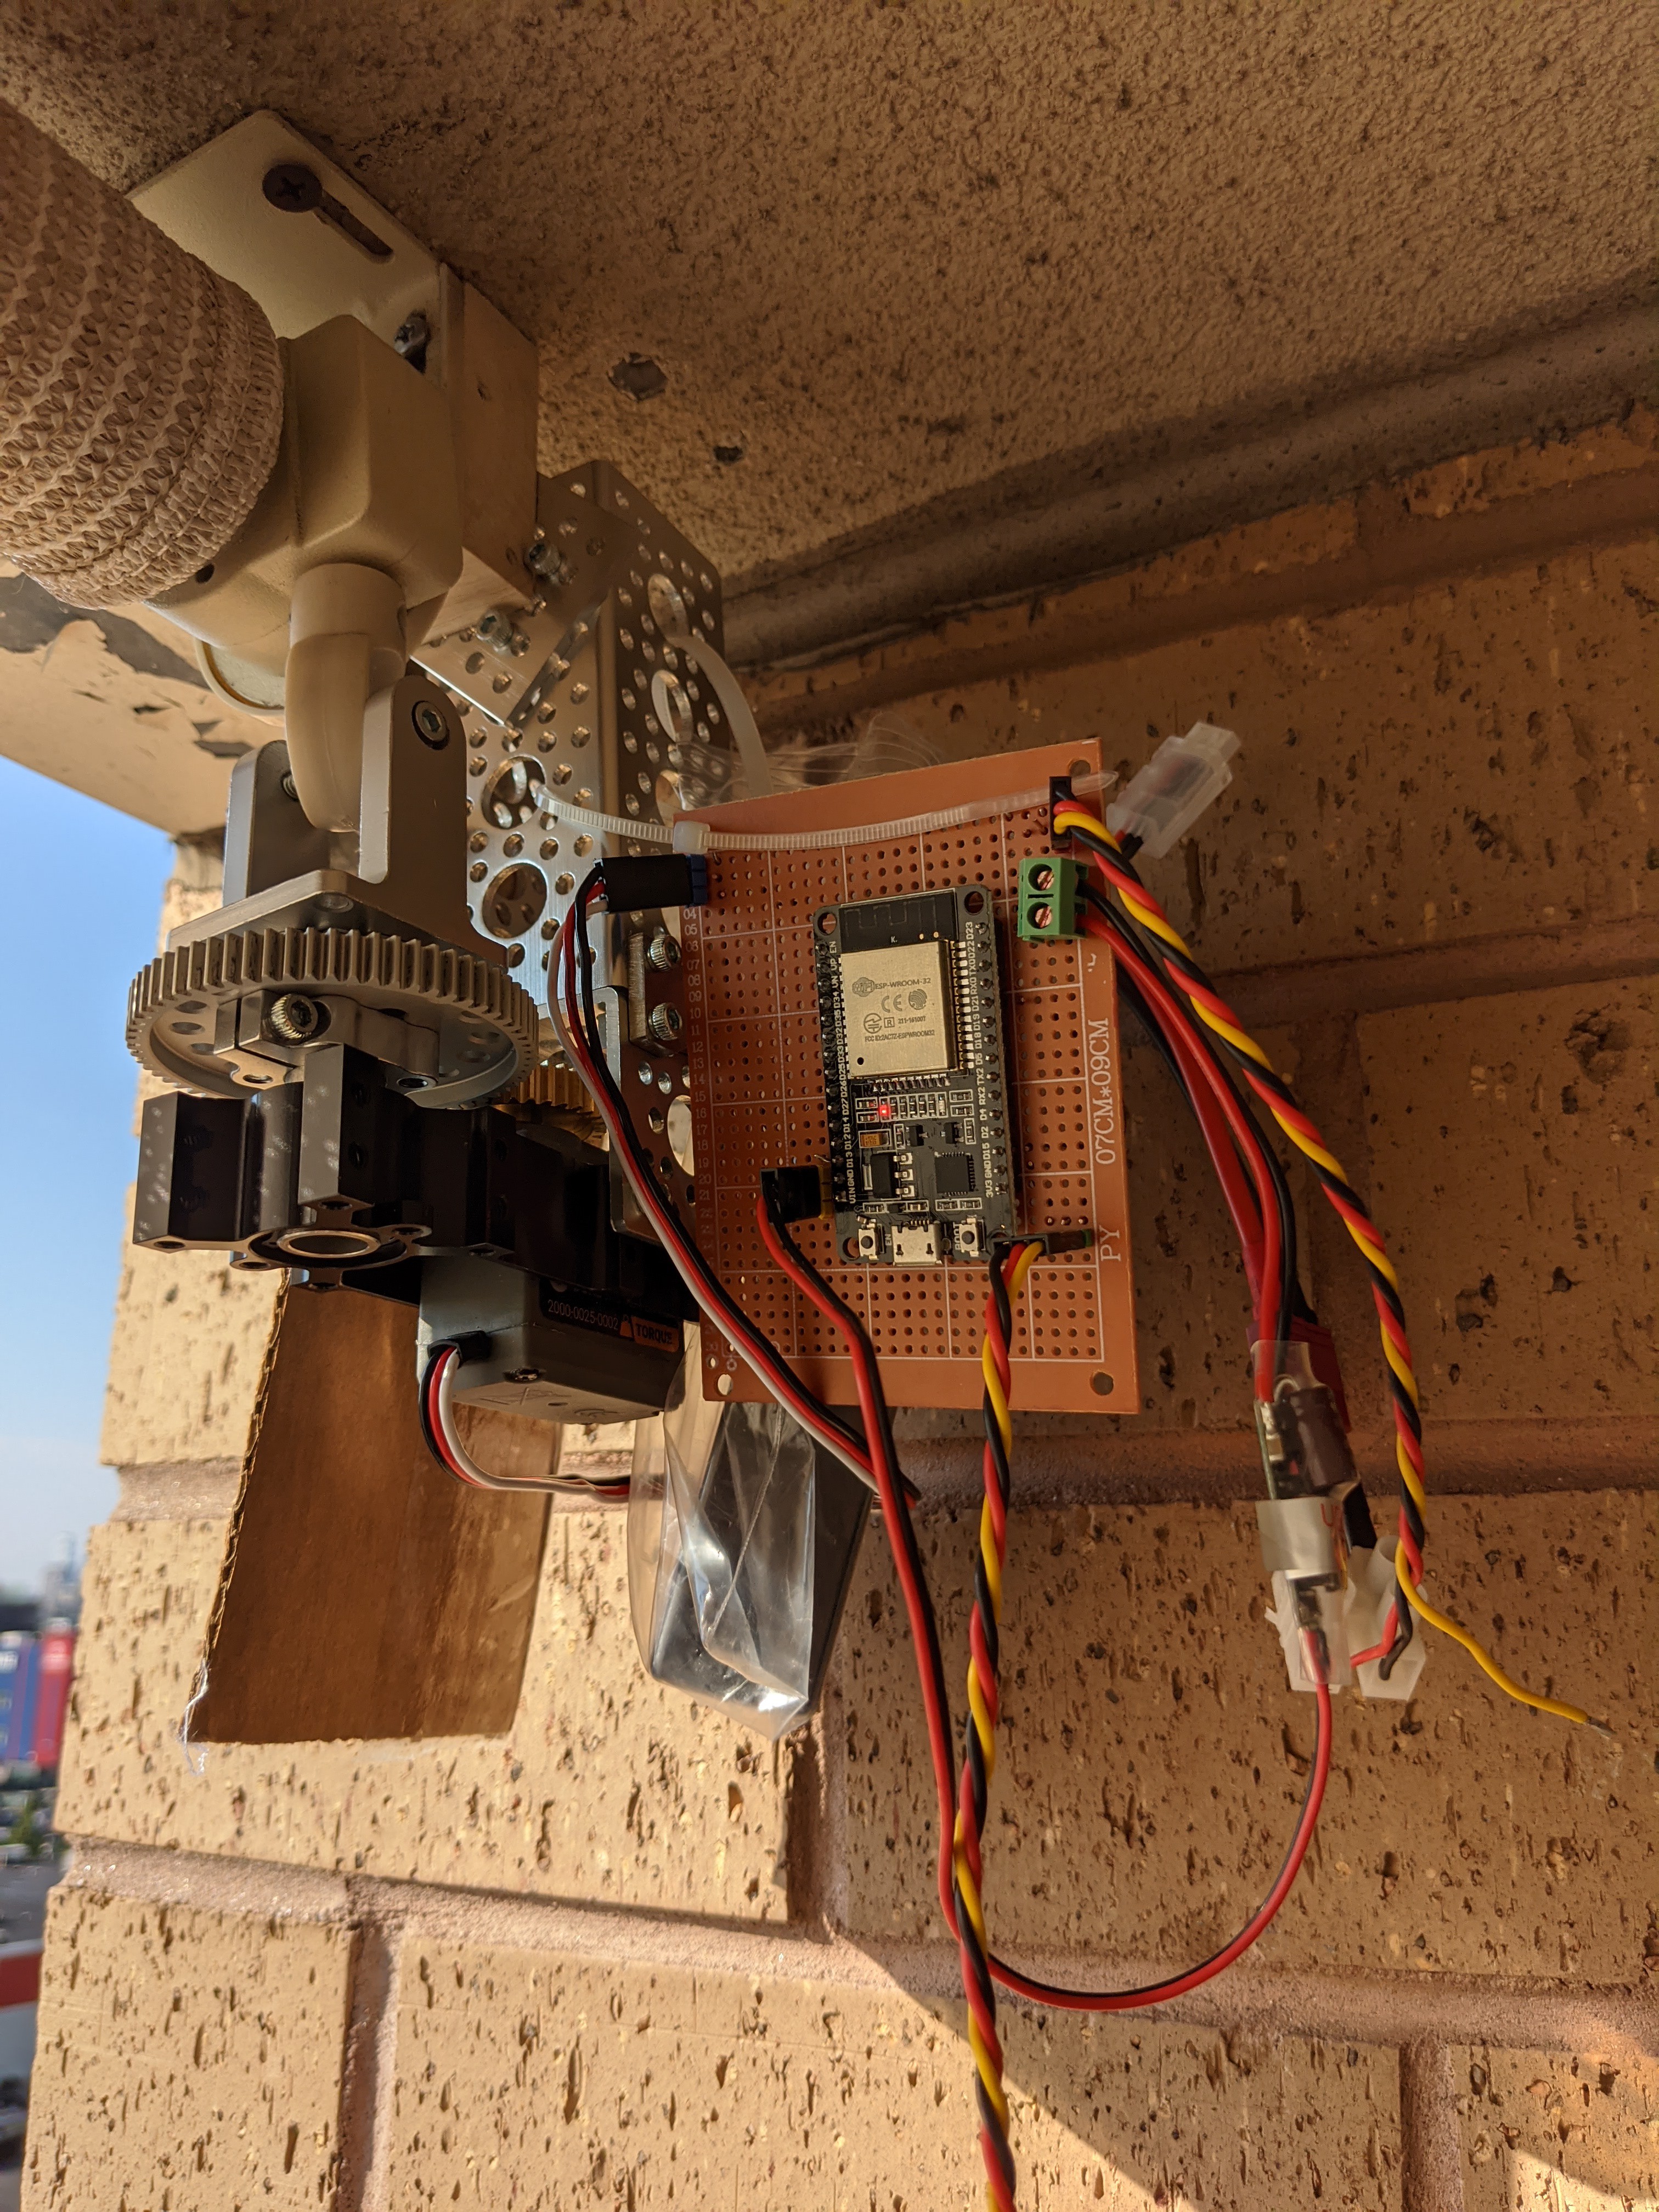
I later "installed" it in my balcony:
This worked pretty nicely, here's a demo:
Supporting Automatic Stops Using NFC
At this point of the project I got the minimal features for a fully working motorized shade, but I wanted to take this a step further. It takes a single button press to start lowering/raising the shade, but I still need to wait and press the button again in order to stop it.
I decided to try an interesting approach - using NFC to read position markers on the shade and know when to stop the motor. I used the PN532 NFC module, which is what you probably have inside your phone right now.
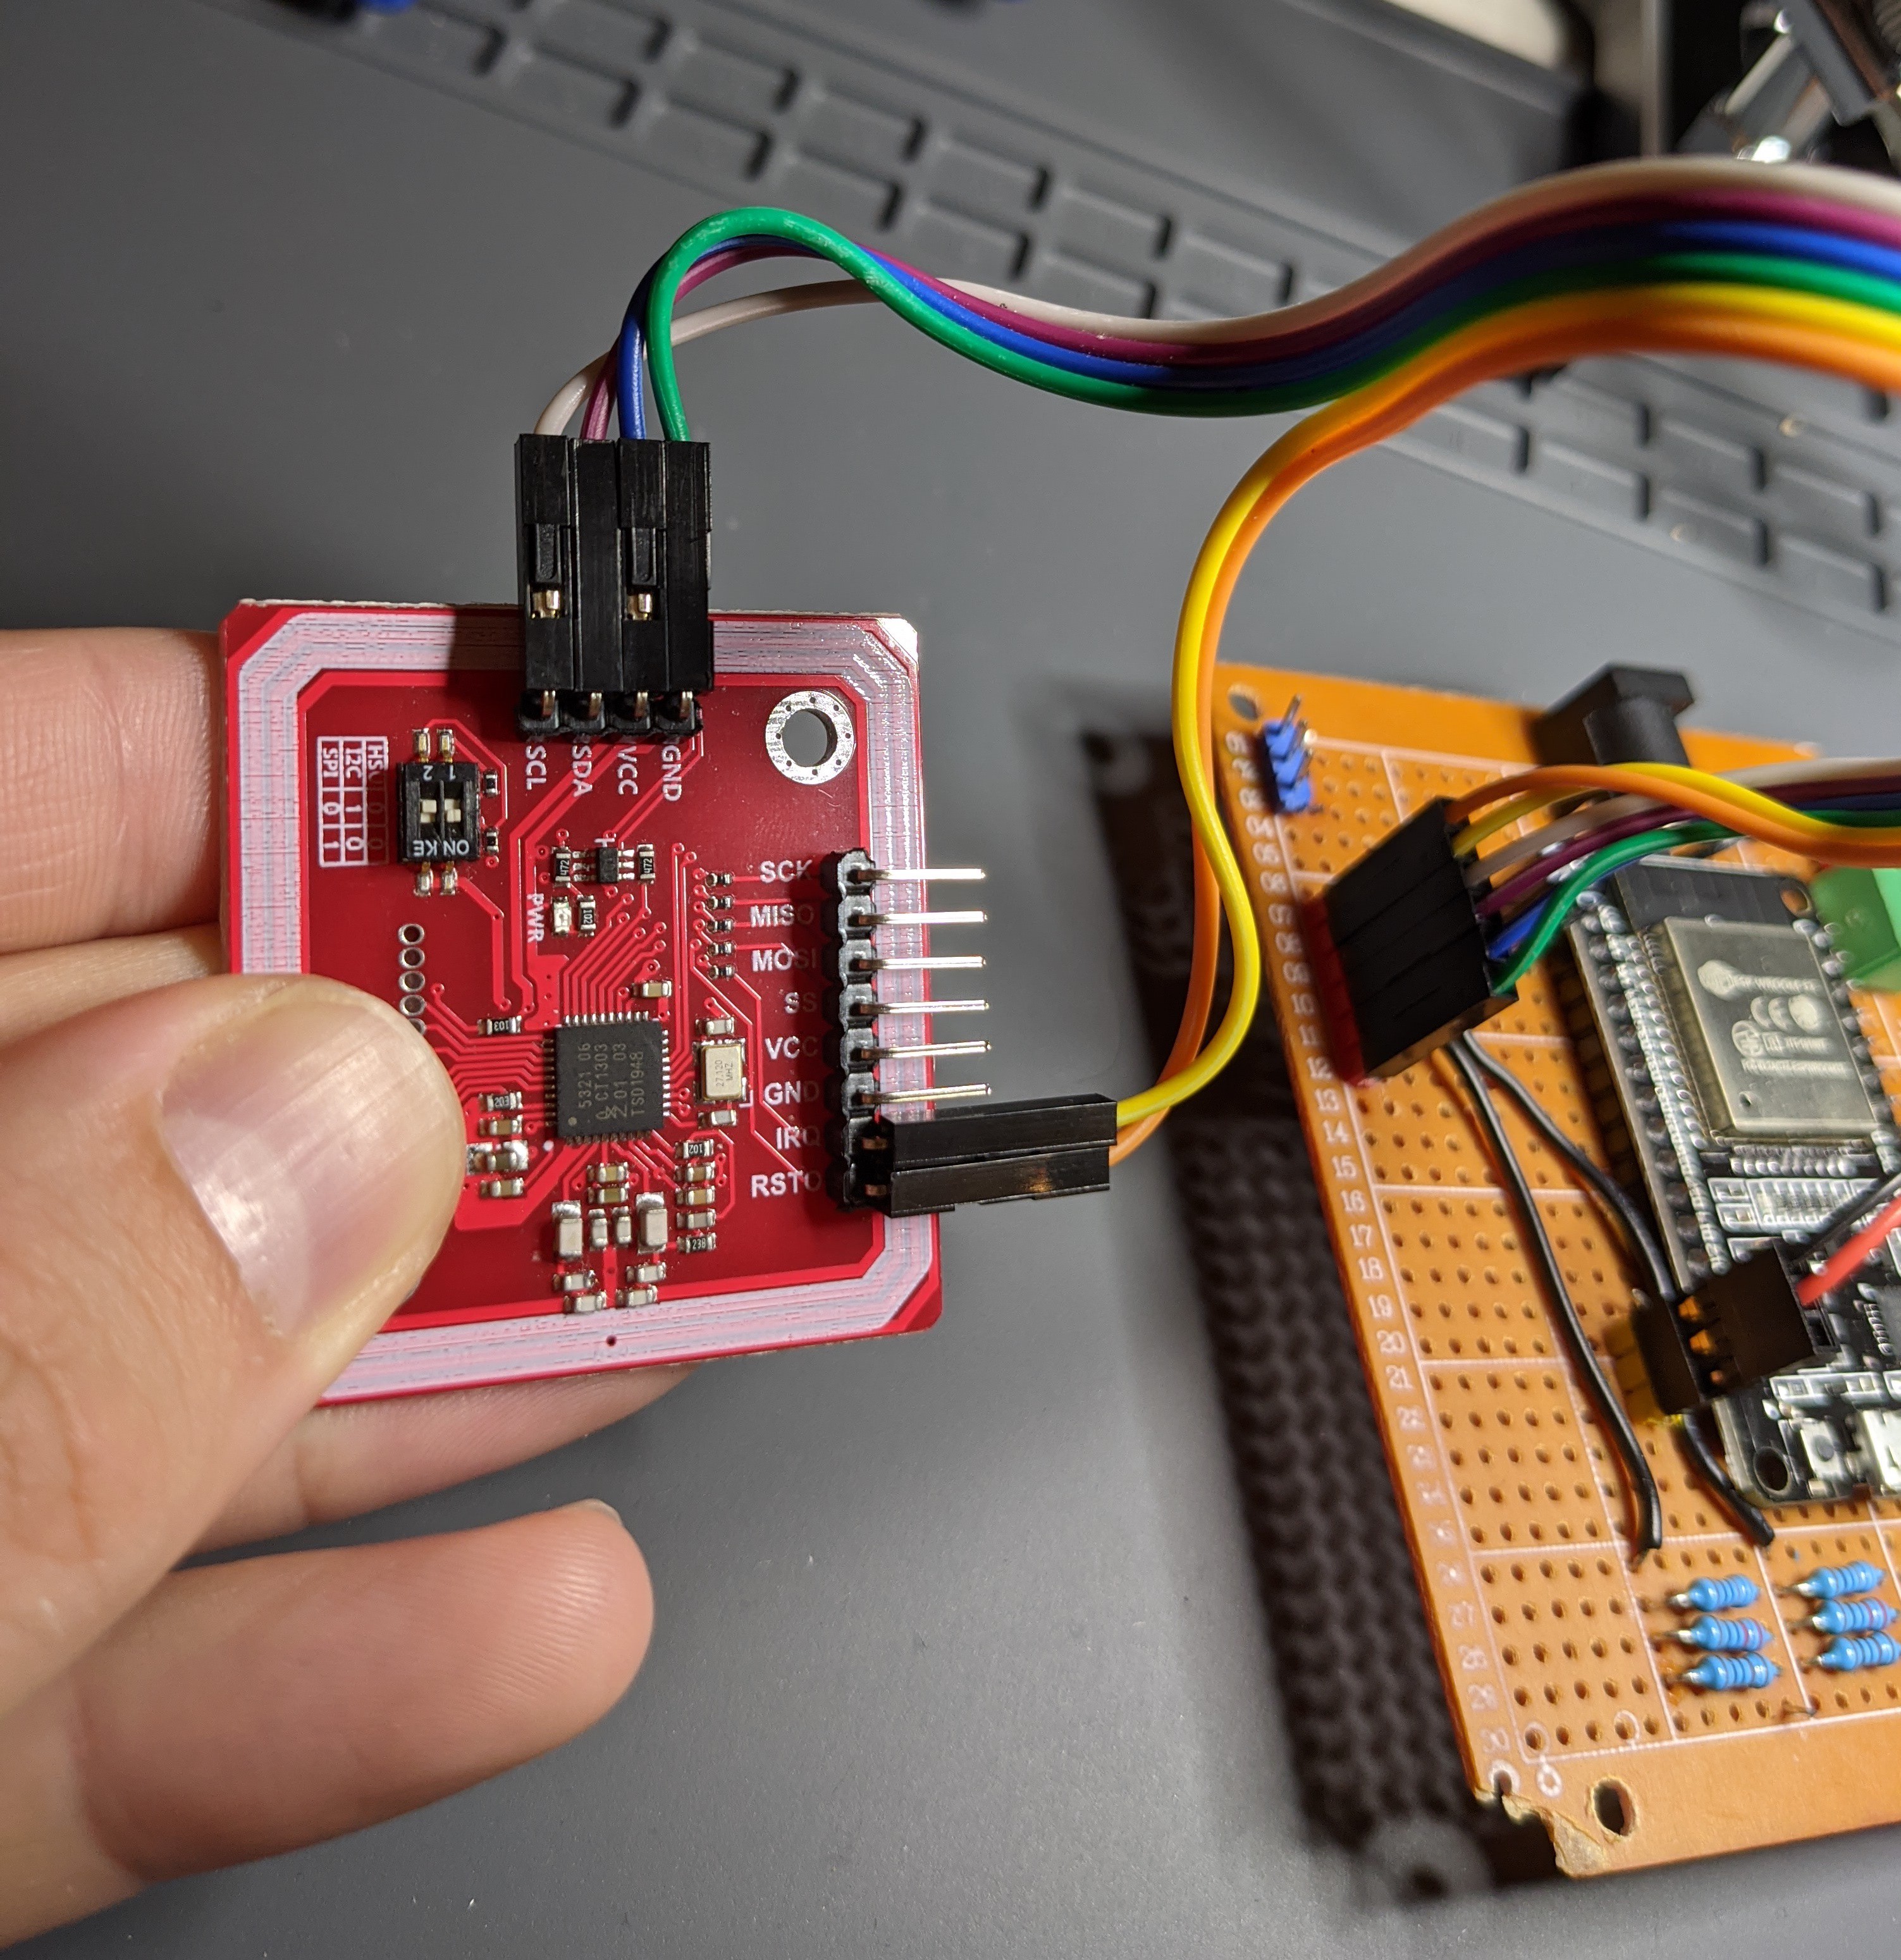
I connected the NFC module using the I2C communication protocol, like this this diagram:
Writing the code to interact with the NFC chip was pretty straightforward using the Adafruit PN532 library. But, I needed to add 2 new API methods in order to support waiting for NFC tags in a non-blocking manner (see my merged Github pull-request for more info). Here's a snippet showing how my code is using the NFC module to control the motor:
// API for the NFC module (PN532 chip)
Adafruit_PN532 nfc(PN532_IRQ, PN532_RESET);

// Supported NFC tags for each shade position (0%, 100% etc.)
const uint32_t CARDID_100_PERCENT = 3952824665;
const uint32_t CARDID_0_PERCENT = 913822226;

// ..

void setup() {
  pinMode(PN532_IRQ, INPUT_PULLUP);

  // ...
}

// Main function that loops as long as the controller is powered on
void loop() {
  irqCurr = digitalRead(PN532_IRQ);

  // ...

  // The DOWN button is pressed
  if (btnDownCurr == LOW && btnDownPrev == HIGH) {
    if (raisingShade || loweringShade) {
      stopShade();
    } else {
      lowerShade();

      // Puts the NFC module on a listening mode, a NON-BLOCKING call
      nfc.startPassiveTargetIDDetection(PN532_MIFARE_ISO14443A);
      listeningToNFC = true;
    }
  }

  // If the NFC module is currently listening and we’re notified via the
  // IRQ line that a card was detected
  if (listeningToNFC && irqCurr == LOW && irqPrev == HIGH) {
    // Read the detected NFC tag's info
    success = nfc.readDetectedPassiveTargetID(uid, &uidLength);

    if (success) {
      // If the tag is valid, we'll read its ID
      uint32_t cardId = getCardId(uid, uidLength);
      if (cardId == CARDID_0_PERCENT) {
        if (loweringShade) {
          // Found the "0% open" position tag while lowering the shade,
          // we can stop because the shade is now fully closed
          stopShade();
          listeningToNFC = false;
        } else if (raisingShade) {
          // Ignoring..
        }
      } else if (cardId == CARDID_100_PERCENT) {
        // Similar implementation as above.
        // Stop raising the shade when the CARDID_100_PERCENT tag is detected,
        // since the shade is now fully open.
      }
    }

    // If we didn't stop the motor and still need to listen to NFC tags
    if (listeningToNFC) {
      delay(500);

      // Puts the NFC module on a listening mode again
      nfc.startPassiveTargetIDDetection(PN532_MIFARE_ISO14443A);
    }
  }
    // ...
}
Here's a demo for the new functionality in my developement environment:
I later mounted the NFC module and tested it in my balcony. Here's how that test went:
Hardware facelift
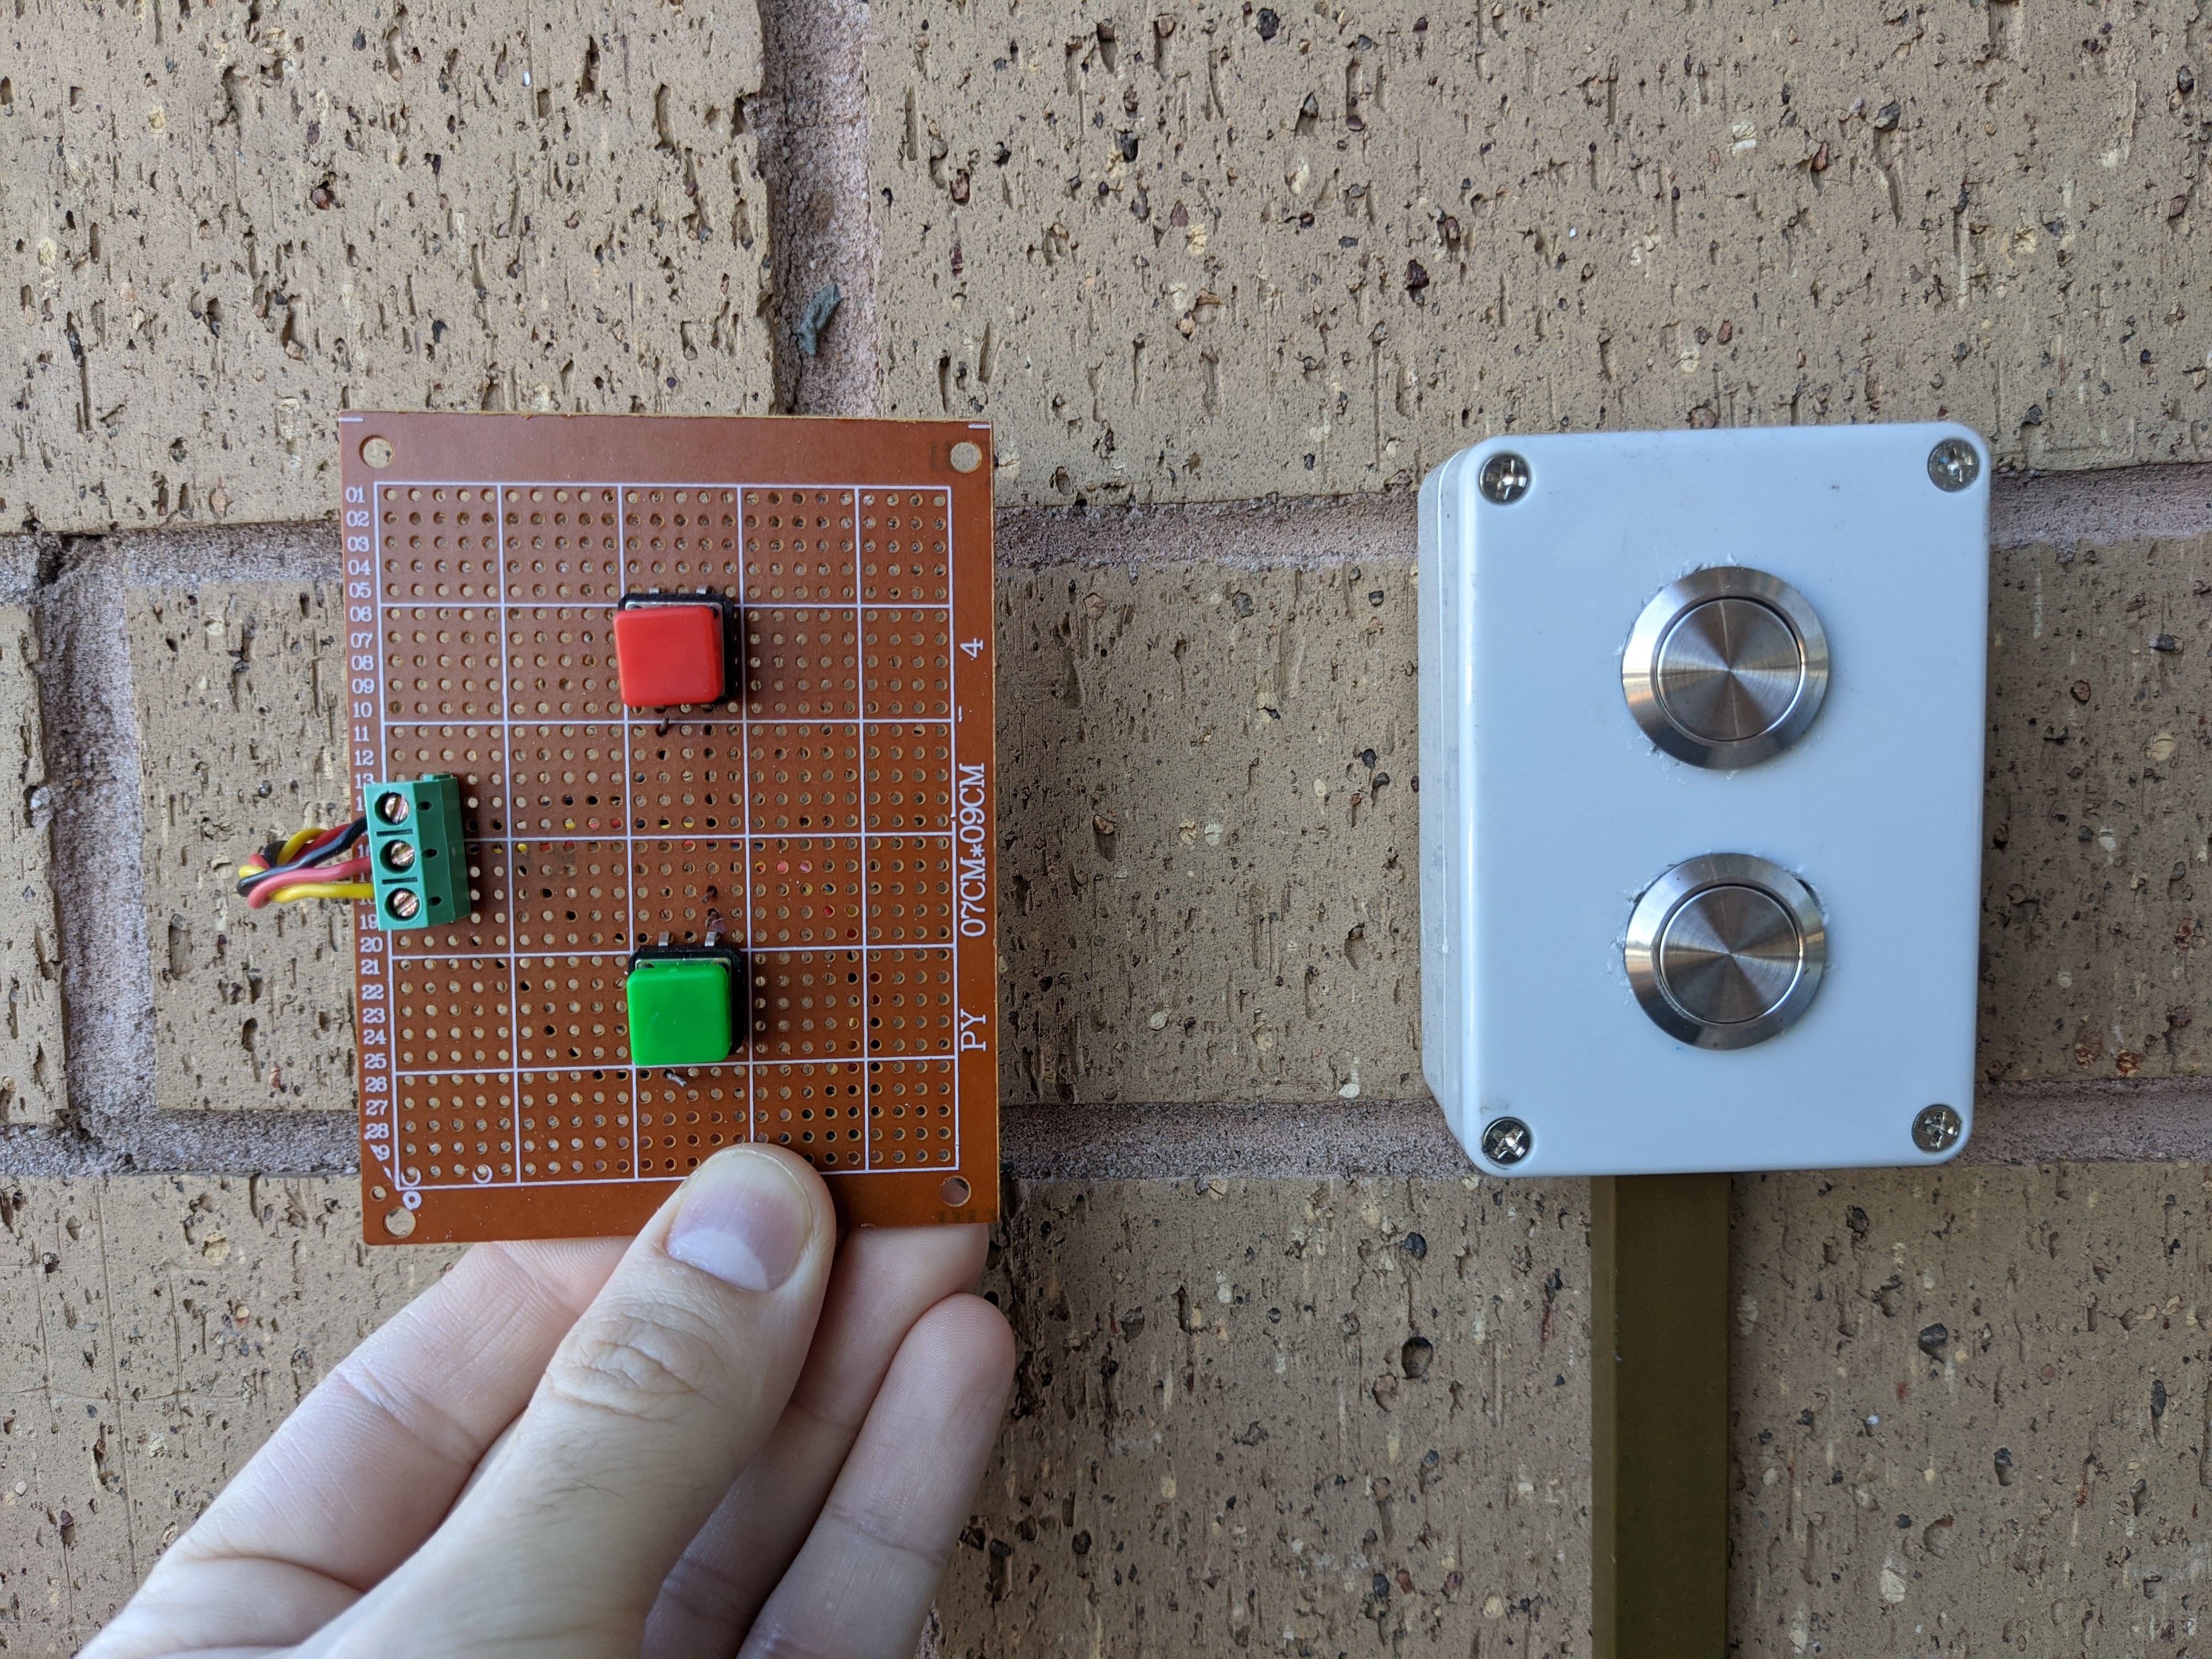
Before moving to new software features, I wanted to spend some time improving the hardware side. I upgraded the remote to be a mounted waterproof switch box:
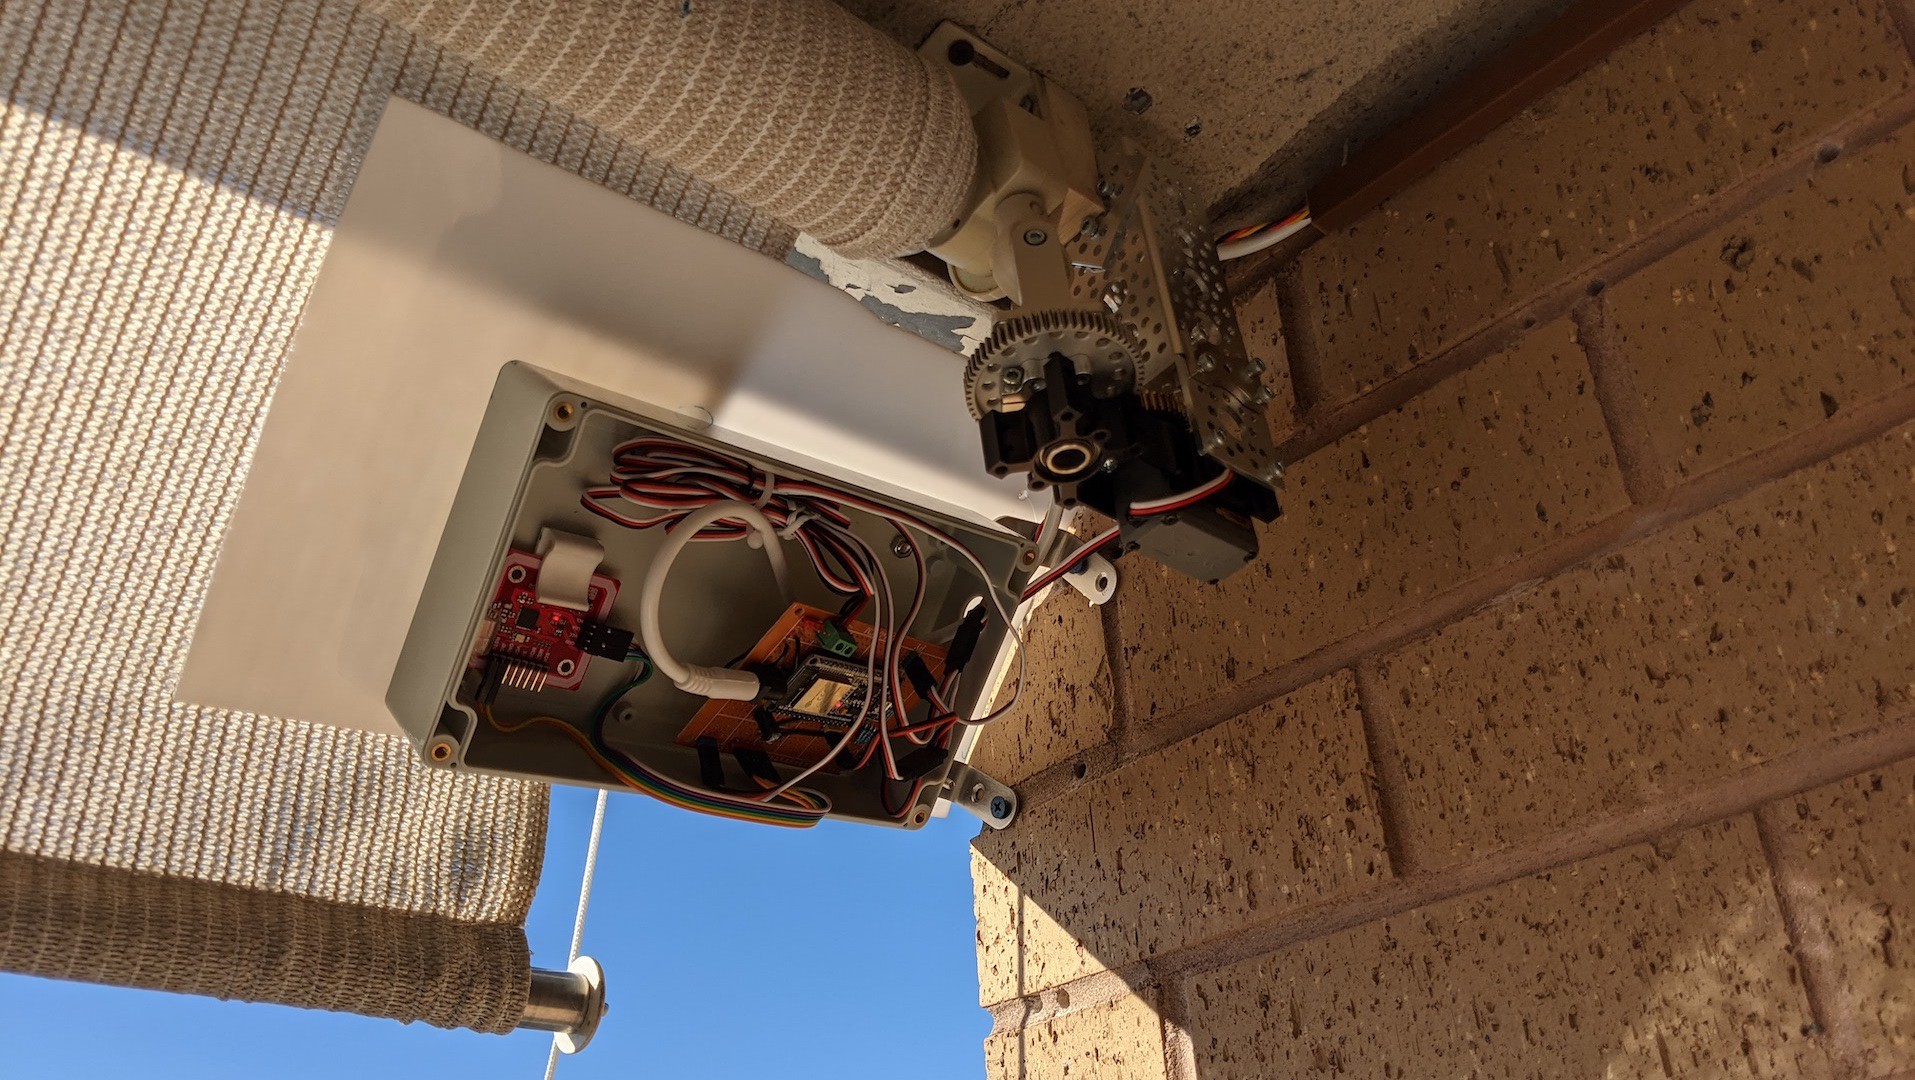
Moved the main circuit and the NFC module to a single box:
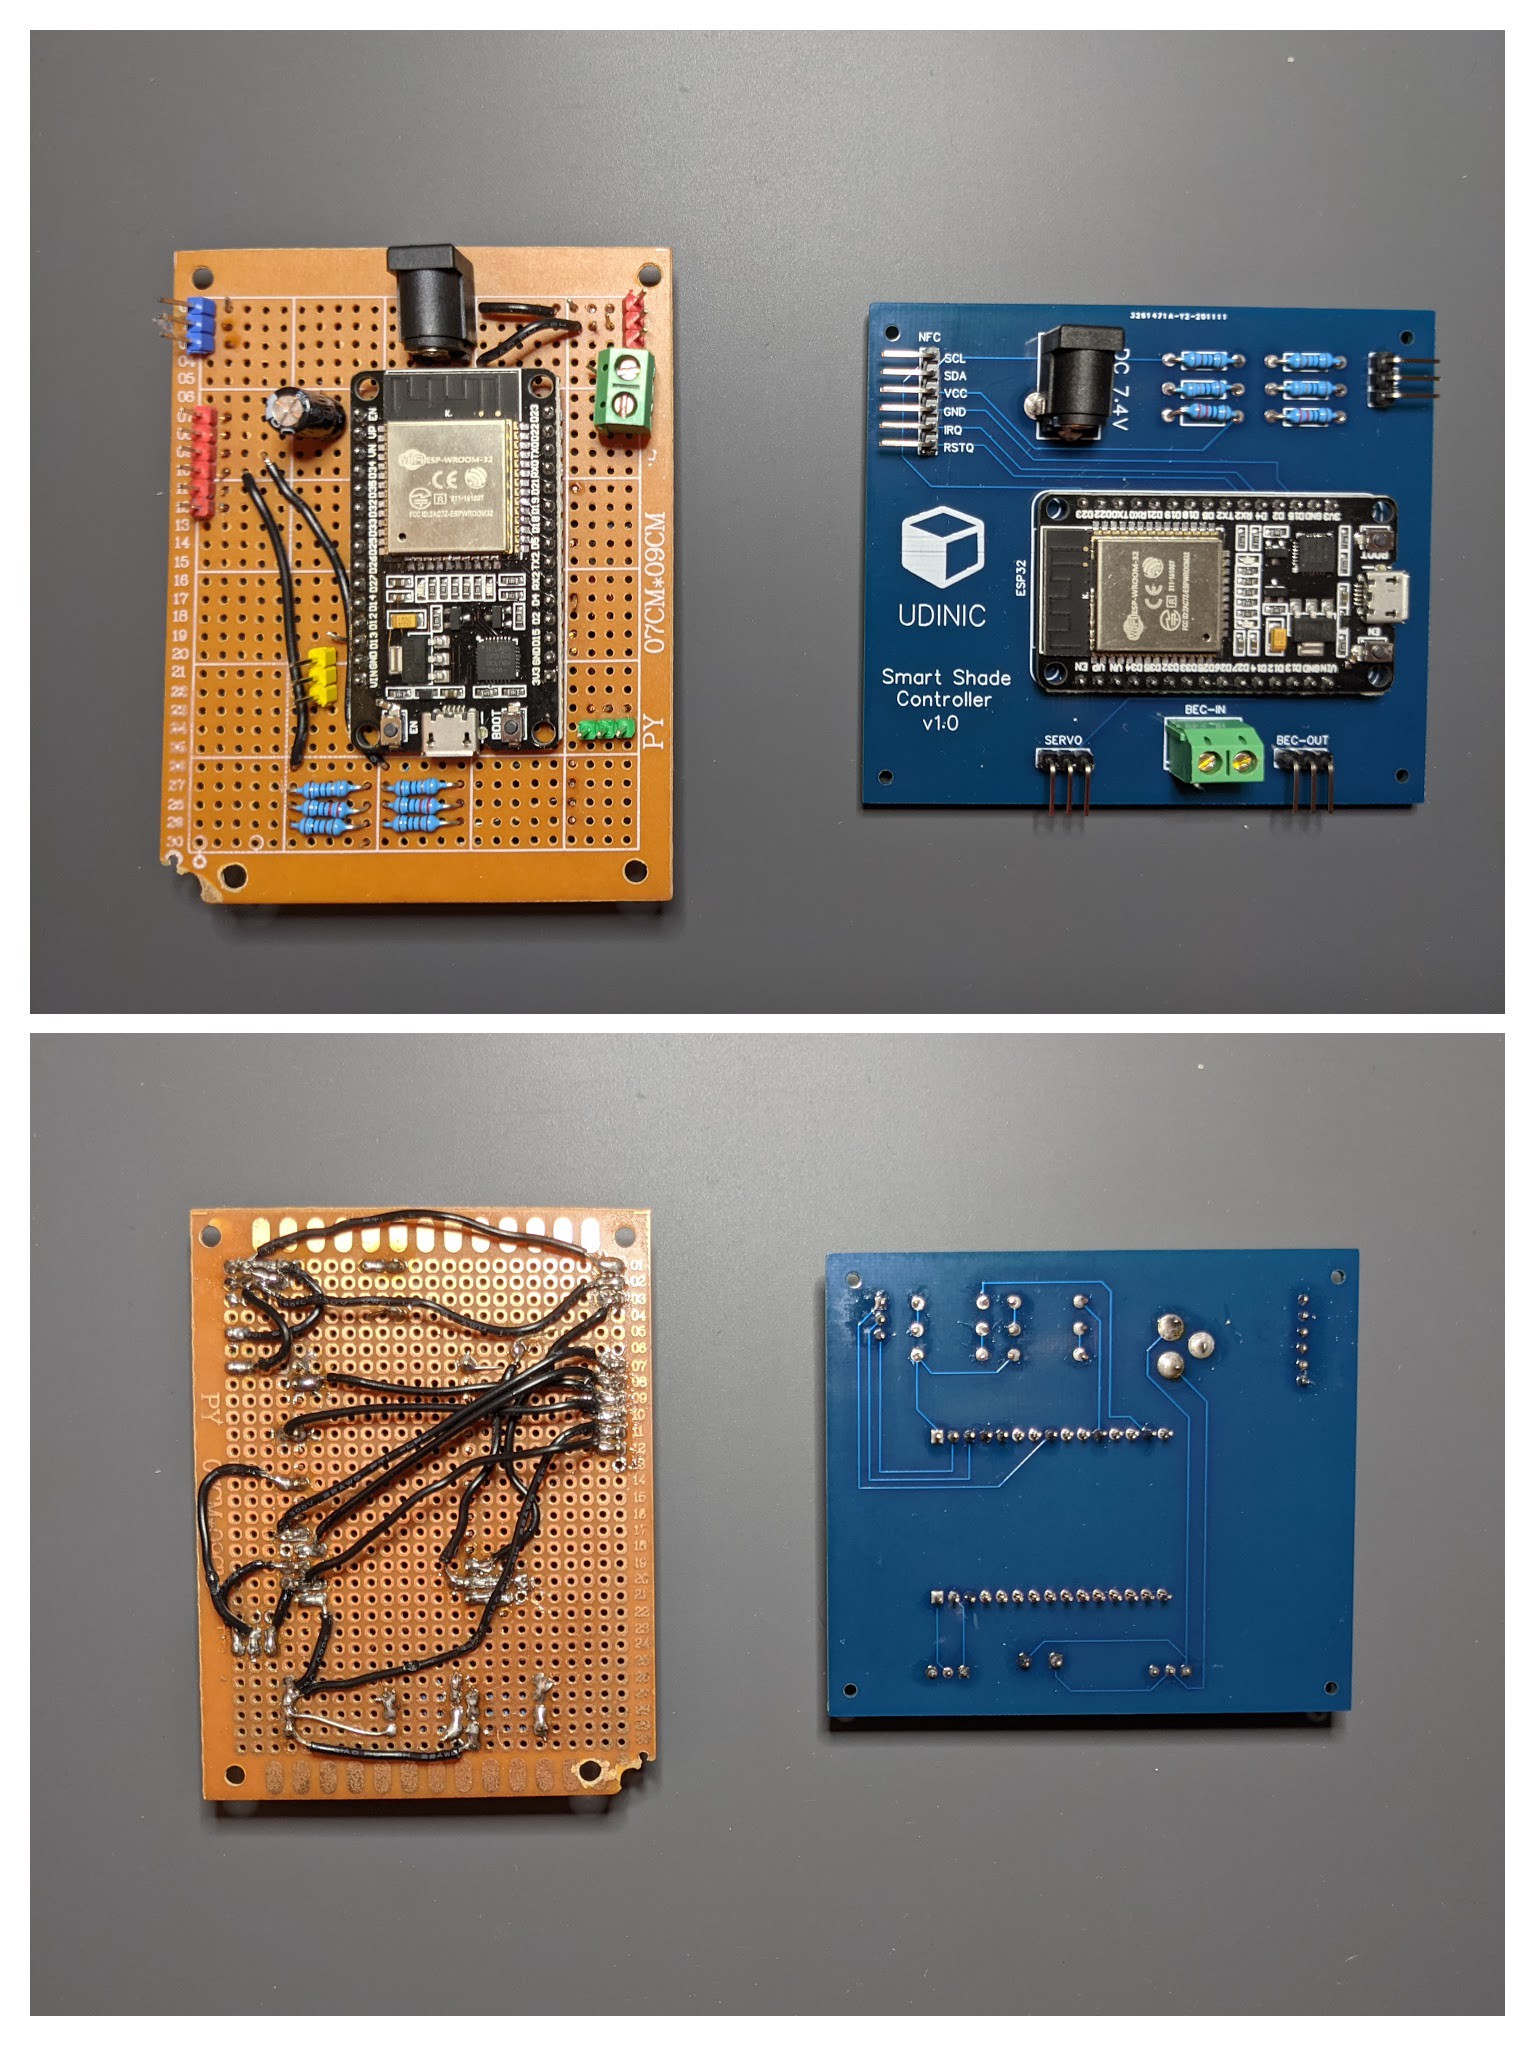
And created a PCB to replace the perfboard:
Supporting Voice Commands via Google Assistant
One of the reasons I switched very early on from an Arduino board to ESP32, is the WiFi support. This opens up new possibilities for my shade controller, the main one I was after is supporting Google Assistant and responding to voice commands. This is the change that will upgrade the shade controller to be a “smart shade controller” 😎.
In order to communicate with an ESP32 via WiFi I decided to use MQTT, a lightweight messaging protocol. I used Adafruit IO as a cloud service and used their Arduino library for using their API in my circuit.

I then made Google Assistant communicate with Adafruit IO using IFTTT, by creating an applet that connects both. Here's everything in action:
Nice!
Resources
I wrote a detailed blog post explaining how everything works, why I made it this way and lessons for future projects. Check it out if you're interested:
http://blog.udinic.com/2021/01/13/automating-balcony-shade-with-nfc/
You can find the source code in my Github project