Close
0%
0%

Trollduino V1.0

Response to Hackaday comments section: a 555 timer in Arduino form factor

Similar projects worth following
"That's stupid! Why use an Arduino when you could do the same thing with a 555?"
- representitive comment on any Hackaday post that describes any Arduino project ever.

Well, here you go then. Enjoy.

"That's stupid! Why use an Arduino when you could do the same thing with a 555?"

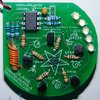
Ok, so now is your chance to put up or shut up.  Here's a 555 in traditional Arduino UNO form factor.

Specifically designed for old school analogue tinkerers.

No need to learn a flashy, confusing new fangled IDE. Analogue programming is simple and easy with two resistors and a capacitor using the Integrated Simple Analogue Programming Interface (ISAPI).

Pin compatible with most Arduino shields (functionality may be limited).

Trollduino adapted Blink sketch:

  • Install the following code:

    R1 = 1k;
    R2 = 68k;
    C = 10uF;

  • This sketch uses the integral output LED. An external load can be added by selecting and connecting an output pin on the Output Connection Distributer (OCD).
  • Select the voltage source.  You can use a 5V USB supply from your a PC or wall-wart or connect a 9 - 12V supply to the barrel connector.  If you have both connected, either will do. Who cares?
  • Enjoy the blinking!

Notes:

This is version 1.0 of a silly joke.  There are a couple of errors and a few changes I would make if I was going to continue with development.

First, I forgot to add mounting holes in the gerber.  I'm also considering breaking out R1, R2 and C connections to the 6 analogue pins.

Note that use of Comic Sans is not an error.

The circuit and layout were designed using Design Spark V9 from RS Components.

The PCB's were fabricated using Seed Studios Fusion service.

Shoutout to my local makerspace the Perth Artifactory.

If there is any interest (and I get around to it) I'll fix the gerbers and add them to the project files here.

Jumper functions:

There are jumpers on the reverse side of the board for diconnecting various components and to assist in changing circuit function from astable to monostable if required:

NAMEDEFAULTFUNCTION
DISCCLOSEDDisconnect Discharge pin
from R1/R2 junction
THRSHCLOSEDDisconnect Threshhold pin
from R2 / C junction
TRIGCLOSEDDisconnect Trigger pin
from Threshhold pin
CONTCLOSEDDisconnect Control voltage pin
from decoupling capacitor
OUT_HOPENBypass 220 ohm
output resistor (OUTput Hard)
LEDCLOSEDDisconnect output LED
RST_HOPENBypass Reset pullup Resistor
(ReSeT_Hard) 
WARNING! RST_B MUST BE CUT
IF RST_H IS CLOSED!
RST_BCLOSEDDisconnect Reset button
and pin (ReSeT_Button)
WARNING! RST_B MUST BE CUT
IF RST_H IS CLOSED!

TrollduinoV02.zip

Updated Gerber files with mounting holes fixed. This version not tested. Anyone is welcome to make and distribute these at cost. I request that you honor attribution.

x-zip-compressed - 100.13 kB - 01/19/2021 at 09:41

Download

TRDV01_03.gif

GIF of the "Blink Sketch" running.

Graphics Interchange Format - 641.10 kB - 01/15/2021 at 08:26

Preview
Download

TrollduinoV02 - Schematic.pdf

Schematic. Apologies for the tiny writing. this is a limit of the design software that I've not been able to overcome. Also sorry for the crappy layout.

Adobe Portable Document Format - 41.65 kB - 01/15/2021 at 08:23

Preview
Download

  • 1
    "Programming" sockets

    The sockets used to hold the 3 "programming" components R1, R2 and C are machined header pins stripped of their supporting plastic.

    An example of these can be seen here at Sparkfun, but these are available from plenty of other places too.

View all instructions

Enjoy this project?

Share

Discussions

Licinio Fortunato wrote 12/19/2022 at 19:23 point

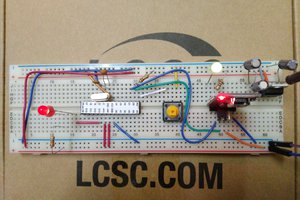
For who want to see the project making just folow the link https://www.tiktok.com/@deep_paradox/video/7178938146959150341?is_from_webapp=1&sender_device=pc&web_id=7178939508849821190

also i have 4extra trollduino's diy for sell it (20€) each 

  Are you sure? yes | no

Licinio Fortunato wrote 08/10/2022 at 21:23 point

Hey there. This is pretty awesome. How can I buy a troll?

  Are you sure? yes | no

Mild Lee Interested wrote 08/22/2022 at 12:13 point

Hi.  I'm not selling them, but all the gerber files are available if you want get your own boards made.

If you decide you want to sell them, it would be very much appreciated if you would attribute the design to me.  The web address of this project would be fine.

  Are you sure? yes | no

Licinio Fortunato wrote 11/15/2022 at 18:03 point

hey there man, like you suggest i buy the pcb's boards and now just need buy some missing components and lets get on the project, i wish to tag you in tiktok if you have of curse.    

  Are you sure? yes | no

michimartini wrote 05/09/2022 at 08:10 point

Wow, that is so cool, awesome troll level. 

  Are you sure? yes | no

Scott Walde wrote 03/30/2021 at 19:35 point

I love this! I love it so much I already ordered a set of boards and built one to show off to my friends.  I'd love to kit these and sell them through my local makerspace, but your statement "Anyone is welcome to make and distribute these at cost. I request that you honor attribution." is a bit too vague to safely do this.  I could play all sorts of games to justify my "cost" but I'd rather have your blessing to do whatever I do.  (ie, can we profit off the parts? Can we recoup processing fees?  We _are_ a non-profit if that makes any difference to you.)  Would you consider relicensing under an accepted OSHW license so it's more clear what we can do with this?  Whatever you say, I still want to thank you for this great project.  I smile every time I see it blinking.

  Are you sure? yes | no

Mild Lee Interested wrote 04/01/2021 at 13:40 point

Hi Scott.  This was pretty much a throwaway joke and I don't intend to make it into a commercial kit, although I might end up putting a few up on Tindie if I get around to it.

You are very welcome to sell kits through your makerspace as a fundraiser if you like.  If you get a good kit set up, let me know and I might buy some from you for our makerspace, too.

https://artifactory.org.au

I'm pretty pleased with how it turned out. It would be very much appreciated if you would attribute the design to me in your kit documentation.  The URL of this project would be fine.

  Are you sure? yes | no

chatelao wrote 02/15/2021 at 07:16 point

This is so freaking cool :-) - Is there any upgrade option to 556 ?

  Are you sure? yes | no

Rob Englebright wrote 01/22/2021 at 13:59 point

ordered up some of the boards from JLPCB 

  Are you sure? yes | no

umurri wrote 01/22/2021 at 11:29 point

Bravo!!!

I'm glad to see a project like yours.
It's not a joke.
Besides being useful to those who use the '555' for several reasons, 
your project, perhaps started as a joke, actually 
is really a good example.

Certainly it would be very useful in schools, but also among adults, as well as for the 'nostalgic', your project shows how something really 'well done' can be accomplished. 
It shows how much satisfaction can be given by the design of a HW, even if it is very simple, provided it is done WELL and without taking into account how much it can make.

Someone could consider it superfluous or even useless. But you are right: it is different to play around with components to choose and put in the right sockets than to write code.
One is not better than the other, but it is good not to forget either and to be able not only to program, but also to understand a datasheet, choose components and connect them.
These are things that with your Trollduino you have also made enjoyable.
My compliments for the idea, the suggestion, the realization.

  Are you sure? yes | no

Tillo wrote 01/20/2021 at 09:03 point

Best. Project. On. Hackaday.

  Are you sure? yes | no

Mild Lee Interested wrote 01/22/2021 at 05:17 point

Thankyou very much.  I'm glad you enjoyed the joke.

  Are you sure? yes | no

Mild Lee Interested wrote 01/19/2021 at 09:50 point

I've added the updated Gerber files (with mounting holes fixed) to the project.  This version not tested. 

Anyone is welcome to make and distribute these at cost.  I request that you honor attribution.

  Are you sure? yes | no

Paul McClay wrote 01/18/2021 at 00:01 point

Well, that clearly needs a few decades of R & C values on the board with a FET switch network to connect selected combinations to the R1/R2/C terminals -- controlled by an mcu of some sort. And a library of control functions written for some relatively accessible IDE. With a programmable mcu on board, it could control other stuff too.

  Are you sure? yes | no

Digicool Things wrote 01/17/2021 at 21:26 point

Brilliant!  Not only does this board replace the 90% of Arduino boards (that only ever achieved "Blink"), you also have to admire the onboard TO220 7805 1A regulator (plenty of power for all the forthcoming Trollduino Hats), and some mention must also be made of the newly coined definition for OCD, as "Output Connection Distributer (OCD)".  Hopefully just the first of a family of Trollduino boards to satisfy a "Triple Five is Alive" maker community! :-)

  Are you sure? yes | no

Lazer.Coh3n wrote 01/17/2021 at 18:59 point

I like the idea of this board very much.

I myself started with the 555 and other discreet circuitry before starting out on the Arduino and I feel it gave me much benefit, so I am happy to see that other beginners will get the opportunity to start off on the right foot.

What I do see that I would like to point out is that the 555 board seems like it only supports astable mode, how would one go about making a monostable "one shot" timer for instance?  There are so many different things one can do with the 555 timer, does this board have all that flexibility?

Disclaimer: I didn't look too deep into the board build I just had a quick look and this thought crossed my mind, I was hoping maybe you could clarify for me. 

Overall the board looks great.

Great job!

  Are you sure? yes | no

leumasyerrp wrote 01/17/2021 at 12:39 point

I have a bin full of useless 555 chips that I could finally find a use for. This is awesome, can't wait for the gerbers.

  Are you sure? yes | no

Neville wrote 01/17/2021 at 02:28 point

I would like to have the gerber files for this awesome piece of technology

  Are you sure? yes | no

Mild Lee Interested wrote 01/16/2021 at 13:58 point

Feed back has provided a few ideas I like that might get included if I feel motivated, including a wholely unnecessary ISCP header and an ATMega8uF on the USB to return the error message "I am a 555 timer" when you try to download to it with the Arduino IDE. 

  Are you sure? yes | no

Jan Waclawek wrote 01/16/2021 at 09:35 point

Through-hole coding is so 20th century... Please consider adding some SMD footprints for the sketches.

And upgrade it with a trimmer library.

  Are you sure? yes | no

Mild Lee Interested wrote 01/16/2021 at 13:50 point

Through hole is an elegant technique, for a more civilized age :)

Possible shields considered did include one with trip pots and variable cap, but it seemed like overkill fror a stupid joke board. 

I did like the idea if a 1 x 1 x 1 LED cube.  But with a filiment lamp instead of an LED.

  Are you sure? yes | no

Ken Yap wrote 01/15/2021 at 19:21 point

When is Due with the 556 coming out? 🤣

  Are you sure? yes | no

RW wrote 01/15/2021 at 19:52 point

Why play catchup, skip that and go straight for quad core with a 558

  Are you sure? yes | no

Ken Yap wrote 01/15/2021 at 20:28 point

👍

  Are you sure? yes | no

Mild Lee Interested wrote 01/16/2021 at 13:52 point

Trollduino Mega, perhaps :)

  Are you sure? yes | no

Tillo wrote 01/20/2021 at 08:59 point

3 555s in a row. Three 555s in a trenchcoat.

  Are you sure? yes | no

Laurence White wrote 01/15/2021 at 18:32 point

Loved it!

  Are you sure? yes | no

Mild Lee Interested wrote 01/16/2021 at 13:52 point

Thanks

  Are you sure? yes | no

Dan Maloney wrote 01/15/2021 at 17:31 point

OK, you win the internet!

  Are you sure? yes | no

Mild Lee Interested wrote 01/16/2021 at 13:52 point

Thanks :)

  Are you sure? yes | no

Similar Projects

Does this project spark your interest?

Become a member to follow this project and never miss any updates