 setCREATE
- APPLICATIONS
The MC60HB can be used as a controller for simple and limited projects by using the GPIOs and available pins on the I/O ports. Or if you need more GPIOs, you can use the MC60HB as a passive device controlled by another microcontroller like an Arduino or a Teensy, using serial communication.
-FEATURES
- Dual SIM-CARD
- GSM
- GPRS
- SMS
- Phone Call
- Micro SD-CARD
- GNSS
- Bluetooth 3.0 / 4.0*
- Dual UART
- I2C
- Network Status Indication
- Three Antennas
- GPIO
- Analog Audio Channel
- Audio Playing/Audio Recording
- ADC
- RTC
- Speech Codec Modes
- Echo Arithmetic
- Jamming Detection
- Firmware Upgrade
- Hard Reset Button

- The MC60 Module

Before getting to the MC60HB, let's take a look at its brain.
MC60 is a quad-band full-featured GSM/GPRS module using the LCC castellation package. With an extensive set of Internet protocols (TCP, UDP, PPP, FTP, HTTP, and SSL), it has integrated the GNSS technology for satellite navigation. Based on the latest 2G chipset, it has the optimal performance in SMS & data transmission as well as audio service even in harsh environments. It features a Dual SIM Single Standby function. MC60 module integrates both GPRS and GNSS engines in one compact and low profile SMT package. It supports EPOTM technology which provides predicted Extended Prediction Orbit to speed up TTFF without the need for an extra server. Based on EPO data, QuecFastFix Online function further reduces TTFF in cold start, making cold start TTFF comparable to that in the hot start. EASYTM (Embedded Assist System) technology is also supported. It enables the GNSS engine to achieve a very fast first fix when there is no enough satellite information. MC60 additionally supports working in proven AlwaysLocate™ and GLP (GNSS Low Power) modes, which ensure great positioning accuracy while with very low power consumption. The built-in LNA provides the module with improved RF sensitivity and exceptional acquisition/tracking performance even in weak signal areas.
The compact form factor, great positioning performance, low power consumption, and dual (U)SIM card interfaces make MC60 the best choice for a wide range of M2M applications, such as automotive, telematics, wearable device, asset tracker, pet tracker, and so on
- Dual SIM-CARD

The MC60HB lets you use two Nano SIM-CARD on your projects. With this SIM-CARDS, you'll be able to access these features:
- SMS:
You can send and receive SMS using MC60HB, which means you can program it to send pre-saved messages to your phone, or send commands from your phone to the MC60HB to make it do something.
- Phone Calls:
You can make phone calls using MC60HB. For example, you can program the board to call you when something unusual happened and tell you exactly what is going on by playing the pre-recorded voice messages. You can also call the board with your phone and use it as a regular phone.
- GPRS:
A 2G internet connection is available to use with the SIM-CARDs. The speed is 85Kbps which is more or less enough for the small packages you may send and receive using the MC60HB. The internet connection also helps to improve the functionality of GPS.
For using the GSM and the GPRS features, there is a UFL connector on the PCB that you can connect a 2.4GHz antenna to it.
- Micro SD-CAR

There's a push-pull micro SD slot on the PCB that you can use to store data on it. you can use this SD-CARD to store downloaded data, pre-save text messages, pre-saved voice messages, tracking location, etc.
every connection needed is already done on the PCB and the only thing you have to do is to configure the program.
- GNSS

MC60HB, allows you to use the GNSS system. with this feature, you'll be able to use GPS, GLONASS, Galileo, BeiDou, and QZSS to locate the PCB everywhere in the world.
This feature comes in handy when you need to track the PCB, for example making a car tracking device or a security system.
- Bluetooth

Bluetooth connectivity feature lets you connect your projects to any other device that supports Bluetooth communication, such as smart-phones or BMS systems. The MC60HB has an already soldered antenna for Bluetooth, so just program the module and run it! There's also an optional BLE feature which depends on the version of the MC60 module used on the boards.
- 3.5mm Jack

There is a 3.5mm headphone jack soldered on the PCB, so you can simply plug a headphone or a microphone or a speaker into that and use it as the audio input/output of your project. this can help you to create audio-based projects, like a .mp3 player, emergency alarm, security systems, tracking systems, etc.
The PCB tracks related to audio interfaces are all deferential pairs and the circuit is completely defended against noises, by using the reference design given by the Quectel wireless.
- Programmable Indicators

(sorry for the bad image quality)
There are four LEDs on the MC60HB, three of them are yellow and one of them is orange. The yellow LEDs, dedicated to the GPIO pins RTS, CTS, and DTR, are programmable, which means you can program them to turn on or off whenever you want, so you'll be able to monitor your process better. the other LED, called NETLIGHT, is for network status indication means you can program it to show different effects depending on the network status, again for better monitoring of the process.
- I/O Ports
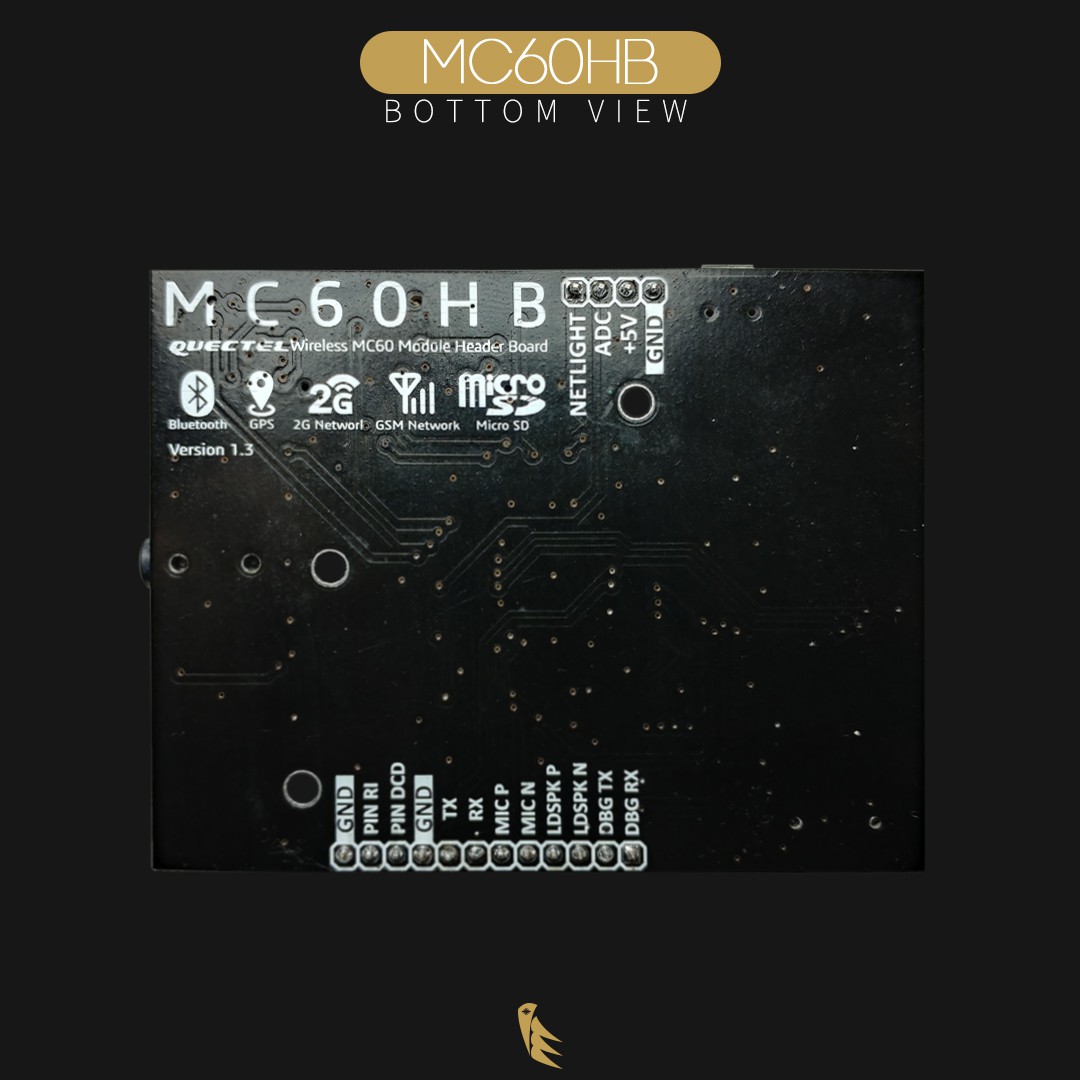
There are two pin headers on the top and bottom of the board. Overall, 16 pins. Let go through them one by one:
- GND: Ground pin, there are 3 GND pins.
- +5V: Can be used as input or output.
- NETLIGHT: Connected to the NETLIGHT pin, explained in programmable indicators.
- ADC: MC60HB has an Analog to Digital converter block.
- RI, DCD: GPIOs, also the i2c port.
- TX, RX: Transfer and receiver of the UART port.
- MIC P, MIC N: Positive and negative inputs for an external microphone. can be used as an alternate way for audio input rather than the 3.5mm Jack.
- LDSPK P, LDSPK N: Positive and negative inputs for an external loudspeaker. can be used as an alternate way for audio input rather than the 3.5mm Jack.
- DBG TX, DBG RX: Transfer and receiver of the debug UART port.
The MC60HB is Bread-Board compatible and you can put it on a Bread-Board.
- RTC Battery
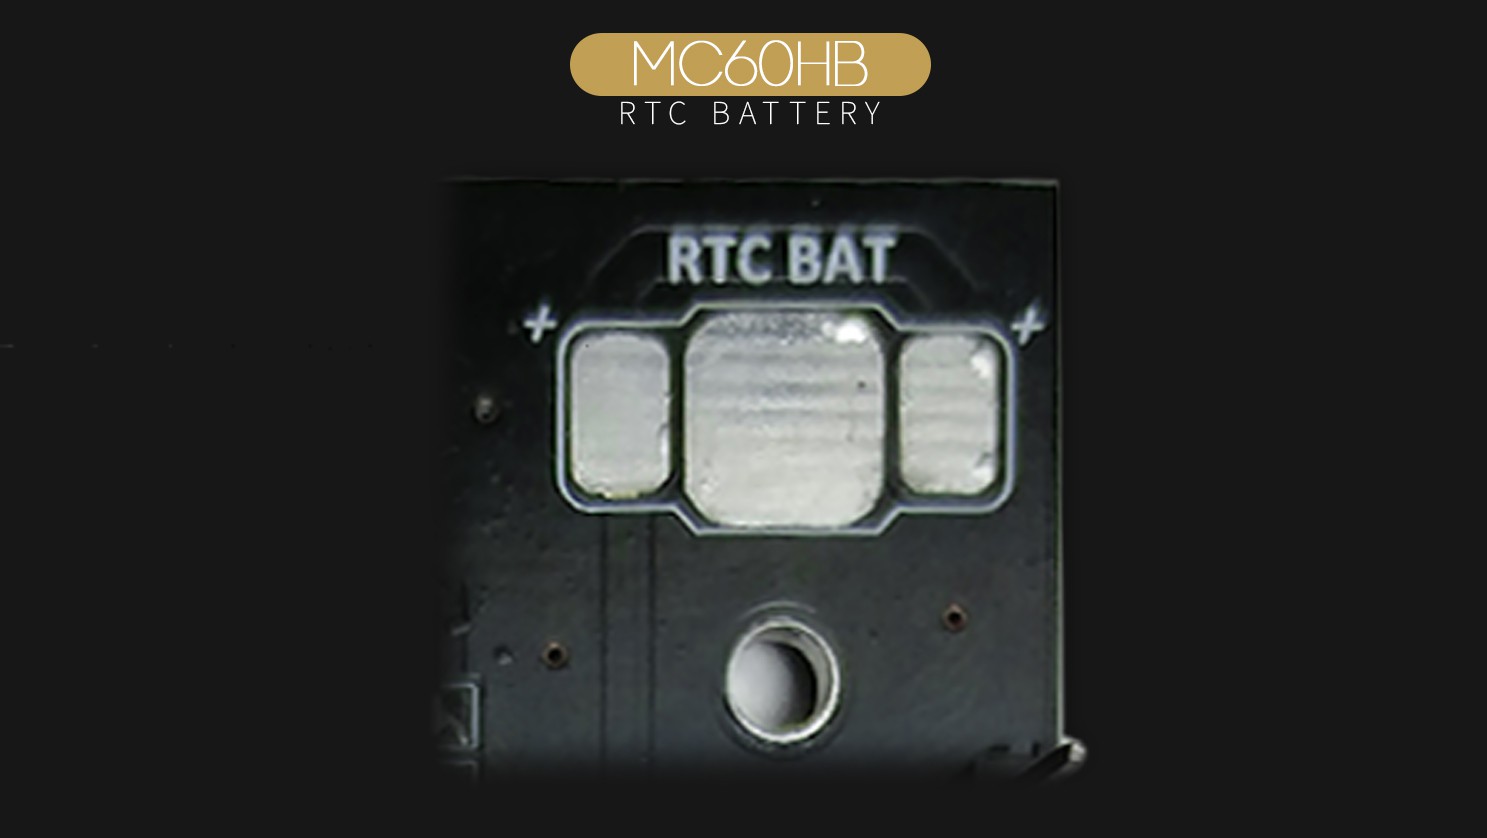
MC60HB has an SMD pad for a coin cell battery which can be placed on the PCB using a copper sheet. the battery is connected to the RTC pin of the MC60 module, it'll help the MC60HB for warm and hot starting, which according to the MC60 datasheet, warm starting takes 30 seconds, and hot starting takes only 1 second.
- Power Input and PSU
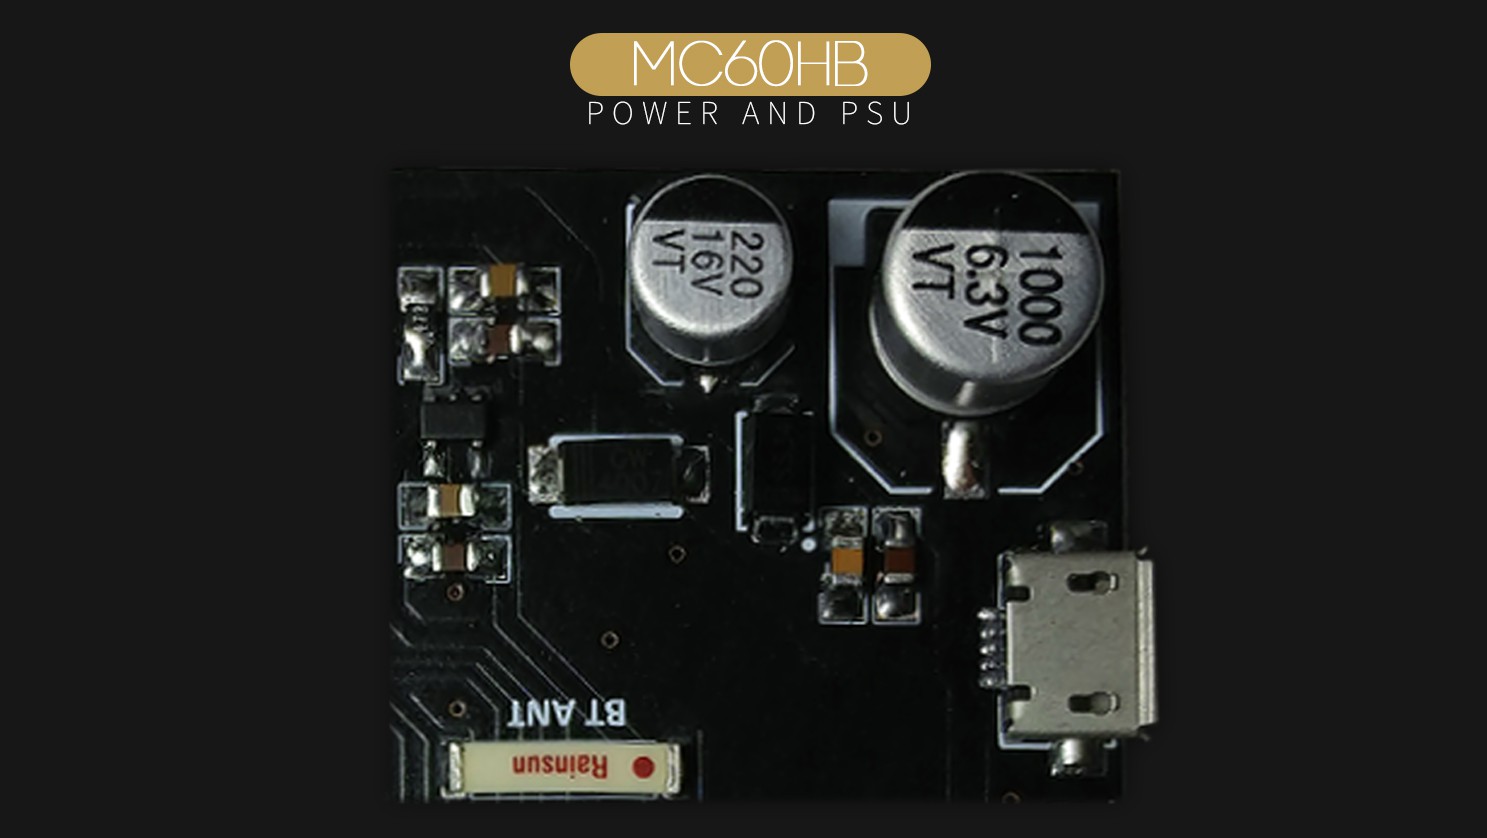
MC60HB has a well designed PSU on it, which takes +5V DC and makes 4.2V and 3.3V out of it. MC60 module has a peak-current spike of 1.9A which is considered in designing the PSU. also there is a 220uF tantalum capacitor right next to the MC60 module which is in charge of feeding the module in those current spikes.
And for the power input, you can use the GND and +5V pins on the I/O port, or you can plug a Micro-USB cable into the board and power it on. it's recommended to don't use a laptop or PC USB port since they can't deliver enough power and may be damaged.
p.s: the Micro-USB connector is not designed to be used for data transfer, we used it only as a power input connector because of its size.
The MC60HB is still getting improved, so we will be so happy to get any tips, advice, or criticism that can help us improve the functionality of this project. If you can help us with any of these, feel free to tell us in the comments, or contact me by sending me a private message or an e-mail, also you can DM me on Instagram.