 AdroitConfusion
Hardware
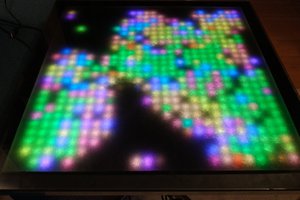
We bought a 48 by 48 hardware pegboard from our local hardware store. Using a hand drill, we widened every other hole until we could snugly fit 529 NeoPixel inside to create a 23 by 23 LED matrix. In hindsight, it would have been better to paint the pegboard black to make the colors stand out better and somehow better the Ping Pong balls. We used an Xacto knife to cut a plus sign into each Ping Pong ball, after which we hot glued on to each LED. It is advised not to burn holes into the Ping Pong balls as it releases toxic fumes into the air. You then want to use wires to evenly distribute the power to all of the LEDS (remember to use electrical tape to insulate the parts of the wire that are exposed and soldered). Afterwards, we connected WEMOS D1 Mini, the power supply, and the Nintendo Nunchuk.
Software
Go to my Github in order to download the proper files.
There are seven classes for the program, main, tetrisBlock.cpp, breakOutBlock.cpp, faces.h, letters.h, palettes.h, and aliens.cpp. Our code relies on the FASTLed and Nintendo Extension Controller libraries. We used the Arduino IDE to write and compile our code though any IDE that can compile C/C++ would also work.

 Markus

 Coders Cafe