 spencerkrit78
How to build iOS apps on a PC
Want to develop iOS apps? You will most likely need a Mac. If for any reason you don’t have a Mac, no worries! There are some workarounds you can do to run Xcode on a PC.
What is Xcode and why do you need it?
Xcode is a software program designed specifically for macOS. It’s also known as an integrated development environment that allows creating and publishing applications for Apple products.
This tool provides a host of features that are indispensable for building great iOS apps. These include a source editor, an asset catalog editor, Interface Builder, a version editor, complete documentation, powerful compilers, and many more. The only thing that you may find disappointing is that you can’t run it on operating systems other than macOS.
The challenge
Say you want to write applications for iOS, but you are not a Mac fan and are using a PC. The bad news: Apple does not allow their OS to be run on non-Apple machines. That means you can’t get a PC-compatible version of macOS. The good news: if you can't get hold of any Mac, you can try running Xcode on Windows using an alternative method described below.
The solution
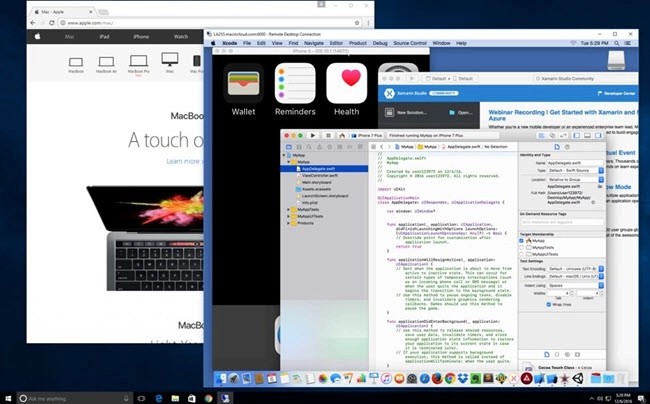
One of the most common ways to work with Xcode on Windows is by renting a Mac remotely in the cloud. This will let you access a cloud-based Mac with macOS without having a real Mac in your hands.
“How-to” guide:
- The provider of an in-cloud Mac server connects real Mac hardware to the network.
- You connect to the cloud-based Mac remotely within an RDP (Remote Desktop Protocol) session.
- That's it! Now the Mac can be accessed from your Windows or Linux computer.
Cloud-based rent-a-Mac services are typically offered under monthly plans with prices starting from $20/month (services like MacinCloud and MacStadium). Depending on your needs, you can select between different hardware options, e.g. a Mac Mini, a Mac Pro, etc.
Given that Windows comes with a built-in Remote Desktop Client, you can utilize it to create a Remote Desktop Connection to your cloud-based Mac. Once connected, it’s easy to start Xcode and begin (or continue) to develop your iOS app.
In-cloud Mac services usually offer one or several of the following options:
- You rent a dedicated Mac that provides access to a real Mac computer placed in a remote data center.
- You rent a virtual Mac which allows you to work with macOS without having access to real Apple hardware.
- You use a Mac Build Server that is configured to compile iOS apps you have already built on your Mac.
In terms of convenience and performance, a dedicated Mac is probably the best choice. A virtual machine is not bad but is not as powerful as a real Mac.
Despite its many advantages, renting a remote Mac has its limitations. Probably the most critical one is the inability to connect your iOS device to Xcode over USB. What you can usually do when running Xcode on your local Mac is test your app on an iPhone or an iPad connected to your computer with a USB or a Lightning cable. This scenario does not seem possible with a cloud-based Mac. Instead, you can try one of these alternatives:
- The first thing that comes to mind is an iPhone Simulator that can be run just inside Xcode. It will be a big help when developing an iOS app if there’s no way to connect a physical device for debugging your app.
- When working with a virtual Mac, you can also rely on third-party software like FlexiHub or USB over Ethernet to redirect your iPhone to a virtual environment and access it from a cloud-based Mac like the device was attached physically.
- Another solution would be to install your app on an iPhone using the TestFlight service (like Bugsnag).
As you can see, renting a Mac in the cloud could save you significant time and money. It eliminates the need to purchase a pricy...
Read more »
 Oliver
 Thaddaeus
 Chris Hamilton
 Danny
Danny