
This project has been sponsored by PCBWay. They are the most cost effective and quality oriented PCB manufacturers. You can order your prototype PCBs in a small quantity, as small as 5 pcs of PCB. In addition to the standard pcbs, we could also support advanced pcbs, FPC/rigid -flex pcbs and other related service. To get your instant quote for different types of PCBs, click here. They sponsor me so that I can keep making interesting projects for you.
As we know, Raspberry Pi is known as the “Pocket Size PC”, but for debugging and project purposes it’s cumbersome to carry an additional display for it. Also, many of us don’t have access to an HDMI display, so, we figured out a way to easily connect a Raspberry Pi to a laptop display. So sit back and enjoy this simple tutorial!
Getting the things
- Raspberry Pi
- Ethernet Cable
- Power Adapter(EU) / US Standard
- SD Card
- Laptop
(Optional) Components required for setting it up the first time:
- HDMI/ AV Display
- Keyboard and Mouse
How Does it Work?
To connect a Raspberry Pi to a laptop display, you can simply use an Ethernet cable. The Raspberry Pi’s desktop GUI (Graphical User Interface) can be viewed through the laptop display using a 100 Mbps Ethernet connection between the two. There are many software programs available that can establish a connection between a Raspberry Pi and your laptop. We used VNC server software to connect the Pi to our laptop. Installing the VNC server on your Pi allows you to see the Raspberry Pi’s desktop remotely, using the mouse and keyboard as if you were sitting right in front of your Pi. It also means that you can put your Pi anywhere else in your home and still control it. Also, the internet can be shared from your laptop’s WiFi over Ethernet. This also lets you access the internet on the Pi and connect it to your laptop display.
Setting up your Raspberry Pi
Before moving to connect your Raspberry Pi to your laptop display, you need an SD card with the OS preinstalled, or install Raspbian on a blank SD card. You will find lots of blogs and tutorials on preparing an SD card for the Raspberry Pi. If you are a beginner, you can simply click here and know more about this. This will show how to install the OS for the Raspberry Pi. You can also buy SD cards with the Raspbian and NOOBs operating systems preinstalled. I would suggest you install the latest full Raspbian OS image from the official Raspberry Pi website as it is having VNC Server in the OS package.
After setting up your SD Card, insert it into the Raspberry Pi. Next, connect your power adapter to the Raspberry Pi to power it. Also, connect your Raspberry Pi to the laptop via an Ethernet cable and connect a keyboard and mouse to it.
Note: You need screen and a mouse after booting a new OS into Pi for the first time as by default, the SSH and VNC are disabled in Pi. Without SSH disabled, we cannot enable the PuTTY Configuration.
Sharing Internet Over Ethernet
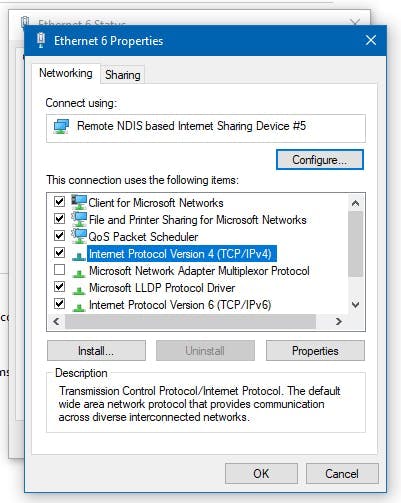
This step explains how you can share your laptop internet with the Raspberry Pi via Ethernet cable. In Windows: To share the internet with multiple users over Ethernet, go to Network and Sharing Center. Then click on the WiFi network:

Click on Properties (shown below), then go to Sharing and click on “Allow other network users to connect”. Make sure that the networking connection is changed to the connection of the Raspberry Pi. In my case, it is Ethernet:

1 / 3
2 / 3

3 / 3
Finding IP for PuTTY Configuration
By default, the laptop will give a dynamic IP to the Raspberry Pi. Thus, we have to find out the IP address of Pi now.
As shown above, the IP assigned to my Pi is 192.168.137.144. To check the IP assigned to the connected Ethernet device, do the following. Considering that the IP assigned to your Pi is 192.168.137.144 and the subnet mask is 255.255.255.0...
Read more »

 Brayden DeVito
Excellent work on Documentation, even though the Project it self isn't that thrilling ^^. But i would also mention that on rpi Zero and 4 you have OTG, wich allows to enable the Ethernet Gadged Driver wich will bring up a Network Connection to you rpi when you connect the USB to your computer. See: https://learn.adafruit.com/turning-your-raspberry-pi-zero-into-a-usb-gadget/ethernet-gadget