Dharmik Patel
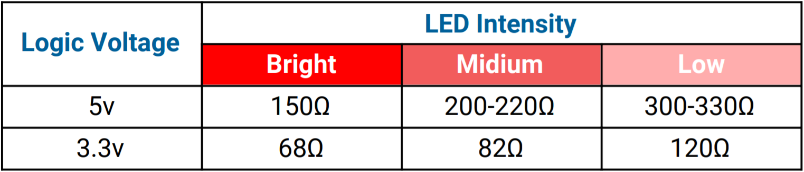
Before jumping to blinking LED we need to calculate our current limiting resistor value.
How To Calculate LED Resistor Value?
Don't worry we have ready to use table for you, Still if you want to know how its done you can check out ohms law and all explanation at our project page.
1. LED Blink Using Delay
Blinking LED in Arduino using delay function is the simplest method among all others. This method is easy to understand.
- Simplest method to understand as a beginner.
- Code will be blocked due to delay.
- Code uses 866 bytes of program memory and Global variables use 14 bytes.
/*
  Code written by: Dharmik
  Basic LED blink code using Delay
  Code uses 924 bytes of program memory and Global variables use 9 bytes.
  Find more on www.TechTOnions.com
*/

#define LED 13 // Defining an LED variable as 13 because our LED is connected to pin 13
void setup() {
  pinMode(LED, OUTPUT); // Set LED pin as OUTPUT
}

void loop() {
  digitalWrite(LED, HIGH);    // turn LED ON by writing HIGH (Sending 5v to pin 13)
  delay(1000);                       // wait for a second
  digitalWrite(LED, LOW);     // turn LED OFF by writing LOW (Sending 0v to pin 13)
  delay(1000);                       // wait for a second
}
2. Blink LED using Counters
Using counters is the best method for beginners as it is simple as using the delay method and, this method will not block your code.
- Also simple to understand
- Code will be none Blocking.
- Code uses 810 bytes of program memory and Global variables use 13 bytes.
/*
  Date: 23-01-21
  Code written by: Dharmik
  LED blink code using a counter
  Code is non blocking code
  Code uses 810 bytes of program memory and Global variables use 13 bytes
  Find more on www.TechTOnions.com
*/

#define LED 13    // Defining an LED variable as 13 because our LED is connected to pin 13
long counter = 0; // Defining counter variable for counting

void setup() {
  pinMode(LED, OUTPUT); // Set LED pin as OUTPUT
}

void loop() {

  counter++;                 // will increment counter by 1
  if (counter == 100000)     // Check if counter value reach to 100000
  {
    digitalWrite(LED, HIGH); // turn LED ON by writing HIGH (Sending 5v to pin 13)
  }
  else if (counter == 200000) // Check if counter value reach to 200000
  {
    counter = 0;             // making counter value to 0
    digitalWrite(LED, LOW);  // turn LED OFF by writing LOW (Sending 0v to pin 13)
  }
  //Code is non blocking you can add your loop code after this
}
3. LED Blink Using Millis Function
Blinking an LED using the millis function is the most used method when it comes to doing multiple tasks at the same time using Arduino.
Understanding this method is a little tricky as compared to the above two methods.
Let’s first look at our millis blink code.
- Moderate to understand.
- Code will be none Blocking.
- Code uses 924 bytes of program memory and Global variables use 9 bytes.
/*
  Date: 23-01-21
  Code writen by: Dharmik
  LED blink code using millis
  Code is non blocking code
  Code uses 866 bytes of program memory and Global variables use 14 bytes
  Find more on www.TechTOnions.com
*/
#define LED 13                  // Defining an LED variable as 13 because our LED is connected to pin 13
unsigned long previousMillis;   // variable for comparing millis counter
bool ledState = false;       // will determine current led state
void setup() {
  pinMode(LED, OUTPUT);         // Set LED pin as OUTPUT
}

void loop() {
  if (millis() - previousMillis >= 1000)  // check that 1000ms is pass
  {
    if (ledState == false) {              // check the leddState and toggle it.
      ledState = true;
    }
    else {
      ledState = false;
    }
    digitalWrite(LED, ledState);          // Set LED state to ledState
    previousMillis = millis();            // set previousMillis to current millis
  }
}
4. Blink LED Using Watchdog Timer Interrupt
All micro controllers have timers block in their architecture, and the Watchdog timer is one of them.
We can use Watchdog timers to blink our LED.
Watchdog Timers are not designed to blink an LED; they are designed to serve different functionality to know more about watchdog timers and their usage check here.
- Little tricky to understand.
- Code will be none Blocking.
- Code uses 810 bytes of program memory and Global variables use 10 bytes.

To set different time intervals, we have to set different bits for WDP0, WDP1 & WDP2 as per the table.
Complete explanation can be found at project page.
5. LED Blink Using a Timer Interrupt
Arduino UNO has 3 timers: timer0, timer1 & timer2. Timers come in handy when an application needs high timing accuracy. timer0 is already being used by the default millis() function in Arduino.
Therefor timer left for us are timer1 and timer2.
We have used timer1 for this example. Find more details at project page.
- Tricky to understand.
- Code will be none Blocking.
- Code uses 880 bytes of program memory and Global variables use 10 bytes.
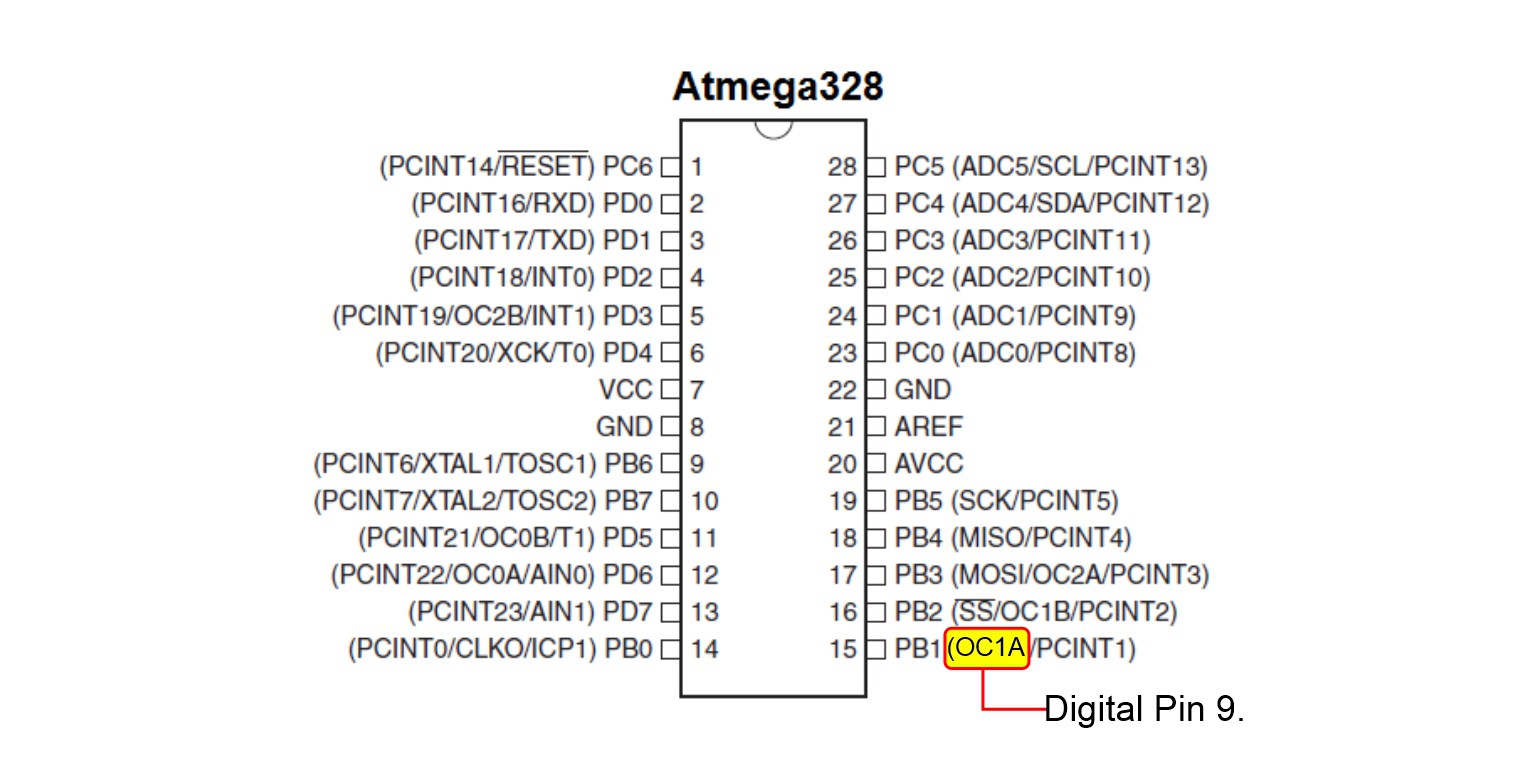
6. LED Blink With Hardware Timer Toggle
This method is very similar to the timer interrupt method.
But this time, we will not use any interrupt; we will directly toggle LED connected to Digital Pin 9.
This method only works with Digital pin 9. As we have use OC1A to toggle this pin as per our need.
- Tricky to understand.
- Code will be none Blocking.
- Code uses 634 bytes of program memory and Global variables use 9 bytes.